Best Moho Pro & Anime Studio 2D Illustration Animation Course for Beginners in 2019?
Hello and welcome to the course. In this lecture, we're going to discuss what is Moho? Which would naturally lead into a discussion of the illustration workflow and then we'll conclude with a course overview.
In the rest of the course, we'll discuss illustration, rigging and animation in that order from the work flow. So I'll see you in the first lecture.
If you will enjoy reading and contributing to the discussion for this post, will you please join us on the YouTube video above and leave a comment there because I read and respond to most comments on YouTube?
If you find anything helpful in this video or funny, will you please leave a like because you will feel great helping other people find it?
In this opening lecture, I want to talk about what is Moho? Or basically how to make cartoons, because that's really what Moho is. It is a cartoon creation software tool.
Now this is recorded as of September of 2017 and some of the information may be dated the further we get into the future. Let's begin by looking at the company that distributes Moho. It's called Smith Micro and this is its website.
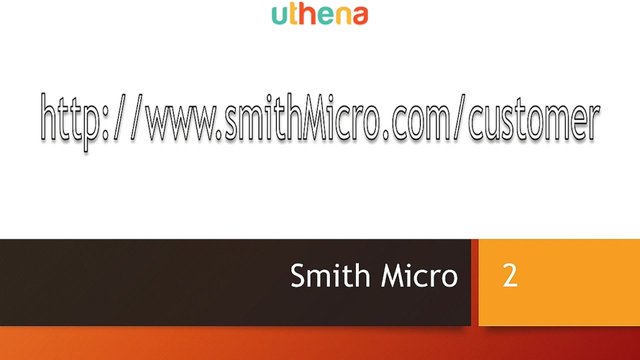
Now if you just go to SmithMicro.com, you'll end up seeing their high level website where they talk about services and partners and stuff like that. You actually have to click on their ‘Products’ link which takes you to /customer to get to the customer graphics section of the website.
Once you get there, you're going to going to find that they have quite a line of graphics products.
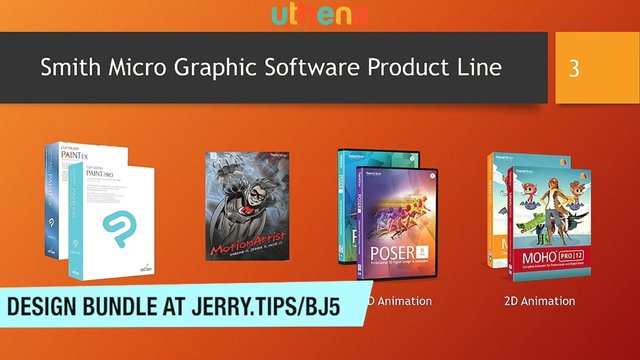
The other thing that you're likely to find is that their products are expensive. Remember, these are professional products. Now they do have debut or entry-level products that are somewhat cheaper, but you're still probably going to get tempted into the pro products which cost hundreds of dollars.
So let's begin by looking at Clip Studio Paint formerly known as Manga Studio.
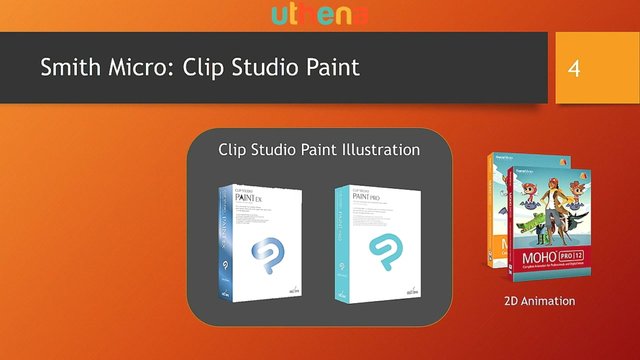
This is Smith Micro’s illustration software and it’s really fantastic its greatest competitor is probably Photoshop or Illustrator. It's along the same lines.
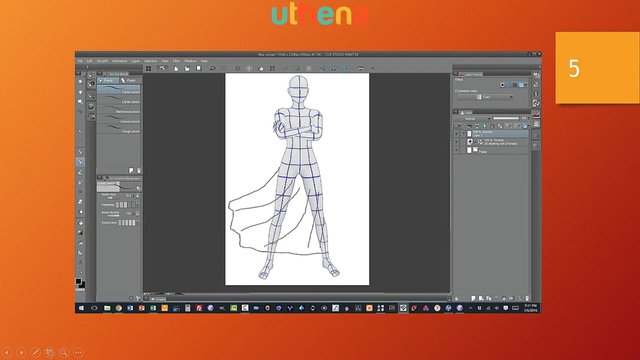
It's a vector editor that generates vector graphics such as this where I'm drawing using a 3D model to trace.
The other product that's useful with Clip Studio Paint pro is Motion Artist.
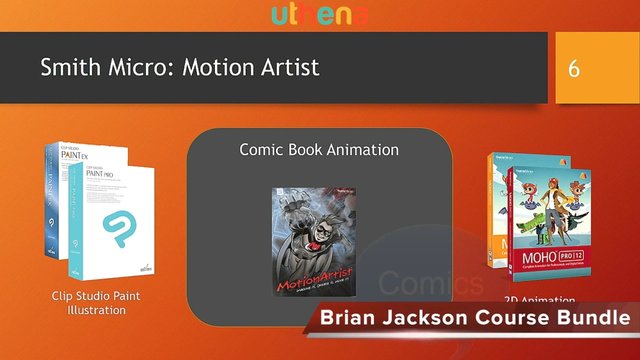
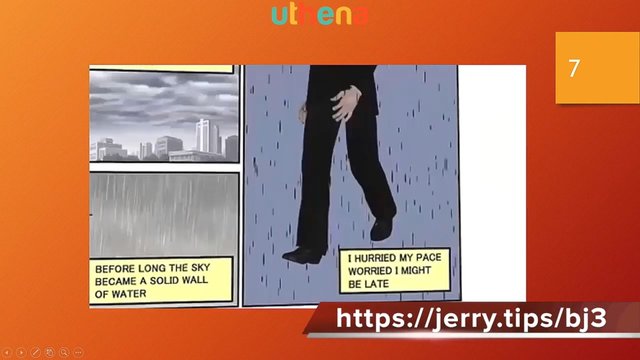
Motion Artist allows you to put some motion to your cartoons if you're a cartoonist such as in this demonstration where you can see that there is an animation from cell-to-cell on the comic that I drew.
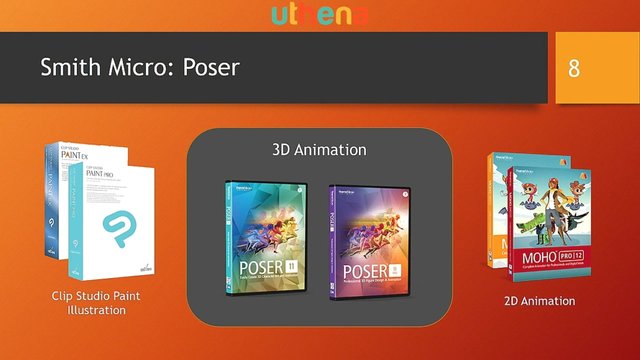
This is done using Motion Artist. The next product to consider is Poser, which is a 3D animation product where you get to spin your characters 360 degrees and see them from all sides.
W here you can generate graphics such as this that shows an airplane scene where passengers have a dispute.

And finally there's Moho.
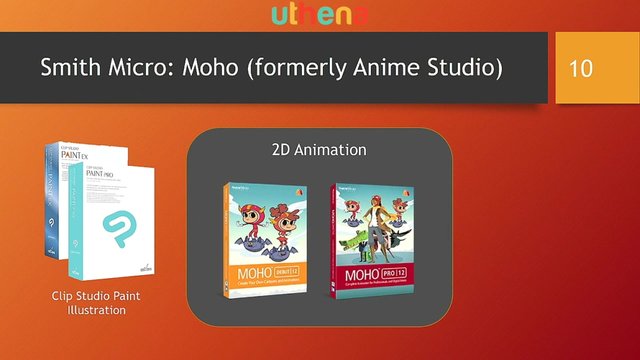
Which like the previous products, comes in a debut or entry-level product and a pro product which allows you to do 2D animation such as in this.
Once again, the website is SmithMicro.com/customer. And here we encounter our first bit project. What I want you to do is consider pausing the video at this point and going to Smith Micro to look at their products and make sure that you're watching the course and purchasing the right product for what you want to do.
Next, I want to talk about why Moho 2D animation?
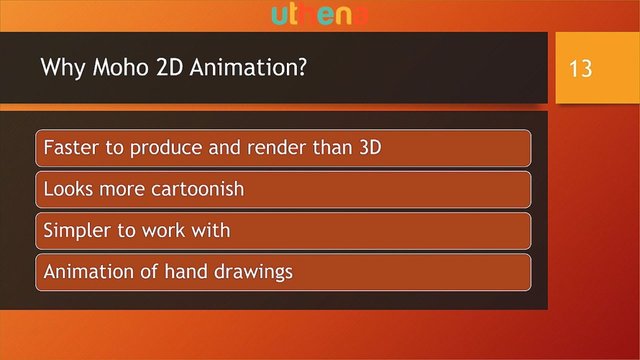
For one thing it's faster to produce and render than 3D, 3D takes a lot of machine resources and it takes a lot of time to render things. It looks more cartoonish than the more realistic 3D animation. It's also simpler to work with and you can use it to animate hand drawings by scanning them and then tracing them.
First, I want to talk about the Moho pro advantages over the debut version.
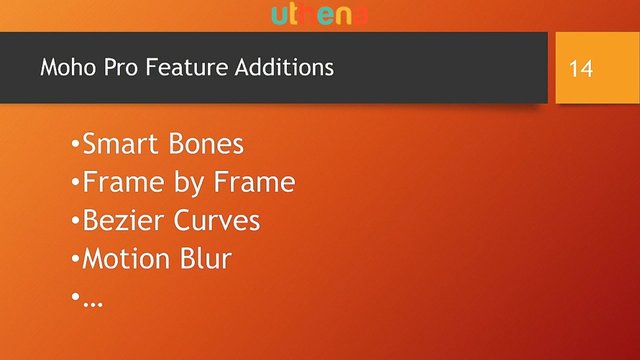
It has a lot of additional features that you're going to want smart bones, frame by frame animation, Bezier curves, motion blur and more.
It just has a ton of additional features. If you fall in love with debut you're going to want to have pro.
Next I want to look at the price comparison Moho debut is fairly inexpensive at about 70 bucks, but hold on to your britches, because Moho pro can cost upwards of $400. The rule here is buy Moho Pro only with a coupon. And another option is to buy debut and upgrade that's a little bit more expensive, but I bet you're going to get tempted into pro eventually, because Moho is one cool product.
Now as of September 17th, the previous version of Moho was called Anime Studio 11 and that's where we get the formerly known as.
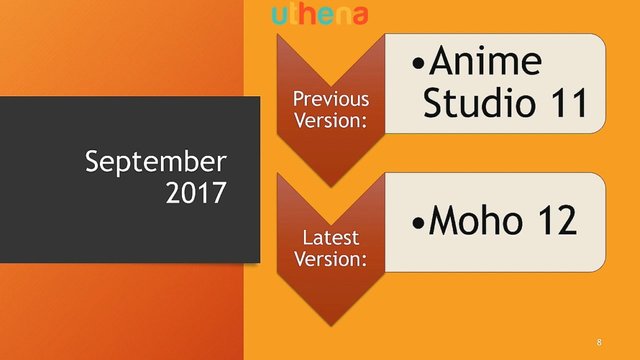
It's currently called Moho 12 and these two versions are not exactly identical. Moho 12 has several significant additions above the predecessor release.
There are also alternatives to Moho including for illustration, Clip Studio Paint by Smith Micro and Photoshop.
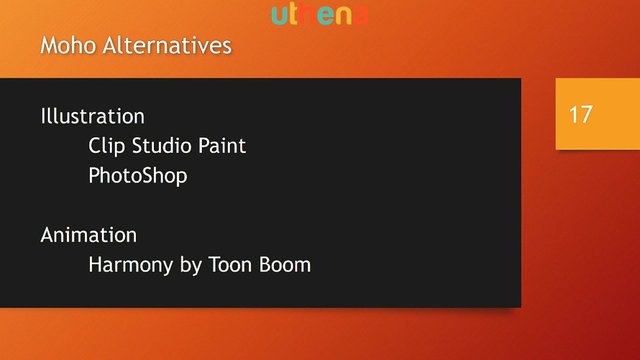
Both of them allow you to create sophisticated illustrations and save them as SVG files for importation into Moho. And for animation, I've heard great things about Harmony by Toon Boom, but this is even more expensive. This is the top-of-the-line professional 2D animation tool.
Now, I want to talk about two types of graphics.
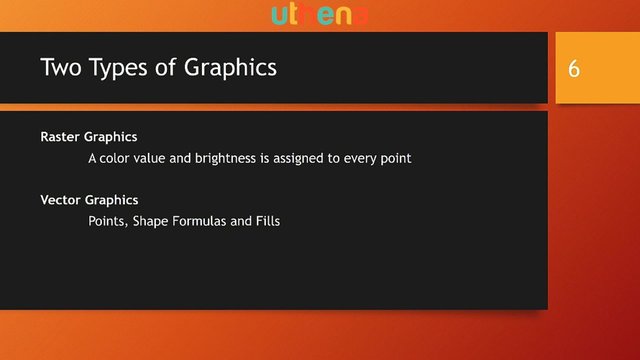
What you're normally used to in doing JPEGs or PNGs and so on are called raster graphics.
These are extremely large graphics, because there's a value to describe the color and the brightness of every point in the image. What Moho works with, is vector graphics which is just points, shape formulas and fills, very small very simple to render and very simple to animate.
Vector graphics provides a standard SVG or Standard Vector Graphics open file format which allows you to share your vector graphics between programs.
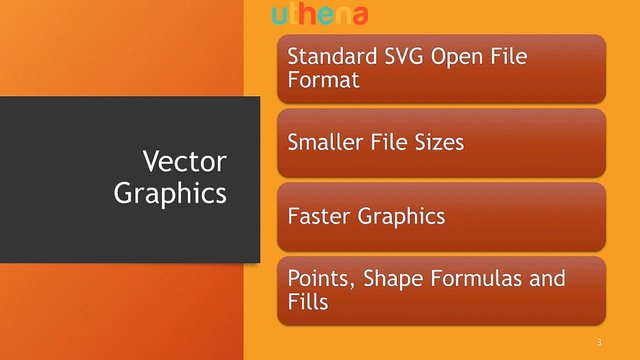
It creates smaller file sizes, because you're storing much less information, you're not storing every point in the image. You also get faster graphics, because software can process the formulas and points defined in an SVG graphic much faster than the raster graphic bit values.
Remember, it's just points, shape formulas and fills. Though I use Windows, Moho supports both Windows and the Mac OS. And one last thing, a standard Windows Installer is provided which makes installation a breeze.
Now this is what I recommend.
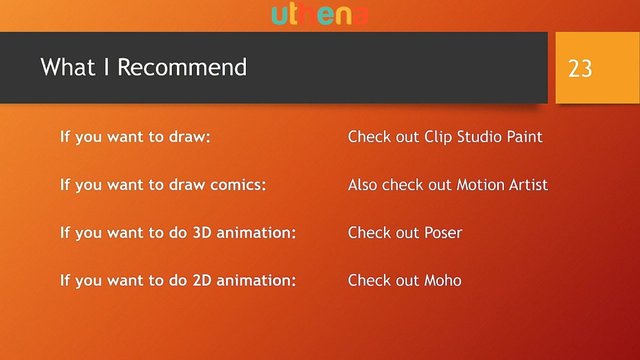
If you want to draw, check out Clip Studio Paint instead of Moho. If you want to draw comics, also check out Motion Artist. I think it's a neat addition to Clip Studio Paint. If you want to do 3D animation, you have to try out Poser. That's the way to go. Very similar to Blender, the open source product, if you're familiar with that. And if you want to do 2D animation, I think Moho is the answer.
So here we've encountered our second little bit project. I want you to go off now and decide what you're going to pick up as far as a software product.
One of the options you have is to do a free trial for 30 days. You might want to just pick up debut and later upgrade to Moho pro if you're not sure about what you want to do.
Next, I'd like to talk with you about the animation workflow.
There are a series of steps that come as standard order that you perform to complete animation. That's actually why there are teams, because teams or multiple people actually on big projects work as teams on each of the steps in the workflow or there might be an individual.
But in my case it's usually me and in your case it's probably going to be the same until you learn that you're going to do all of these steps in the workflow.
Now let's take a look at what these steps are.
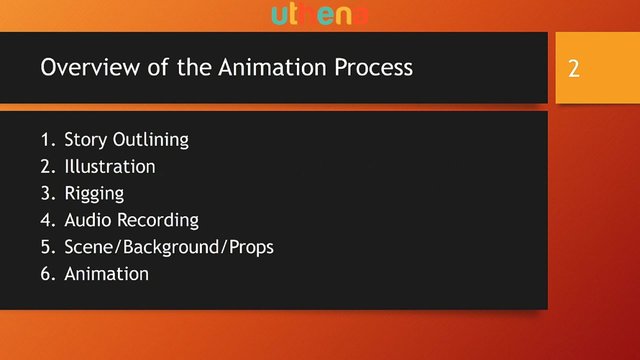
Number one is the story outlining. Somebody's got to have a story or what's going to happen a plot, characters, scenes all of these things and that's kind of the writer director kind of part. Because they're also going to decide how do the scenes fit together and all of this stuff. So they'll probably be heavily involved in production as well.
Now I'm not going to talk about all of that outside stuff. You're going to have to come up with your own story. I'm not going to tell you how, but I'm going to talk about steps two through six.
The first is illustration. You have to draw whatever your characters are going to be and more specifically, you have to draw them as vector graphics rather than raster graphics, because vector graphics can be more easily and faster animated.
Next you're going to rig the characters. What this involves is setting bones that actually move points based on their movement.
So you move the bones the character moves, and Moho is smart enough to fill in all of the steps in between one placement of the bones and the next to make it a smooth animation. So rigging is the process of taking an illustration, a vector graphic illustration and then binding bones to all of the points so that it moves and looks natural when it does. You also put in switches to have different eyes, you'll put in controls to blink, you'll also put in switches to have different hands and maybe hats and add facial hair or exclude it and switches that control the mouth movements and the blinking of eyes and so on. All of this has to do with rigging.
Now when you get done with illustration and rigging, you have a finished character and one of your options is to go into the Moho library and grab some finished characters and then knowing about illustration and rigging, you can go modify the illustration or rigging to make your own character from those. That'll save you a lot of work and get you a more precise character.
Next what you usually do, is you record audio. And the reason that you do this before animating is that part of animation is lip syncing so you've got to have the audio and you've got to have the characters react to what they're saying.
Somewhere along the line, you're going to create scenes and backgrounds and props and all of that so you've got to have supporting graphics as well.
And then finally, you make it to the animation part which is where you move the rigged characters around a scene, a backdrop with props and have them interact with their environments and multiple characters interact with one another.
Now, I want to take a more detailed look at each of these steps after storytelling.
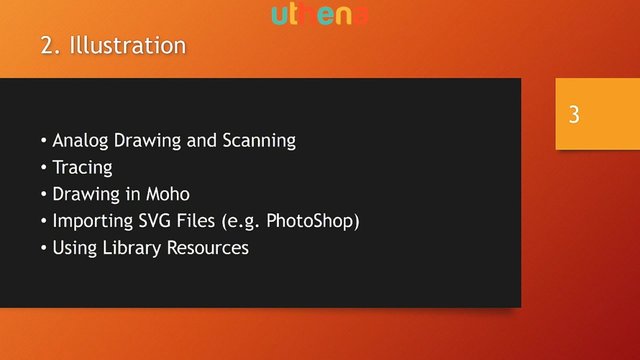
When it comes to illustration, you actually have several choices you can draw using analog drawing methods outside of a computer and then scan those drawings in.
And then what I like to do, is trace. So I'll either trace images that I've gotten off the internet or drawings done by my wife that are analog and scanned to turn them into vector graphics.
Another is to just originate your drawing in Moho.
You can also import SVG files from programs like Photoshop or Clip Studio Paint or use the library resources. So there's a lot of ways to come up with illustrations.
If you don't want to particularly illustrate, go ahead and use the library. If you're not very good at drawing, go ahead and trace. If you're great at all of them, then you're probably working in Photoshop and might want to import. If you're somewhere in the middle, you might want to draw in Moho.
So you've got all the styles covered.
Next is rigging and that's adding bones to a character or an object.

Remember, that you can also have animated objects that do things Inanimate objects. You then bind the bones to the points and to actions. So points would move the character around as you move the bones, actions would maybe flip to a different hand position or a different mouth position.
And then you may have to draw additional shapes as required. So if you're going to flip hands, you need to draw more than one hand position and you may not do that until you're rigging.
Next comes audio recording.

Now here you have options. You could download free audio from the internet so playing music in the background and so on is no problem. You can import your own recordings as I'm doing here. I recommend using the product Audacity which is free off the internet for doing recordings and who knows, there may be time in this course that I can give you a little Audacity demonstration.
You can also record within Moho and we will definitely be looking at that or use library resources which includes little sounds that you can incorporate. Popping sounds, bangs, all the common sounds that you might want to incorporate.
Now next comes scenes, backgrounds and props.
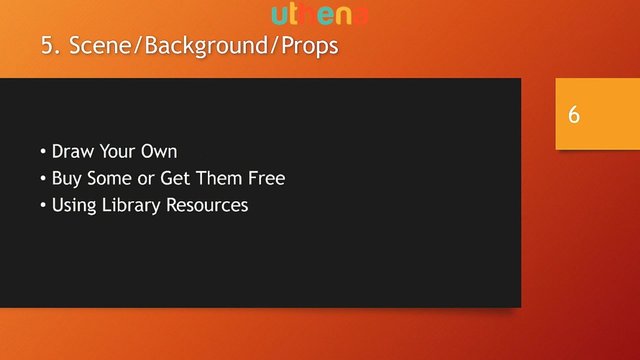
You can draw your own and that's actually fun to do if you like that kind of thing, or you can buy them or get them free off the internet or use library resources once again to fill them in. So you've got your options here.
And then finally comes animation.
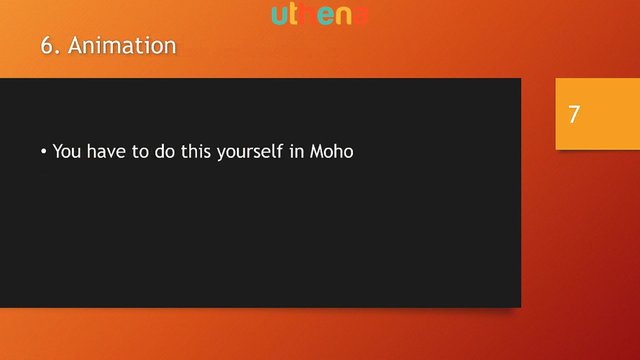
We all know about animation. That's the recording and the movement of the bones and so on. The actual creating of the cartoon. And you have to do this yourself. You can't load this from a library and so on. Well actually you can to a certain extent, but this is where the artistry of animation comes together.
So you have all of these options. Are you interested in the storytelling part? Are you interested in illustration? Because you can draw and take snapshots and make still images of your drawings. Are you interested in rigging? Maybe you just like to create characters through illustration and rigging. Well, specialize in that part. Maybe you really like the animation part of things, the moving of things, but you don't particularly like illustration or rigging. Well, in that case, use the library resources. No illustration and rigging so that you can modify the resources just slightly to make them your own and then go ahead and spend most of your time with animation.
So what I'd like you to do is prioritize your favorite animation, in the big sense, tasks. And prioritize them in order. What's the most important? What's the least important? And post your list when you get it to the Q&A section of this course. Or if that's too much work, just post your favorite. What are you primarily interested in? Is it the illustration? The illustration and rigging? Or just the animation itself? Or the whole thing?
Personally I find the whole thing a blast and it's nice having a variety of tasks. Now this is a pause point so I encourage you to pause the video right now and go do this task. Prioritize your tasks, you can rewind and see what the list was again, and put together your priority order.
I'd like to know and you probably would like to know what is it that you're so interested in that you're taking this course on 2D animation?
Up next is going to be the course overview.

I'm going to show you how this course is laid out and the little tricks that I've used in it and how you can take it.
In this lecture, I want to provide a course overview for the course you're about to spend several hours watching. So we're going to talk about what you're going to learn in this course not only what you're going to learn, but how you're going to learn it.
So I'm going to begin with a history of your instructor, because this is kind of justification for why I should be teaching this course.
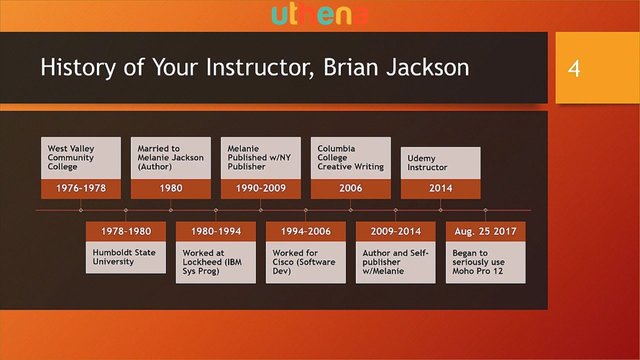
I went to a Community College and then Humboldt State where I got a degree in Business Administration, married Melanie Jackson who was an author and then I worked for Lockheed for a while. And in that interim Melanie became a New York published author. And then I worked for Cisco Systems where I cashed out on the stock options just before the tech bubble burst which allowed me to retire at the age of 48.
I went to Columbia College when we moved up into the foothills of California and took creative writing to brush up my writing skills. And then from 2009 to 2014, I was a author and self-publisher along with my wife Melanie Jackson. In 2014, I became a Udemy instructor and just recently in fact it's been about two weeks I have been a dedicated Moho pro 12 user.
Now that doesn't exactly set me up as justification for why I should be teaching this course, so let me address why I created this course.
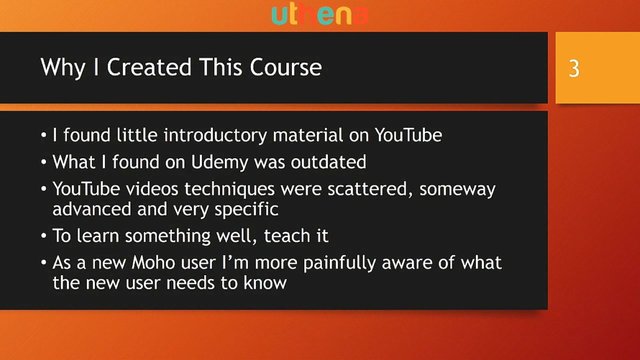
While I was out there trying to learn Moho, I found that there was very little introductory material on YouTube. I found two good sources of introductory material and I'm going to address those in the resources that is the article after this lecture. And what I found on Udemy seemed to be outdated and just kind of disjointed.
YouTube video techniques were great, but they were scattered and some of them were very advanced and some were very specific on techniques.
Where was the general introduction to Moho information that was up-to-date?
I couldn't find any so I kind of pieced it together myself. And one of the things that I learned early is that if you want to learn something well, and I'd like to learn Moho well, teach it. And as a result of putting this course together, I went out and had to gather a whole bunch of basic techniques and I learned a bunch of stuff that I didn't know about Moho and fundamental stuff that I can use over and over again. So it's already been useful even if this course tanks.
Additionally, I watched a video on training techniques and it said, “You know one of the great fallacies is that you have to be an expert or a professional at something to teach it.”
In reality if you're a beginner you actually know and are more familiar with what a beginner needs to know. It seemed like a lot of the videos I saw skip beginning techniques and I went, “Wait a second, what was that? You're going to press a space bar? You're going to do this? What does that mean?”
In this course, I start at the very beginning and go very slowly through what a beginner needs. At that point, you can go and watch any YouTube video you want and you're going to understand the fundamentals that those techniques are based on.
So this is an introduction for beginners to Moho. It's an extensive one. So if you want to know Moho really well, this is the course.
Now here are the topics that we're going to cover after an introductory workshop where we're going to have some fun creating some animation. That's after the next couple documents in the conclusion video in this section. And I apologize for this section being so long.
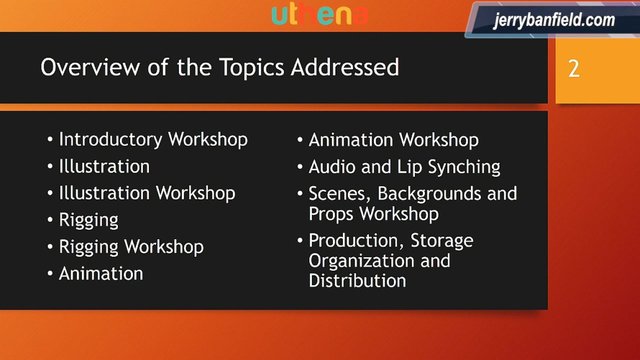
We're going to have pairs of first illustration and then an illustration workshop, rigging in a rigging workshop, animation in an animation workshop. And then I'm going to conclude with how to do audio and lip syncing, several techniques one using Papagayo, a tool which automatically kind of lip syncs for you. And then we're going to look at drawing backgrounds and props and all that stuff and scenes and how to organize those. And then we're going to conclude with an important topic, production and storage and organization of all your stuff and how you're going to distribute it. It's kind of like the administrative part of putting together a cartoon.
Now in addition, this course is being taught in a specific way.

Along through the course, you're going to hit these pause points, right? You already encountered those before and they look like this.
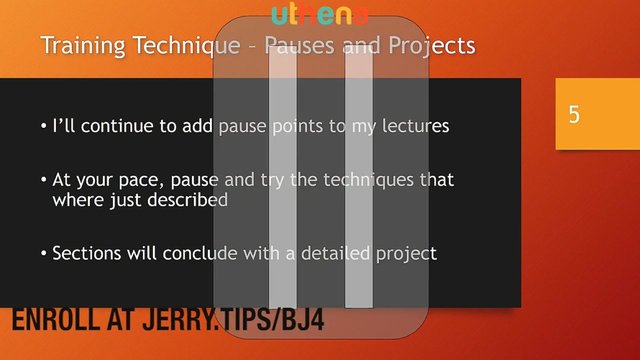
When you hit those I am suggesting that you pause the video and go try out the techniques. Now you should also do this at your own pace. If I'm not doing it enough or you can ignore them if I'm doing them too rapidly or too repeatedly, and do the pauses at your own pace, but be sure to pause this video and go try out the techniques after you've accumulated several of them. In addition, sections will conclude with major projects. So after illustration there will be an illustration project where you will illustrate a character. After rigging your rigging character. After animation you'll create a small a 30-second cartoon video.
Coming up next is that document on additional resources.

Be sure to scan it, because it's going to give you a lot of good stuff that you can watch and read to learn about Moho.
In this lecture, I want to take somebody new to Moho through the process of using it to create an illustration and I'm going to do it in under 10 minutes.
The first thing that you do is you start Moho. Now I'm going to start from a blank screen here just so that you know that there's nothing up my sleeve. You’re seeing exactly the way that it's done. I don't have anything preset.

And finally here it comes and the first thing Moho does is it brings in a default animation and I can right away start playing this and I can see an example animation. I can also play with it and modify it if I know what I'm doing.
This animation is way too complicated to work with and by the way I just returned the play head which we saw moving ahead along we could stop it and I can go back to the beginning which is where we want to be.
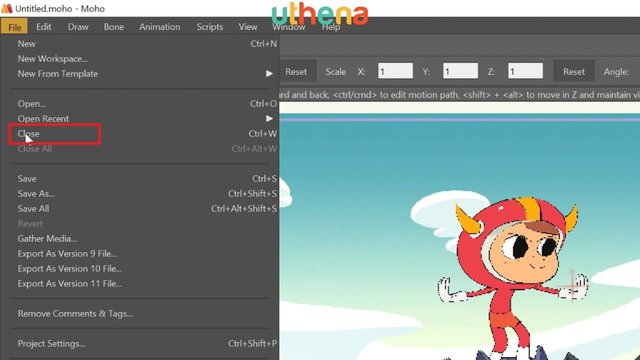
Now what I'm going to do is I'm going to say ‘File’, ‘Close’ to get rid of that particular animation.
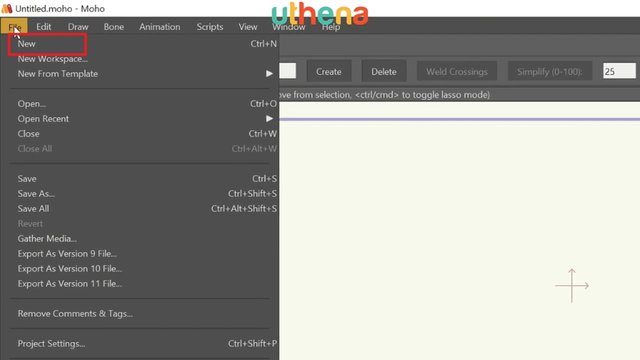
And I'm going to go ‘File’ ‘New’ to create a new one.
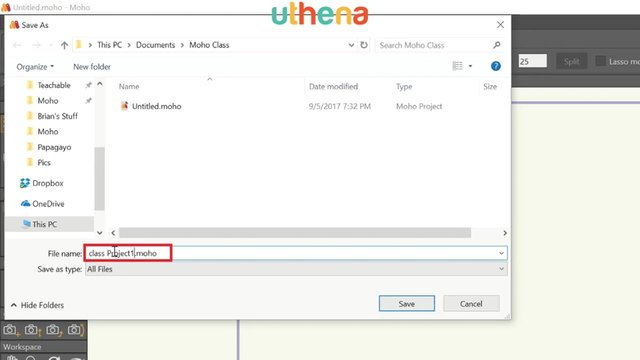
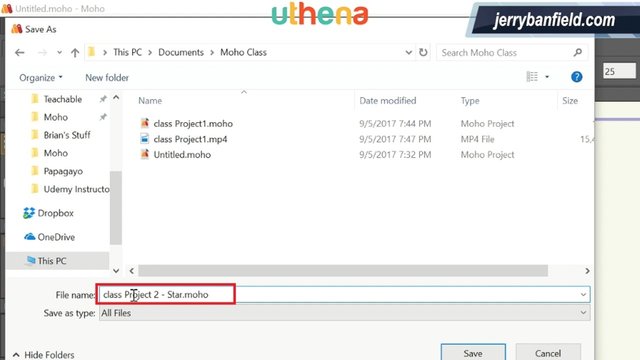
Now the first thing that we need to do is save our work somewhere. So I'm going to go to ‘File’ ‘Save As’ and at this point you can create a directory. I would recommend going to ‘Documents’ and using ‘New Folder’ to create a new folder called ‘Moho Class’.
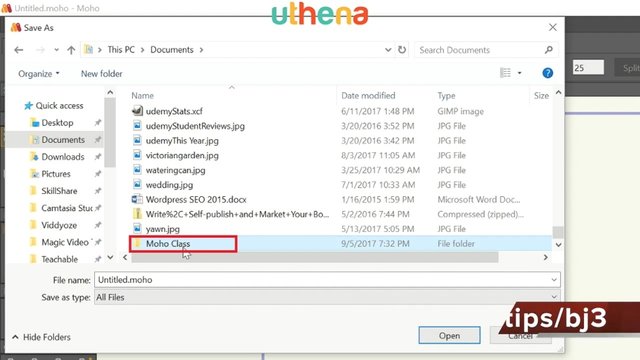
Now we've got a folder in which we can put our materials. Double-click on the folder to open it and then let's name this ‘class Project1’.
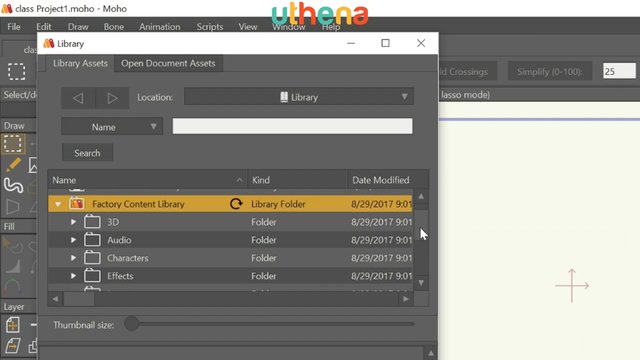
Great. Now we've got a saved file. Now the first thing that we're going to do, is we're going to bring in a background. And to do that, I want you to ‘Open Window’ come down to ‘Library’ that will open the library window which contains resources that we can reuse.

Go to ‘Factory Content’ and you notice it has this little arrow to the right, click on that and it'll open this. This is just like a directory structure. And in it you have characters and effects and images all these things that you can reuse.
But what we're going to go after is scenes, and under scenes, we want backgrounds.
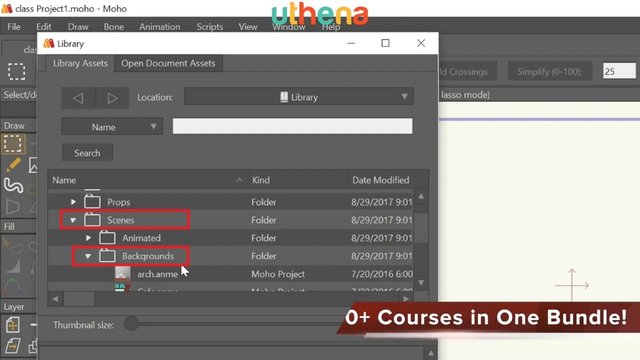
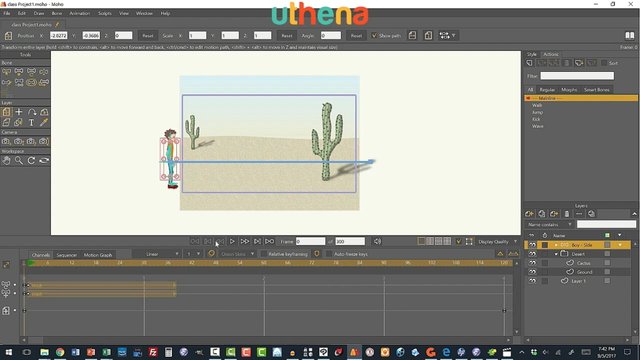
And under backgrounds finally we make it to ‘Desert.anme’. Let's bring that in. If I double click on it it brings up a sample that I can look at. So we're going to have a desert scene. Let's go ahead and say ‘OK’.
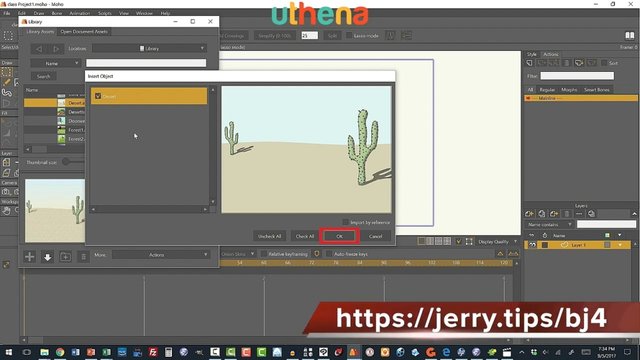
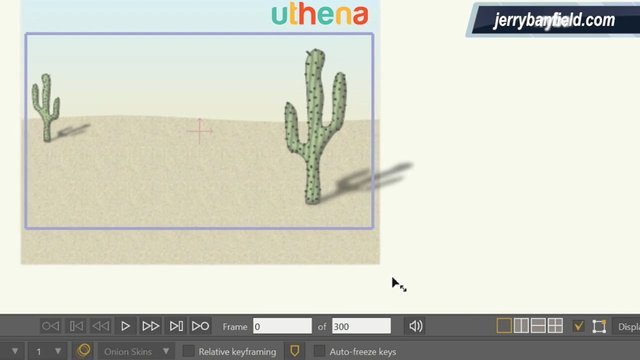
Now we can get rid of the library window by clicking on the X in the upper right hand corner. So we're looking at the desert scene. This purple box here is actually the view area of your cartoon. Notice that the scene does not fill up the background.
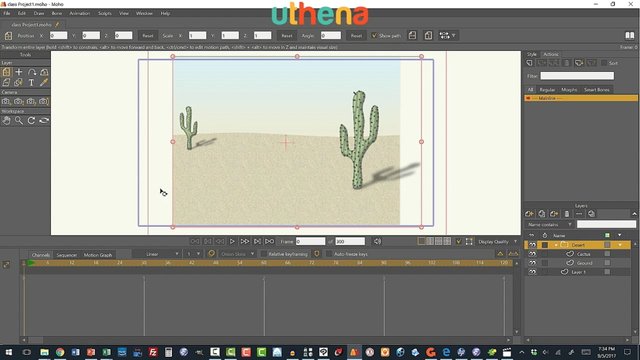
Also notice this, that we can zoom in and out by rolling our mouse wheel in different directions in and out. We can also pan the screen by right clicking anywhere and moving our mouse around, two important navigation features.
Now what we're going to do is zoom out just a little and then grab with the mouse the lower right hand corner of this box here. The little red circle. And you'll notice that your mouse will turn into this two-way arrow.
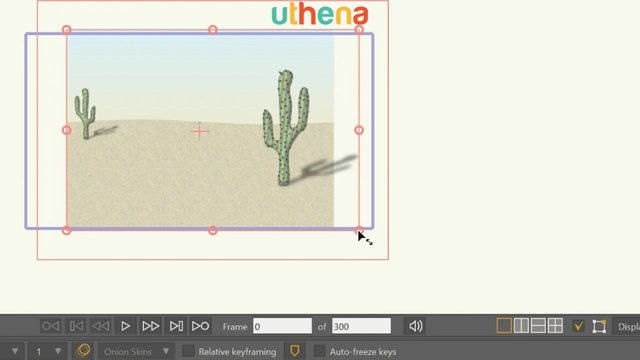
When that happens, click down and pull away. This will expand the desert scene and we want it to be just larger than the purple box. The purple box being the viewing area of our cartoon. And congratulations you've just created a background to your cartoon.
Next we're going to open the ‘Window’ menu and come down to ‘Character Wizard’ to create a character.
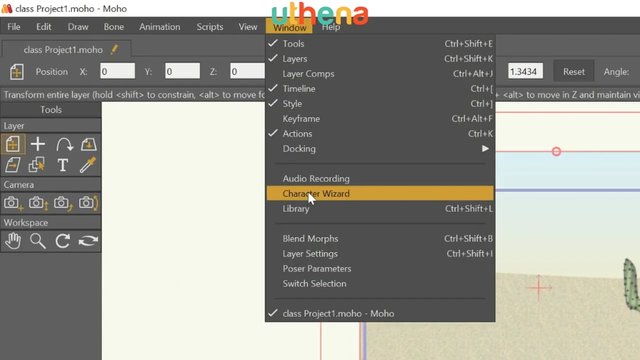
And it brings up the boy.
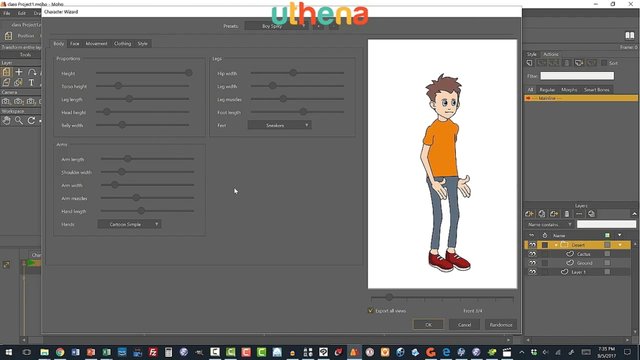
We can choose from different characters including a creature and a mannequin, but I'm going to go with spiky boy. And we can go here and change the proportions of his various body parts give him very long legs and a short torso.
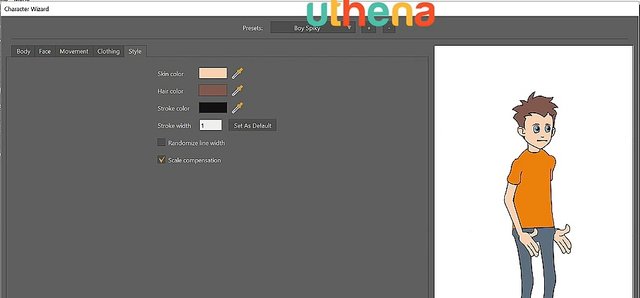
We can change the length of his arms and his shoulders and how wide he is. Try completely configuring this character to be you. Then you can go to the face and modify all of these things, the colors of things and so on. You can even go to movement and change the way that he walks.

The walk action is something that we're going to use to animate. I can change the color of his clothing and the type and here in style I can even change the styles of his skin and so on to make him exactly me.
I'm just going to accept the existing boy. Now what we want is have him walk from left to right across the desert, so we're going to take a side scene.
Notice this little scroller down on the bottom will change in one quarter circular increments the direction in which you're looking at this character.
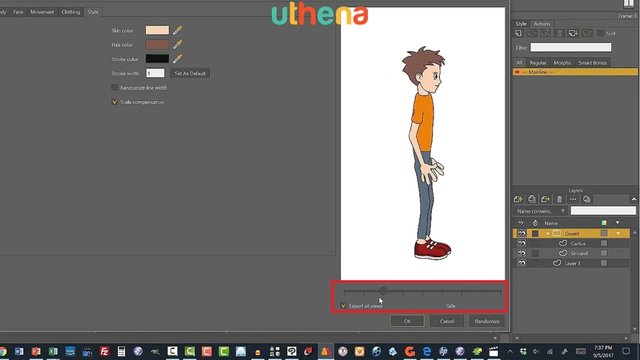
We want the side view here. The third notch over. And we also want to export only one view so uncheck the box ‘Export all views’ and click ‘OK’. And you can see that our character has arrived in the scene.
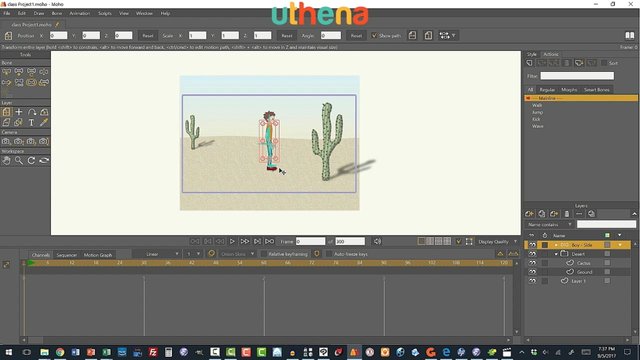
Congratulations. You just illustrated your first character. Now the problem is is he's standing in the middle. We want to change that, but first we're going to check out a few things on the screen.
Notice on the far right that we actually have things called ‘Layers’ and if we move these layers up and down, we can change what's on top of other layers.
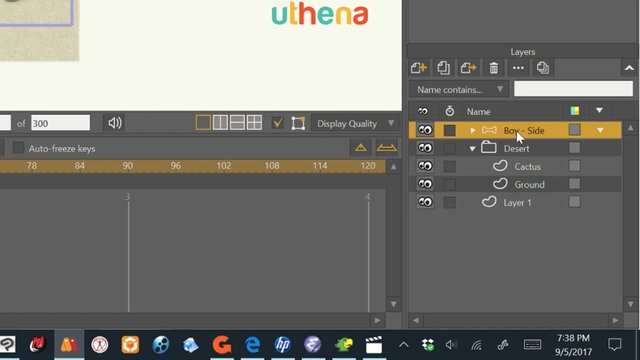
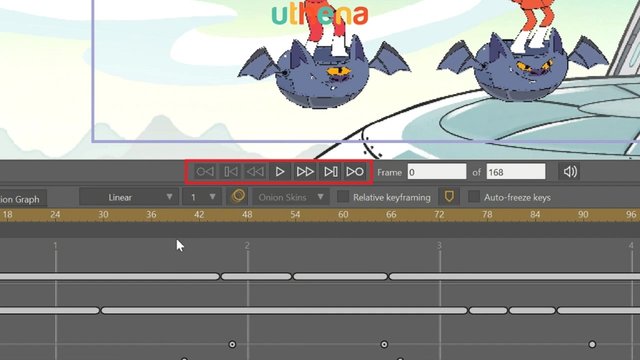
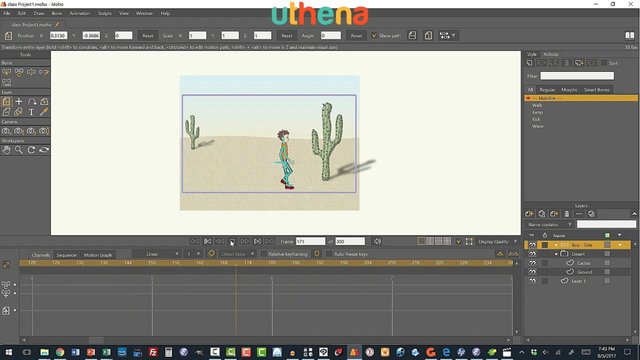
So just notice that there are layers and if sometimes you try to do something you could be on the wrong layer. We want to be on the ‘Boy – Side’ layer. And notice the timeline here. We can set up an animation on frame 0.
Once the frame advances into the timeline, the current frame then we're doing an animation so we're actually animating a scene and every change that we make will be recorded and animated by Moho. On frame 0, we can modify things so make sure you're on frame 0 on the timeline and that the boy is selected in the layers.
Next pick the ‘Transform Layer’ tool that looks like a four-way arrow in a bent sheet of paper. Click on it and it will highlight.
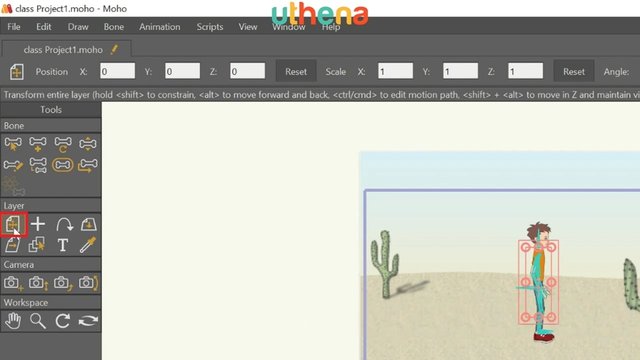
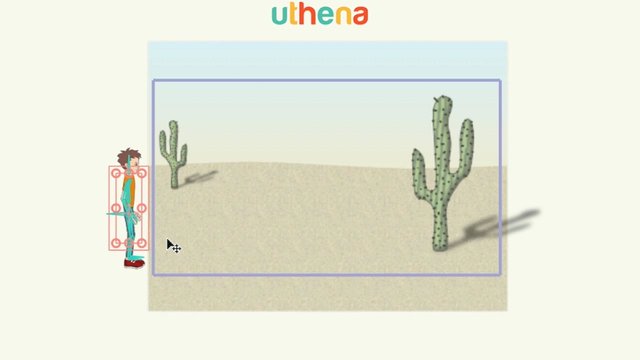
Now go over and notice this red box with the eight circles in it. If I click and hold down in the very middle, I can move the boy character over to the left off the screen. Now I'm ready to start my animation.
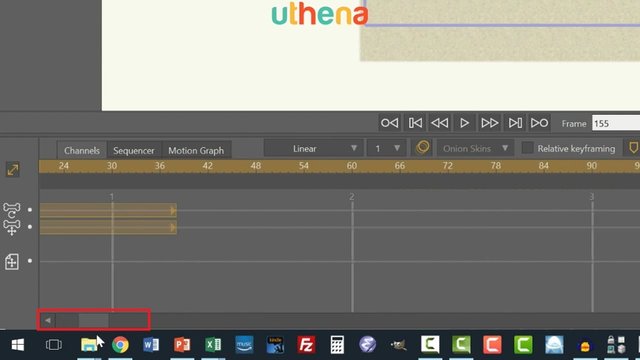
What I'm going to do is have him walk and to do that I can quickly assign an action. If I go to ‘Window’ and select ‘Actions’ the ‘Action’ window will open either in the middle of the screen or docked as this one does.
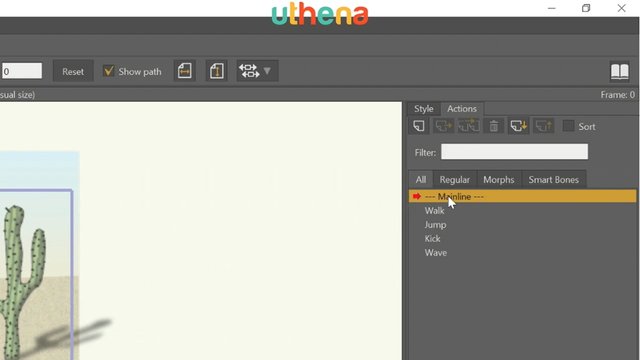
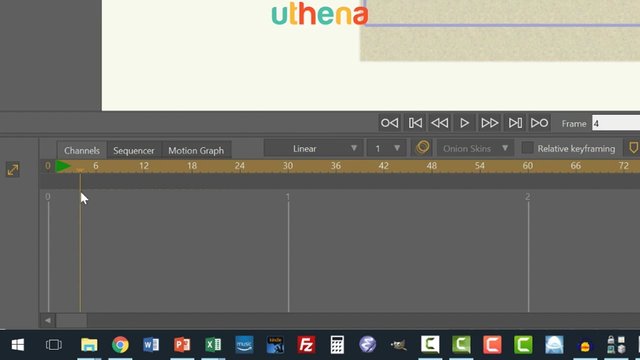
We want to move the current frame in the timeline to 1, click on ‘Walk’ and then select ‘Insert Reference’. That will insert a copy of the walk cycle which is a repeating cycle.
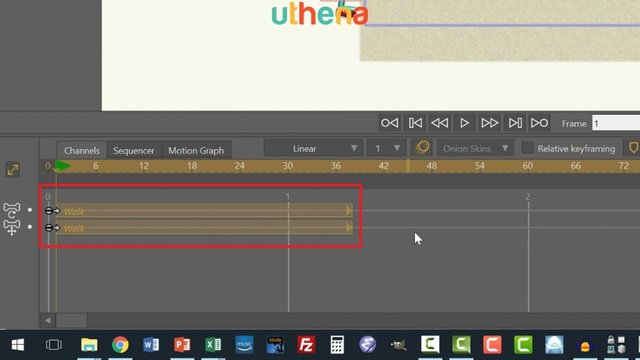
So now we can click ‘Play’ which is the arrow in the middle of the screen and we walk in place. We want the character to walk across the screen so click the square to stop the replay and then click the arrow pointing at the block to move all the way over to the left and get back to frame 0.
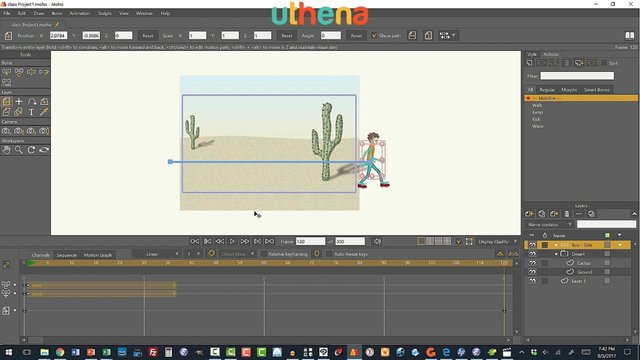
What we want to do, is to decide how long it's going to take for him to walk across the screen. So we have him starting on the left and as we move the frame forward just by grabbing the triangle at the top of the gold line and dragging it across the timeline we can set where the next action is going to occur. And let's set it to 120. That's what fits on my screen.
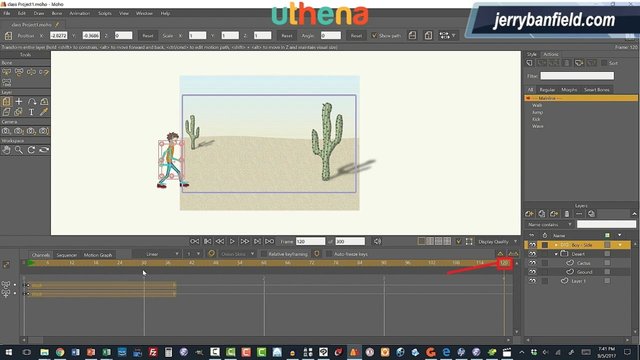
Now if you notice, there's 30 frames per second in my set up, so that means that it's four seconds that we're going to record. That's how long it's going to take him to walk across the desert. Next with your ‘Transform Layer’ tool selected, click again in the middle of the boy and drag him all the way across until he's off the screen on the right. There, you've just created the complete animation. Go ahead and play it.
We forgot to go to frame 0. So let's rewind and play.
Now he's moving a little fast. In fact it looks like he's sliding on the ground. So maybe we want to change the speed or the time that it takes him to make it all the way across the desert.
Now notice the little scroller down here at the very bottom of the screen scrolls the timeline left and right.
Here's what's known as a key frame at 120.
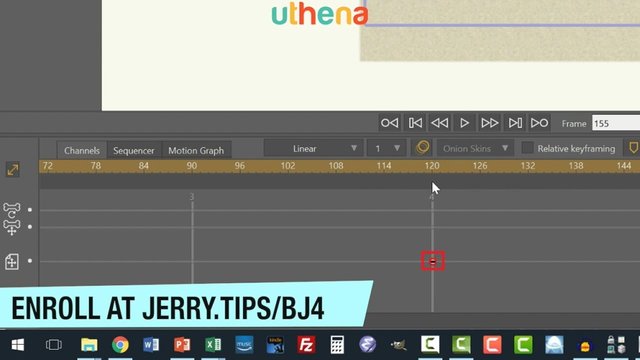
We created that by setting the boy’s ending position. What we're going to do is scroll until the key frame is on the very left of the screen, click the key frame to turn it red with our left mouse button and then click and hold it and drag it over. Let's go. Have we hit the end of the screen?
Notice that it scrolls. Let's go to 10 seconds.
Now it's going to take him 10 seconds to traverse the desert. Let's hit the rewind button and then play again.
That's a little more reasonable and he's trudging. He wouldn't be moving that fast. And it repeats. Let's hit ‘Stop’.Congratulations. You just created your first animated cartoon in Moho.
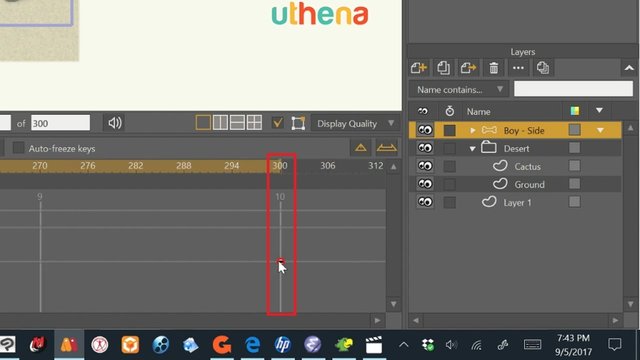
Now the next step that we'll do is go up to ‘File’ and say ‘Save’ so that we can update our saved ‘class Project1’. Then we'll say ‘File’ and go all the way down to ‘Export Animation’.
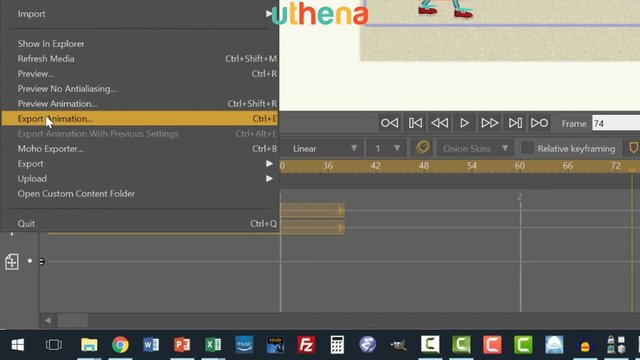
On the ‘Export Animation’ page we'll see that we have ‘Start frame’ ‘1’ and we put at the ‘End frame’ of ‘300’ if it's not there. We can choose between an MP4 file or an AVI, we can even create an animated GIF and leave all of these render options alone. Notice we're exporting to the same directory that our class project was in. Its just going to be called ‘.MP4’ instead of ‘.Moho’. So we click ‘OK’.
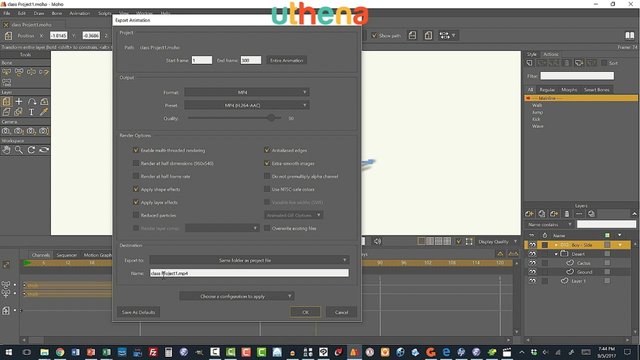
Now this is actually the longest part of the entire process. It's going to take upwards of two or three minutes. Maybe even as much as five to render this short scene. So I'll speed this up. When finished Moho will play the finished product for you.
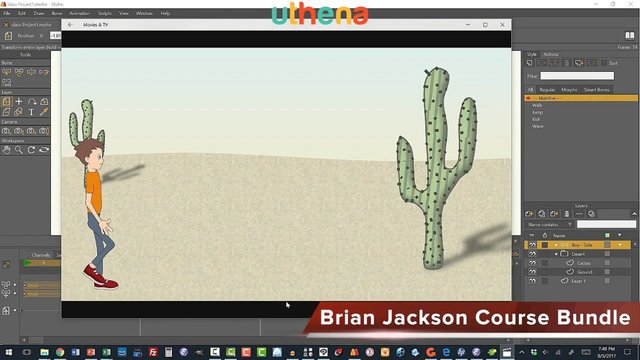
And there you have it. If we go to ‘File Explorer’ and to our directory ‘Moho Class’ we can see that we have a new MP4 along with our ‘class Project1.Moho.’

If you wanted to extend this simple project, you could try adding the other action sequences on other frames from the actions list or you could modify your character to trick them out and make them look completely different.
One more thing to make note of is that you can always hold the Ctrl key and hit Z to undo your last action if it was an error. In fact you can Ctrl+Z repeatedly to undo multiple actions. Remember Ctrl+Z is your friend.
Simple illustration rigged with bones and animated.

Hello everybody, in this lecture and the following two lectures, we're going to do a simple illustration, rig it with bones so that we can control it and then do a simple animation.
So you're going to see the entire process. Let's begin by starting Moho. And once again, it takes a while to come up. And once it does come up, it shows you the default character this we don't want so we're going to go up to ‘File’ ‘Close’.
Now let's use ‘File’ ‘New’ to create a new project. Let's go to ‘File’ and ‘Save As’ and save this in our project directory ‘Moho Class’ and we'll save it as the file ‘class Project2’ and let's put a - and say ‘Star’ so we know what we're doing.
What we're going to do is we're going to draw a simple star character similar to the debut step-by-step tutorial that I pointed you to in the resources, but much more simplified.
So let's begin.
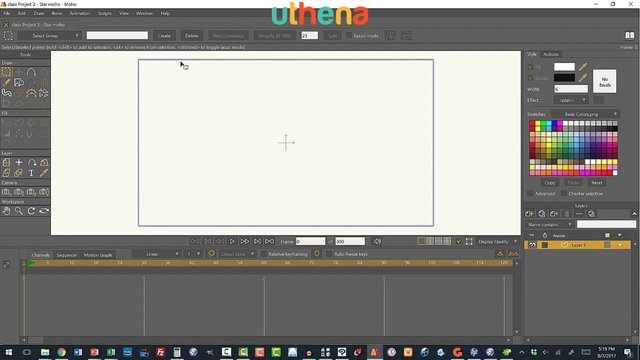
We've got a pallet here, we've got the purple area showing us the screen area and what we're going to do is making sure that we're on the layer that we want, we only have one layer, and that we're in frame 0 which is where we do illustration rather than animation which takes place on the rest of the timeline.
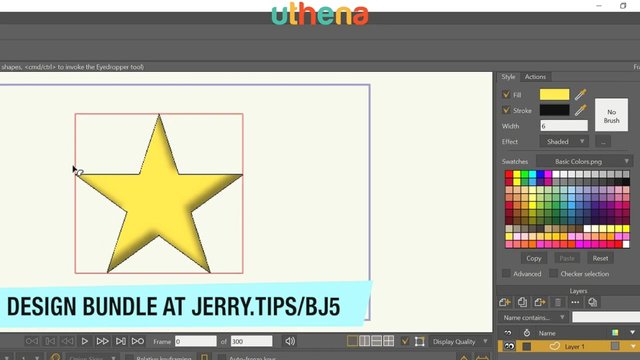
So with all of this set up, we'll select ‘Draw Shape’ and the shape that we want is a star for the basic body.
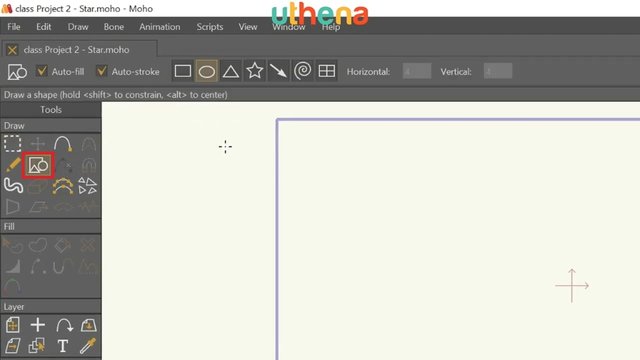
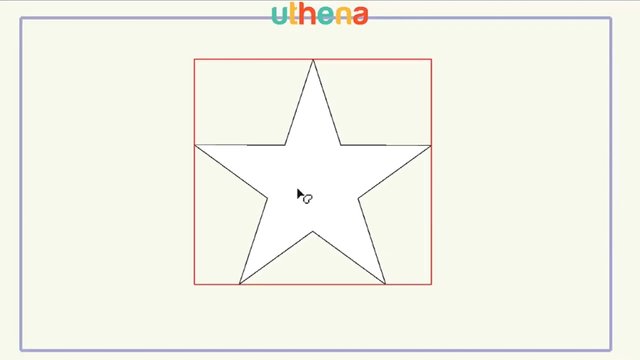
So let's select that and then pick any place on your pallet and just pull the star out. Now we want it to be fairly large so that we can see it, but we also need room to animate it so let's make it about this size.
Now we go to ‘Transform Shape’ we can move it down into the center of our area.
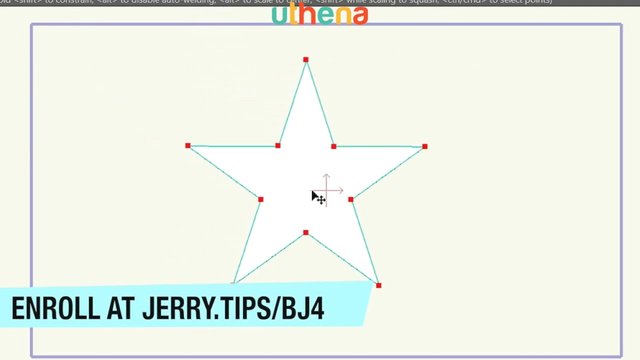
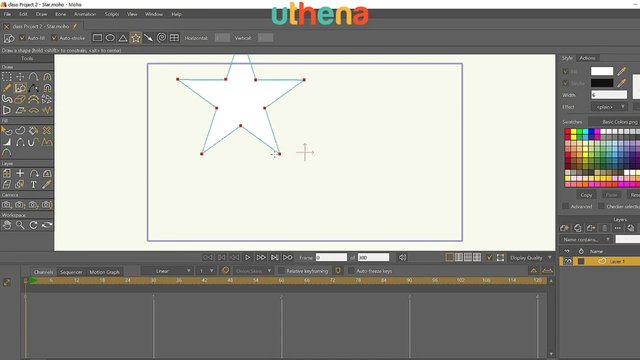
Now this star black and white is very plain so let's go ahead and click ‘Select Shape’ come over and click on the star and notice it's selected now.
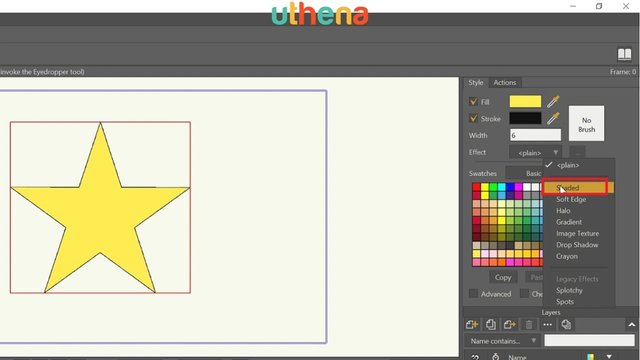
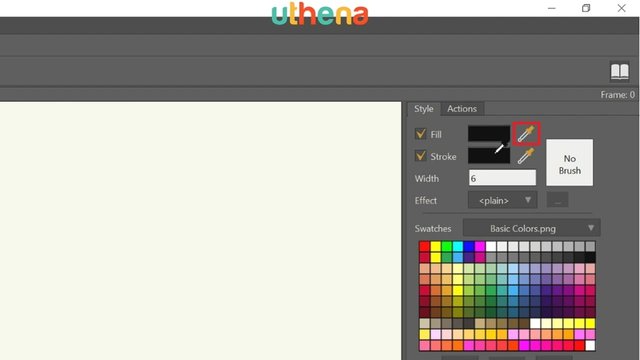
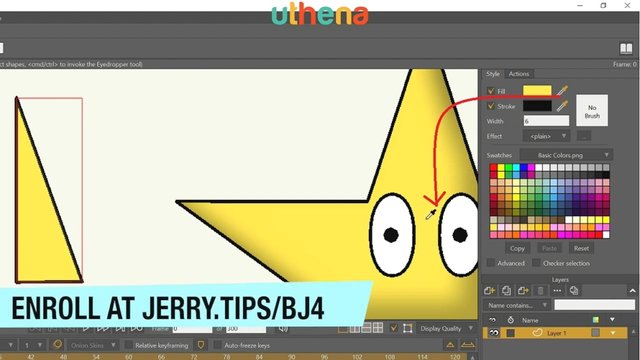
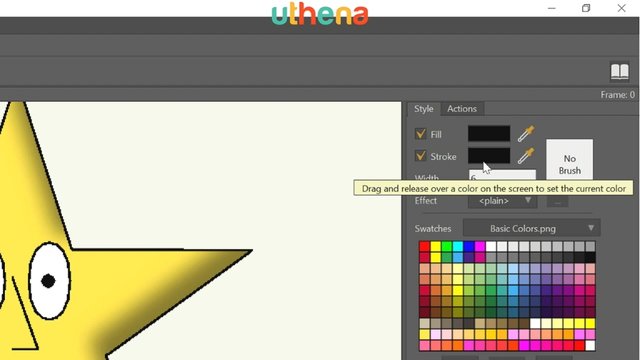
Now we can come up here and we can change its fill, its stroke and its line width, we can also give it effects. Another option is to pick colors from the swatches let's go ahead and pick yellow to make the star yellow and black as a fine stroke and we'll go with a width of 6, I usually use 3 or 4 1/2 as the line width, but 6 is good for a large character like this.

The other thing we want to do give it a bit of a 3D shape, so let's click on the little arrow here on the effect that says ‘plain’ and come down and click ‘Shaded’.
This shading is fine we can control the offset and so on and the angle of the shading here and how much it blurs. But I'm going to go ahead and go with this default shading.
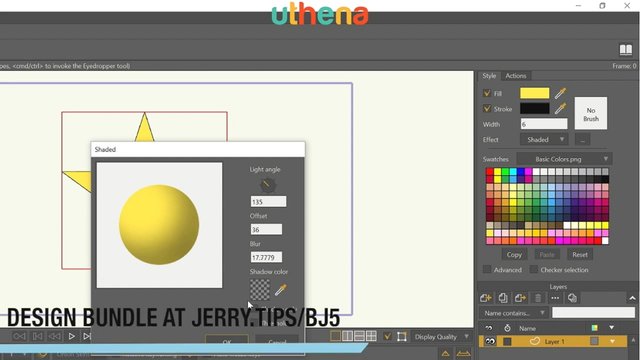
There, now it looks more or less 3D.
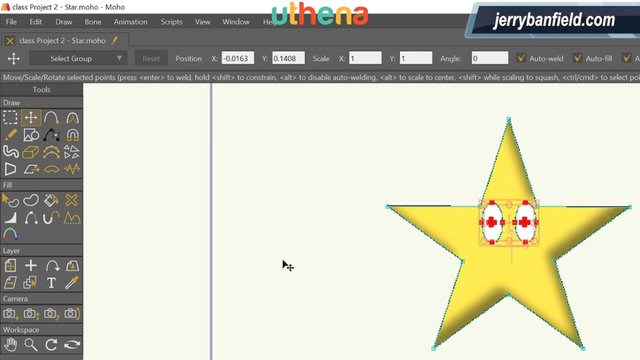
The next thing we'll do is add eyes let's go again to ‘Create Shape’ and we'll select the oval. Now pull the oval out, we want them fairly small so they'll fit in here so let's zoom in on what we're doing.
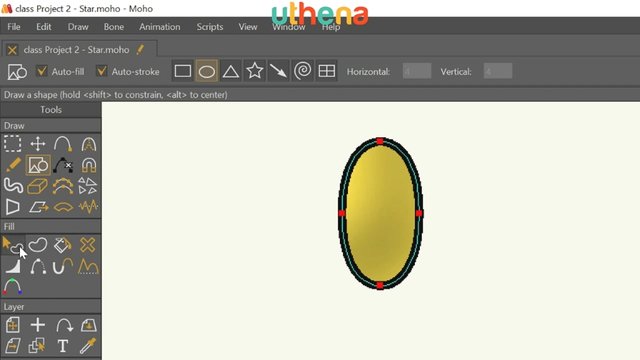
Once again, select ‘Shape’ and come over here and this time we want the color to be white so let's click on the color and move the little selector here up into the upper left hand corner.
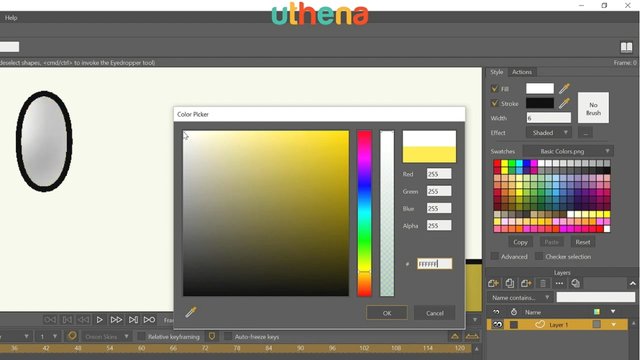
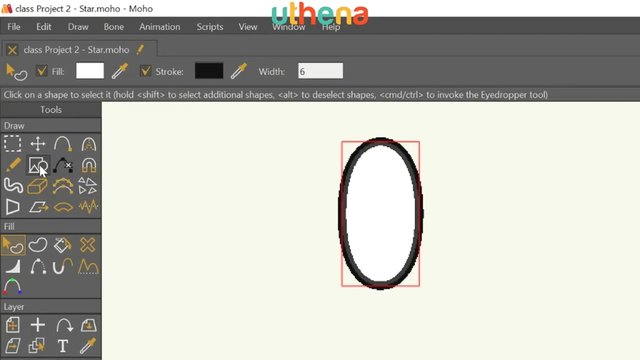
That'll make it white and say ‘OK’. We don't want this to be shaded so let's just make it plain there. Now we have a plain black oval.
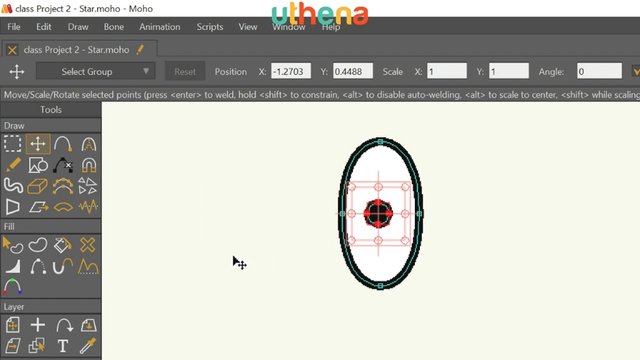
Next we'll create another shape for the eyeball. Once again, we want the oval, but this time hold down shift so we can pull a perfect circle. There we go, that's a nice size for a pupil.
Now the thing we want to do with this is once again, select the shape with the ‘Select Shape’ tool come over and this time if we want the fill to be black which we do, we can use the eyedropper. Pull the eyedropper to any color on the screen and it will use that color. For instance I can pull it down onto the stroke color and make it black.
Now let's use the ‘Transform Points’ tool to select this and move it into the center of our eye.
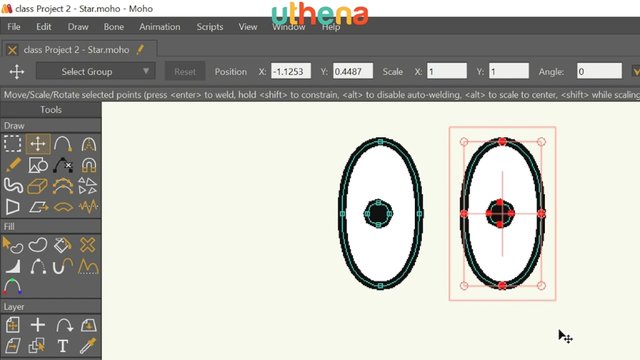
Next we're going to make a copy of the eye. Use ‘Select Points’ to drag the mouse around the eye. When everything’s selected, hit Ctrl+C and Ctrl+V on your keyboard. That's the cut and paste keys.
Now holding shift, I can transform this shape and make sure that it stays aligned over to the left. We now have two eyes.
Let's zoom out by scrolling the mouse wheel and then I'm going to grab with the right mouse button and drag my picture into the center of the screen.
Use ‘Select Points’ and select both eyes. Now use the ‘Transform’ tool to move those two eyes into our drawing. Those are a little small and far apart.
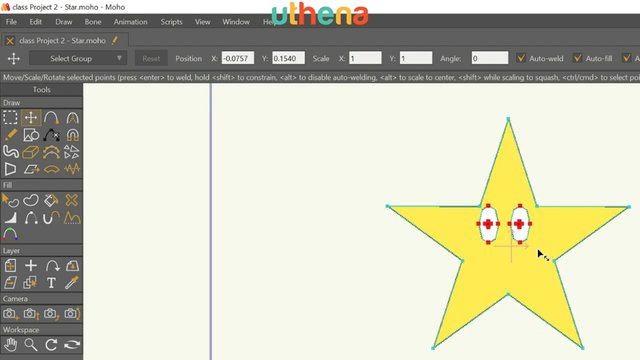
Let’s grab the corner of the ‘Transform’ tool and expand the size of our eyes. Now we can move them into position as larger eyes.
Next we'll create a nose. Once again, we go to ‘Insert Shape’ or ‘Draw Shape’. This time we want a triangle so let's select that, pull down a triangle, click ‘Transform Points’ and we want to transform this.
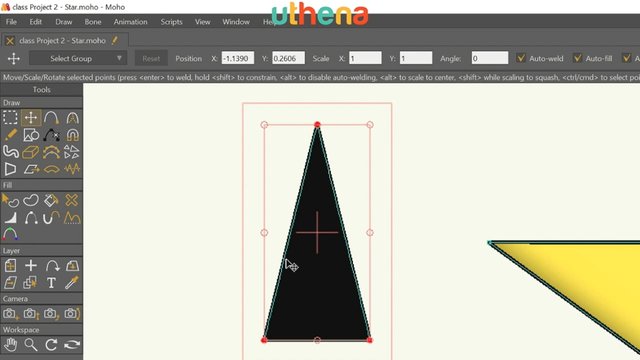
This time let's zoom in and use the right mouse button to drag the triangle into the center of the screen. Now if we click in this outside border rather than the inside, in the inside we can move it, in the outside we can rotate it so we're going to rotate it until this line is more or less straight up and down this left line. There we go.
Now we can use ‘Transform Points’ click anywhere to unselect all points and then drag this point down so that it's right angle in the lower left hand corner. There we go.
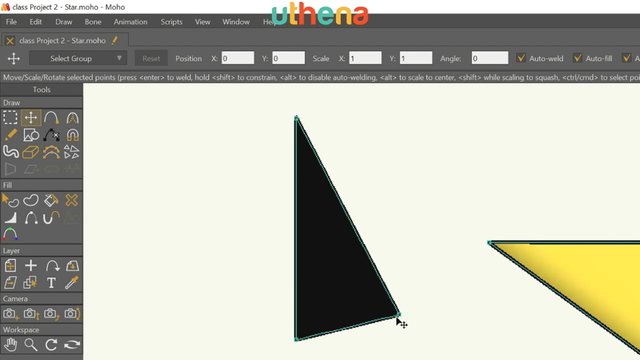
Once again, let's select the shape and this time we want to make it gold again. Well the simple way to make it gold, and to match the star color is to grab the eyedropper on the fill and drag it down over the star that makes it gold.
Now the other thing we want is to remove a line, because we don't want to see that as part of our nose. So let's go here and pick ‘Hide Edge’.
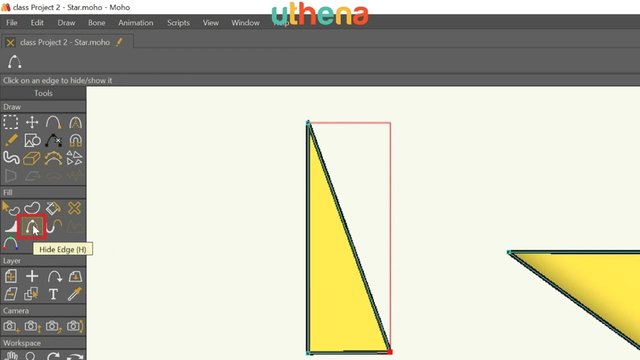
Come over and click on the edge that we don't want.
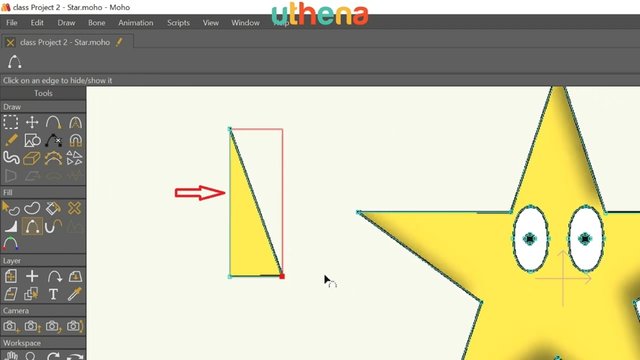
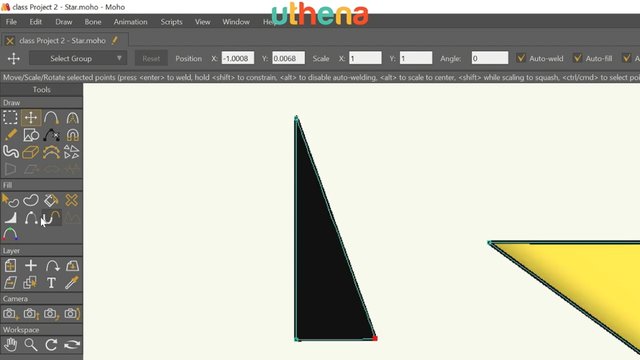
There now you won't see that thick line. Let's zoom out a little, drag the star into the center of the screen and use the ‘Transform’ tool to move our nose over onto the character. Wow, that's way too large.
Let's grab the lower left hand round button so that we can resize this triangle and then move it down into place. There we have a nose.
As the final drawing element, we're going to create a mouth.
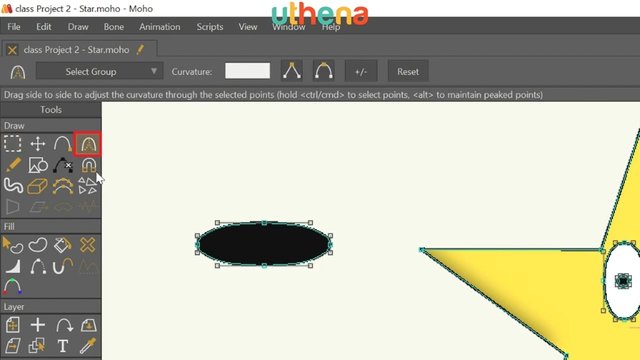
Let's go ahead to draw a shape again and select the ‘Oval’ tool. We'll pull out an oval about the size that we want, click ‘Select Shape’, click on the shape, make sure it's selected and then come over here and grab the eyedropper for fill and make the fill and stroke color the same.
Now we're going to shape this mouth. Click to make sure none of the points are selected with the ‘Select Points’ tool then click on the ‘Curvature’ tool.
Here we'll select the left side of the mouth and rather than have it rounded, we'll make it peaked by clicking the peak button.
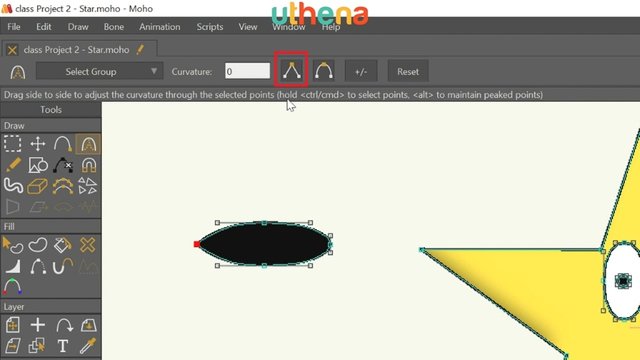
Then we'll go to the right mouth and make that peaked as well. There. This is become more mouth shaped.
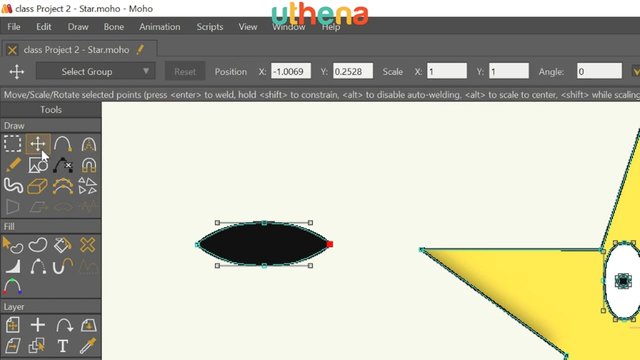
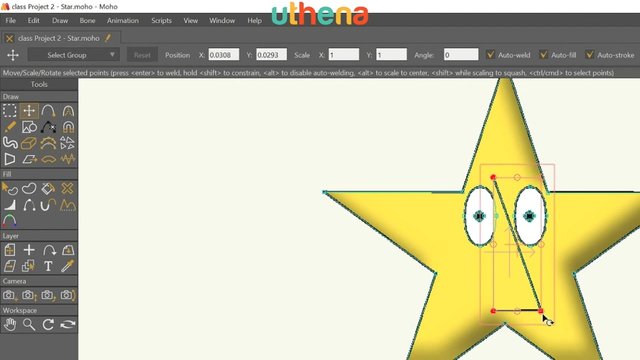
Now let's go to the ‘Transform Points’ tool and we'll take these points and drag them up so that we can make a smile.
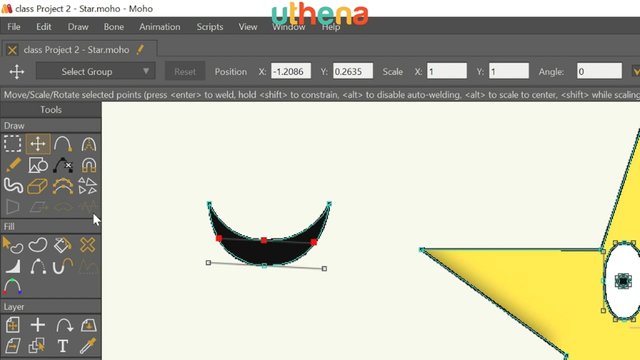
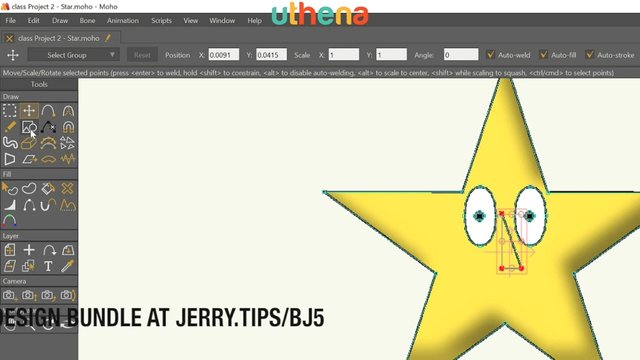
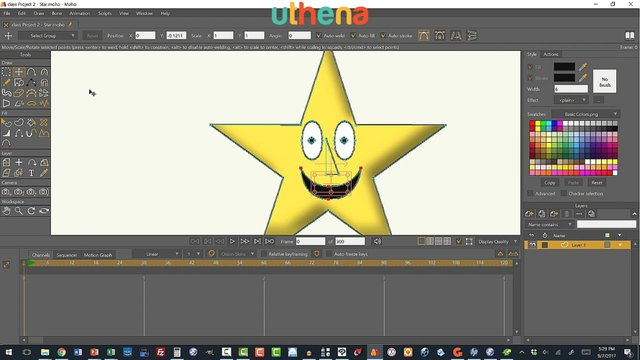
Now let's grab this point in the middle, pull it down so it isn't quite that large and use the transform tool clicking on the shape and clicking in the middle and not on the edge to drag that smile over into position, and there we have our smiling star.
WHERE TO SEE MORE.
Would you like to continue learning about How to Make 2D Animations and Illustrations Using Moho? If you are interested will you please buy the complete course, How to Make 2D Animations and Illustrations Using Moho, on the Uthena Education Platform..
You can also get the first three hour and a half of the course completely for free on YouTube.
Thank you for reading the blog post or watching the course on YouTube.
I love you.
You’re awesome.
Thank you very much for checking out How to Make 2D Animations and Illustrations Using Moho and I hope to see you again in the next blog post or video.
Love,
Jerry Banfield.
Posted from my blog with SteemPress : https://jerrybanfield.com/best-moho-animation-course-beginners-2019/
HMmmmmm, I like what its all about, and hope this help many thrive better
This post earned a total payout of 0.049$ and 0.037$ worth of author reward which was liquified using @likwid. To learn more.
Thanks so much
I like this post very much sir .thanks for sharing
Thank you most appreciated stay well steem on