Part 5 - Build Steem blockchain application with Vue.js: Passing data among components, state management via Vuex, and data persistent in Vue.js

Repository
Vue.js: https://github.com/vuejs/vue
What Will I Learn?
- How to pass data between parent and child components
- How to manage states by Vuex
- How to persist data in Vue.js application
Requirements
- A Node.js environment (Ubuntu 18 + Node.js is used in this tutorial)
- Basic HTML/CSS/Javascript knowledge
Difficulty
Basic level
Tutorial contents
In last tutorial, dynamic route and event handling has been discussed. A few components have been added. Now it is the time to think about how to pass information between components. The most basic way of passing data between components will be discussed first, e.g. using parameters and events between parent and child components. Then the limitations will be discussed and Vuex will be introduced to manage the states within the application. Furthermore, vuex-persist is discussed to have data stored in the local storage.
Passing data between parent and child components
Add three components
To demonstrate how to pass data between parent and child components, three components will be added:
- Settings is the parent component which will handle all events happening in the children components.
- PostSettings is a child component which will handle all settings related to posts/comments.
- ActivitySettings is a child component which will handle all activities settings.
First, add components/PostSettings.vue with the following content:
<template>
  <div>
    <h4>Post Settings</h4>
    <label for="number">Default number of posts/comments</label>
    <input name="number">
  </div>
</template>

<script>
export default {
  // Name of this component
  name: 'PostSettings'
}
</script>

<style scoped>
</style>
Second, add components/ActivitySettings.vue with the following content:
<template>
  <div>
    <h4>Activity Settings</h4>
  </div>
</template>

<script>

export default {
  name: 'ActivitySettings'
}
</script>

<style scoped>
</style>
Last, add components/Settings.vue with the following content:
<template>
  <div>
    <ActivitySettings></ActivitySettings>
    <hr/>
    <PostSettings></PostSettings>
  </div>
</template>

<script>
import ActivitySettings from './ActivitySettings'
import PostSettings from './PostSettings'

export default {
  // Name of this component
  name: 'Settings',
  components: {ActivitySettings, PostSettings}
}
</script>

<style scoped>
</style>
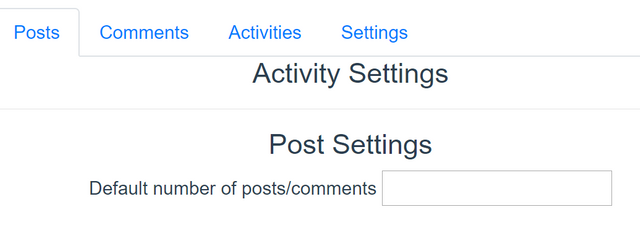
The application should look like:
Passing data from parent to child component
To pass data from parent to child component, firstly, some properties need to be defined in the child component, e.g. ‘operations’ is added to ActivitySettings.vue:
props: ['operations']
To display if the data is received properly, add this line in the template:
{{operations}}
More complex processing logic can be added in ActivitySettings component. But for now, that is enough to demonstrate how the child component receive the data passed from parent component.
Now, update parent component, e.g. add this line into parent component’s template:
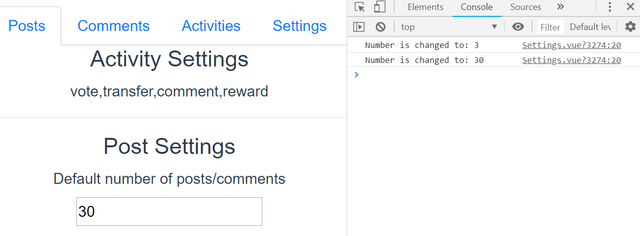
<ActivitySettings operations="vote,transfer,comment,reward"></ActivitySettings>
In the above code, ‘operations’ is the property name defined in the child component. The application should look like:

Passing data from child to parent component
To demonstrate how to emit data via event from child to parent component, first add ‘changed’ method to PostSettings component:
// This event handler will emit an event with data to parent component
changed: function (event) {
  this.$emit('default_number_changed', event.target.value)
}
In the above code, ‘default_number_changed’ is the event name and ‘event.target.value’ is the value to be passed to parent component.
Also, the event handler must bind to the input field, e.g.
<input @input="changed" name="number">
By this way, whenever the user provides any input, the ‘default_number_changed’ event will be emitted to parent component.
In parent component, e.g. Settings.vue, the following code needs to be added to receive the event:
<PostSettings @default_number_changed="handleChange"></PostSettings>
Also, add some processing logic:
methods: {
  handleChange: function (number) {
    console.log('Number is changed to: ' + number)
  }
}
Open the developer tool in the browser, the output should be seen as shown below:
State management via Vuex
As discussed in previous section, component properties and events can be used to pass information between parent and children components. However, when the application is getting bigger, it is very common to share data among components which do not have direct relationships. For example, in the demo application, in ‘Settings’ component, some users’ preferences will be stored there and these preferences need to be accessible by other components, e.g. Posts, Comments etc. The Settings component does not have a parent-child relationship with Posts and Comments. In this case, Vuex is a perfect choice to share data among these components.
Install Vuex
To use Vuex, first, run the following command to install vuex package and get it added into package.json
npm install --save vuex
Add Vuex store
Then create file: store/index.js with the following content:
import Vuex from 'vuex'
import Vue from 'vue'

// Declare that Vuex will be used to manage states
Vue.use(Vuex)

export default new Vuex.Store(
  // Declare the states need to be managed
  state: {
    default_number_of_posts: 10
  }
})
In the above code, after importing Vuex, ‘Vue.use(Vuex)’ must be used to let Vue know that Vuex is the state manager now. Then any states can be added to Vuex store and they will be available to other Vue components. In here, for demo purpose, only one state, e.g. ‘default_number_of_posts’ is used.
The state can be modified and retrieved by using mutations and getters, e.g.
mutations: {
  change (state, number) {
    state.default_number_of_posts = number
  }
},
getters: {
  default_number_of_posts: state => state.default_number_of_posts
}
Update main.js
Then ‘main.js’ needs to be updated to make a reference to the Vuex store. First import the file:
import store from './store'
And update the main Vue component to:
new Vue({
  el: '#app',
  store, // declare the 'store' will be used for state management
  router, // default router
  components: { App }, // the main component
  template: '<App/>' // This will load the template defined in App.vue
})
Access state from other components
Now, it is ready to share the state, e.g. ‘default_number_of_posts’ among components. First open components/Comments.vue and make the following change:
<template>
  <div>
    Default number of posts/comments:
    **{{ $store.getters.default_number_of_posts }}**
  </div>
</template>
The value of ‘default_number_of_posts’ will be displayed in Comments component.
Similarly, the default number of posts being loaded in Posts, e.g. change:
steem.api.getDiscussionsByAuthorBeforeDate(this.username, null, new Date().toISOString().split('.')[0], 10, function (err, result) {
to:
steem.api.getDiscussionsByAuthorBeforeDate(this.username, null, new Date().toISOString().split('.')[0], this.$store.getters.default_number_of_posts, function (err, result) {
Change state value
To store the value of state, ‘changed’ method in PostSettings component need to be updated:
methods: {
  // changed event handler will send the new value to Vuex store
  changed: function (event) {
    this.$store.commit('change', event.target.value)
  }
}
So, it is ready to test now. Change the default number of posts to ‘20’ and navigate to ‘Posts’ tab, the behaviour of Posts component will be changed!
Data persistent in Vue.js
In the previous section, Vuex has been discussed to share data among components. But, what will happen if the browser is closed, or the server is restarted? All data being saved to state by Vuex will be lost! The reasons is because that state management is a mechanism to store application’s states within the application’s lifecycle. If any information needs to be saved in the storage, some extra work needs to be done. In this case, vuex-persist can be used to store states to a storage, e.g. local storage within the browsers.
Install vuex-persist
First run this command to install ‘vuex-persist’ package:
npm install vuex-persist
Update store/index.js
Now ‘store/index.js’ needs to be updated:
import VuexPersist from 'vuex-persist'

Vue.use(Vuex)

const vuexPersist = new VuexPersist({
  key: 'vuedemo',
  storage: localStorage
})
While creating Vue store,
plugins: [vuexPersist.plugin]
Load demo application, and change default_number_of_posts to ‘5’, then close browser and restart webpack server. Access the demo application again, and the value of ‘default_number_of_posts’ is reloaded from local storage.
Curriculum
This is the 5th tutorial. More interesting topics will be covered in the following tutorials!
Previous tutorials
Part 1 - Build Steem blockchain application with Vue.js: installation and first demo
Part 2 - Build Steem blockchain application with Vue.js: components, computed properties and build/deployment process
Part 3 - Build Steem blockchain application with Vue.js: using Bootstrap, nav component, mixins, and first iteration of Posts component
Part 4 - Build Steem blockchain application with Vue.js: dynamic route, and event handling
Proof of Work Done
Source code for this tutorial: https://github.com/aa-feng/VuejsTutorial/tree/t05
Master branch of the source code (will be updated with ongoing tutorials): https://github.com/aa-feng/VuejsTutorial
The live demo of latest iteration: https://vuetutorials.aafeng.top
Thank you for your contribution @aafeng.
We've been reviewing your tutorial and suggest the following points below:
We suggest that in the next tutorial put a shorter title, your title of this contribution is very extensive.
At the end of your tutorial having a demo of your work is great, so the readers can experience what you have developed and have more insight than you built.
Thanks for following our suggestions from the previous tutorial, your contribution is much better.
Thank you for your work in developing this tutorial.
Looking forward to your upcoming tutorials.
Your contribution has been evaluated according to Utopian policies and guidelines, as well as a predefined set of questions pertaining to the category.
To view those questions and the relevant answers related to your post, click here.
Need help? Chat with us on Discord.
[utopian-moderator]
Thank you for your feedback, will take your suggestions in next tutorial.
Posted using Partiko Android
Thank you for your review, @portugalcoin! Keep up the good work!
Hey, @aafeng!
Thanks for contributing on Utopian.
We’re already looking forward to your next contribution!
Get higher incentives and support Utopian.io!
Simply set @utopian.pay as a 5% (or higher) payout beneficiary on your contribution post (via SteemPlus or Steeditor).
Want to chat? Join us on Discord https://discord.gg/h52nFrV.
Vote for Utopian Witness!
Hi @aafeng!
Your post was upvoted by @steem-ua, new Steem dApp, using UserAuthority for algorithmic post curation!
Your post is eligible for our upvote, thanks to our collaboration with @utopian-io!
Feel free to join our @steem-ua Discord server
Hi @aafeng!
Your post was upvoted by @steem-ua, new Steem dApp, using UserAuthority for algorithmic post curation!
Your post is eligible for our upvote, thanks to our collaboration with @utopian-io!
Feel free to join our @steem-ua Discord server