[React Native] 인스타그램 UI 만들기 #1

이번에는 리액트 네이티브(React Native)로 인스타그램 UI을 구현하는 포스팅입니다. 다른 앱을 따라 만들어 보는 것은 굉장히 재미있습니다.
구글에서 인스타그램 클론 코딩 강의를 찾아보니, 다른 개발자들이 올린 동영상 강의를 몇 개 찾을 수 있었습니다.
- Udemy 강좌: React-Native + Redux + Redux-Saga + INSTAGRAM Clone
- Nomad Coders 강좌: 인스타그램 클론 코딩
사실 위의 강의 2개는 유료입니다. 저처럼 가난한 개발자는 유료 강의도 가끔 듣지만, 무료 강의를 더 많이 이용합니다. 아래는 유튜브에 공개되어 있는 무료 강의입니다. 이 포스팅은 아래 강의를 듣고 정리한 내용입니다.
프로젝트 생성하기
동영상 강의에서는 라이브러리를 먼저 설치하고 프로젝트를 생성하지만, 저는 제 스타일로 프로젝트를 먼저 생성하고 시작합니다.
expo-cli를 이용하여 프로젝트를 생성합니다.
$ expo-cli init instagram-clone
$ cd instagram-clone
expo-cli가 없는 분들은 여기를 참고하세요.
그다음, UI 라이브러리를 설치합니다.
$ yarn add native-base @expo/vector-icons
yarn이 없으신 분들은 여기를 참고하세요.
그 다음은 네비게이션을 위한 라이브러리를 설치합니다.
$ yarn add react-navigation
첫 화면 MainScreen 만들기
Components 폴더를 생성합니다. 그리고 Components 폴더 아래에 MainScreen.js를 생성하고 아래와 같이 입력합니다.
import React, { Component } from 'react';
import { StyleSheet, Platform } from 'react-native';

export default class App extends Component {
  render() {
    return (
      <View style={styles.container}>
        <Text>MainScreen</Text>
      </View>
    );
  }
}

const styles = StyleSheet.create({
  container: {
    flex: 1,
    alignItems: 'center',
    justifyContent: 'center',
  },
});
createStackNavigator 생성하기
App.js 파일을 열어서 수정합니다. App.js 파일 상단에 react-navigation와 방금 만든 ./Components/MainScreen 를 import 합니다. createStackNavigator() 함수를 사용하여 AppStackNavigator를 생성합니다. 그리고 첫 번째 Navigator에 MainScreen 컴포넌트를 등록합니다.
import React, { Component } from 'react';
import { StyleSheet, Text, View } from 'react-native';
import { createStackNavigator, createAppContainer } from 'react-navigation';
import MainScreen from './Components/MainScreen';

const AppStackNavigator = createStackNavigator({
  Main:{
    screen: MainScreen // MainScreen 컴포넌트를 네비게이터에 등록
  }
});

export default createAppContainer(AppStackNavigator);
상단 네비게이션 구현하기
native-base에서 Icon을 import하고, navigationOptions을 생성합니다. navigationOptions에는 왼쪽에 보여질 ios-camera 아이콘과 오른쪽에 보여질 ios-send 아이콘을 설정합니다.
import React, { Component } from 'react';
import { StyleSheet, Text, View } from 'react-native';
import { Icon } from 'native-base'; // 추가된 코드

export default class MainScreen extends Component {

  // navigationOptions 코드 추가
  static navigationOptions = {
    headerLeft: <Icon name='ios-camera' style={{ paddingLeft:10 }}/>,
    title: 'Instagram',
    headerRight: <Icon name='ios-send' style={{ paddingRight:10 }}/>,
  }

  render() {
    return (
      <View style={styles.container}>
        <Text>MainScreen</Text>
      </View>
    );
  }
}

// 이하 코드 생략
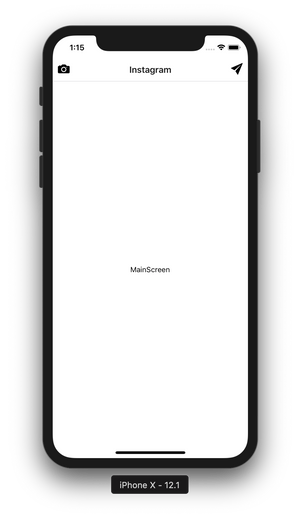
여기까지 작업한 화면입니다. 상단에 카메라와 비행기 아이콘이 보이나요?
탭 네비게이터 구현하기
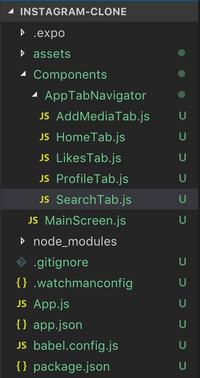
Components 폴더 아래에 AppTabNavigator 폴더를 생성합니다. 그리고 AppTabNavigator 폴더 아래에 5개의 파일을 생성합니다. HomeTab.js, SearchTab.js, AddMediaTab.js, LikesTab.js, ProfileTab.js 파일을 각각 생성합니다. 생성되는 파일의 내용은 아래와 비슷하게 입력합니다.
import React, { Component } from 'react';
import { View, Text, StyleSheet } from 'react-native';

export default class HomeTab extends Component {
    render() {
        return (
            <View style={style.container}>
                <Text>HomeTab</Text>
            </View>
        );
    }
}

const style = StyleSheet.create({
    container: {
        flex: 1,
        alignItems: 'center',
        justifyContent: 'center',
    }
});
우리가 생성한 파일 구조는 아래와 같습니다.
그 다음은 MainScreen.js 파일을 수정합니다. react-navigation와 AppTabNavigator 컴포넌트들을 import 합니다. 그리고 하단에 보여줄 탭네비게이터 AppTabNavigator를 생성합니다.
// ... 일부 import 코드 생략 ...

import { createBottomTabNavigator, createAppContainer } from 'react-navigation';

// 하단 탭에 들어갈 컴포넌트들
import HomeTab from './AppTabNavigator/HomeTab'
import SearchTab from './AppTabNavigator/SearchTab'
import AddMediaTab from './AppTabNavigator/AddMediaTab'
import LikesTab from './AppTabNavigator/LikesTab'
import ProfileTab from './AppTabNavigator/ProfileTab'

// 하단 탭 네비게이터 생성
const AppTabNavigator = createBottomTabNavigator({
  HomeTab: { screen: HomeTab },
  SearchTab: { screen: SearchTab },
  AddMediaTab: { screen: AddMediaTab },
  LikesTab: { screen: LikesTab },
  ProfileTab: { screen: ProfileTab }
});

const AppTabContainet = createAppContainer(AppTabNavigator);

export default class MainScreen extends Component {

 // navigationOptions 코드 생략

  render() {
    return <AppTabContainet/>; // AppTabContainet 컴포넌트를 리턴한다.
  }
}

// ... 이하 코드 생략 ...
동영상 강좌에서는
createTabNavigator를 사용하여 하단 탭 네비게이터를 구현했습니다. 하지만 현재는createTabNavigator가 deprecated 되었습니다. 그래서createBottomTabNavigator또는createMaterialTopTabNavigator를 사용해야 합니다.
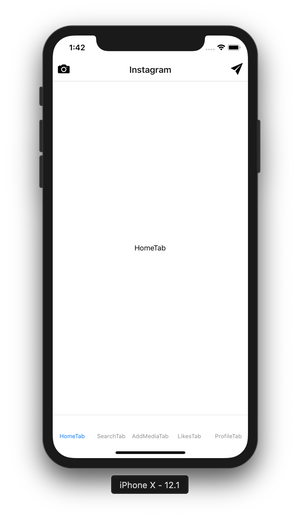
여기까지 작업한 화면입니다.
탭 네비게이터에 아이콘 넣기
HomeTab.js 파일을 수정합니다. navigationOptions를 생성하고, Icon을 입력합니다.
// ... 일부 import 코드 생략 ...

import { Icon } from 'native-base';

export default class HomeTab extends Component {

    static navigationOptions = {
        tabBarIcon: ({ tintColor }) => (
            <Icon name='ios-home' style={{ color: tintColor }} />
        )
    }

// ... 이하 코드 생략 ...
이어서 SearchTab.js, AddMediaTab.js, LikesTab.js, ProfileTab.js 파일도 수정합니다. 파일에 아이콘을 각각 'ios-search', 'ios-add-circle', 'ios-heart', 'person'로 입력합니다. 각 파일 내용은 깃허브에 업로드된 파일을 참고하세요.
여기까지 작업한 화면입니다.

탭 네비게이터에 스와이프와 애니매이션 넣기
스와이프와 애니매이션을 넣기 위해서는 createMaterialTopTabNavigator를 사용해야 합니다. 앞에서 createBottomTabNavigator로 구현했던 네비게이터를 createMaterialTopTabNavigator로 수정합니다. 그리고 네비게이터에 옵션을 설정합니다. createMaterialTopTabNavigator 옵션에 대한 자세한 설명은 TabNavigatorConfig 문서를 참고하세요.
// ... 일부 import 코드 생략 ...

// createBottomTabNavigator를 createMaterialTopTabNavigator로 수정
import { createMaterialTopTabNavigator, createAppContainer } from 'react-navigation';

const AppTabNavigator = createMaterialTopTabNavigator({
  HomeTab:{ screen: HomeTab },
  Search:{ screen: SearchTab },
  AddMedia:{ screen: AddMediaTab },
  Likes:{ screen: LikesTab },
  Profile:{ screen: ProfileTab }
}, {
  animationEnabled: true,
  swipeEnabled: true,
  tabBarPosition: "bottom",
  tabBarOptions: {
    style: {
      ...Platform.select({
        ios:{
          backgroundColor:'white',
        }
      })
    },
    iconStyle: { height: 100 },
    activeTintColor: '#000',
    inactiveTintColor: '#d1cece',
    upperCaseLabel: false,
    showLabel: false,
    showIcon: true,
  }
});

// ... 이하 코드 생략 ...
여기까지 작업한 화면입니다.
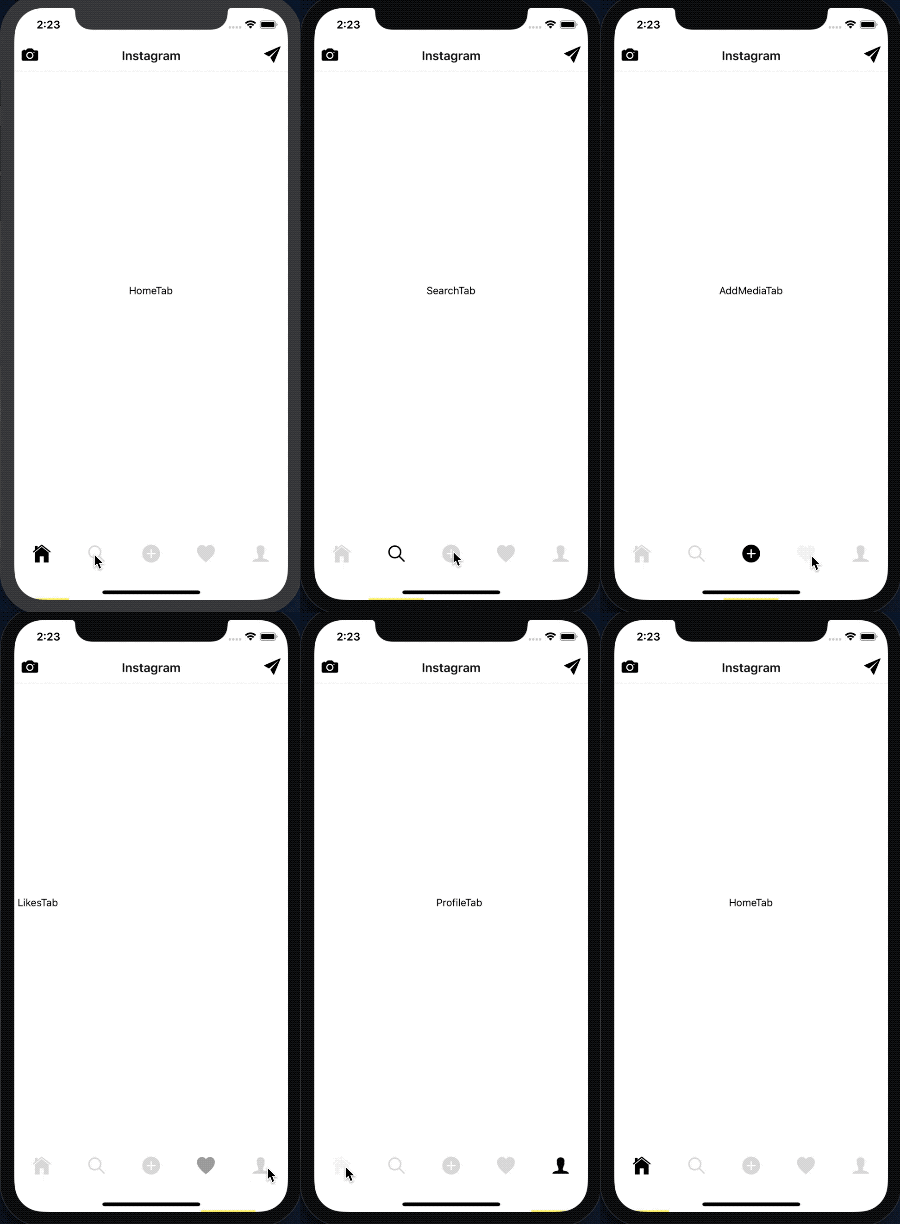
이제 하단 탭 아이콘을 클릭하면 페이지 슬라이드 애니메이션이 발생합니다.
작업한 코드는 모두 깃허브에 업로드되어 있습니다.
https://github.com/anpigon/rn_instagram_clone
여기까지 읽어주셔서 감사합니다.
시리즈
- [React Native] 인스타그램 UI 만들기 #1
- [React Native] 인스타그램 UI 만들기 #2
- [React Native] 인스타그램 UI 만들기 #3
- [React Native] 인스타그램 UI 만들기 #4
- [React Native] 인스타그램 UI 만들기 #5
Sponsored ( Powered by dclick )
[서평] 의료혁명 치료혁명 자연정혈요법 실습편
이 책을 한 시간만 읽으면 의사가 못 고치는 병도 스스로 쉽게 고친다. ★장의 어혈을 제거하는...
짱짱맨 호출에 응답하여 보팅하였습니다. 즐거운 주말 보내시기를 바랍니다.
Congratulations @anpigon! You have completed the following achievement on the Steem blockchain and have been rewarded with new badge(s) :
Click here to view your Board
If you no longer want to receive notifications, reply to this comment with the word
STOPTo support your work, I also upvoted your post!
크..........영알못이라 유튭 플레이를 눌렀더니 현기증이....크흡..ㅠㅠ
저도 영알못이에요. ㅠㅠ 하지만 해당 동영상은 대부분이 개발 용어라서 어렴풋이 알아듣고 있습니다. 그리고 잘 이해가 안되는 부분은 몇번이고 돌려보고 있어요. 그래서 9분 영상인데 다 듣는데 30분 이상 걸립니다. 그리고 영어 발음이 정말 인상적입니다. 듣다보면 빅뱅이론의 라지와 심슨가족의 아포가 생각납니다. ㅎㅎ
오..라지! ㅋㅋㅋ 빅뱅이론 애청자인뎅! 라지의 발음이 생각나네염...ㅋㅋㅋㅋㅋ
와 멋지네요!
저기에 스팀 컨텐트가 들어간다고 상상하니 멋진거같아요. !!
Ui가 되게 깔끔하네요.
인스타그램을 따라한 스팀잇 모바일앱이 있으면 좋겠어요. ㅋ
저는 리액트 네이티브 공부하고 싶어서 작은 프로젝트 하나 하면서 공부하고있어요.
리액트 네이티브로 스팀, 스팀커넥트 연결하고
이미지를 스팀잇에 올리는거까지 한번 해봤는데요.
안피곤님처럼 글쓰기가 어렵네요
잘 읽고 갑니다.
스팀커넥트와 이미지 업로드까지 구현했으면 스팀잇앱을 만드는 중이군요? 조만간 공개될 스팀잇 앱이 기대됩니다. 만드는 과정을 포스팅을 해주면 더 재미있겠지만, 글쓰기가 어렵다고 하시니
조금 아쉽네요. 그리고 저도 리액트 네이티브 공부를 좀 더 하고 나서 모바일 앱을 만들어 볼까 합니다. ㅎㅎ
조금씩 정리를 해서 올려볼게요 ㅎㅎ 제 이번년도 목표에는 글 잘쓰기도 있거든요! ㅋㅋ
Hi @anpigon!
Your post was upvoted by @steem-ua, new Steem dApp, using UserAuthority for algorithmic post curation!
Your UA account score is currently 2.854 which ranks you at #12026 across all Steem accounts.
Your rank has dropped 10 places in the last three days (old rank 12016).
In our last Algorithmic Curation Round, consisting of 210 contributions, your post is ranked at #132.
Evaluation of your UA score:
Feel free to join our @steem-ua Discord server
안피곤님 강의듣고 이 앱 만들기 도전합니다. ㅎㅎㅎ
언젠가 5일차에 닿아서 다 만들었습니다. 하고 댓글 달길 바랍니다. ㅋㅋㅋㅋㅋㅋㅋㅋㅋㅋ
유로보틱스님 관심끌기에 성공했네요. ㅎㅎ 배워서 멋진 앱을 만들어 보시기 바랍니다. 기대하겠습니다.
ㅠㅅㅠ 근데 지금 코드를 따라치다가 난관에 봉착했습니다. 제 PC 윈도우라서 ㅋㅋㅋㅋ static navigationOptions ={headerLeft:<Icon name='ios-camera' 앗. ios가 등장하는군요. ㅋㅋㅋㅋ 이런. ㅋㅋㅋㅋ
그리고 제 글을 리스팀 해주셔서 감사합니다. 덕분에 더 많은 분이 제 글을 볼 수 있겠네요.
열심히 배워볼려고 리스팀 했습니다. ㅎㅎㅎ 예. 감사합니다. ㅎㅎㅎ