A Walkthrough of Popular Monero Wallets.
Monero is one of the most widely used cryptocurrencies, and its market cap is a testament to that. The blockchain’s ability to enable private transactions provides a unique digital value transfer mechanism. Moreover, as the blockchain utilizes a proof-of-work consensus mechanism, it remains true to the foundational nature of blockchain technology: decentralization.
Given the popularity of Monero, XMR is a cryptocurrency commonly owned by members of the Crypto community. As is the case with any cryptocurrency, the security of any XMR address’s private key is of paramount importance.
As XMR can be bought at most major cryptocurrency exchanges, a vast portion of the coins’ speculators retain their holdings within their exchange wallets. Not only is this risky as the exchange becomes the custodian of the cryptocurrency, but it also doesn’t align with the privacy and decentralization principles of the Monero blockchain, its founders, and its community.
Thus, the coin’s true hodlers opt for either paper wallets or hardware wallets. This piece dives into the user experience of storing and transacting XMR through its widely used secure storage options.

Paper Wallet
The acquisition of an XMR paper wallet is somewhat similar to the paper wallet acquisition of BTC or ETH. Paper wallets are secure as the private keys are entirely in control of the wallet holder. The drawback is that XMR paper wallets require the holder to store either a mnemonic seed or private key. Thus, the security of an XMR paper wallet is only as good as the security of the means utilized to protect the mnemonic seed or private key. A vast portion of people either keep it in a custodian’s storage (like bank safe), which makes the wallet seizable, or in a household safe which can expose the wallet to seizure or even potential theft, not to mention the risk of fire, flood, or other disaster that can destroy the wallet.
Irrespective, those who are confident in being able to properly secure the mnemonic seed or private key may opt for a paper wallet for storage.
Set-up
To get started, holders need to download an XMR wallet generator from Github. The website, https://moneroaddress.org/, provides real-time updated redirects to XMR wallet generator’s Github download. Once the wallet generator is downloaded, XMR holders must disconnect their devices from the internet. Moreover, it is of critical importance that the device being used is free of malware.
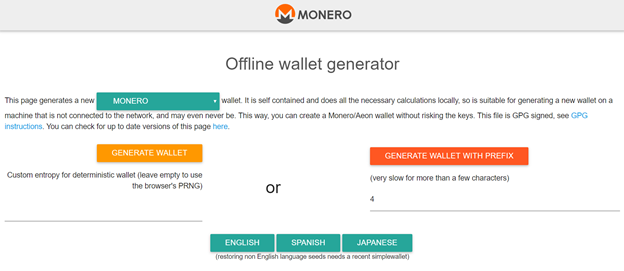
Once offline, XMR holders can generate a wallet by clicking on the “generate wallet” button. The action will result in the provision of a public address, which will be used for receiving funds, a mnemonic seed, and private keys (spend key and view key).
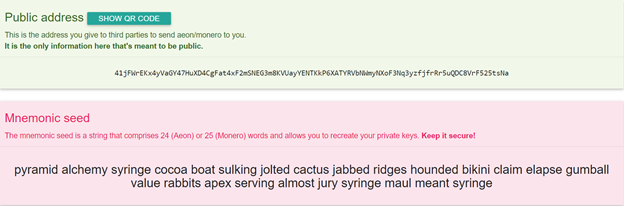
The mnemonic seed can be used to recover the private keys at any point and thus the seed must be kept secure and out of reach/sight of everyone. The wallet generator also provides the raw private keys but their storage is optional. Having to store the seed plus private keys is an added burden; thus, the storage of the keys is optional.
Transacting
Paper wallets, also dubbed as cold storage, are not meant to facilitate the spending of cryptocurrencies—at least not in an efficient manner.
Naturally, as the name implies, cold storage is meant to prioritize storage and thus transactability is sacrificed. Whenever an XMR holder intends to transfer XMR from a paper wallet, the mnemonic seed and/or private keys would be exposed to some form of online interface, thereby nullifying the security of the wallet. All unspent XMR would then have to be transferred to a new paper wallet.
Thus, XMR paper wallets are an option for long-term storage of the cryptocurrency, but not very suitable for a holder that needs to regularly transfer XMR funds, which is the innate purpose of a currency. Overall, because so many different steps are required to be performed with exact precision a paper wallet would also not be recommended for inexperienced users who are very likely to lose funds due to user error.
XMR Hardware Wallets (Ledger)
Given the lack of ease in transacting XMR through paper wallets, many holders opt for hardware wallets, particularly Ledger. Hardware wallets, like Ledger, store private keys. Note that hardware wallets do not store the cryptocurrency; the coins always remain on the blockchain. Hardware wallets store private keys that allow access to the funds held on the blockchain on a specific address.
Given that a Ledger, like any hardware wallet, stores private keys, ensuring no one gets a hold of the physical device is of paramount importance.
As the keys are stored within, anyone or any entity that gets a hold of a Ledger may be able to acquire the private keys held within. Thus, any holders using a Ledger wallet must keep the physical device out of others’ reach at all times.
Set-up
Just connecting the Ledger wallet to the computer and then heading over to Ledger Live to download the XMR application for fund storage is not an option for many XMR holders. The Ledger Live platform presently does not have proper support for the Monero application (read: wallet). Thus, storing XMR on a Ledger can be a lengthy process for some.
To get started, connect the Ledger to a computer. Once you’ve entered your pin on the Ledger, confirm the hardware wallet’s connection to your Ledger Live; in case of a Ledger Nano, this is done by simultaneously pressing the two buttons on the wallet. Interestingly, the Monero application does appear in the Live Manager, but for many users, any attempt to install the application results in the following message:
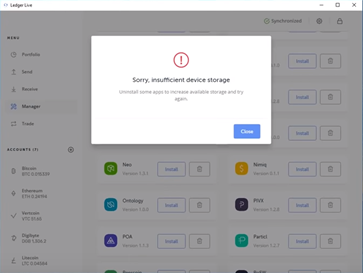
If you are one of the few who are able to proceed without getting an error, you saved a lot of time.
For the rest, even if you were to uninstall some applications on the wallet, the error message will still be prompted whenever an attempt to install the Monero application is made. The only solution is to uninstall all applications on the wallet and then disconnected from the computer. Worry not, as removing the applications does not remove the private keys held within the device and thus the funds are safe. Now, reconnect the wallet, enter the pin code, and approve the synchronization with Ledger Live. With an empty device, the Monero application can be downloaded for everyone.
Transacting
If you have the latest Ledger device, it will have an in-built account support for receiving/sending XMR.
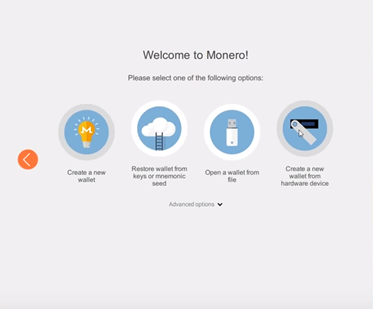
For anyone who does not have latest Ledger, once the Monero application is downloaded, users have to conquer a hurdle: downloading account support. To acquire account support, head to https://getmonero.org, and download the Monero desktop wallet. Once downloaded, launch the wallet and you’ll be prompted to create a wallet from various options, including a Ledger.
Click the “new wallet from hardware device” option. As long as the Monero application is on the Ledger hardware wallet, the Monero desktop wallet will be able to connect to the Ledger wallet. You’ll be prompted to set up a wallet name and this will have to be confirmed through the physical device.
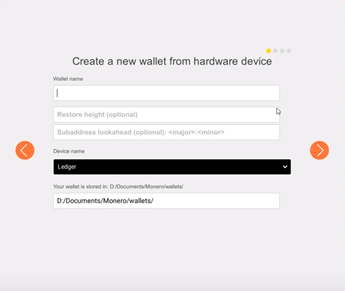
Once you’ve chosen a wallet name and confirmed it on the Ledger, you won’t be given any seed as it’s already stored on the Ledger. You’d instead be directed to the wallet dashboard.
To fully access the wallet, network synchronization must be established. This takes a while, but once its complete, the Monero desktop wallet will function as the dashboard for those who do not use the latest Ledger wallet. Irrespective of whether you use the desktop wallet or the live Ledger Live dashboard for XMR, you’ll now be able to send and receive XMR.
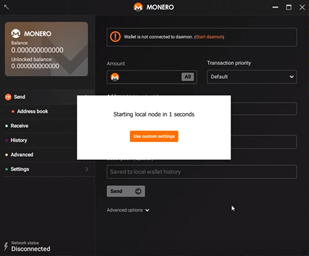
XMR holders who have the latest Ledger device can make transactions through the Ledger Live. On the Ledger Live, open the “Send” tab. Now, enter the amount to be sent and the transaction priority (pay network fees). Once the receiving address is entered, users will have to approve the transaction with the Ledger hardware wallet.
By pressing the buttons on the physical device, users will, on by one, approve the fee, the amount to be transferred, and the receiving address. Once the transaction details are approved, press Ok on the Ledger Live to proceed with the transfer.
For those who do not have the latest Ledger device, you’ll have to proceed with a transfer from the desktop wallet. The process is similar as you’ll have to choose the “Send” button on the Monero desktop wallet. Next, you’ll be prompted to choose the receiving address, amount to be spent, and the network fee. Once you send the transfer, it’ll have to be confirmed on the Ledger device.
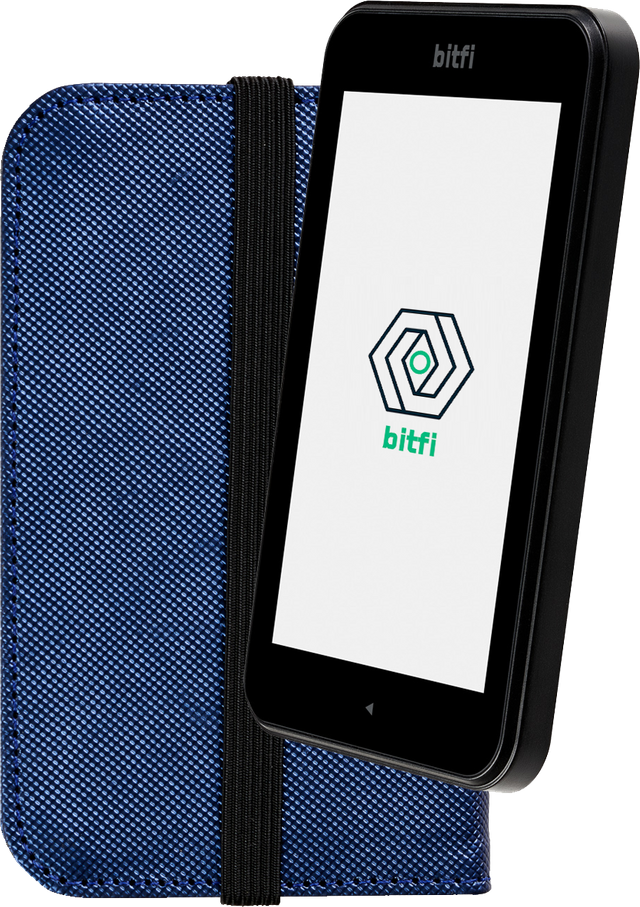
Bitfi
Bitfi is a private key generator technology that serves as a new hardware wallet solution. Unlike other hardware wallets, Bitfi has a key advantageous distinction: Bitfi does not store private keys. Thus, even if some one or some entity (i.e. government) gets physical access to a Bitfi device, they will be unable to access the private keys as the device does not have them.
When a transaction is made, the device operates an algorithmic calculation to generate a key which comes into existence for less than a second and the signals approval to the blockchain (the private key itself is never transmitted out of device). The coins held on the Bitfi user’s address are then transferred to the target address.
Set-up
Monero is one of the native-supported blockchains on Bitfi and therefore there is no download, install, or external application involved. To store XMR on a Bitfi, XMR holders simply need to have a Bitfi wallet and that’s it. There is actually nothing to set-up and you can just start using it right away.
Transacting
To receive XMR, users can either sign-in to the Dashboard or tap the “payment addresses” option on the Bitfi device. This will display to them their public XMR address and QR code which can be used to receive funds.
To send funds, users will have to use the Dashboard to initiate the transaction which is then approved by user on the Bitfi device. After clicking the “send” tab in the Dashboard, users will be presented with the following prompt:
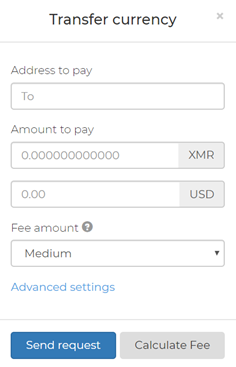
XMR holders need to simply enter the receiving address, amount to pay, and preferred network fee. After the send button is pressed, the Bitfi device will require a transaction approval through the entry of the salt and passphrase.
Once the transaction is approved, funds will be transferred.
Summary
While Monero paper wallets are a good option for long-term storage, they require a strong focus on mnemonic seed security and have little facilitation for regular transactional needs as a new paper wallet would need to be setup after each payment. Thus, most XMR holders who value the security of their funds opt for hardware wallets.
Users who have the latest Ledger device have a limited number of steps to set-up XMR support on the wallet; people who do not have the most recent Ledger wallet will have to use the Ledger device in coordination with a desktop XMR wallet in order to set-up their account and make payments. Meanwhile, a Bitfi device comes with native support for Monero and is immediately available for XMR payments, making it the most convenient secure wallet for XMR holders with the most intuitive interface.


Connect with me:
Crypto News Crypto Airdrops ICO List Blockchain Lawyers

im using QT since ages:)
New technologies are coming in the digital wallet field, they are improving the digital payment methods.
Wow
http://fnd.us/61TxE2?ref=sh_67zLu3
I saved this in my fav tab, this will come in handy i am sure! Wooo monero!
Greetings @hatu
The security of the keys, as well as being able to use them in a safe way, has become the challenge for the hardware and software companies. Excellent research work, which gives the Steemit community information of great educational value.I just got my portfolio down to 5 coins. I need a privacy coin so monero may be the one for me.
Monero has definately gained a lot of popularity in the past few months and it is about tkme some serious developments around it should start surfacing. Great article and thanks for the simplicity of monero wallets all in one.
scash!tip 100
⚡$$$ Tipped @evanpetzer
⚡100.000 SWIFT! If you don't know how I work, click here! Currently the price ofSwiftCashin the market is$0.003 USDperSWIFT. Current value of the tip is$0.300 USD. To find out more aboutSwiftCash, please read our whitepaper!Monero is definitely a strong coin due to its core structure. To have anonymity "I think with 3 ring signature" (Don't quote me) has virtually an impossible way to keep user's anonymous. With that said good post and keep up the good work.
I use cakewallett on my IOS device and really like it. thanks for the info
I mine sumokoin before where I was able to mine some of it using my laptop. Sumokoin is known to be the fork of monero.
Awesome information about Monero! Many people using XMR already, and I recommend the paper wallet indeed!