Image Recognition With Sipeed MaiX and Arduino IDE/Micropython
I already wrote one article on how to run OpenMV demos on Sipeed Maix Bit and also did a video of object detection demo with this board. One of the many questions people have asked is - how can I recognize an object that the neural network is not trained for? In other words how to make your own image classifier and run it with hardware acceleration.
This is an understandable question, since for your project you probably don't need to recognize some generic objects, like cats and dogs and airplanes. You want to recognize something specific, for example, a breed of the dog for that automatic pet door, or a plant species for sorting, or any other exiting applications you can think about!
I got you! In this article I will teach you how to create your own custom image classifier with transfer learning in Keras, convert the trained model to .kmodel format and run it on Sipeed board (can be any board, Bit/Dock or Go) using Micropython or Arduino IDE. And only your imagination will be the limit to tasks you can do with this knowledge.
UPDATE MAY 2020 : Seeing how my article and video on Image Recognition with K210 boards are still very popular and among top results on YouTube and Google, I decided to update the article to include the information about aXeleRate, Keras-based framework for AI on the Edge I develop.
aXeleRate, essentially, is based off the collection of scripts I used for training image recognition/object detection models - combined into a single framework and optimized for workflow on Google Colab. It is more convenient to use and more up to date.
Below is archived old version of the article. For the new version, please follow to here
Step 1: CNN and Transfer Learning: Some Theory
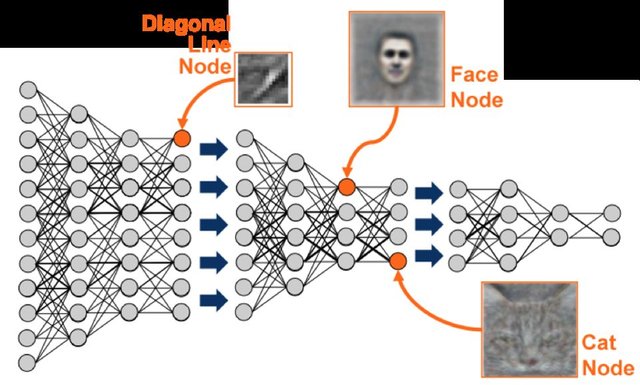
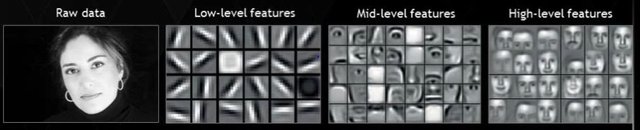
Convolutional Neural Networks or CNN is a class of deep neural networks, most commonly applied to analyzing visual imagery. There is a lot of literature on the internet on the topic and I'll give some links in the last part of the article. In short, you can think of CNN as a series of filters, applied to the image, each filter looking for a specific feature in the image - on the lower convolutional layers the features are usually lines and simple shapes and on the higher layers the features can be more specific, e.g. body parts, specific textures, parts of animals or plants, etc. A presence of certain set of features can give us a clue to what the object in the image might be. Whiskers, two eyes and a black nose? Must be cat! Green leaves, a tree trunk? Looks like a tree!
I hope you get the idea about the working principle of CNN now. Normally a deep neural network needs thousands of images and hours of training time(depends on the hardware you are using for training) to "develop" filters that are useful for recognizing the types of objects you want. But there is a shortcut.
A model trained to recognize a lot of different common objects(cats, dogs, house appliances, transport, etc) already has a lot of those useful filters "developed", so we don't need it to learn recognizing the basic shapes and parts of the objects again. We can just re-train the last few layers of the network to recognize specific classes of objects, that are important for us. This is called "transfer learning". You need significantly much less training data and compute time with transfer learning, since you are only training last few layers of the network, composed maybe of few hundred neurons.
Sounds awesome, right? Let's see how to implement it.
Step 2: Prepare Your Environment

My working environment is Ubuntu 16.04, 64bit. You can use Virtual machine to run Ubuntu image since we will not use GPU for training. With some modifications you can also run the training script on Windows, but for model conversion you will need to use Linux system. So, preferable environment for you to execute this tutorial is Ubuntu 16.04, running natively or in virtual machine.
Let's start by installing Miniconda, which is environment manager for Python. We will create isolated environment, so we won't accidentally change anything in your system Python environment.
Download the installer here
After installation is complete, create a new environment and install the necessary packages:
conda create -n ml python=3.6 tensorflow=1.12 keras pillow numpy
Let's activate the new environment
conda activate ml
A prefix before your bash shell will appear with the name of the environment, indicating that you work now in that environment.
Step 3: Re-training Script Explanation
Clone my github repository for this article from here .
Let's start by doing a quick sanity check and see if our default MobileNet model can identify objects we are interested in. Execute test.py from cloned github repo. It will download MobileNet pre-trained model from the internet and run the inference on three images provided. Let's see the results!
Hm... Okay, it can identify German shepherd dog correctly, but it seems to think that Santa is a sock with 0.22 confidence score and Arduino Uno is a modem. Low confidence scores is model's way of telling you, that it is basically clueless about what the object is. Now it is time to do some transfer learning.
In cloned github repo folder you can see file named mbnet_kers.py. This is our training script. Let's examine it's content.
NB! The script is intentionally very basic. I could have made it more user-friendly by adding argparse arguments, such as path to images, number of epochs, image size, etc. Instead I chose to keep it very simple, so it would be easy for relative beginners in Python and ML to understand and modify it.
As usual we start by importing all the necessary packages.
def prepare_image(file) function takes care of image preprocessing(resizing and converting to numpy array) for sample images.
base_model=keras.applications.mobilenet.MobileNet(input_shape=(128, 128, 3), alpha = 0.75,depth_multiplier = 1, dropout = 0.001,include_top = False, weights = "imagenet", classes = 1000)
This line imports a MobileNet v1 model with weights pre-trained on imagenet dataset without the top of the model included - the top of the model takes care of final classification of detected features into class probability. Since we want the model to recognize new classes, we are going to import just the base model and create a new "top" for it, which we will train on our images.
x=base_model.output<br>x=GlobalAveragePooling2D()(x)
x=Dense(100,activation='relu')(x) #we add dense layers so that the model can learn more complex functions and classify for better results.
x=Dropout(0.5)(x)
x=Dense(50,activation='relu')(x) #dense layer 3
preds=Dense(2,activation='softmax')(x) #final layer with softmax activation
model=Model(inputs=base_model.input,outputs=preds)
This is exactly what we are doing here. We add a few layers on top of the base model with Dropout to prevent overfitting. Note that number of neurons in the last layer(called "preds") depends on the number of classes you want to recognize. In my case it's 2.
for layer in model.layers[:86]:<br> layer.trainable=False
for layer in model.layers[86:]:
    layer.trainable=True
Here we set the layers of base model to "not trainable", meaning their weights will NOT change during the training.
train_datagen=ImageDataGenerator(preprocessing_function=preprocess_input) #included in our dependencies
train_generator=train_datagen.flow_from_directory('/images',target_size=(128,128), color_mode='rgb',batch_size=32,class_mode='categorical', shuffle=True)
Those two lines conveniently take care of preprocessing images from our training directory(/images) for us.
model.fit_generator(generator=train_generator,steps_per_epoch=step_size_train,epochs=10)
Here is the line that starts the actual training process for 10 epochs.
model.save('my_model.h5')
After training we save the model in current folder.
preprocessed_image = prepare_image('24.jpg')<br>predictions_santa = model.predict(preprocessed_image)
print("Santa")
print(predictions_santa[0][1]*100)
print("Uno")
print(predictions_santa[0][0]*100)
preprocessed_image = prepare_image('48.jpg')
predictions_uno = model.predict(preprocessed_image)
print("Santa")
print(predictions_uno[0][1]*100)
print("Uno")
print(predictions_uno[0][0]*100)
Finally we test the model on our test images to see how well it performs on the images it hasn't seen.
Step 4: Re-train the Model, Convert Keras Model to Kmodel
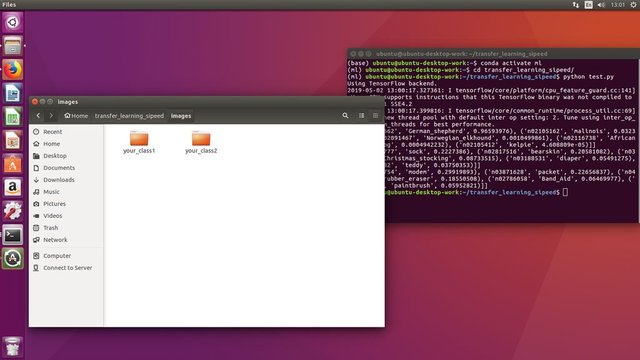
For this toy example we will be training the model to recognize Santa Claus and Arduino Uno. Obviously you can choose other classes. Put the images from different classes into separate folders in /images directory(e.g. 100 images of Santa to santa folder and 100 images of arduino to arduino folder).
Run the training script with
python mbnet_kers.py
Whoa, that was fast. 10 epochs training takes about 2 minutes on my old workstation and the accuracy is pretty good. Now, with your images, mileage may wary. There is no silver bullet when it comes to hyperparameters in machine learning, but I recommend you to tweak image size(128x128 pixels is pretty small, the higher the better), number of layers and their width in the top of the network, number of images in training dataset(the more the better, make sure they are representative of that particular class!) and the number of training epochs.
Next we will convert our Keras model(.h5) to Tensorflow lite model(.tflite) and finally to .kmodel format.
tflite_convert --output_file=model.tflite \ --keras_model_file=my_model.h5
this will use tensorflow command line tool to convert your keras model to tflite format.
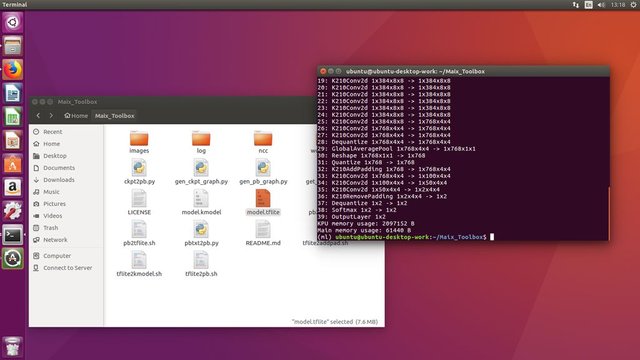
After that clone Maix toolbox repository and from repository directory execute following command in terminal
./tflite2kmodel.sh model.tflite
If the conversion was successful you will see output similar to the one above.
Now to the last step, actually running our model on Sipeed hardware!
Step 5: Run the Model on Sipeed Maix Bit
There are two ways to run the model you have now on Sipeed Maix hardware: micropython firmware and Arduino IDE. Micropython hardware is easier to use, but it occupies significant portion of available memory, so there is less space left for the model. Arduino IDE is basically C code, which is much more efficient and has smaller memory footprint. My model is just 1.9Mb, so both options work for it. You can use models as large as 2.9 Mb with Micropython, for anything larger you need to consider using Arduino IDE.
Download OpenMV IDE from here and minimal micropython firmware from here.
Burn the firmware with kflash,py tool:
python3 kflash.py maixpy.bin
Copy labels.txt and model.kmodel to the root of an SD card and insert SD card into Sipeed Maix Bit.
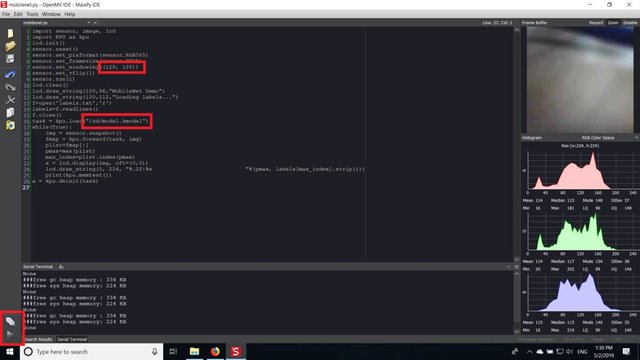
Open OpenMV IDE and press the connect button. Open mobilenet.py script and press Start button. You should be seeing a live stream from camera and if you open Serial Terminal you will the top image recognition result with the confidence score!
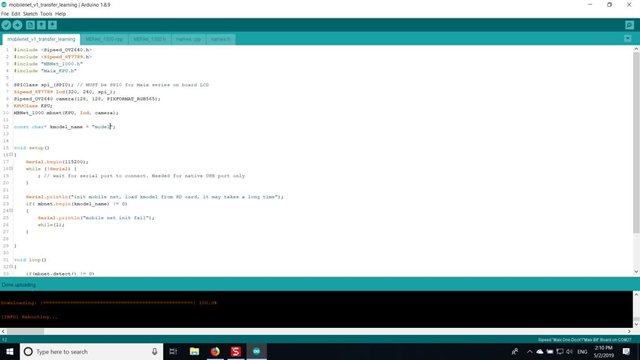
For using with Arduino IDE, first you need to follow the procedure for adding Sipeed boards to Arduino IDE, which is documented here. After you added the boards, open the mobilenet_v1_transfer_learning.ino sketch and upload it to Sipeed Maix Bit. Change the name of the model on SD card to "model" (or make a copy with this name). You can change the label names in names.cpp. It will show the live camera stream on the Sipeed Maix screen along with the top image recognition result.
Step 6: Conclusions
Here are some more materials to read on the topic of CNNs and transfer learning:
Transfer Learning using Mobilenet and Keras A great explanation of Transfer learning, this tutorial uses a modified version of the code from that article.
Cats and dogs and convolutional neural networks Explains basics behind CNNs and visualizes some of the filters. With cats!
Train, Convert, Run MobileNet on Sipeed MaixPy and MaixDuino! A tutorial from the Sipeed team on how to train Mobilenet 1000 classes from scratch(no transfer learning). You can download their pre-trained model and try it out!
Hope you can use the knowledge you have now to build some awesome projects with machine vision! You can buy Sipeed boards here, they are among the cheapest options available for ML on embedded systems.
Add me on LinkedIn if you have any question and subscribe to my YouTube channel to get notified about more interesting projects involving machine learning and robotics.
Hi @wintermuteai, I have the deepest respect for what you do. And it is the first time that I see a video where someone explains how you could set up KI recognition.
Here, I have to be honest: I also never searched for it :)
But it is cool to see that it exists.
Keep up the good work buddy
I appreciate your feedback very much!
I'm surprised my article on transfer learning with Keras and inference on embedded system gained a lot of attention, both here and on instructables. I guess there's not so much material on that topic especially the latter part.
Hi wintermuteai,
Visit curiesteem.com or join the Curie Discord community to learn more.
Hi!
Thank you for you feedback! I will have a look at the Curie community curation project.
Congratulations @wintermuteai! You have completed the following achievement on the Steem blockchain and have been rewarded with new badge(s) :
You can view your badges on your Steem Board and compare to others on the Steem Ranking
If you no longer want to receive notifications, reply to this comment with the word
STOPDo not miss the last post from @steemitboard:
Vote for @Steemitboard as a witness to get one more award and increased upvotes!