Pencil Portrait Tutorial | Sketching The Nose
Hi all...before I continue with this tutorial, I just want to give a shoutout to the lovely @deemarshall who did an interview post for me here: Interview with the Colouring, Stencil and Doodle Artist @coloringiship for the Steemit Art Centre. It's an honor to be featured in Dee's post and I am glad to support her Steemit Art Centre initiative.
This is the second tutorial in my portrait sketching series. I posted the first tutorial yesterday here: Pencil Portrait Tutorial | Sketching The Eye. In this second tutorial, I will focus on the nose.
Before I proceed, I want to make it clear that this tutorial is not very detail. I purposely leave out certain areas (like how to make the grid lines) because you can learn that by reading/watching tutorials made by others. I don't include the shading technique (hatching, cross-hatching) as well because you can easily google that info on the Internet.
Use this tutorial as a guide. Always refer to your reference image and try to capture the likeness as best as you can. If you can't get it right, that is totally fine.
The materials
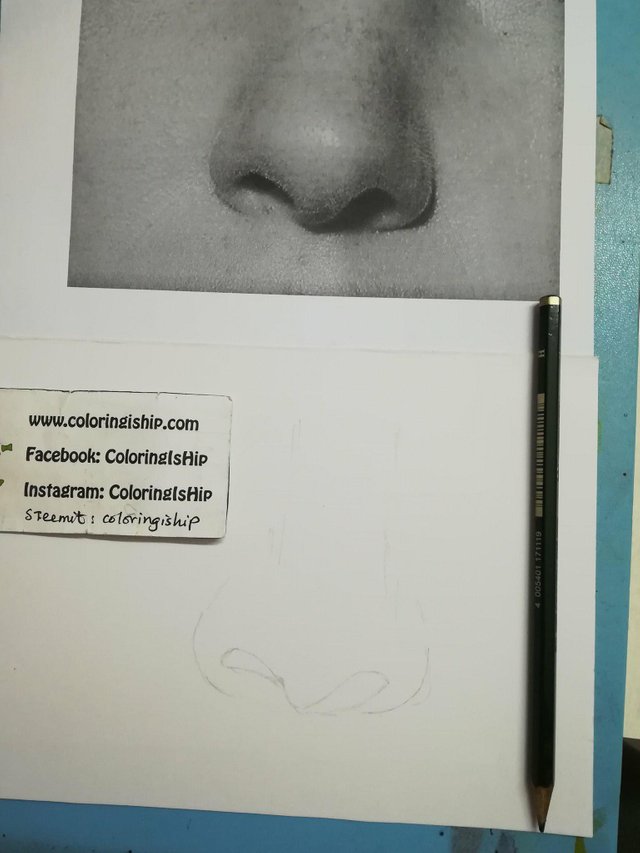
- Reference photo. Download the photo, crop it, and print it in black and white.
- Drawing paper - you can use any kind of paper. No need to use expensive paper unless you want to.
- Pencils - H, 2B, 3B, 4B, 6B
- Art eraser
- Rubber eraser
Step 1
Some artists mentioned that the nose is the easiest feature to draw but I beg to differ. I found that the nose is the hardest to draw, even harder than the eyes! If you have attempted to sketch portraits before you might encounter this issue with the nose - flaring nostrils! LOL! Yes, I have that problem too LOL.
Anyway, unlike the eyes, the nose doesn't do much in terms of giving the emotional response for the portrait.
The main key to draw a realistic nose it to avoid outlining. You need the outline on the initial sketch but as your drawing progresses you need to erase the outline.
Let's get started, shall we?
Start by drawing the nose outline. I strongly suggest you use the grid method to draw this outline. However, if you are confident you can draw it free-hand, go head. Do whatever works for you.
Step 2
Use a 2B pencil to shade the area on the left side of the nose.

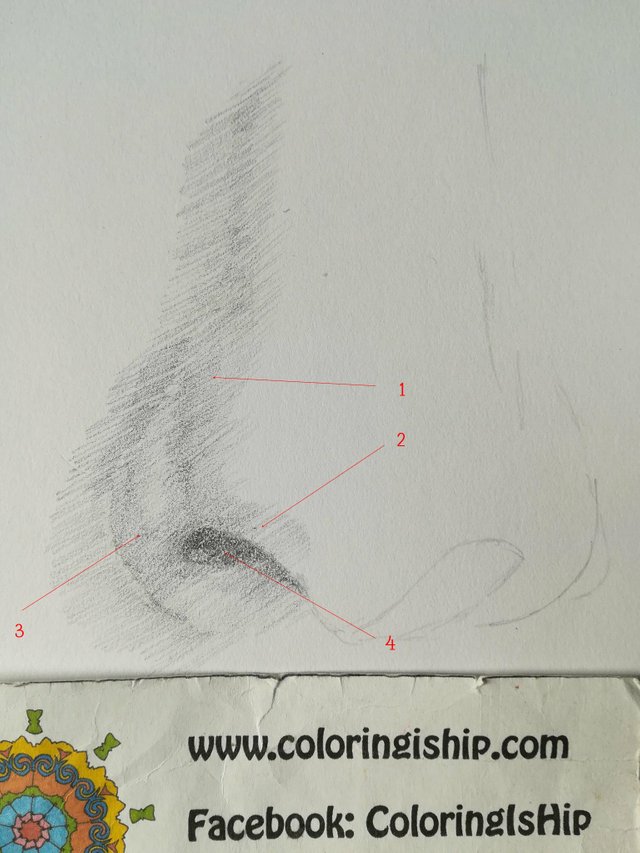
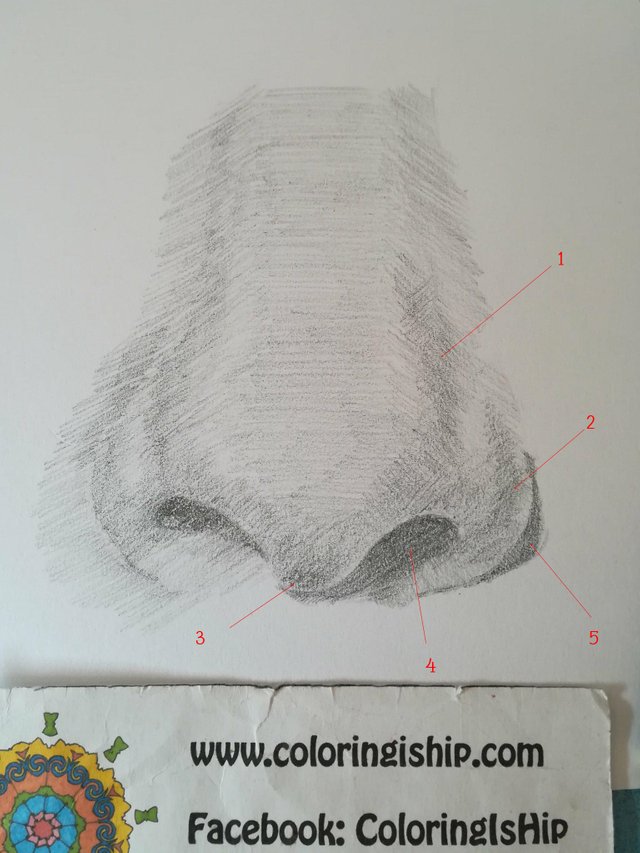
Step 3
Use a 2B pencil to shade the areas on 1, 2, and 3. Use a 3B pencil to lightly darken the areas between 1 and 2. Use a 6B pencil to shade the nostril.
Step 4
- Use a 2B pencil to shade the nose bridge.
- Use a 2B pencil to shade the right side of the nose, and continue to 3 and 4. Next, use a 3B pencil to lightly darken the areas on 3 and 4.
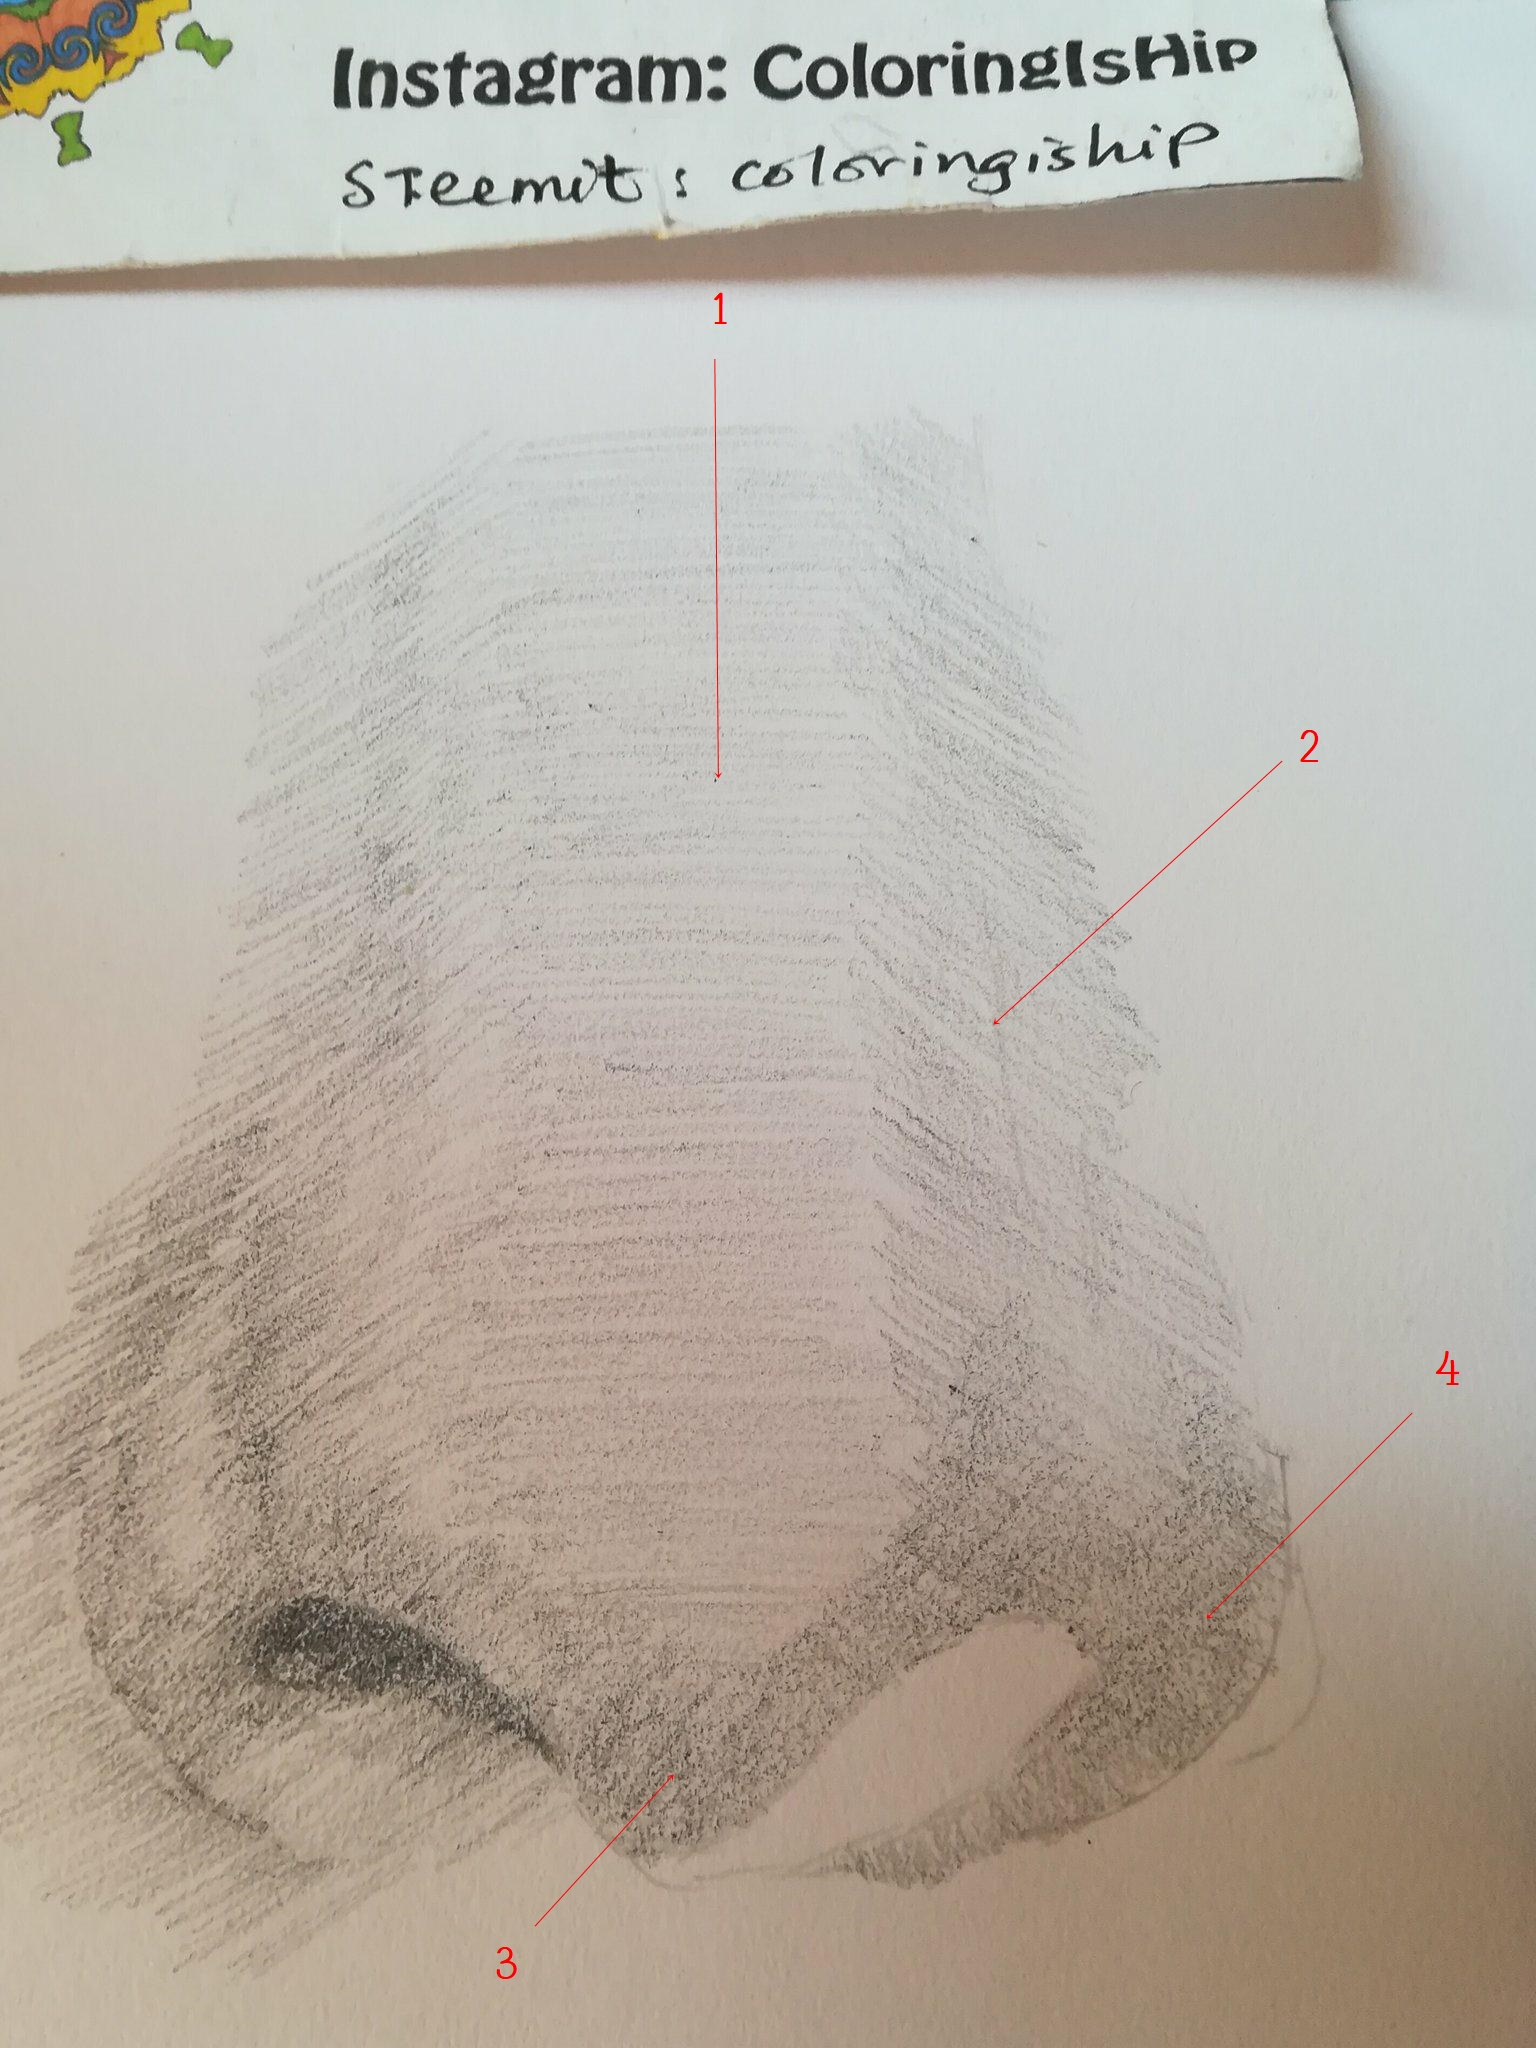
Step 5
Use a 4B pencil to darken the areas on 1, 2, and 3. Next, use a 6B pencil to darken the nostril (4) and the right side of the nose (5),
Step 6
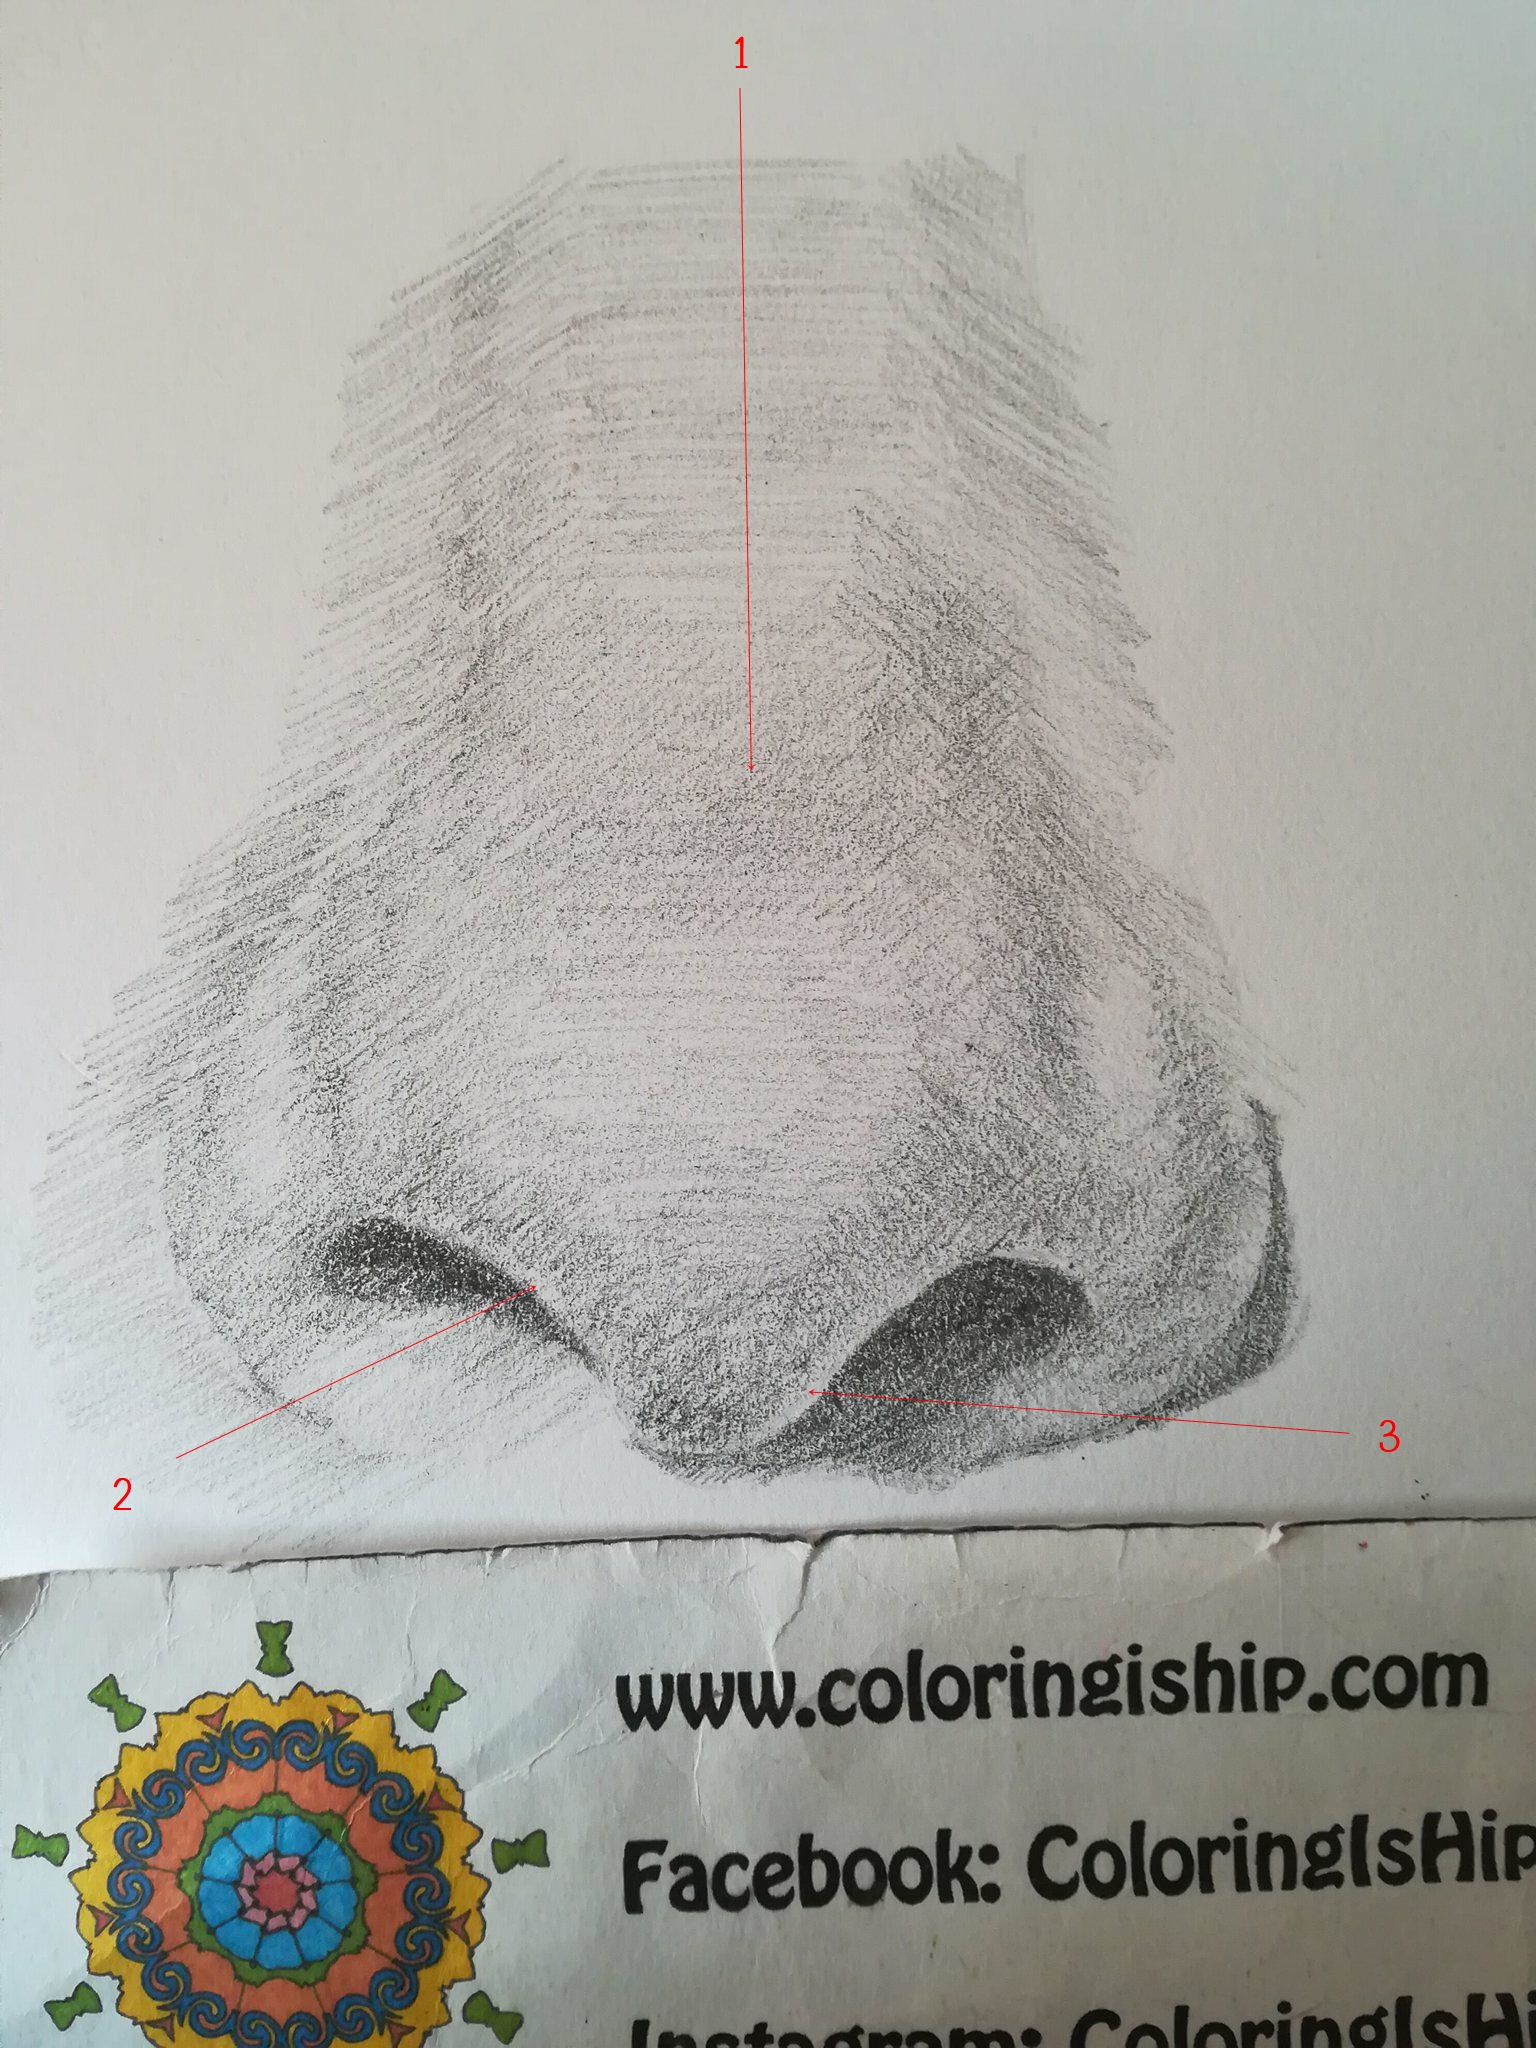
- Refer to your reference image. If you notice, the middle part of the nose bridge is slightly darker. Use a 3B pencil to lightly darken this area.
- and (3) Use your art eraser and very gently press the eraser on the areas on 2 and 3 to create highlights. Do not rub but press lightly on your paper to lift the graphite.
Step 7
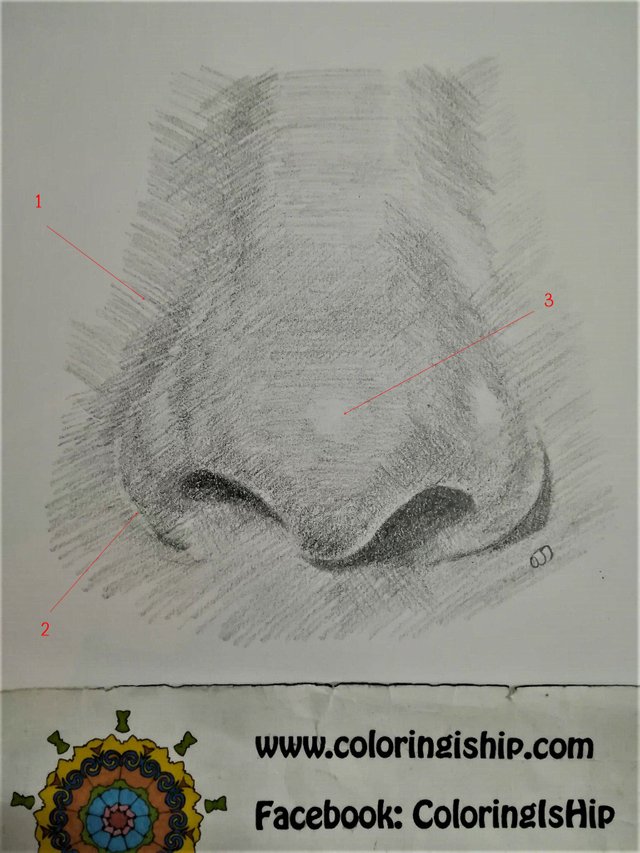
- Use a 2B pencil to shade the areas around the nose. You can use a 3B pencil to darken certain parts but be careful when you shade the areas beneath the nose. Rough sketch marks may appear like nose hairs! (like mine below which I did intentionally to show how it looks like LOL)!
- and (3) Use your art eraser and very gently press the eraser on the areas on 2 and 3 to create highlights. Do not rub but press lightly on your paper to lift the graphite.
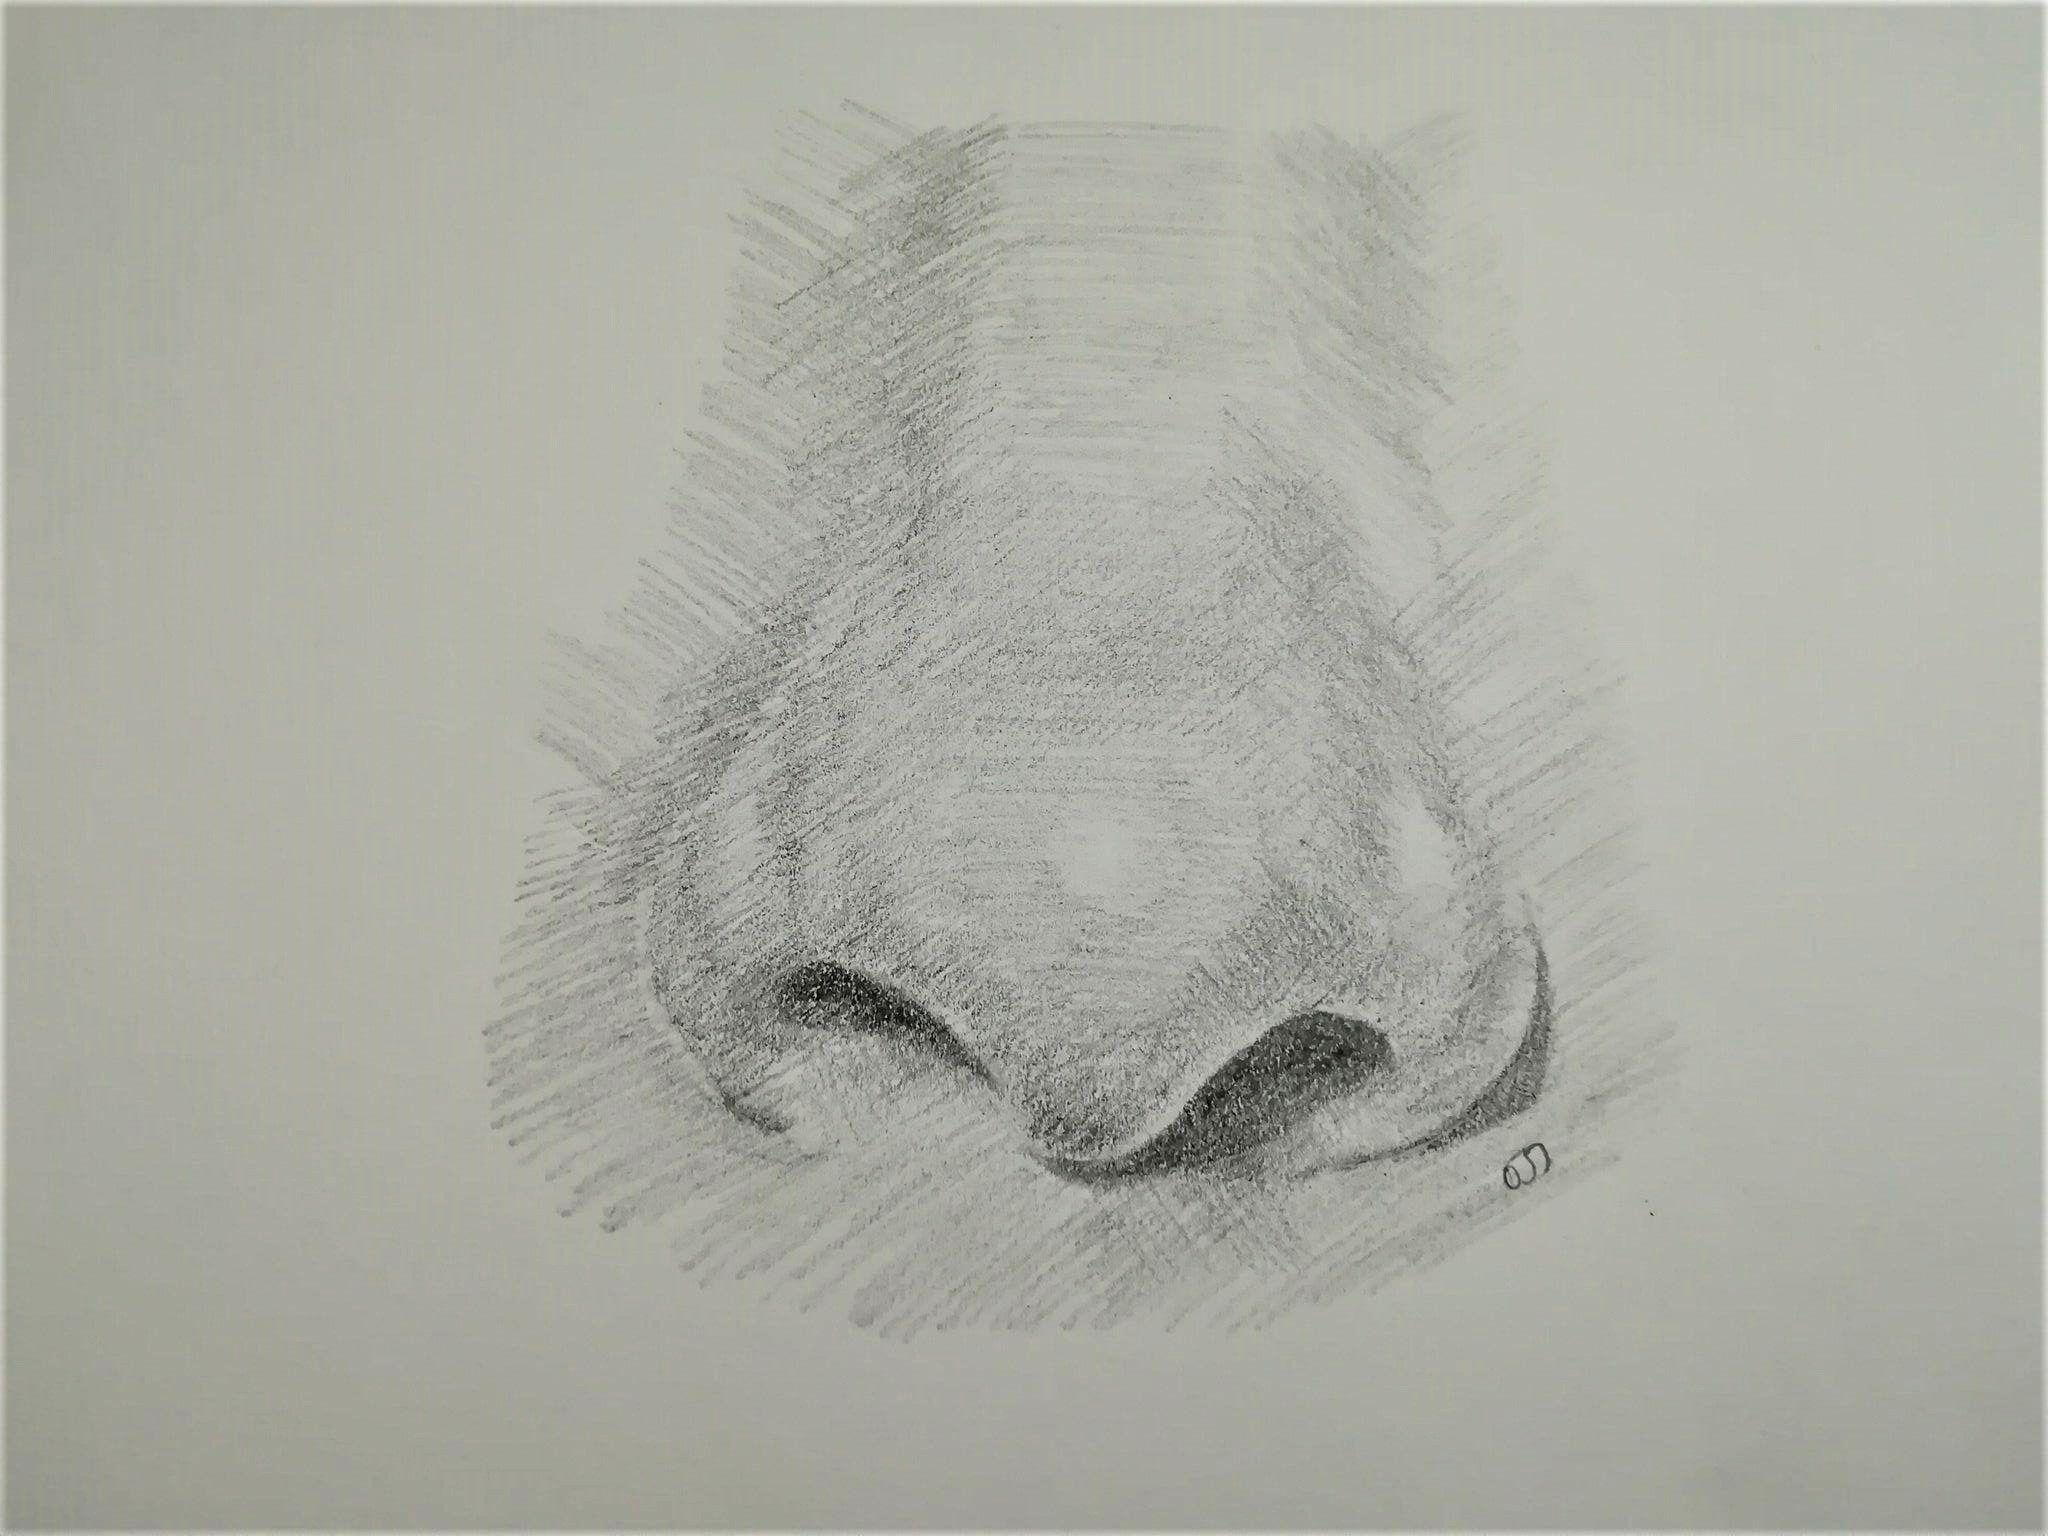
And that's it tutorial for the nose!
Thank you for checking out my post!
My previous posts:
Pencil Portrait Tutorial | Sketching The Eye
A Tribute Post To Four Amazing Mothers In My Life
Happy Mother's Day, Steemians!
My Sketchbook | Unity, Respect, Tolerance
I am selling some of my paintings over on Artfinder. Shipping is FREE worldwide. You can check them out here: ARTFINDER.
My gifts & merchandise available at REDBUBBLE (international), Printcious & CreativeUnited (Malaysia).
Thank you!

My avatar was illustrated by @pinstory
What a useful tutorial. I'm keeping it as a reference for when I need to draw a nose. Thank you so much for mentioning me! Your interview is superb reading :)
Thank you @deemarshall. It's an honor to support your initiative.
This post has been curated by TeamMalaysia Community :-
To support the growth of TeamMalaysia Follow our upvotes by using steemauto.com and follow trail of @myach
Vote TeamMalaysia witness bitrocker2020 using this link vote for witness
Enjoying your tutorial series!