Do it yourself filesystem with Dokan
What's up guys?! A week has passed and its time for a new Blogpost. This time I am gonna give you a small introduction to Dokan. You don't have a clue? Never heard of Dokan before? No problem... I haven't either. But in the life as a student there comes the moment where one must write his Bachelor thesis. No matter how much you procrastinate. As a part of my thesis, I had to write a filesystem and this is exactly where Dokan came into play to save my ass.
WHAT IN THE HELL IS DOKAN?!
So let's start from the beginning. As I mentioned before, I had to implement my own Filesystem. Yeah, basically you could write your own filesystem driver. But that would be like writing a compiler to print a simple "Hello World". But there is a really cool concept which is heavily used in the Linux world. Its called FUSE (Filesystem in Userspace). With FUSE everyone is able to create their own Filesystem without writing a Kernel component. FUSE empowers you to write a Filesystem in the same manner as a user-mode application. So what is Dokan?! Dokan is simply FUSE for Windows. It is as simple as that. You could even use Dokan to run a filesystem which has been written with FUSE under windows.
Okay cool... How does this magic work?!
So you are right. Without a kernel component, there is no way to implement a filesystem. But you don't have to write it, because Dokan did. So Dokan ships with two components: (1) dokan1.sys alias "Dokan File System Driver" (2) dokan1.ddl which is used in a "Filesystem Application". So take a look at the picture below
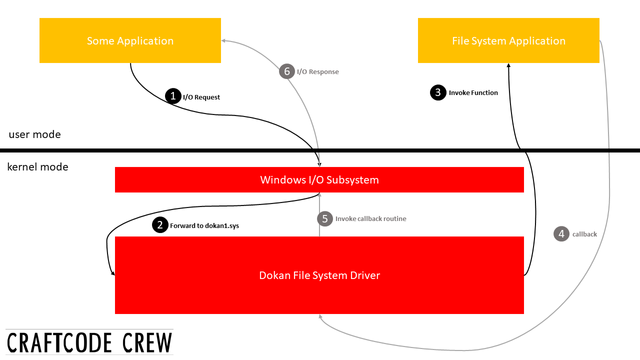
First, a random Application is running. It could be Word, Visual Studio, IntelliJ or your web browser rendering a porno website that is trying to write a virus into a file 😉. Let's assume it is the web browser. If the web browser tries to write some content x to a file y its gonna fire a I/O-request.
This I/O-request is processed by the Windows I/O Subsystem. Note that by passing the I/O-request to the Windows I/O Subsystem we leave the user mode and enter the kernel mode of Windows (this is 1 in the picture above).
Secondly, the Windows I/O Subsystem will delegate the I/O-request to a Driver responsible for the filesystem. In our case that would be the Dokan File System Driver. Which is dokan1.sys. Please note that we did not write any code for that driver, it just needs to be installed (this is 2 in the picture above).
Third, our Filesystem Application which has registered itself in the Dokan File System Driver gets notified about the I/O-Request. By implementing the interface which comes in the dokan1.dll, our Filesystem Application is now responsible for computing the I/O-Request. Whatever has to be done needs to be done by our Filesystem Application. And as you might already guess: Yes this is the part we need to write! The Filesystem Application than invokes a callback function and the Dokan File System Driver is back in line (this is 3-4 in the picture).
Last but not least, the Dokan File System Driver receives the I/O-Response created by our Filesystem Application and invokes the callback routine of the Windows I/O Subsystem. The Windows I/O Subsystem than forwards the result to the application which created the I/O-Request. In our case the Web browser with the porno site (this is 5-6 in the picture).
Just do it! Writing a simple Filesystem
Scope
Okay, we are actually not going to implement a complete Filesystem 😅. That would be too much for a blog post. We are doing something simple. Let's create a Filesystem that contains a fake file which can be read with a editor.
Warmup: Preparations
As I already mentioned before, we need to install the Dokan File System Driver. It is used as a proxy for our Filesystem Application. You can get the latest Version here.
As soon as we have the Dokan File System Driver installed, we can create a blank C# Console Application. Please note that you could also use Dokan with other languages. As always, you can find my solution on GitHub. After we've created the Console Application, which will be our Filesystem Application, we need to add the Dokan library (dokan1.dll). Luckily there is a NuGet package.
Everything settled? Let the game begin!
Mount the FS
First of all, we need to implement the IDokanOperations from the dokan1.dll. Since this is for learning purposes I didn't create a second class. So everything is in one class. In the Main()-Method I create a new instance of the class and mount the Filesystem.
static void Main(string[] args)
{
    var m = new StupidFS();
    // mounting point, dokan options, num of threads
    m.Mount("s:\\", DokanOptions.DebugMode, 5);
}
1..2..3.. and it crashed! What happened? As you can see from the Console output, several I/O-request failed. First, the GetVolumeInformation-Operation failed and then the Mounted-Operation. They failed because we did not implement them yet. But it's simple: in the GetVolumeInformation-Request we just need to provide some information for the OS. Basically, this is just some Meta information for our filesystem. Like its name, how long a path can get and which feature it supports. Let's implement it:
[...]
public NtStatus GetVolumeInformation(...)
{
volumeLabel = "CraftCode Crew";
features = FileSystemFeatures.None;
fileSystemName = "CCCFS";
maximumComponentLength = 256;
return DokanResult.Success;
}
[...]
public NtStatus Mounted(DokanFileInfo info)
{
return DokanResult.Success;
}
But it won't work yet. We also need to "implement" the CreateFile-Methode:
public NtStatus CreateFile(...)
{
return DokanResult.Success;
}
Did you notice how every method returns a NtStatus? This status indicates wherever a request has failed (and why) or succeeded. You might wonder why we need to return a Success in the CreateFile-Methode for mounting the filesystem. As soon as we mount the filesystem, it tries to create some fileproxis. If we throw an exception, our filesystem ends up in a bad state.
Faking a file
Whenever the filesystem has to list files there a two possible request: FindFilesWithPattern and FindFiles. Luckily, we just need to implement one and suppress the other one. We are going to implement the FindFiles-Methode. Therefore we will return a DokanResult.NotImplemented in FindFilesWithPattern, so whenever the filesystem gets this request it will be rerouted to FindFiles.
One of the parameters in FindFiles is a list of FileInformation objects. We are just going to fake one item and add it to a list which will be set to the parameter files.
public NtStatus FindFilesWithPattern(...)
{
files = null;
return DokanResult.NotImplemented;
}
public NtStatus FindFiles(...)
{
var fileInfo = new FileInformation
{
FileName = "carftCodeCrew.txt",
CreationTime = DateTime.Now,
LastAccessTime = DateTime.Now,
LastWriteTime = DateTime.Now,
Length = FileContent.Length * 8,
};
files = new List<FileInformation> {fileInfo};
return DokanResult.Success;
}
And we did it! Our filesystem now shows one file!
Did you notice FileContent? It's just a global string containing the content of our textfile.
Reading with the good old Editor
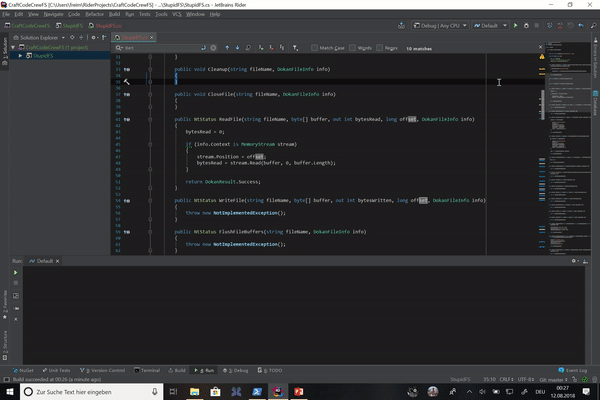
Let's read data from our filesystem! We want to read the string FileContent with the good old Editor. So, first of all, we need to make changes to the CreateFile-Methode. Whenever we need to open a file or dir, the CreateFile-Methode gets invoked. We need to provide the DokanFileInfo object with a context. In case of a read operation, the context is a stream where the data is located. Since we want to read a string, we are going to use a MemoryStream.
public NtStatus CreateFile(...)
{
if (fileName.Equals(@"\carftCodeCrew.txt"))
{
info.Context = new MemoryStream(System.Text.Encoding.ASCII.GetBytes(FileContent));
}
return DokanResult.Success;
}
We are close but not quite there. When an application like Editor tries to open a file it also wants to read the meta information of the file. For example, to set the window title. Therefore we need to implement the GetFileInformation-Methode. Since our filesystem just has one file it is really trivial:
public NtStatus GetFileInformation(...)
{
fileInfo = new FileInformation
{
FileName = "carftCodeCrew.txt",
Attributes = 0,
CreationTime = DateTime.Now,
LastAccessTime = DateTime.Now,
LastWriteTime = DateTime.Now,
Length = FileContent.Length * 8,
};
return DokanResult.Success;
}
Now we are really close 😉 We just need to implement the ReadFile-Methode(). In this method, we get the Stream from the DokanFileInfo.Context and then read the bytes that have been requested. It is really as simple as this.
public NtStatus ReadFile(...)
{
bytesRead = 0;
if (info.Context is MemoryStream stream)
{
stream.Position = offset;
bytesRead = stream.Read(buffer, 0, buffer.Length);
}
return DokanResult.Success;
}
The lovely CraftCodeCrewFS
Posted from my blog with SteemPress : http://craftcodecrew.com/do-it-yourself-filesystem-with-dokan