CryptoCurrency today Balkan >> Dapps: How to Create a Decentralized Application
After the development and implementation of smart contracts in 2015, a new model for building successful and scalable technologies was born in the form of “Dapps,” or decentralized applications. Decentralized applications have become so popular over the years that they started overloading the Ethereum network and slowing it down due to constant workloads. To unload the blockchain, the Loom Network introduced ZombieChain, a common sidechain for all Ethereum Dapps. At the moment, there are 1,576 applications operating within the industry. And their number grows every day. Can you build a Dapp yourself?
A Dapp Is More Than a Smart Contract
——————————————————
Decentralized applications are similar in many respects to smart contracts based on Ethereum. Nevertheless, there are essential differences between the two developments. If smart contracts are only associated with financial transactions and have a limit on the number of participants at a particular time, Dapps extend these boundaries and go beyond the established rules, as an unlimited number of users can participate in the application at any one time (although this will cause network overloading), and developers are not limited to just the economic sector and can create applications for the entertainment, music, gaming, and other industries. A full list of applications can be found on the given website that provides constant updates on network members.
Thus, Dapps are utilities with which one can implement and continue to accompany CI or CD processes (Continuous Integration or Continuous Delivery) in the future.
For an application to be treated as a Dapp, it must meet the following criteria:
The application must be fully open source and run autonomously without control. The utility can be adapted and improved by users, but all changes must be decided on the basis of a consensus of its participants.
To avoid any central points of failure, all application data and work records must be cryptographically stored in a public decentralized blockchain.
The application must use a token (Bitcoin or an altcoin specific to the system) that is required to access the application. In addition, any contribution of the miners should be rewarded with application tokens.
The application is required to generate tokens in accordance with a standard cryptographic algorithm that acts as evidence that the nodes are reliable (Bitcoin uses the Proof of Work algorithm).
A Dapp consists of two parts: an interface written in HTML, and a backend, or a "database" for the interface.
Decentralized applications can be divided into two classes. The first is a program for everyday use, where all actions are performed instantly and automatically. An example of such a technology can be BitTorrent, a protocol for transferring data between users.
The second class includes applications that take into account the reputation of network members, where all nodes are monitored and maintain a specified status within the application. Providing trust between the parties is one of the main functions of such applications. There is no way to express this level of trust in a monetary equivalent and, accordingly, to transfer it to someone else.
How to Launch a Dapp. Basic Instructions
———————————————————
Resources are required in the form of competent developers, programmers, a well-developed idea, and a budget in order to write a high-quality smart contract. The process of creating a Dapp is much simpler and more understandable.
On its website, the Ethereum team gives recommendations on how to build one’s own application.
The first step is to install the AlethZero client with the C ++ language. After installing it on the computer you will see white windows with the browser. 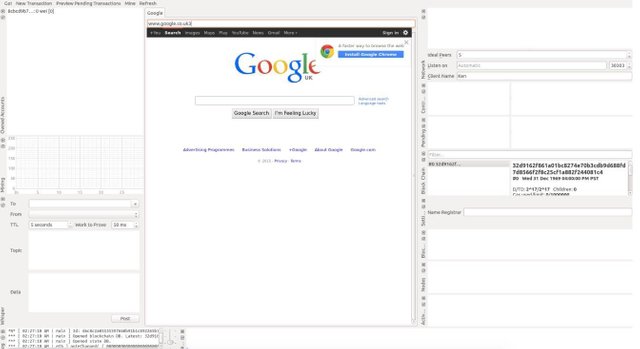 The experts at Ethereum promise to release their Mist browser, which will be designed to work with Dapps. It can now be downloaded in the beta version, and it will look like this:
 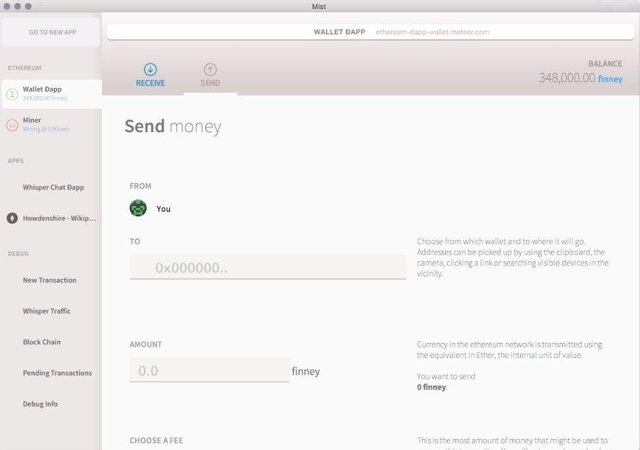 To create Dapp, it is best to use the Solidity language, since it is formally supported by the Ethdev team. But there are several other languages that can be implemented in the application. They are LLL (similar to Lisp, or "list processing language") and Serpent (similar to the Python general purpose programming language).
After selecting the language, one must enter at least one token account on the system to start the contract. Then one needs to press the "send" function, similar to contract.send (account, amount) to move the token.
To write a program, one can use any editor, the information from which is then transferred to AlethZero. 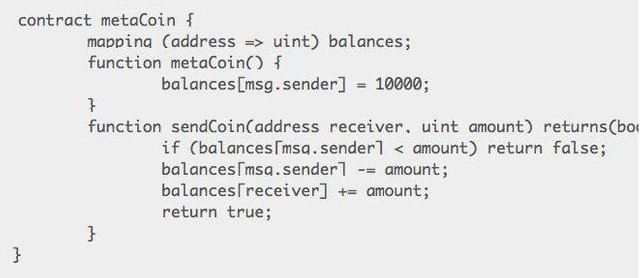 Contracts are divided into methods. The first one is MetaCoin. It is a special constructor method that determines the initial state of storage of contract data. The constructor functions always have the same name as the contract. This initialization code is executed only once when the contract is created.
The second part of the contract is the contract code itself, the material that will be permanently preserved in the Ethereum network. It cannot be changed and the code will be backed up by millions of nodes ensuring that it is reliable. In this case, it is a simple function that checks the sender's balance. If the balance is large enough, the system itself will transfer the tokens to another account.  The string above creates a mapping where one’s own code strictly writes information to the contract storage. Here we defined a match for key pairs of a value of the address and uint called balance. The balance of coins will be stored here.
Note that there are two types of data: address and uint. Unlike the Serpent language, Solidity statically types and performs type checking during compilation. Specifying the type before compilation also allows one to reduce the size of the data array transferred by transactions, and this helps the compiler to create a more optimized EVM code.  This is the initialization of the contract, which will be run only once (as it is in the MetaCoin constructor method) and perform two actions. First, the contract uses msg.sender to find the common address of the sender of the transaction. That is, the creator. Secondly, the contract refers to the repository of contracts, using the displayed balances. Contracts store data as a pair of key values of 32 bytes in length.
Msg.sender is a 160-bit number that indicates one’s own public key. This is a unique identifier on the network that cannot be forged under the cryptographic laws that Ethereum implements.
After assigning the initial balance, one needs to pay attention to the sendCoin function, which will be executed every time we call the contract. This is the only executable function that the user can call because the initialization function cannot be called again. 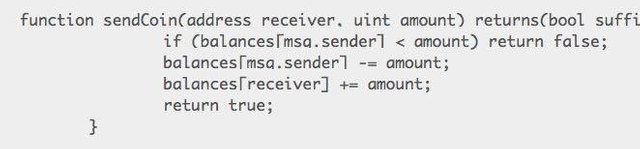 This function has two arguments passed to it by the transaction: the receiver is another 160-bit common address of the recipient, and the sum is the number of tokens one wants to send to the recipient.
The first line checks the current balance msg.sender, or the least amount of tokens that can be sent. To complete the transaction, the account must have a sufficient number of tokens.
One can confirm the process of transferring tokens from one address to another using the msg.sender, receiver, and amount.
If the balance is checked, the condition will be evaluated as false, and the next two lines will subtract the amount sent from the sender's balance: balances[msg.sender] = amount; then they will be added to the balance of the account receiving the tokens: balances[receiver] + = amount.
Thus, we got a function that will send tokens from one account to another. And do not forget about the gas that is needed to perform transactions on the Ethereum network.
How to Launch a Dapp. Step: Working in AlethZero
————————————————————————
After one writes down the sequence of moves, all the information will need to be transferred to AlethZero. Open the wallet and make sure it is a personal interface and that a notepad with a contract stored inside is available. In this manual, one does not need to connect to Testnet. Instead, select "Use Private chain" in the debug menu and create a private chain. Because of this, the creator will rely on the fact that the test network is online when developing the Dapp.
Click the "New transaction" button in the menu bar to open and start a new transaction. Here, one needs to enter the contract code and make a transaction that consists of the address to send, the parameters for the gas and the code entry panel or the transaction data.
Ether will be required to save this contract or its work, but it is not yet available. Mining begets Ether.
Since the creator has a private chain running and is not connected to the network, only new blocks can be used. Click "Mine" on the toolbar, then go to the debug menu and select "Force Mining.” At this point, the various tabs should be filled with information. The account tab has a visual representation of the block development process. When a successful block is detected, the red mark reaches a peak, and the balance should increase. To view the process, one can use the "Blockchain" tab, where each action is recorded.
One can stop mining at the moment when they become the holders of any tokens (in our example Finney coins are described) of projects that are based on Ethereum. To do this, click "My" again and expand the contract.
Re-run the "New Transaction" popup window and copy and paste the Solidity that was previously written in the "Data" text box. It should look something like this: 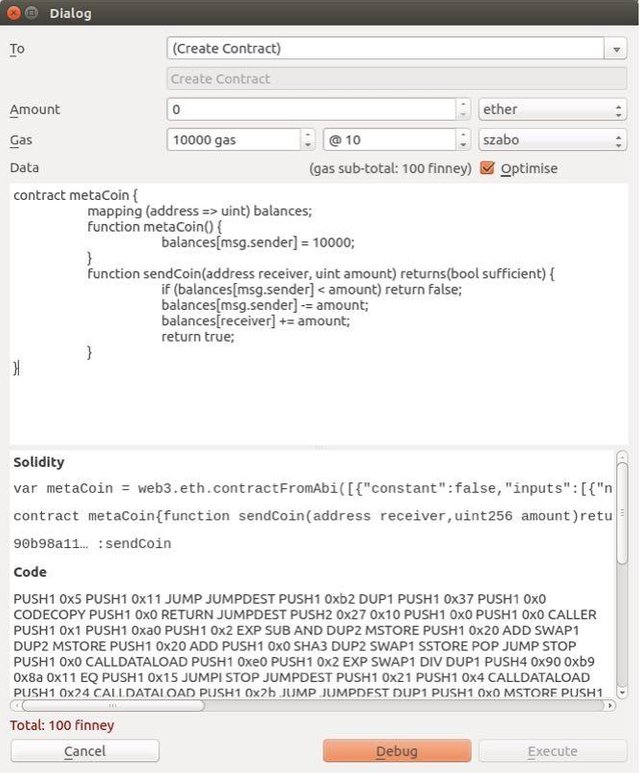 Since we are just creating a test contract and are not going to send Ether to other accounts, all blank fields can be left as default. But in this example, 10,000 gas is sent to the contract at a price of 10 Szabo for each Ether. Szabo is another unit of value equivalent to 0.000001 Ether. The contract will not consume all the gas, because the test code in this contract is very simple.
Even if there are any compilation errors in the contract, there is no need to worry about it as the debugger will find and point to an incorrect string or symbol. After that, one needs to find two messages in the panel under the contract code. The first section of "Solidity" contains a code snippet similar to JavaScript (which is not used in the system, but simply has some common components with the code), a list of all executable functions in the contract, and the ABI (Application Byte Interface) in the sendCoin function. Highlight this information and copy it into notepad. The second is a series of assembly instructions similar to "PUSH2 0x27 0x10 CALLER . . .” This is one’s own EVM contract code in its compiled form.
Now that the contract is compiled, one just needs to click "Execute" to deploy the contract in a decentralized database.
Since we are not mining, the contract will go into "Pending" mode and look like this:  After clicking "Execute" in the transaction area, pay attention to the "creates" field for this particular transaction on the pending panel, in this case, "1f530b6b . . ." (each user will have its own unique ID).
Now that there is a pending contract, one needs to fix it in the blockchain by developing the block. Click "mine" and wait for the transaction to disappear from the pending panel, and a new record will appear in the "Contract" panel. Turn off the mining function again and click on the new contract in the contracts panel. This will appear: 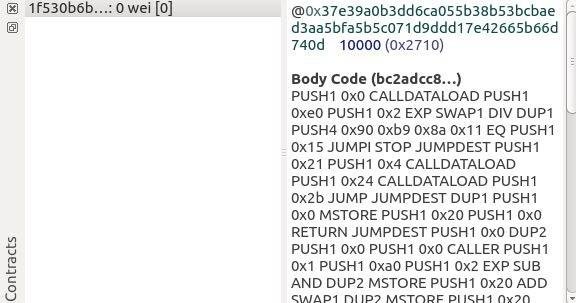 Then the initial configuration record should appear in the contract data store, and it can be seen after specifying the SHA3 key values of the common address and the number "10,000.” One needs to check whether they can send tokens to another public key. To run the sendCoin function, one needs to send the transaction to the address of the contracts, specifying the address “to,” "value," and the function identifier in the transaction data array. Find the transaction area and paste the address of the contracts into the "Address" field:
 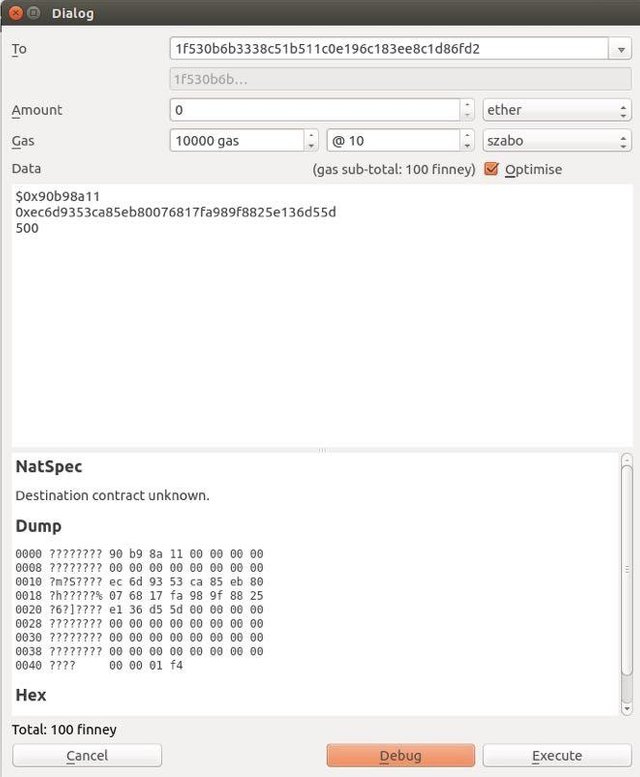 Now, in the area where the code was previously entered, enter the function identifier and the recipient address and the value in separate lines. When we previously sent the contract to the network, we had to save the sendCoin ID. Use 0xec6d9353ca85eb80076817fa989f8825e136d55d (common address on the test network: p) and any value below 10,000. The data should look something like this:$0x90b98a11
0xec6d9353ca85eb80076817fa989f8825e136d55d
500
Every time one calls a function in a contract, it takes the form of a 4-byte function identifier followed by function arguments that automatically fill up to 32 bytes.
Click "Execute" and we should see the transaction pending again, press "my" until we have generated a new block, and then stop mining. Now the contract should look something like this: 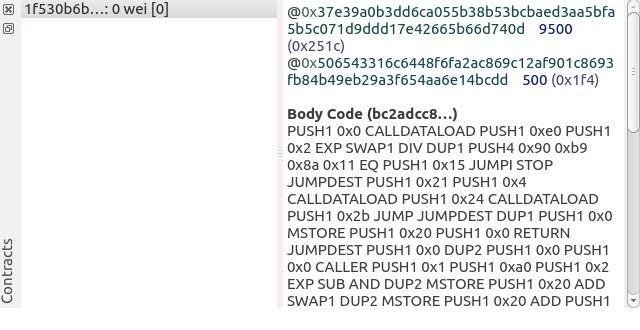
Exhale, This Is the End
——————————-
And that's all, you have created your very first contract! Test the network with small transactions on a wallet. After testing, one can further develop this application, explore new features and implement various functions to improve and modify its operation.