A New Technique in 3D Modelling for Me, a Little Modelling Trick for You
Hello!
It's Rain here. Me, not the weather!
I'm currently working on a number of models and none of them is finished yet. That's what happens when I scroll through Artstation and Pinterest too much, I get so inspired and wanted to create everything. While I'm working on them, I've found this new technique that I discovered because I watched a wrong tutorial. The right man in the wrong tutorial can make a difference, I suppose. Sound familiar?
Anyway, let's get down to it. I'll try to explain this as best as I could. As far as I understand it, it is a method to create clean edged gaps on a mesh that will look like 'plates'. This method might help if you want to model robots, spaceship, Death Star or something like that, etc.
If you want to follow along, note that the order of the modifiers is important, so if you make a mistake and get stuck, you'll need to backtrack to figure out how to fix it. Also, note that coffee is important too, so be sure to prepare a cup first. Or a gallon if that's how you prefer it.

Anyway, let's get down to it v2.0. Firstly, start by subdividing the cube 3 times and apply the Subsurf modifier immediately. This is so we get the amount of edge loops we need, at least for this particular experiment.

Then, add Edge Split and Smooth modifiers. These two create and control the gap on the surface. Now, to create the gap, select the edges you want the gaps to be in, press Ctrl+E and select Mark Sharp and bam! You're awesome. Be proud.
Now that you have your gap, control the spacing by increasing or decreasing the Factor on the Smooth modifier.
The next modifiers to add is the Subsurf modifier, again, and the Solidify modifier. The Subsurf is so we get smoother surface and round corners. Then add Solidify modifier, set the Thickness to about .04 or .05 so we can see the thiccness better. Click the Smooth Shading on the Tool Bar if you like to see the mesh in, well, smooth shading.
Problems. Just What We Need
Done experimenting (or did you?). Now, you probably get this crap when you extrude some faces. This happen because the Edge Split modifier tells Blender to split all edges that are greater than 30 degree angle.
Ew.
So to solve this, simply uncheck the Edge Angle and this problem is... still kinda there. Heh. The extruded geometries are now looking good, but the weird shading along the edges is still visible a little bit. I suspect this only happens when you set the shading to smooth shading.
To solve this without going back to flat shading, go to the Data tab in the Properties, then check Auto Smooth. Now sip your coffee like a boss.

Better.
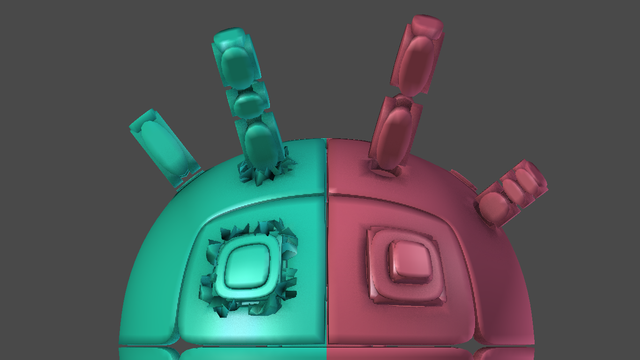
The extrusions on the right part of the object is what happen when you extrude right away. While the extrusions on the left part of the object is what you're going to get if you select the face, press I and left click, mark sharp, then extrude/intrude. And it looks better in my opinion.
But Wait! There's More
"What if I want some of the edges to be pointy instead of round?"
There's also this trick, you see all the corners are round thanks to the Subsurf modifier. But what if you want some of them to be pointy? For that, select the edges of the gap you wish to make pointy, then press Shift+E, move your mouse to make it pointy or round.
Shift+E
For easier time in Edit mode, toggle the Display modifier in edit mode on for the Smooth modifier, and also the Adjust edit cage on the Subsurf modifier.
"What if I want some of the gaps to have different spacing than the other?"
The logic is to group the edge loops you wish to have different spacing than the rest. Select the said edge loops, go to Data tab, scroll down to Vertex Groups and add a group. Then click assign. Go back to the Modifiers tab, and hit copy the Smooth modifier. Click on the Vertex Group on the second Smooth modifier, then select the group you just made.
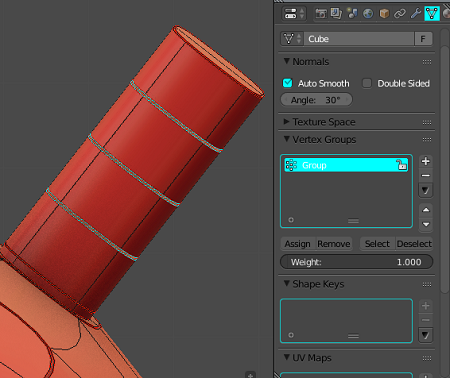
The Data tab and the Vertex Groups location
This will make the second Smooth modifier to only control the spacing of the grouped edge loops. As you can see on the gif below, I manipulate the spacing of only those specific edge loops without affecting the other.
Ta da
"What if I want some more coffee?"
By upvoting this post.
This could be useful for hard surface modelling. But, it comes with the downside, which is the amount of polygons. By subdividing twice you might get too many polygons for your model, which means you may need to do that thing that nobody likes... retopology.
If you want a quicker workflow, there's an addon for this that you can get for $22.50 here: Plating Generator and Greebles.

That's pretty much it about my new discovery. Unlike before, I'm sharing some tricks instead of artworks, so I hope this is still enjoyable, somehow. I played around with this and get that mech Kirby looking thing.
The things I'm currently enjoying working on is sculpting Leah from Stardew Valley, Titan Eren, Rusty the steampunk robot you see on my ava, a dieselpunk hoverbike, a streamline moderne structure, and more. I hope I can finish them all at once but unfortunately I'm not an alien. I'll happily share these on Steemit when they're finished.
If you have any suggestion, advice, or maybe tips as well, let me know in the comment section below because after all, I'm a learner myself. I hope you get something from this post even if it's just a little bit, other than caffeine.

Click the icons below to join some of the best Steemit community on Discord where you can meet and hang out with awesome fellow gamers and artists, and help each other grow.


©2018 Adam Rainite Lawsone
So cool ! I love all of these tips and tricks and your gifs and illustrating pictures are really amazing peek into the world of 3D modelling !!!! <3 I love it, @rainite !!!
Mhm, I didn't even have the imagine of this method in 3D modelling before. It's interesting to me and I hope this helps someone. And thank you, Spider, I'm glad you like this, even though I didn't make this non-Blender user friendly...
i know one or two 3D artists :D sometimes i make them kinda try to show me 3D stuff and im like WWAAAAAAAOOOOHHHHHHHH
MAGIC
Soon you'll know three and he'll be willing to show you his best 3D artwork and you'll go WWAAAAAAAOOOOHHHHHHHH MAGIC again.
But it'll be so long until then though :>
This post was shared in the Curation Collective Discord community for curators, and upvoted and resteemed by the @c-squared community account after manual review.
@c-squared runs a community witness. Please consider using one of your witness votes on us here
Bows politely
Thank you ^^
Congratulations @rainite! You have completed the following achievement on the Steem blockchain and have been rewarded with new badge(s) :
Click here to view your Board of Honor
If you no longer want to receive notifications, reply to this comment with the word
STOPTo support your work, I also upvoted your post!
That was a really well written and entertaining article my new friend!
Awesome!!
Thanks a lot for sharing these techniques and tipps. I am not a 3d designer but first I thought your article will be about designing a model for 3d printing - basically it does also ^^
but I am using a free online tool for that (tinkercad). It is super basic and not even 10% of the functionalities as blender offers.
Thanks for sharing :)
If I am searching for a 3d designer in future - I think - I will ask you first :P
Peace!
#engagetogrow
P.S. I can imagine awesome interesting dtube videos by you about that stuff. Did you ever tried to make a video tutorial? I know a curation service searcing for diy videos and can play the "middleman" :P
Hey, thanks for the awesome comment!
I checked that software out and it looks like a great simpler alternative to the more complicated 3d softwares such as Blender, 3Ds Max, Zbrush and the like. Sometimes we could use faster workflow from software that offers simplicity like that.
Also, thank you! I'm only 3 months into Blender and have never tried to create any tutorial video before, only posting step-by-step process of my creations. But maybe, just maybe I'll do that when I get far better in 3d design, and that curation service sounds like a good idea. But not now, I'll need to git gud first.
This post is some sort of experiment to see how is it like to post a tutorial on Steemit, with the language that I think is 'less friendly' for those who do not use Blender. So I'm glad you find it entertaining nonetheles. ^^
Hello @rainite, thank you for sharing this creative work! We just stopped by to say that you've been upvoted by the @creativecrypto magazine. The Creative Crypto is all about art on the blockchain and learning from creatives like you. Looking forward to crossing paths again soon. Steem on!
Mhm, looking forward to crossing paths again indeed!
Thanks for sharing <3 will try it out soon :)
You're very welcome ^^