New ARK Core Commander
With the release of ARK Core v2, it is only fitting that the ARK Commander be allowed to join in the party! That is why we have completely re-written the ARK Commander to coincide with the launch of Core v2. For those of you who don’t know, the ARK Commander is a tool that gets ARK Core up and running in a matter of minutes for those running nodes/delegates.
ARK Core 2.0 Commander is a tool set that helps ARK node operators quickly install the ARK Core along with all necessary dependencies required. Node configuration, operation and monitoring functions are also provided. This eliminates the inconvenience of manual command line entry, and all essential functions can be performed without writing a single command!(okay, except cloning and starting the script).
The new ARK Core 2.0 Commander follows a modular structure similar to the new ARK Core, making it easier for developers to quickly examine the code (the previous commander was a single file, making it harder to find things).
GitHub Repository Link :
https://github.com/ArkEcosystem/core-commander
In this blog post we’ll review the new ARK Core Commander 2.0 and get you familiar with how to use it.
NOTE: The new Core Commander can be cloned and started, but you won’t be able to install Core v2 until it becomes available on June 14th 2018 — please wait until tomorrow to start anything and we ask that you don’t stop your DevNet nodes yet either.
Preparations
To install ARK Core Commander simply login to your server with your credentials (note that you should have ‘sudo’ privileges with the user you are going to be using it with — not ‘root’), we recommend running this on a clean OS install since it will be a lot easier to debug things as they occur.
P.S.: If you forgot how to add sudo user, login to your new server using ‘root’ credentials and input:
adduser ark
usermod -a -G sudo ark
And relogin with your newly created user (in our case ‘ark’).
This can be any name or word, doesn't need to be ‘ark’. But for this post we will refer to our sudo username as ‘ark’.
Download latest release from GitHub repository:
cd ~ && git clone https://github.com/arkecosystem/core-commander.git
To start it simply run it with this command:
cd ~/core-commander && bash commander.sh
An intro screen will pop-up asking you to input your ‘sudo’ password for current user.

Next, all the necessary dependencies will be installed. Don’t interrupt the process — it may take several minutes depending on your server specs.

After it finishes you’ll be prompted to reboot servers by pressing any key.

Now, your session will end and you will need to relogin to your server. Login and start the commander again, input your sudo password when prompted.
cd ~/core-commander && bash commander.sh
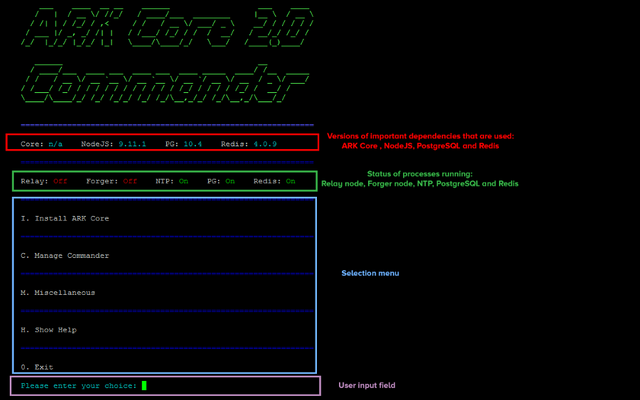
The new ARK Commander will start:
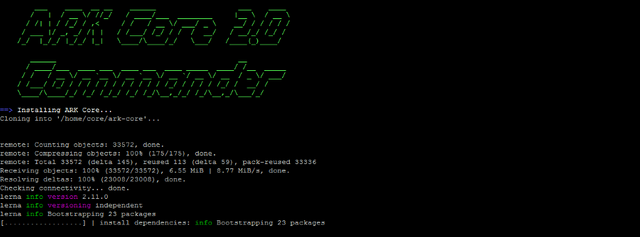
Since we’ll be installing ARK for the first time enter ‘I’ or ‘i’ (selections are not case sensitive so you can use lower or upper case letters). Don’t interrupt the install, let it run.
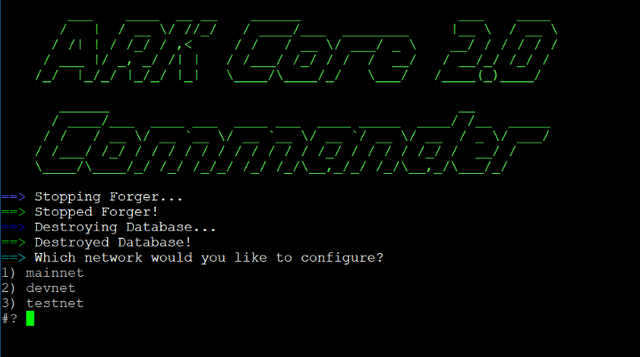
Once installed, you will be asked to select a network. Enter ‘2’ for devnet.
You’ll be asked if you want to start a relay process. Input ‘y’ and press ‘enter’ to start ARK Core as a relay. If you are a delegate you will configure the forger in the next step.
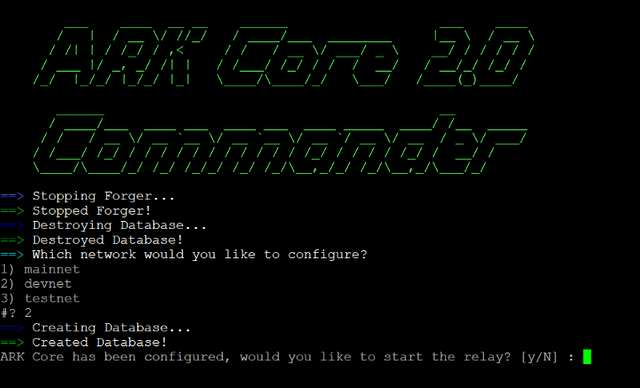
We are done! To return to menu press any key.

Next, you will see more options in commander:
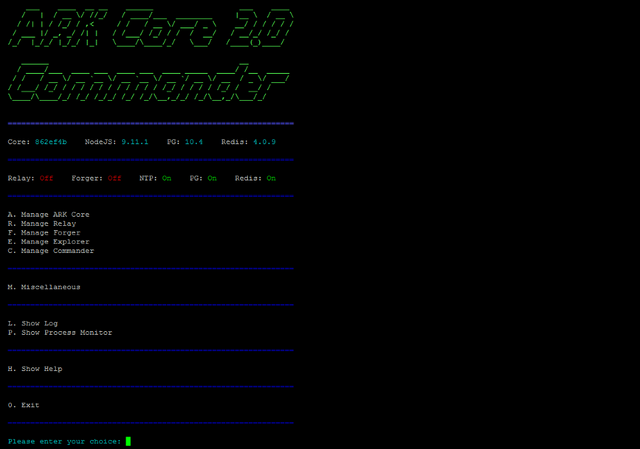
We now have a relay node started, and you’ll see in the menu Relay : ‘On’ meaning relay is running.
To open logs and check the process press ‘L’ or ‘l’ (you can close logs by pressing ‘ctrl+c’ to return to menu). If you won’t be running a delegate you can stop here. If you are running a delegate, let’s configure ‘Forger’ as well (scroll down to Forger Node Setup) .
Let’s go over the commander and what each command offers:
‘I’ — Install ARK Core— installs most recent ARK Core from GitHub repository.
‘A’ — Manage ARK Core — opens ARK core options.
- ‘U’ — Update ARK — update ARK core if new version is available.
- ‘P’ — Uninstall ARK — uninstall ARK Core from your system.
- ‘C ‘— Configure ARK — lets you select a network configuration and automatically creates the database for the config you chose.
‘R’ — Manage Relay— opens ARK relay node process options.
- ‘K’ — Stop Relay— stops ARK relay node process (shown only if relay node is running).
- ‘S’ — Start Relay — starts ARK relay node process (shown only if relay node is not running).
- ‘R’ — Restart Relay — restarts (stops and starts) relay node process.
- ‘L’ — Show Log — shows PM2 relay node process log.
‘F’ — Manage Forger— opens ARK forger node process options.
- ‘K’ — Stop Forger— stops ARK relay node process (shown only if forger node is running). ‘S’ — Start Forger— starts ARK forger node process (shown only if forger node is not running).
- ‘R’ — Restart Forger — restarts (stops and starts) forger node process.
- ‘C ‘ — Configure Forger — lets you configure forger config file (optional BIP38 encryption and your delegate secret).
- ‘L’ — Show Log — shows PM2 forger node process log(shown only if forger node is not running).
‘E’ — Manage Explorer— opens ARK explorer options.
- ‘I’ — Install ARK Explorer — you can install ARK blockchain explorer on your server.
- ‘S’ — Start ARK Explorer— starts ARK explorer process (only visible if you have ARK explorer installed).
- ‘L’ — Show Log — shows PM2 explorer process log.
‘C’ — Manage Commander— opens ARK commander options.
- ‘R’ — Configure Core Repository— you can change core repository path with different Github repo (if you want to pull Core code from custom path).
- ‘A’ — Configure Core Directory — lets you configure directory core is installed into when you do Install ARK Core (can change before you start core installation).
- ‘D’ — Configure Core Data Directory— lets you configure data directory (where things like database and logs go).
- ‘C’ — Configure Core Config Directory — lets you configure config directory of your configuration files.
- ‘T’ —Configure Token— lets you configure different token (ARK by default).
- ‘N’ — Configure Token Network — lets you configure different token network (testnet by default).
- ’X’ — Configure Explorer Repository —you can change core repository path with different Github repo (if you want to pull Explorer code from custom path).
- ’E’ —Configure Explorer Directory — lets you configure directory explorer is installed into when you do ARK explorer installation (can change before you start explorer installation).
‘M’ —Miscellaneous — opens miscellaneous menu.
- ‘U’ — Install OS Updates— checks for OS updates and installs them if available.
- ‘E’ — Create Commander Executable — lets you create executable so you can do “./commander.sh” instead of “bash ./commander.sh” to start commander.
- ‘A’ — Create Commander Alias — lets you create alias so you can start Commander by inputting “commander” instead of “bash ./commander.sh” from anywhere within your current session.
‘L’ — Show Log — opens core log so you can see what is going on with your node process in real-time.
‘P’ — Show Process Monitor— opens PM2 monitor tool so you can see log information where app is, CPU and memory usage and much more.
‘H’ — Show Help — opens help file where all this information is available as well.
‘X’ — Exit— exits ARK Commander.
Forger Node Setup
Note: You will need to register a delegate to continue forger setup.
If you’ll be running a delegate node on DevNet we need to setup ‘Forger’ node process, which includes configuring your passphrase in the configuration file and optional BIP38 encryption of your passphrase.
In the main menu press ‘F’ and ‘enter’ to open forger sub menu:

Now we need to configure forger so press ‘C’ and ‘enter’ to open configuration menu.
You will be asked if you want to use BIP38 encryption for your delegate passphrase. We recommend you use it if you want to encrypt your delegate passphrase, but it is an optional feature.

Next you will be asked to input your delegate passphrase, input it or paste it and press ‘enter’ to save (characters are not visible as you write for security reasons):

If you selected ‘Y’ for BIP38 encryption in next step you’ll be asked to write your selected password for encryption. If you pressed ’n’ you won’t be presented with this message.

After you are done you’ll be asked if you want to start forger process. As we want it to start press ‘Y’ and ‘enter’.

If you have selected ‘Y’ — forger process will start.
Note that you need to input BIP38 password if you have it set in first step.

You’ll return to menu. That is it! You are now all set. You can now check logs and wait for your node to sync to the network. Welcome to the new ARK Core Commander!
And as always if you find any bugs, issues or just want to further improve the new Core Commander:
Report issues : https://github.com/ArkEcosystem/core-commander/issues
Pull requests : https://github.com/ArkEcosystem/core-commander/pulls
Follow us on social media ( Twitter | Facebook | Reddit ) and stay tuned to our blog on Medium and here on Steemit.