How to Create the Smart Contract for Your Token & Crowdsale in a Matter of Minutes – TokenGen In-Depth Tutorial
Blockchain is an emerging industry and new projects spring into existence almost on an hourly basis. However, the majority of them don’t even get to their ICO and even if they do, most of the the ICOs are a complete disaster. Furthermore, even projects with a relatively successful ICO tend to have a high chance of failing not long after the ICO is concluded.
While the reason for all of that is certainly not one-fold, a big part of it, especially concerning the early stage failures, is the difficulty of blockchain development and the high costs that come with hiring specialists that can write the code necessary for a project to take off the ground – its token and crowdsale smart contract.
Today, we are more than happy to present the new version of TokenGen to the blockchain industry. TokenGen allows anyone, regardless of their technical background, to easily create the smart contract necessary to establish and then sell an ERC20 token on the ETH blockchain – in a matter of minutes.
So, if you have a great idea about a blockchain-based startup, but you have gotten scared by the current unwelcoming blockchain development landscape, worry not as TokenGen will come to your rescue. Now let me back up all of that.
How to Use TokenGen to Create Your Token & Crowdsale Smart Contract
First of all, let’s lay the foundation of what you will need in order to use TokenGen:
MetaMask – you will need to install MetaMask in your browser (currently supports Chrome, Firefox, Opera, and Brave). MetaMask is used to login to TokenGen and make payments. Detailed instructions on using MetaMask can be found on their website.
Fabric Tokens – the only way to pay when using TokenGen is with FT. That means that you will not be able to get access to your smart contract unless you pay in Fabric Tokens in the end. If you don’t know where to purchase FT, refer to this page: https://fabrictoken.io/fabric/
Ether – you will need to have some ETH in your MetaMask account in order to pay the transaction fees.
And that’s it. So, once you install MetaMask, you need to create a vault and then create at least one address in it. Send some FT and ETH to that address and you are ready to use TokenGen. Let me show you how.
Logging In
The first step to using TokenGen is logging into the tool:
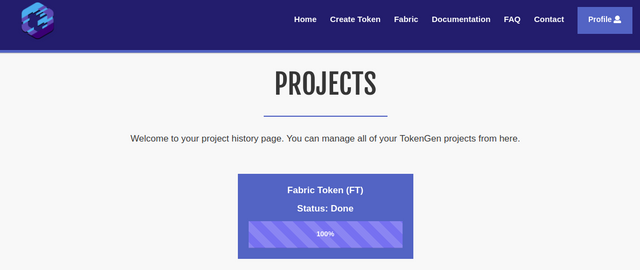
As you can see, I already have a project created for the purposes of this tutorial. But, when you login with a MetaMask account that hasn’t yet used TokenGen, you will see a message telling you that you still don’t have any TokenGen projects and where you can go to create your first one i.e. the Create Token page.
Creating Your First Token Using TokenGen
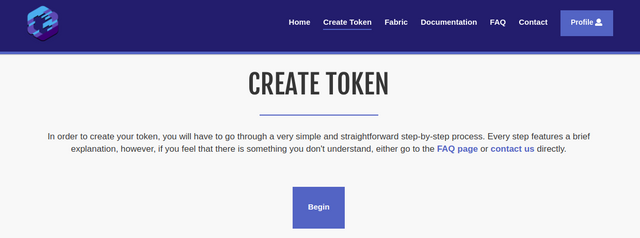
You will see in a second just how easy it is to create your very own custom token using TokenGen. First thing, go to the Create Token page and click the Begin button. On a quick side note, we strongly recommend reading through the Documentation and FAQ pages before proceeding with the token creation process:
Once you click the Begin button, well, the token creation process will begin and you will be redirected to step 1 – choosing your token features:
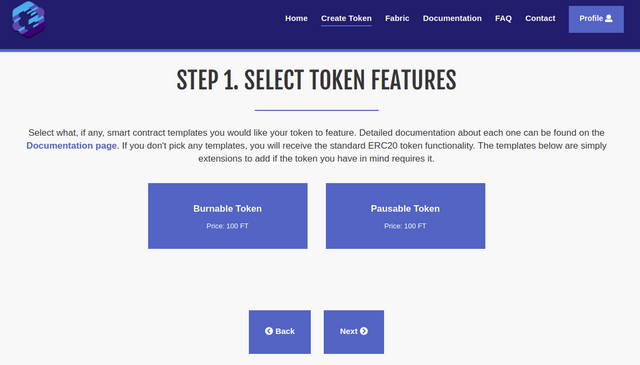
As you can see, you can choose from two token features – Burnable Token and Pausable Token. Both are self-explanatory in the functionality they will provide for your token but again, if there is anything unclear, hover over each feature for a quick tooltip, refer to the TokenGen Documentation page, or send us a message via the form on the Contact page.
Another thing to note here is the individual prices of each feature. As explained when TokenGen was announced, the standard fee for a project is 10 EUR worth of FT, which will provide you with a very basic ERC20 token and a simple fundraiser to sell that token. However, each feature that further expands the functionality of your smart contract will have its own individual price mainly based on its complexity.
Now, once you have selected your token features (if any), you can move onto step 2 – the selection of your fundraiser features:
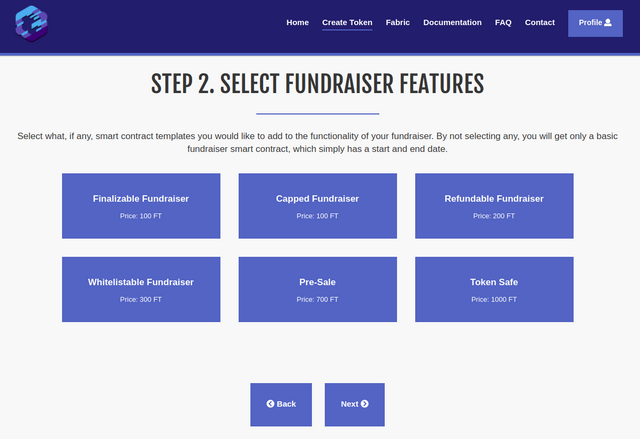
As you can see, there are a lot more features for the fundraiser than the token, which is completely natural. Again, all of these are pretty self-explanatory in what they do, but do take a look at the tooltips for each one or the Documentation page if you want to make sure you are not mistaken about something.
For this first example, I will not select any features, just to show you what TokenGen will provide you with by default, if no features are selected. So, moving on to step 3 – providing project details:
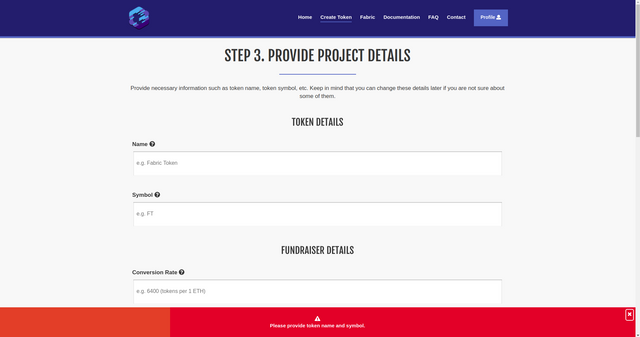
As you can see, all you need to do is provide the necessary details about your project features. Currently, only token name and symbol are mandatory in order to proceed with the process as you are able to add/edit the rest later on via your Projects page. Why so?
Well, because you might not yet be certain of your fundraiser start or end date, or the conversion rate of your token, etc. Thus, you can leave them blank while you are going through the token creation process and then fill them out later on (we will show how you can do that as well in a bit).
An important thing to note here is that, each project input has a tooltip that briefly explains what that field represents. As you cannot see by the screenshot above, by default, if no additional features are selected, the following details are present:
Token
Name
Symbol
Fundraiser
Conversion rate
Start date
Start time
End date
End time
Beneficiary – the address where funds gathered in the crowdsale will be sent.
Min. Contribution
Max. Contribution
Gas Price Limit
Now onto the next and final step of the token creation process – the payment:

As already mentioned, if no additional features are selected, the project cost will be 10 EUR worth of FT. In this instance, we have set it to 100 FT. The payment page is pretty simple, displaying the cost of your project and a purchase button. Of course, you can always go back and change something if you think you’ve overlooked a thing or two.
But if you think you’ve selected the right features for your token and fundraiser (if any), you can proceed and click on the Purchase Smart Contract button.
If you have enough FT in your currently selected MetaMask account, a window will pop up asking you to confirm the payment. Once you do, the transaction will become pending and TokenGen will wait until it is delegated to the ETH network.
Keep in mind that you must not refresh the page while TokenGen is waiting for the transaction to be confirmed. If you do so by mistake or whatever the case is, you will need to contact support via the Contact page and ask how you can verify your payment and proceed with the progress of your project.
MetaMask allows you to set the gas price you are willing to pay for the transaction, so if you set a low gas price, for instance 1 gwei, you might wait a while until it is picked up by a miner and included in a block. So we recommend having some patience – it can take up to several minutes or even a day or so if you set a very low gas price and the ETH network is experiencing heavy load.
We recommend looking at https://ethstats.net/ before making payment via TokenGen, so that you set a decent gas price on the transaction and it goes through relatively fast. Recently, gas prices of around 10 gwei are standard.
Now, if there are no issues with the transaction, once it is delegated to the ETH blockchain i.e. it is included in a block, you will be redirected back to the Projects page where you will see your brand new project:
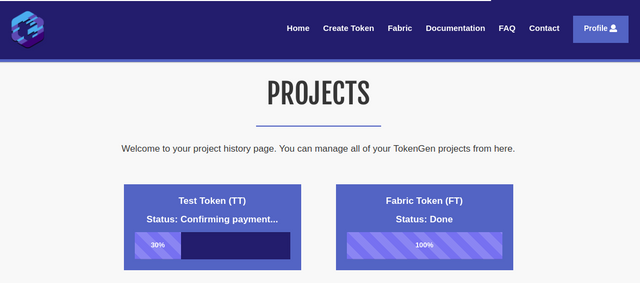
There are a few steps that a TokenGen project goes through until it gets to a 100%. Those include:
Confirming payment – TokenGen is waiting for the payment transaction to get at least 12 confirmations before it will consider it valid. 12 confirmations take, on average, around 3 minutes to complete.
Building the smart contract – TokenGen is building your smart contract based on the features you selected and on the project details you provided.
Testing the smart contract – TokenGen is testing the smart contract built on the previous step as it goes through various scenarios in order to ensure smart contract validity. The build log will be visible on the Manage Project page for each individual project and all tests will appear there so you can see for yourself what scenarios are covered.
Done – the smart contract package is ready for use.
At this point, all you have to do is wait until your new project reaches 100% and then you will be able to use the smart contract and fill any project details that you left empty during the token creation process i.e. introducing the Manage Project page:
Blockchain is an emerging industry and new projects spring into existence almost on an hourly basis. However, the majority of them don’t even get to their ICO and even if they do, most of the the ICOs are a complete disaster. Furthermore, even projects with a relatively successful ICO tend to have a high chance of failing not long after the ICO is concluded.
While the reason for all of that is certainly not one-fold, a big part of it, especially concerning the early stage failures, is the difficulty of blockchain development and the high costs that come with hiring specialists that can write the code necessary for a project to take off the ground – its token and crowdsale smart contract.
Today, we are more than happy to present the new version of TokenGen to the blockchain industry. TokenGen allows anyone, regardless of their technical background, to easily create the smart contract necessary to establish and then sell an ERC20 token on the ETH blockchain – in a matter of minutes.
So, if you have a great idea about a blockchain-based startup, but you have gotten scared by the current unwelcoming blockchain development landscape, worry not as TokenGen will come to your rescue. Now let me back up all of that.
How to Use TokenGen to Create Your Token & Crowdsale Smart Contract
First of all, let’s lay the foundation of what you will need in order to use TokenGen:
MetaMask – you will need to install MetaMask in your browser (currently supports Chrome, Firefox, Opera, and Brave). MetaMask is used to login to TokenGen and make payments. Detailed instructions on using MetaMask can be found on their website.
Fabric Tokens – the only way to pay when using TokenGen is with FT. That means that you will not be able to get access to your smart contract unless you pay in Fabric Tokens in the end. If you don’t know where to purchase FT, refer to this page: https://fabrictoken.io/fabric/
Ether – you will need to have some ETH in your MetaMask account in order to pay the transaction fees.
And that’s it. So, once you install MetaMask, you need to create a vault and then create at least one address in it. Send some FT and ETH to that address and you are ready to use TokenGen. Let me show you how.
Logging In
The first step to using TokenGen is logging into the tool:
TokenGen Login Page
Once you click the Login button, a MetaMask window will open up asking you to sign a simple message with a unique identifier. This is done in order to prove that you are actually the owner of the address with which you are logging into TokenGen. Once you sign the message, you will be redirected to your personal Projects page:
TokenGen Projects Page
As you can see, I already have a project created for the purposes of this tutorial. But, when you login with a MetaMask account that hasn’t yet used TokenGen, you will see a message telling you that you still don’t have any TokenGen projects and where you can go to create your first one i.e. the Create Token page.
Creating Your First Token Using TokenGen
You will see in a second just how easy it is to create your very own custom token using TokenGen. First thing, go to the Create Token page and click the Begin button. On a quick side note, we strongly recommend reading through the Documentation and FAQ pages before proceeding with the token creation process:
TokenGen Create Token Page
Once you click the Begin button, well, the token creation process will begin and you will be redirected to step 1 – choosing your token features:
TokenGen Create Token Select Token Features
As you can see, you can choose from two token features – Burnable Token and Pausable Token. Both are self-explanatory in the functionality they will provide for your token but again, if there is anything unclear, hover over each feature for a quick tooltip, refer to the TokenGen Documentation page, or send us a message via the form on the Contact page.
Another thing to note here is the individual prices of each feature. As explained when TokenGen was announced, the standard fee for a project is 10 EUR worth of FT, which will provide you with a very basic ERC20 token and a simple fundraiser to sell that token. However, each feature that further expands the functionality of your smart contract will have its own individual price mainly based on its complexity.
Now, once you have selected your token features (if any), you can move onto step 2 – the selection of your fundraiser features:
TokenGen Create Token Select Fundraiser Features
As you can see, there are a lot more features for the fundraiser than the token, which is completely natural. Again, all of these are pretty self-explanatory in what they do, but do take a look at the tooltips for each one or the Documentation page if you want to make sure you are not mistaken about something.
For this first example, I will not select any features, just to show you what TokenGen will provide you with by default, if no features are selected. So, moving on to step 3 – providing project details:
TokenGen Create Token Provide Project Details
As you can see, all you need to do is provide the necessary details about your project features. Currently, only token name and symbol are mandatory in order to proceed with the process as you are able to add/edit the rest later on via your Projects page. Why so?
Well, because you might not yet be certain of your fundraiser start or end date, or the conversion rate of your token, etc. Thus, you can leave them blank while you are going through the token creation process and then fill them out later on (we will show how you can do that as well in a bit).
An important thing to note here is that, each project input has a tooltip that briefly explains what that field represents. As you cannot see by the screenshot above, by default, if no additional features are selected, the following details are present:
Token
Name
Symbol
Fundraiser
Conversion rate
Start date
Start time
End date
End time
Beneficiary – the address where funds gathered in the crowdsale will be sent.
Min. Contribution
Max. Contribution
Gas Price Limit
Now onto the next and final step of the token creation process – the payment:
TokenGen Create Token Payment
As already mentioned, if no additional features are selected, the project cost will be 10 EUR worth of FT. In this instance, we have set it to 100 FT. The payment page is pretty simple, displaying the cost of your project and a purchase button. Of course, you can always go back and change something if you think you’ve overlooked a thing or two.
But if you think you’ve selected the right features for your token and fundraiser (if any), you can proceed and click on the Purchase Smart Contract button.
If you have enough FT in your currently selected MetaMask account, a window will pop up asking you to confirm the payment. Once you do, the transaction will become pending and TokenGen will wait until it is delegated to the ETH network.
Keep in mind that you must not refresh the page while TokenGen is waiting for the transaction to be confirmed. If you do so by mistake or whatever the case is, you will need to contact support via the Contact page and ask how you can verify your payment and proceed with the progress of your project.
MetaMask allows you to set the gas price you are willing to pay for the transaction, so if you set a low gas price, for instance 1 gwei, you might wait a while until it is picked up by a miner and included in a block. So we recommend having some patience – it can take up to several minutes or even a day or so if you set a very low gas price and the ETH network is experiencing heavy load.
We recommend looking at https://ethstats.net/ before making payment via TokenGen, so that you set a decent gas price on the transaction and it goes through relatively fast. Recently, gas prices of around 10 gwei are standard.
Now, if there are no issues with the transaction, once it is delegated to the ETH blockchain i.e. it is included in a block, you will be redirected back to the Projects page where you will see your brand new project:
TokenGen Projects
There are a few steps that a TokenGen project goes through until it gets to a 100%. Those include:
Confirming payment – TokenGen is waiting for the payment transaction to get at least 12 confirmations before it will consider it valid. 12 confirmations take, on average, around 3 minutes to complete.
Building the smart contract – TokenGen is building your smart contract based on the features you selected and on the project details you provided.
Testing the smart contract – TokenGen is testing the smart contract built on the previous step as it goes through various scenarios in order to ensure smart contract validity. The build log will be visible on the Manage Project page for each individual project and all tests will appear there so you can see for yourself what scenarios are covered.
Done – the smart contract package is ready for use.
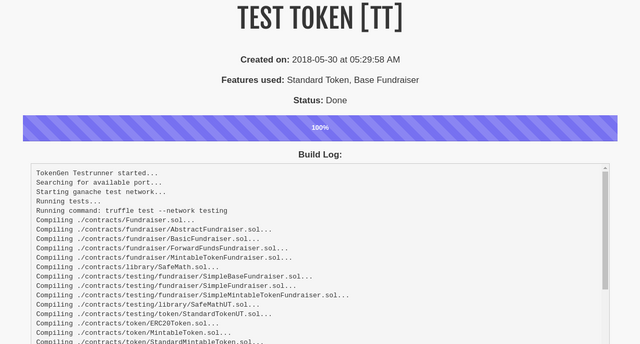
At this point, all you have to do is wait until your new project reaches 100% and then you will be able to use the smart contract and fill any project details that you left empty during the token creation process i.e. introducing the Manage Project page:
TokenGen Test Token Manage Project
As you can see, the Test Token we created has been generated by TokenGen and we can even see the build log with all of the tests that the tool has performed on the smart contract. Naturally, at the moment, the tests fail as we haven’t provided some necessary details such as start and end date, conversion rate, etc.
So, as mentioned earlier, we don’t need to add all details at the time of the token creation process. You can edit and add the ones you are not sure about later via the Manage Project page. So, let’s go ahead and do so:
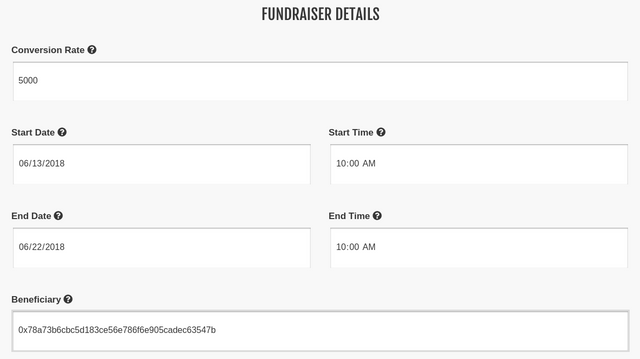
Once we add these details, we can go ahead and click the Save & Rebuild button at the bottom of the page. TokenGen will then save the new project details and begin to re-build the smart contract package. Once finished, the tool will display the full build log with all of the tests, provided all of the required details aren’t missing. Here is the build log for our little Test Token (remember that we haven’t selected any additional features at all):
”TokenGen Testrunner started…
Searching for available port…
Starting ganache test network…
Running tests…
Running command: truffle test –network testing
Compiling ./contracts/Fundraiser.sol…
Compiling ./contracts/fundraiser/AbstractFundraiser.sol…
Compiling ./contracts/fundraiser/BasicFundraiser.sol…
Compiling ./contracts/fundraiser/ForwardFundsFundraiser.sol…
Compiling ./contracts/fundraiser/MintableTokenFundraiser.sol…
Compiling ./contracts/library/SafeMath.sol…
Compiling ./contracts/testing/fundraiser/SimpleBaseFundraiser.sol…
Compiling ./contracts/testing/fundraiser/SimpleFundraiser.sol…
Compiling ./contracts/testing/fundraiser/SimpleMintableTokenFundraiser.sol…
Compiling ./contracts/testing/library/SafeMathUT.sol…
Compiling ./contracts/testing/token/StandardTokenUT.sol…
Compiling ./contracts/token/ERC20Token.sol…
Compiling ./contracts/token/MintableToken.sol…
Compiling ./contracts/token/StandardMintableToken.sol…
Compiling ./contracts/token/StandardToken.sol…
Compiling ./contracts/trait/HasOwner.sol…
Compilation warnings encountered:
/tmp/tg-test-15ppg2i3.qbw/contracts/Fundraiser.sol:51:7: Warning: This looks like an address but has an invalid checksum. If this is not used as an address, please prepend ’00’. Correct checksummed address: ‘0x78a73B6CBc5D183CE56e786f6e905CaDEC63547B’. For more information please see https://solidity.readthedocs.io/en/develop/types.html#address-literals
0x78a73b6cbc5d183ce56e786f6e905cadec63547b // Beneficiary
^—————————————-^
// Project parameters
{
“StandardToken”: {
“Name”: “Test Token”,
“Symbol”: “TT”
},
“BurnableToken”: null,
“PausableToken”: null,
“BaseFundraiser”: {
“ConversionRate”: 5000,
“StartDate”: “2018-06-13”,
“StartTime”: “10:00”,
“EndDate”: “2018-06-22”,
“EndTime”: “10:00”,
“Beneficiary”: “0x78a73b6cbc5d183ce56e786f6e905cadec63547b”,
“MinContribution”: null,
“MaxContribution”: null,
“StartDateTime”: “2018-06-13T10:00:00Z”,
“StartTimestamp”: 1528884000,
“EndDateTime”: “2018-06-22T10:00:00Z”,
“EndTimestamp”: 1529661600,
“HasIndividualCaps”: false
},
“PreSale”: null,
“CappedFundraiser”: null,
“FinalizableFundraiser”: null,
“RefundableFundraiser”: null,
“WhitelistableFundraiser”: null,
“TokenSafe”: null
}
Contract: SafeMathUT [SafeMath, library]
✓ should be able to add numbers correctly
✓ should throw an exception when overflow on addition
✓ should be able to subtract numbers correctly
✓ should not allow the subtraction a – b if a < b, i.e. underflow
✓ should be able to multiple numbers correctly
✓ should be able to multiple by zero correctly, e.g. 0 * 3 == 0
✓ should be able to multiple by zero correctly, e.g. 3 * 0 == 0
✓ should throw an exception when overflow on multiplication
✓ should be able to divide numbers correctly
✓ should return the integer value of the division if there is reminder
✓ should return zero if divider is larger than the dividend
✓ should throw an exception when dividing by zero
Contract: StandardTokenUT [StandardToken, token]
✓ should return the correct totalSupply after construction
transfer operations
✓ should emit event after successful transfer (61ms)
✓ should return correct balances after transfer (93ms)
✓ should return correct balances after transfer (87ms)
✓ should fail when trying to transfer more than balance
✓ should not allow zero tokens transfer
✓ should not allow to transfer to address zero (burn)
delegated transfer operations (allowance, approve and transferFrom)
✓ should emit event after successful approval (41ms)
✓ should return the correct allowance after approval (59ms)
✓ should emit event after successful delegated transfer (75ms)
✓ should return correct token balances after transfering from another account (127ms)
✓ should return an error when trying to transfer more than allowed (62ms)
✓ should return an error when trying to transfer more than the balance (71ms)
✓ should not allow zero tokens transferFrom (61ms)
✓ should not allow to burn delegated tokens (58ms)
Contract: StandardMintableToken [MintableToken, token]
✓ should return zero totalSupply after construction
minting operations
✓ should allow owner to mint tokens (67ms)
✓ should not allow other than the owner to mint tokens (71ms)
✓ should allow no other than the owner to disable minting (56ms)
✓ should be able to disable minting only once (60ms)
✓ should not allow minting after it is disabled (62ms)
Contract: StandardMintableToken [StandardToken, token]
✓ should return the correct totalSupply after construction
transfer operations
✓ should emit event after successful transfer
✓ should return correct balances after transfer (69ms)
✓ should return correct balances after transfer (64ms)
✓ should fail when trying to transfer more than balance
✓ should not allow zero tokens transfer
✓ should not allow to transfer to address zero (burn)
delegated transfer operations (allowance, approve and transferFrom)
✓ should emit event after successful approval
✓ should return the correct allowance after approval (50ms)
✓ should emit event after successful delegated transfer (75ms)
✓ should return correct token balances after transfering from another account (114ms)
✓ should return an error when trying to transfer more than allowed (51ms)
✓ should return an error when trying to transfer more than the balance (55ms)
✓ should not allow zero tokens transferFrom (47ms)
✓ should not allow to burn delegated tokens (51ms)
Contract: HasOwner [HasOwner, trait]
✓ should have an owner
✓ should be able to transfer ownership to a new owner (99ms)
✓ should not start transfer from different account than the owner
✓ should not accept ownership from different account than the newOwner (67ms)
Contract: SimpleFundraiser [SimpleFundraiser, fundraiser]
contract creation
✓ should have all token parameters set correctly (130ms)
✓ should not allow zero address beneficiary
✓ should not allow zero conversion rate (42ms)
✓ should not allow the start to be after the end (42ms)
handling the beneficiary
✓ should return the proper beneficiary when created
✓ should not allow to set zero address beneficiary
✓ should allow to change beneficiary (49ms)
✓ should not allow anyone other than the owner to change beneficiary
before the fundraiser begin
✓ should not be ended
conversion rate
✓ should allow to change conversion rate by the owner (50ms)
✓ should not allow to change conversion rate to zero
✓ should not allow to change conversion rate by someone other than the owner
funds and assets
✓ should not allow anyone to create tokens by sending ether to contract
during the fundraiser
✓ should not be ended
conversion rate
✓ should not allow owner to change conversion rate (51ms)
✓ should not allow anyone else to change conversion rate
funds and token assets
✓ should transfer the correct amount of ether to the beneficiary (1006ms)
✓ should not allow transfers with zero amount
✓ should allow to create tokens by sending ether to contract (84ms)
after the fundraiser
✓ should have ended
Contract: SimpleMintableTokenFundraiser [SimpleFundraiser, fundraiser]
contract creation
✓ should have all token parameters set correctly (133ms)
✓ should not allow zero address beneficiary (38ms)
✓ should not allow zero conversion rate (116ms)
✓ should not allow the start to be after the end (48ms)
handling the beneficiary
✓ should return the proper beneficiary when created
✓ should not allow to set zero address beneficiary
✓ should allow to change beneficiary (45ms)
✓ should not allow anyone other than the owner to change beneficiary
before the fundraiser begin
✓ should not be ended
conversion rate
✓ should allow to change conversion rate by the owner (40ms)
✓ should not allow to change conversion rate to zero
✓ should not allow to change conversion rate by someone other than the owner
funds and assets
✓ should not allow anyone to create tokens by sending ether to contract
during the fundraiser
✓ should not be ended
conversion rate
✓ should not allow owner to change conversion rate (47ms)
✓ should not allow anyone else to change conversion rate
funds and token assets
✓ should transfer the correct amount of ether to the beneficiary (1158ms)
✓ should not allow transfers with zero amount
✓ should allow to create tokens by sending ether to contract (93ms)
after the fundraiser
✓ should have ended
Contract: TestTokenFundraiser
Parameters
✓ ERC20 [Name=”Test Token”, Symbol=”TT”, Decimals=18] (66ms)
✓ Start/End [StartTime=2018-06-13T10:00:00Z (1528884000), EndTime=2018-06-22T10:00:00Z (1529661600)] (44ms)
✓ Funds [ConversionRate=5000, Beneficiary=0x78a73b6cbc5d183ce56e786f6e905cadec63547b]
Beneficiary
✓ Correct beneficiary set [address=0x78a73b6cbc5d183ce56e786f6e905cadec63547b]
✓ Owner/Creator can change beneficiary (42ms)
✓ Non-owner cannot change beneficiary
Conversion Rate
✓ Correct conversion rate set [ConversionRate=5000]
✓ Owner can change conversion rate (47ms)
✓ Non-owner cannot change conversion rate
Contract: TestTokenFundraiser [Ethereum network tests]
✓ Contract requires less than ‘7000000’ gas (708ms)
102 passing (23s)”
As you can see, TokenGen tests all kinds of scenarios regarding the smart contract in order to make sure there are no bugs in the code. Bugs in deployed smart contracts are a menace and we have done our best to ensure that TokenGen delivers a flawless smart contract package.
It is imperative that you make sure each of your projects has a perfect build log i.e. all tests are passing and none are failing. If some are failing, you might have provided incorrect project details or you might have missed some required ones as a whole. So make sure the build log is perfect before downloading and using your smart contract package.
Now, let’s create another token, but this time, add some of the advanced features.
Blockchain is an emerging industry and new projects spring into existence almost on an hourly basis. However, the majority of them don’t even get to their ICO and even if they do, most of the the ICOs are a complete disaster. Furthermore, even projects with a relatively successful ICO tend to have a high chance of failing not long after the ICO is concluded.
While the reason for all of that is certainly not one-fold, a big part of it, especially concerning the early stage failures, is the difficulty of blockchain development and the high costs that come with hiring specialists that can write the code necessary for a project to take off the ground – its token and crowdsale smart contract.
Today, we are more than happy to present the new version of TokenGen to the blockchain industry. TokenGen allows anyone, regardless of their technical background, to easily create the smart contract necessary to establish and then sell an ERC20 token on the ETH blockchain – in a matter of minutes.
So, if you have a great idea about a blockchain-based startup, but you have gotten scared by the current unwelcoming blockchain development landscape, worry not as TokenGen will come to your rescue. Now let me back up all of that.
How to Use TokenGen to Create Your Token & Crowdsale Smart Contract
First of all, let’s lay the foundation of what you will need in order to use TokenGen:
MetaMask – you will need to install MetaMask in your browser (currently supports Chrome, Firefox, Opera, and Brave). MetaMask is used to login to TokenGen and make payments. Detailed instructions on using MetaMask can be found on their website.
Fabric Tokens – the only way to pay when using TokenGen is with FT. That means that you will not be able to get access to your smart contract unless you pay in Fabric Tokens in the end. If you don’t know where to purchase FT, refer to this page: https://fabrictoken.io/fabric/
Ether – you will need to have some ETH in your MetaMask account in order to pay the transaction fees.
And that’s it. So, once you install MetaMask, you need to create a vault and then create at least one address in it. Send some FT and ETH to that address and you are ready to use TokenGen. Let me show you how.
Logging In
The first step to using TokenGen is logging into the tool:
TokenGen Login Page
Once you click the Login button, a MetaMask window will open up asking you to sign a simple message with a unique identifier. This is done in order to prove that you are actually the owner of the address with which you are logging into TokenGen. Once you sign the message, you will be redirected to your personal Projects page:
TokenGen Projects Page
As you can see, I already have a project created for the purposes of this tutorial. But, when you login with a MetaMask account that hasn’t yet used TokenGen, you will see a message telling you that you still don’t have any TokenGen projects and where you can go to create your first one i.e. the Create Token page.
Creating Your First Token Using TokenGen
You will see in a second just how easy it is to create your very own custom token using TokenGen. First thing, go to the Create Token page and click the Begin button. On a quick side note, we strongly recommend reading through the Documentation and FAQ pages before proceeding with the token creation process:
TokenGen Create Token Page
Once you click the Begin button, well, the token creation process will begin and you will be redirected to step 1 – choosing your token features:
TokenGen Create Token Select Token Features
As you can see, you can choose from two token features – Burnable Token and Pausable Token. Both are self-explanatory in the functionality they will provide for your token but again, if there is anything unclear, hover over each feature for a quick tooltip, refer to the TokenGen Documentation page, or send us a message via the form on the Contact page.
Another thing to note here is the individual prices of each feature. As explained when TokenGen was announced, the standard fee for a project is 10 EUR worth of FT, which will provide you with a very basic ERC20 token and a simple fundraiser to sell that token. However, each feature that further expands the functionality of your smart contract will have its own individual price mainly based on its complexity.
Now, once you have selected your token features (if any), you can move onto step 2 – the selection of your fundraiser features:
TokenGen Create Token Select Fundraiser Features
As you can see, there are a lot more features for the fundraiser than the token, which is completely natural. Again, all of these are pretty self-explanatory in what they do, but do take a look at the tooltips for each one or the Documentation page if you want to make sure you are not mistaken about something.
For this first example, I will not select any features, just to show you what TokenGen will provide you with by default, if no features are selected. So, moving on to step 3 – providing project details:
TokenGen Create Token Provide Project Details
As you can see, all you need to do is provide the necessary details about your project features. Currently, only token name and symbol are mandatory in order to proceed with the process as you are able to add/edit the rest later on via your Projects page. Why so?
Well, because you might not yet be certain of your fundraiser start or end date, or the conversion rate of your token, etc. Thus, you can leave them blank while you are going through the token creation process and then fill them out later on (we will show how you can do that as well in a bit).
An important thing to note here is that, each project input has a tooltip that briefly explains what that field represents. As you cannot see by the screenshot above, by default, if no additional features are selected, the following details are present:
Token
Name
Symbol
Fundraiser
Conversion rate
Start date
Start time
End date
End time
Beneficiary – the address where funds gathered in the crowdsale will be sent.
Min. Contribution
Max. Contribution
Gas Price Limit
Now onto the next and final step of the token creation process – the payment:
TokenGen Create Token Payment
As already mentioned, if no additional features are selected, the project cost will be 10 EUR worth of FT. In this instance, we have set it to 100 FT. The payment page is pretty simple, displaying the cost of your project and a purchase button. Of course, you can always go back and change something if you think you’ve overlooked a thing or two.
But if you think you’ve selected the right features for your token and fundraiser (if any), you can proceed and click on the Purchase Smart Contract button.
If you have enough FT in your currently selected MetaMask account, a window will pop up asking you to confirm the payment. Once you do, the transaction will become pending and TokenGen will wait until it is delegated to the ETH network.
Keep in mind that you must not refresh the page while TokenGen is waiting for the transaction to be confirmed. If you do so by mistake or whatever the case is, you will need to contact support via the Contact page and ask how you can verify your payment and proceed with the progress of your project.
MetaMask allows you to set the gas price you are willing to pay for the transaction, so if you set a low gas price, for instance 1 gwei, you might wait a while until it is picked up by a miner and included in a block. So we recommend having some patience – it can take up to several minutes or even a day or so if you set a very low gas price and the ETH network is experiencing heavy load.
We recommend looking at https://ethstats.net/ before making payment via TokenGen, so that you set a decent gas price on the transaction and it goes through relatively fast. Recently, gas prices of around 10 gwei are standard.
Now, if there are no issues with the transaction, once it is delegated to the ETH blockchain i.e. it is included in a block, you will be redirected back to the Projects page where you will see your brand new project:
TokenGen Projects
There are a few steps that a TokenGen project goes through until it gets to a 100%. Those include:
Confirming payment – TokenGen is waiting for the payment transaction to get at least 12 confirmations before it will consider it valid. 12 confirmations take, on average, around 3 minutes to complete.
Building the smart contract – TokenGen is building your smart contract based on the features you selected and on the project details you provided.
Testing the smart contract – TokenGen is testing the smart contract built on the previous step as it goes through various scenarios in order to ensure smart contract validity. The build log will be visible on the Manage Project page for each individual project and all tests will appear there so you can see for yourself what scenarios are covered.
Done – the smart contract package is ready for use.
At this point, all you have to do is wait until your new project reaches 100% and then you will be able to use the smart contract and fill any project details that you left empty during the token creation process i.e. introducing the Manage Project page:
TokenGen Test Token Manage Project
As you can see, the Test Token we created has been generated by TokenGen and we can even see the build log with all of the tests that the tool has performed on the smart contract. Naturally, at the moment, the tests fail as we haven’t provided some necessary details such as start and end date, conversion rate, etc.
So, as mentioned earlier, we don’t need to add all details at the time of the token creation process. You can edit and add the ones you are not sure about later via the Manage Project page. So, let’s go ahead and do so:
TokenGen Manage Project Page Edit Project Details
Once we add these details, we can go ahead and click the Save & Rebuild button at the bottom of the page. TokenGen will then save the new project details and begin to re-build the smart contract package. Once finished, the tool will display the full build log with all of the tests, provided all of the required details aren’t missing. Here is the build log for our little Test Token (remember that we haven’t selected any additional features at all):
TokenGen Testrunner started…
Searching for available port…
Starting ganache test network…
Running tests…
Running command: truffle test –network testing
Compiling ./contracts/Fundraiser.sol…
Compiling ./contracts/fundraiser/AbstractFundraiser.sol…
Compiling ./contracts/fundraiser/BasicFundraiser.sol…
Compiling ./contracts/fundraiser/ForwardFundsFundraiser.sol…
Compiling ./contracts/fundraiser/MintableTokenFundraiser.sol…
Compiling ./contracts/library/SafeMath.sol…
Compiling ./contracts/testing/fundraiser/SimpleBaseFundraiser.sol…
Compiling ./contracts/testing/fundraiser/SimpleFundraiser.sol…
Compiling ./contracts/testing/fundraiser/SimpleMintableTokenFundraiser.sol…
Compiling ./contracts/testing/library/SafeMathUT.sol…
Compiling ./contracts/testing/token/StandardTokenUT.sol…
Compiling ./contracts/token/ERC20Token.sol…
Compiling ./contracts/token/MintableToken.sol…
Compiling ./contracts/token/StandardMintableToken.sol…
Compiling ./contracts/token/StandardToken.sol…
Compiling ./contracts/trait/HasOwner.sol…
Compilation warnings encountered:
/tmp/tg-test-15ppg2i3.qbw/contracts/Fundraiser.sol:51:7: Warning: This looks like an address but has an invalid checksum. If this is not used as an address, please prepend ’00’. Correct checksummed address: ‘0x78a73B6CBc5D183CE56e786f6e905CaDEC63547B’. For more information please see https://solidity.readthedocs.io/en/develop/types.html#address-literals
0x78a73b6cbc5d183ce56e786f6e905cadec63547b // Beneficiary
^—————————————-^
// Project parameters
{
“StandardToken”: {
“Name”: “Test Token”,
“Symbol”: “TT”
},
“BurnableToken”: null,
“PausableToken”: null,
“BaseFundraiser”: {
“ConversionRate”: 5000,
“StartDate”: “2018-06-13”,
“StartTime”: “10:00”,
“EndDate”: “2018-06-22”,
“EndTime”: “10:00”,
“Beneficiary”: “0x78a73b6cbc5d183ce56e786f6e905cadec63547b”,
“MinContribution”: null,
“MaxContribution”: null,
“StartDateTime”: “2018-06-13T10:00:00Z”,
“StartTimestamp”: 1528884000,
“EndDateTime”: “2018-06-22T10:00:00Z”,
“EndTimestamp”: 1529661600,
“HasIndividualCaps”: false
},
“PreSale”: null,
“CappedFundraiser”: null,
“FinalizableFundraiser”: null,
“RefundableFundraiser”: null,
“WhitelistableFundraiser”: null,
“TokenSafe”: null
}
Contract: SafeMathUT [SafeMath, library]
✓ should be able to add numbers correctly
✓ should throw an exception when overflow on addition
✓ should be able to subtract numbers correctly
✓ should not allow the subtraction a – b if a < b, i.e. underflow
✓ should be able to multiple numbers correctly
✓ should be able to multiple by zero correctly, e.g. 0 * 3 == 0
✓ should be able to multiple by zero correctly, e.g. 3 * 0 == 0
✓ should throw an exception when overflow on multiplication
✓ should be able to divide numbers correctly
✓ should return the integer value of the division if there is reminder
✓ should return zero if divider is larger than the dividend
✓ should throw an exception when dividing by zero
Contract: StandardTokenUT [StandardToken, token]
✓ should return the correct totalSupply after construction
transfer operations
✓ should emit event after successful transfer (61ms)
✓ should return correct balances after transfer (93ms)
✓ should return correct balances after transfer (87ms)
✓ should fail when trying to transfer more than balance
✓ should not allow zero tokens transfer
✓ should not allow to transfer to address zero (burn)
delegated transfer operations (allowance, approve and transferFrom)
✓ should emit event after successful approval (41ms)
✓ should return the correct allowance after approval (59ms)
✓ should emit event after successful delegated transfer (75ms)
✓ should return correct token balances after transfering from another account (127ms)
✓ should return an error when trying to transfer more than allowed (62ms)
✓ should return an error when trying to transfer more than the balance (71ms)
✓ should not allow zero tokens transferFrom (61ms)
✓ should not allow to burn delegated tokens (58ms)
Contract: StandardMintableToken [MintableToken, token]
✓ should return zero totalSupply after construction
minting operations
✓ should allow owner to mint tokens (67ms)
✓ should not allow other than the owner to mint tokens (71ms)
✓ should allow no other than the owner to disable minting (56ms)
✓ should be able to disable minting only once (60ms)
✓ should not allow minting after it is disabled (62ms)
Contract: StandardMintableToken [StandardToken, token]
✓ should return the correct totalSupply after construction
transfer operations
✓ should emit event after successful transfer
✓ should return correct balances after transfer (69ms)
✓ should return correct balances after transfer (64ms)
✓ should fail when trying to transfer more than balance
✓ should not allow zero tokens transfer
✓ should not allow to transfer to address zero (burn)
delegated transfer operations (allowance, approve and transferFrom)
✓ should emit event after successful approval
✓ should return the correct allowance after approval (50ms)
✓ should emit event after successful delegated transfer (75ms)
✓ should return correct token balances after transfering from another account (114ms)
✓ should return an error when trying to transfer more than allowed (51ms)
✓ should return an error when trying to transfer more than the balance (55ms)
✓ should not allow zero tokens transferFrom (47ms)
✓ should not allow to burn delegated tokens (51ms)
Contract: HasOwner [HasOwner, trait]
✓ should have an owner
✓ should be able to transfer ownership to a new owner (99ms)
✓ should not start transfer from different account than the owner
✓ should not accept ownership from different account than the newOwner (67ms)
Contract: SimpleFundraiser [SimpleFundraiser, fundraiser]
contract creation
✓ should have all token parameters set correctly (130ms)
✓ should not allow zero address beneficiary
✓ should not allow zero conversion rate (42ms)
✓ should not allow the start to be after the end (42ms)
handling the beneficiary
✓ should return the proper beneficiary when created
✓ should not allow to set zero address beneficiary
✓ should allow to change beneficiary (49ms)
✓ should not allow anyone other than the owner to change beneficiary
before the fundraiser begin
✓ should not be ended
conversion rate
✓ should allow to change conversion rate by the owner (50ms)
✓ should not allow to change conversion rate to zero
✓ should not allow to change conversion rate by someone other than the owner
funds and assets
✓ should not allow anyone to create tokens by sending ether to contract
during the fundraiser
✓ should not be ended
conversion rate
✓ should not allow owner to change conversion rate (51ms)
✓ should not allow anyone else to change conversion rate
funds and token assets
✓ should transfer the correct amount of ether to the beneficiary (1006ms)
✓ should not allow transfers with zero amount
✓ should allow to create tokens by sending ether to contract (84ms)
after the fundraiser
✓ should have ended
Contract: SimpleMintableTokenFundraiser [SimpleFundraiser, fundraiser]
contract creation
✓ should have all token parameters set correctly (133ms)
✓ should not allow zero address beneficiary (38ms)
✓ should not allow zero conversion rate (116ms)
✓ should not allow the start to be after the end (48ms)
handling the beneficiary
✓ should return the proper beneficiary when created
✓ should not allow to set zero address beneficiary
✓ should allow to change beneficiary (45ms)
✓ should not allow anyone other than the owner to change beneficiary
before the fundraiser begin
✓ should not be ended
conversion rate
✓ should allow to change conversion rate by the owner (40ms)
✓ should not allow to change conversion rate to zero
✓ should not allow to change conversion rate by someone other than the owner
funds and assets
✓ should not allow anyone to create tokens by sending ether to contract
during the fundraiser
✓ should not be ended
conversion rate
✓ should not allow owner to change conversion rate (47ms)
✓ should not allow anyone else to change conversion rate
funds and token assets
✓ should transfer the correct amount of ether to the beneficiary (1158ms)
✓ should not allow transfers with zero amount
✓ should allow to create tokens by sending ether to contract (93ms)
after the fundraiser
✓ should have ended
Contract: TestTokenFundraiser
Parameters
✓ ERC20 [Name=”Test Token”, Symbol=”TT”, Decimals=18] (66ms)
✓ Start/End [StartTime=2018-06-13T10:00:00Z (1528884000), EndTime=2018-06-22T10:00:00Z (1529661600)] (44ms)
✓ Funds [ConversionRate=5000, Beneficiary=0x78a73b6cbc5d183ce56e786f6e905cadec63547b]
Beneficiary
✓ Correct beneficiary set [address=0x78a73b6cbc5d183ce56e786f6e905cadec63547b]
✓ Owner/Creator can change beneficiary (42ms)
✓ Non-owner cannot change beneficiary
Conversion Rate
✓ Correct conversion rate set [ConversionRate=5000]
✓ Owner can change conversion rate (47ms)
✓ Non-owner cannot change conversion rate
Contract: TestTokenFundraiser [Ethereum network tests]
✓ Contract requires less than ‘7000000’ gas (708ms)
102 passing (23s)
As you can see, TokenGen tests all kinds of scenarios regarding the smart contract in order to make sure there are no bugs in the code. Bugs in deployed smart contracts are a menace and we have done our best to ensure that TokenGen delivers a flawless smart contract package.
It is imperative that you make sure each of your projects has a perfect build log i.e. all tests are passing and none are failing. If some are failing, you might have provided incorrect project details or you might have missed some required ones as a whole. So make sure the build log is perfect before downloading and using your smart contract package.
Now, let’s create another token, but this time, add some of the advanced features.
Creating a More Advanced Smart Contract
The Test Token we created in the previous example is just the basic smart contract that can be generated using TokenGen. It involves a simple ERC20 token with a basic fundraiser that only has a start and end date.
But, TokenGen offers so much more than that. Let’s now create a project that uses a lot of the features provided by the tool. For this new example, we will use the following additional features:
Token
Burnable Token – allows token holders to burn i.e. destroy tokens for whatever reason.
Pausable Token – allows you to pause/unpause transfers on your token.
Fundraiser
Capped Fundraiser – adds a hard cap to your fundraiser.
Whitelistable Fundraiser – allows only whitelisted addresses to participate in the fundraiser (also applies to the pre-sale if the feature is selected).
Pre-Sale – adds a pre-sale period to your fundraiser.
Token Safe – adds a token safe where tokens can be locked for specific groups of people i.e. core team, advisors, etc.
Again, we follow the exact same steps as with the Test Token example – we just provide the project details and then we move onto the payment step. However, this time, the project will cost 2400 FT. Let’s name this one Suppoman Token (ST) and proceed with the payment.
Once the payment is confirmed, TokenGen will begin building and testing the smart contract. However, as opposed to the Test Token we created in the previous example, the Suppoman Token will have a lot more tests due to the fact that we have selected a number of custom features:
”details in link bottom page”
As you can see, this smart contract has close to double the tests compared to the previous one. Testing each smart contract is one of the main parts of TokenGen and it is something we are looking to improve on a weekly basis by adding newer and newer tests that cover an ever-increasing number of scenarios.
It is important to note here that, as we add new features to TokenGen, we will always first test them extensively before allowing users to take advantage of them. Now, we have seen two examples of projects created using TokenGen, but we have not yet seen what the smart contract package looks like. So, it’s about time we did that.
TokenGen Smart Contract Package
For this portrayal, we will use the Suppoman Token we created in the previous segment. Getting the smart contract package generated by TokenGen is extremely simple – just go to the project page for the specific project, and click the Download Package button. Keep in mind that the button will not show if the project does not have a status of Done.
Once you click the Download Package button, an archive will be downloaded to your computer with the following structure: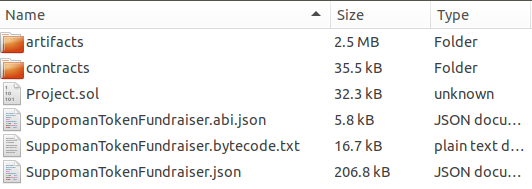
A quick explanation of each of these files and folders:
artifacts – contains JSON files for all of the features used by your project.
contracts – contains all of the .sol files that TokenGen used in order to build your project.
Project.sol – contains the entire code for your project in one place i.e. all of the individual contracts that are used to make up your token and its fundraiser.
ExampleToken.abi.json – contains the application binary interface (ABI) for the token contract. You can check out what the ABI is and how it is used to interact with smart contracts here.
ExampleTokenFundraiser.abi.json – contains the ABI of your fundraiser smart contract.
ExampleTokenFundraiser.bytecode.txt – contains the bytecode of your entire smart contract.
ExampleTokenFundraiser.json – contains the compiled code for the entire smart contract.
Now, let me show you how easy it is to actually deploy a TokenGen smart contract to the Ropsten testnet for example.
How to Deploy a TokenGen Smart Contract
The easiest way to do it is via MyEtherWallet as it will not require you to download the ETH blockchain locally. However, if you do have a Mist wallet fully synced with the Ethereum network, you can also deploy the smart contract from there. I will show you how to do both.
Deploying via MyEtherWallet
We are going to use this scenario to deploy another Suppoman Token to the Ropsten testnet and here’s how we will do it. First off, I will create a new project to only use the following features (simple is almost always better, especially in the case of ICOs):
Pausable Token
Burnable Token
Pre-Sale
I have also provided the following project details:
Fundraiser
Conversion Rate – 10000
Start Date – 07/01/2018
Start Time – 10:00 A.M.
End Date – 12/31/2018
End Time – 10:00 A.M.
Beneficiary – 0x01E092F64f400EC5a03cE7e9F22EE2503a130a8D
Pre-Sale
Total Supply – 50000000 (50 million ST)
Conversion Rate – 20000
Start Date – 06/07/2018
Start Time – 12:00 A.M.
End Date – 06/30/2018
End Time – 10:00 A.M.
We then pay for the project and wait for TokenGen to build and test the smart contract package. Finally, we open up MEW and go to the Contracts page. Then we click on the Deploy Contract link:
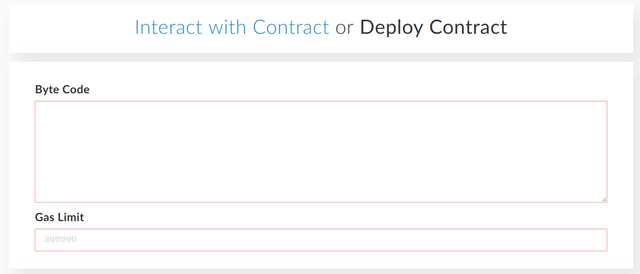
More here:
Congratulations @scortan! You received a personal award!
You can view your badges on your Steem Board and compare to others on the Steem Ranking
Vote for @Steemitboard as a witness to get one more award and increased upvotes!