3D Cryptocurrency Coins Part 1 || Blender Tutorial || Modelling
Topic: 3D Cryptocurrency Coins || Blender Tutorial || Modelling
Prequel:
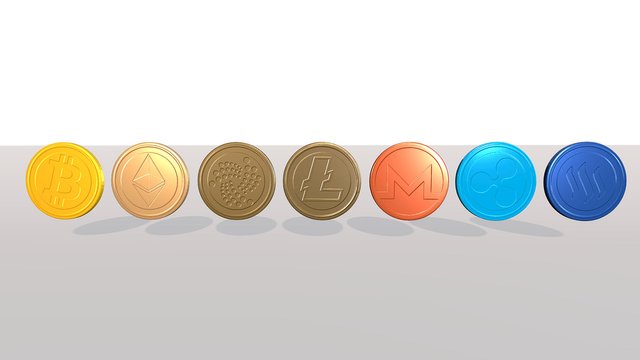
Before I started to write, I was looking for a good opener. It will be my first story about 3D here, that’s why it was important for me to see what is trending. What want the people? What are they talking about? What is currently the most liked story? I checked some trending stories on steemit. I noticed some stories are about cryptocurrency. Yes! Perfect for me. Why? Because I published the day before yesterday some 3D coins on my profile on Sketchfab (download them for free).
Side note:
What is Sketchfab?
Sketchfab is a great realtime rendering web based application. I felt in love with the Sketchfab community, the workers and all the nice rendering options. And the cool thing is, everyone can use it. If you are interested in 3D, I really really recommend Sketchfab.
Goal:
My goal is to give you cryptocurrency coins as 3D models for free. I modelled them in Blender and painted the textures in Substance Painter. If you currently working on something about cryptocurrency and you need them for your game, advertisment, YouTube videos or whatever, just follow this link to my Sketchfab profile and get them.
Credit me:
You are allowed to use them for whatever you like. But it would be cool, if you credit me. Use my Sketchfab link.
What do you download?
You get the files .fbx and .pngs (seven normal maps and seven low poly coins)
What software did I used?
I used the software Blender. It is a free software.
The normal maps are made in Substance Painter. Unfortunately this software is not free. But you can download the trial version.
How did I model them (Tutorial)?
For the ones, who are not interested in how I made them, you don't have to continue reading. Now the little tutorial for beginners follows. :)
You don’t have to be professional, to make your own 3D coins. To be honest. It is quite simple. But it needs a bit time to understand Blender. I will try to explain each step I did.
Before I start, I will give you some fundamental tips (for beginners):
- To select one object in Blender (geometries, cameras etc.) use the Right Mouse Button.
- Middle Mouse Button is to rotate the view around the object.
- Shift + Middle Mouse Button is to move the view.
- 'a' is for select or deselect all objects
- 'x' is to delete objects
- 'g' is to move selected objects
- 's' is to scale selected objects
- 'r' is to rotate selected objects
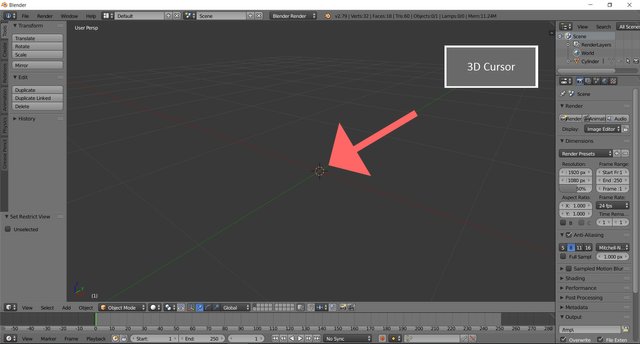
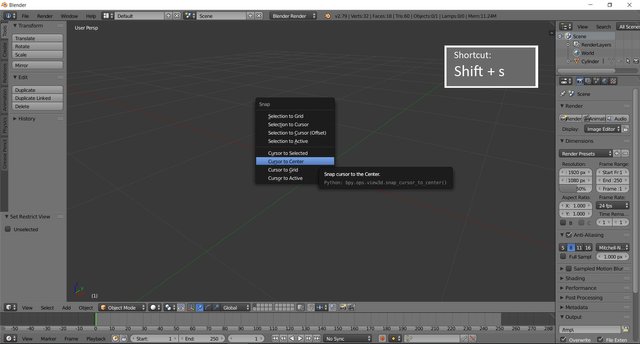
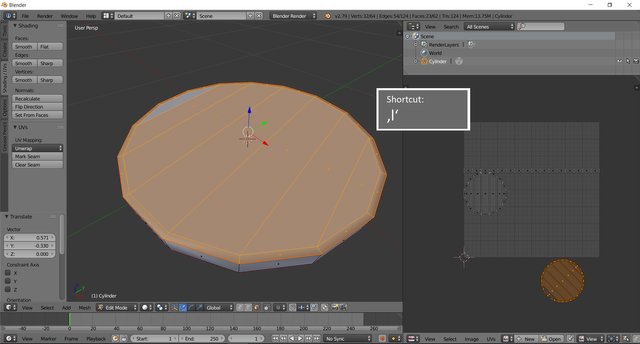
- Shift + 's' is to change the 3D cursor [that little red white circle] (if you add a new object, it will appear at the 3D cursor). I always click Shift + 's' and then choose ‘curser to center’. Don’t mess your energy and time too much with that right now. It is important, when you are more experienced.
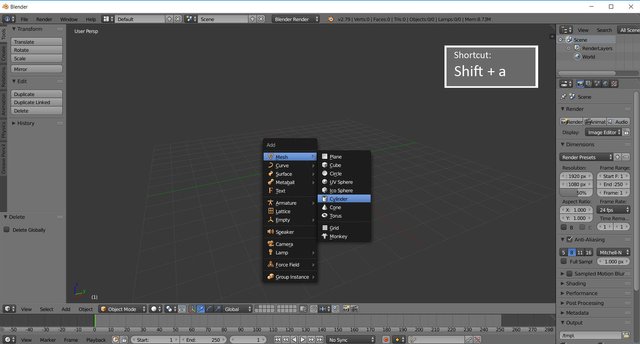
- Shift + 'a' is for adding objects
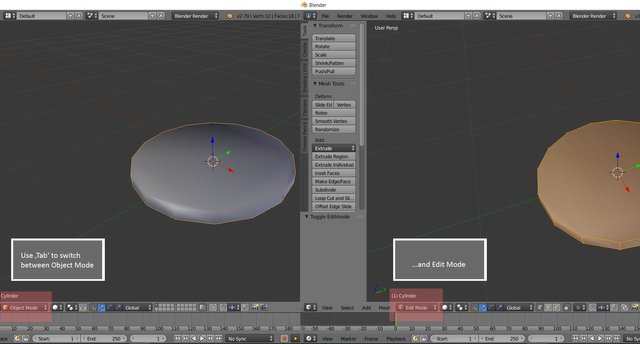
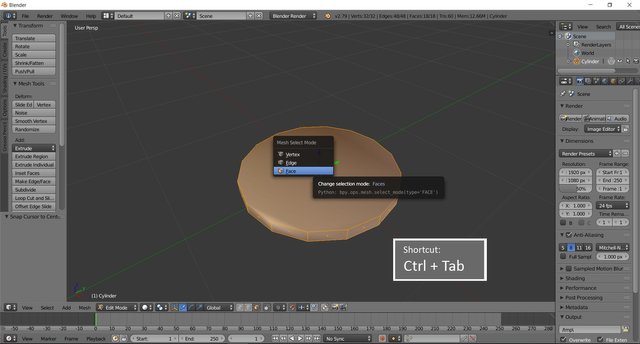
- Use Tab to change the mode. That is really fundamental. In Object Mode you can’t modelling. Press Tab to change from Object Mode to Edit Mode vice versa.
- In Edit Mode press Ctrl + Tab to choose between vertices, edges or faces. One face or polygon has minimum of three (better four) vertices (the knots between the edges). Between two vertices can't be a face. It's rather a edge then. Try to avoid more than four vertices.
- Use ‘a’ to select or deselect all vertices, edges or faces in Edit Mode.
- Use ‘b’ to select more than one vertices, edges or faces in Edit Mode (your cursor change to a rectangle).
My Workflow
Modelling
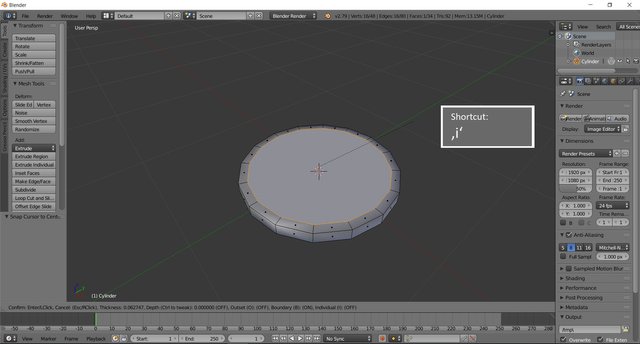
I started with a simple geometry (cylinder) [Shift+a]. I always start with one primitive geometry, as instance cube or cylinder. And I always start with only a few polygons. Don't add too much polygons, it is bad for the handling. At the end there are modifiers, that subdivide the amount of polygons. And you will be able to turn on or off that modifier. But we don't need that topic now. :) Just continue.
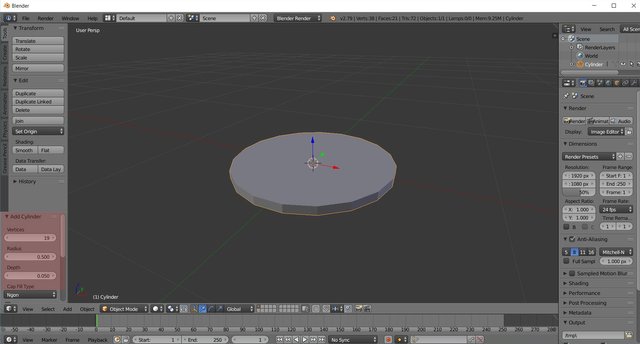
Then I changed in the left bottom menu the amount of vertices, the radius and the depth. I changed the amounts until it looked like a coin.
Don’t move the cylinder before you change the units, because then the menu in the left bottom disappear and you can’t reopen it. It’s important that you change first the numbers and then change the position of the object.
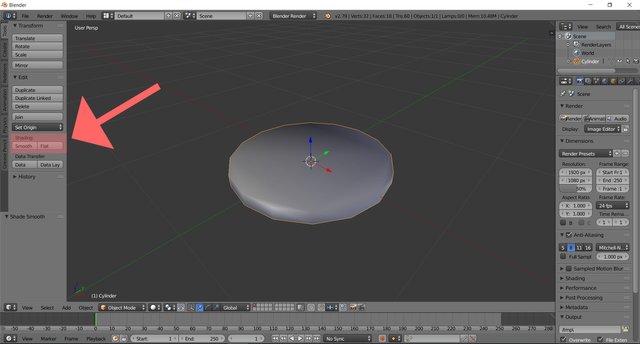
In the next step I changed the shading surface to smooth. It is good for realtime engines like Unity or Unreal, because the surface looks smooth, although you have only a few polygons. We try to avoid too much polygons. Because as more polygons you have as longer it needs to render or the handling is much more exhausting (as instance). However, but even with smooth shader it looks a bit crappy. That’s why I changed the geometry a bit more.
Now you have two options.
Side note:
There is always more than one way to reach the goal. When you practise enough, you will get your own workflow.
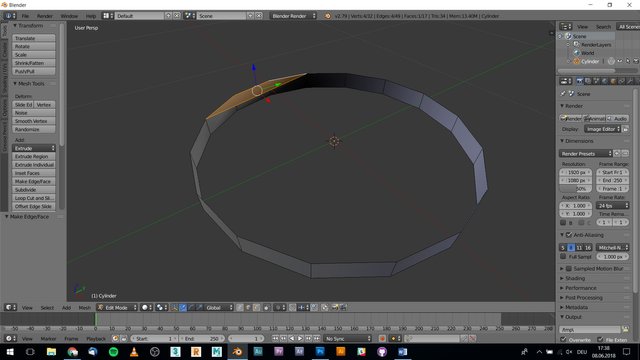
First option: Use insert on each side. Change the mode to Edit Mode by pressing Tab. Press Ctrl + Tab and choose faces.
By pressing ‘a’ you select or deselect all vertices, edges or faces. After u pressed ‘a’ and all faces are deselect, press with the right mouse button the upper face and select it (it should be light orange now). Press ‘i’ and move your mouse slight to the left. Press the Left Mouse Button to release. Now your edge should be more rough.
Do the same with the other side. You also could select both sides at the same time. Select one face, press Shift and select the other side.
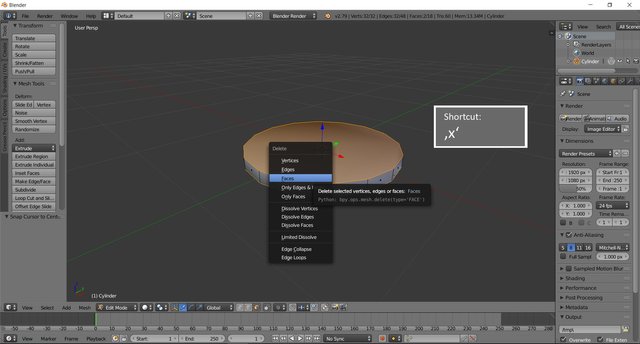
Second option: Retopology. Change the geometry. Select both faces. Press ‘x’ and delete faces.
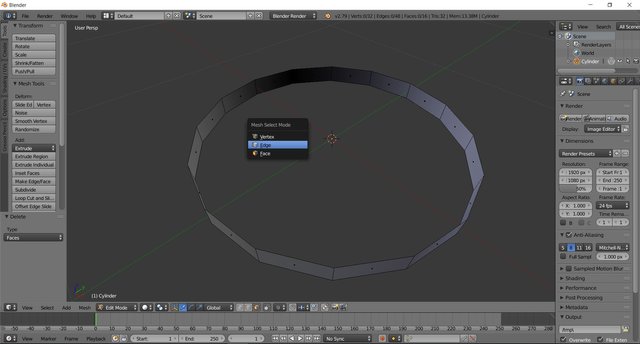
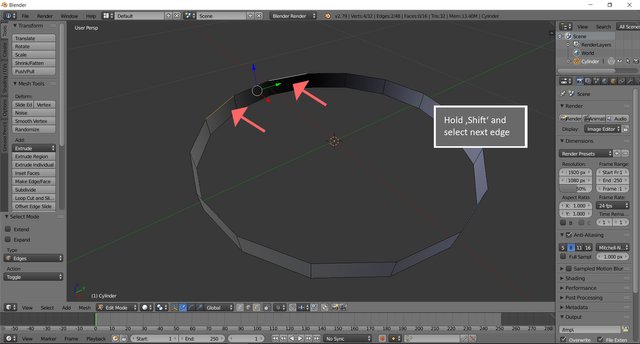
Press Ctrl + Tab and select edges. Now select two edges and press ‘f’. In this way you close the edges with new faces. Repeat this step until your sides are closed (please see the pictures. Don’t select edges side by side. Choose the opposite ones. One face should have four vertices always).
After you insert all faces select the upper faces and press ‘I’. Move your mouse slight to the left and press the Left Mouse Button.
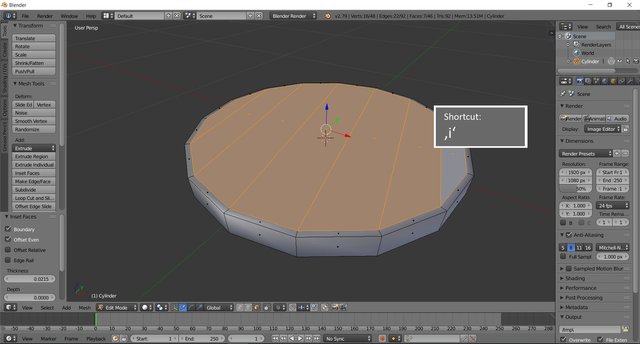
Now we are done with the modelling part.
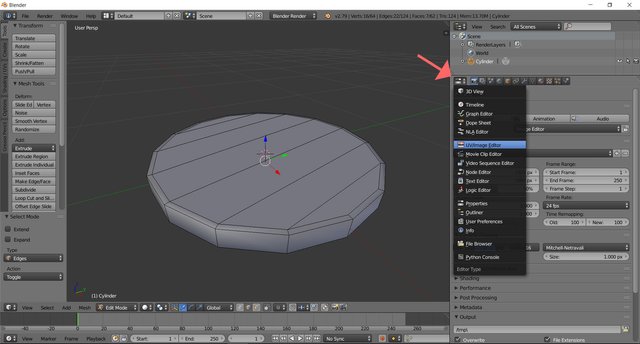
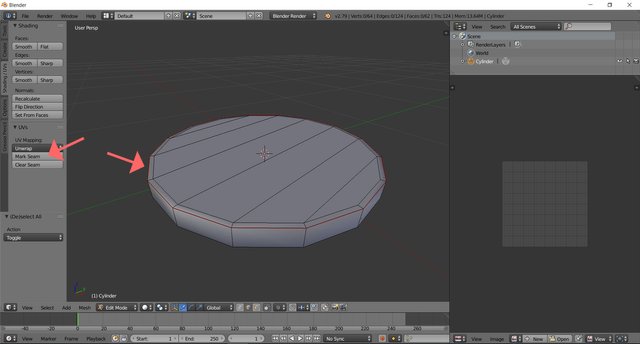
UV mapping/Umwrap
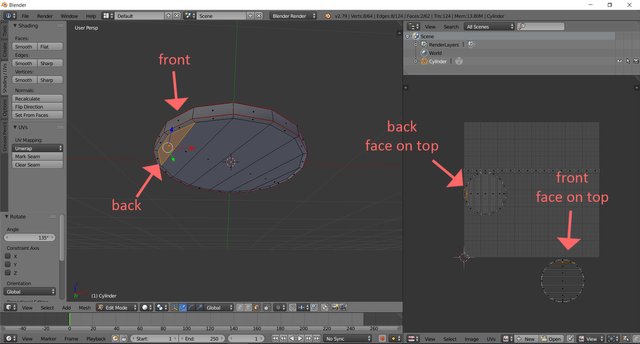
Open the UV/Map Editor at the right side. Press in Edit Mode Ctrl + Tab and choose edges.
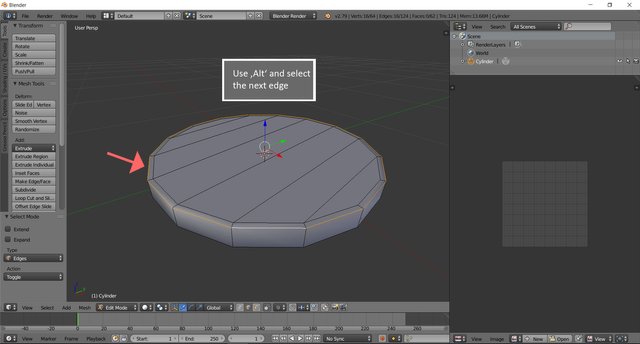
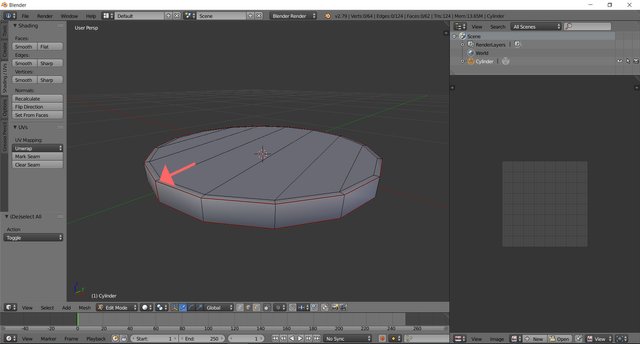
Select one edge and press Alt + second edge. Now all edges in one circle are selected. On the left side you see some menus. Press the ‘Shading / UVs’ tab and press ‘Mark Seam’. Deselect all edges by pressing ‘a’. Now you should see a red circle. That is the seam for our UVs. Do the same for the other side.
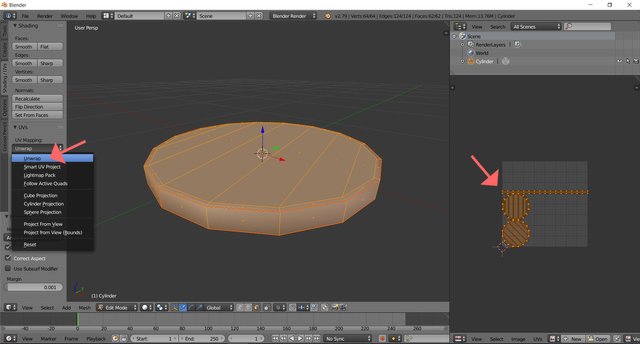
Press ‘Ctrl + Tab’ choose faces, select all faces by pressing ‘a’ and press on the menu ‘Unwrap’. Now you can see at the right side all UVs. These are important for the texture. Now we could export this UVs as .Jpg or .Png and paint on them in any painting software. But we don’t do that right now, because it would need too much time, if we paint each side separately. We are lazy. But also it saves us a lot of frustrating, if we want to have exactly two identically sides. It makes sense, when you need two different sides.
Press in the right bottom ‘Keep UV and edit mode mesh selection in sync’. Now you see all faces in the UV view even you deselect them in the 3D view.
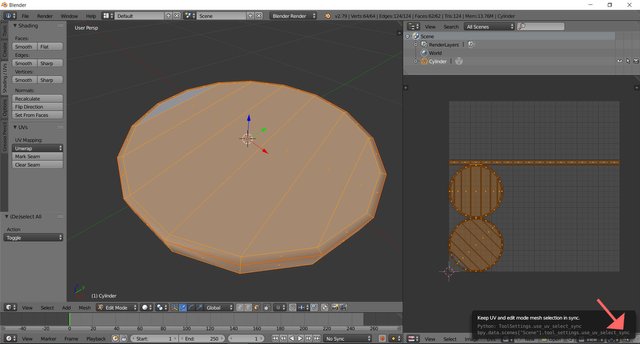
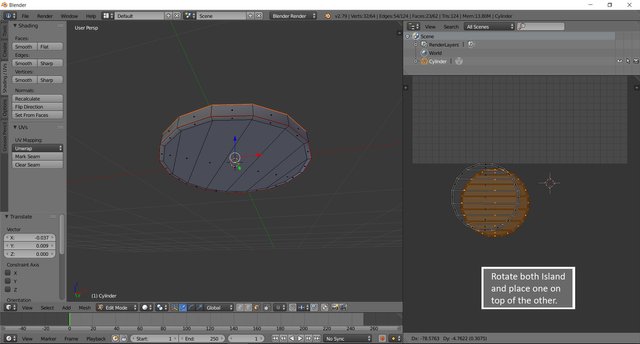
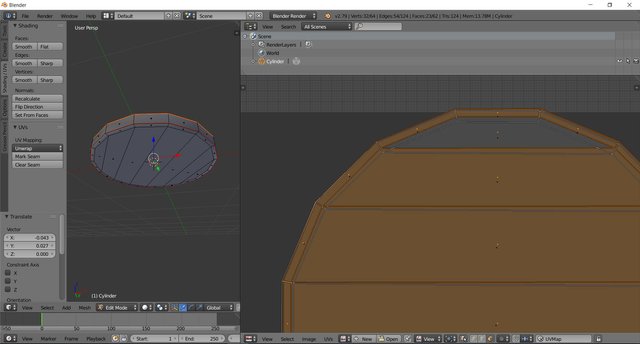
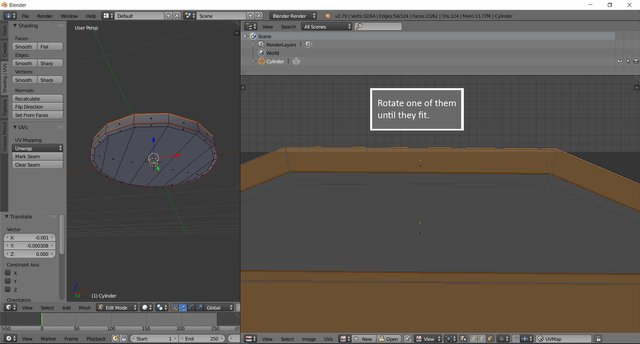
Hover with the mouse over the upper faces of your coin and press ‘l’. Now should be the whole UV be selected. Go with your mouse back in the UV view. Press ‘g’ and move this UV island to the side. Select one face to see where is the top and where is the bottom of the coin. Press ‘l’ again to select the whole Island and then press ‘r’ and rotate the UV island. It is important for later, when we paint the coin. We need to know where is the upper part and where is the bottom of the coin. Do the same with the other side of the coin. Try to find the both upper faces on both sides. Select one UV island and place it on the other one. Use the mouse wheel for zoom in and out. If the island are not even, use ‘r’ to rotate the island until they fit.
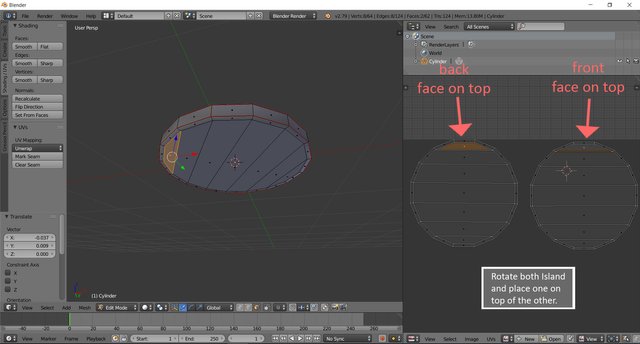
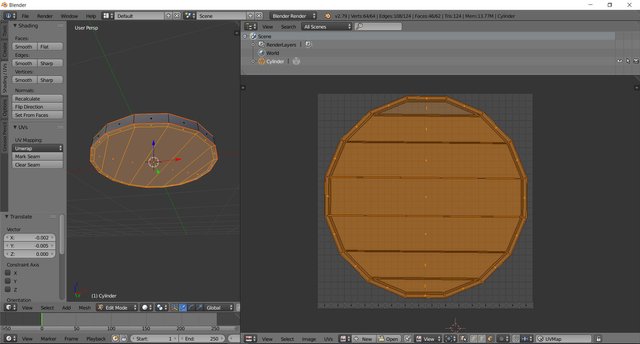
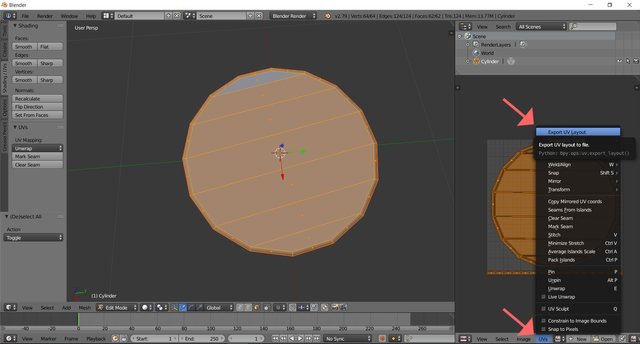
Press ‘b’ select both UV islands and move them to the side. Select the third island move it to the bottom. Reselect the other both ones and press ‘s’ to scale them up. Place all UV island like in the pictures. Now your model is ready and unwrapped for the painting part. You can export the UVs as .jpg and paint them in GIMP or Photoshop. Select all islands, press ‘UVs’ in the menu in the bottom and choose ‘Export UV Layout’.
Done. Congratulation you made a 3D coin! I really hope you learnt something and it was not that frustrating. :) How I made the textures follows in the second part.
Thanks for reading!
If you like my work check out my blog @chromasie. I am new here, so I don't have so many posts yet. But when you read this, I probably work on my next post.
I don't only model 3D stuff. I also like to paint, photography, photogrammetry, traveling etc. Stay tuned!
You can find me on:
 |
|  |
|  |
| 
I took all the pictures. I made all the 3D stuff and tutorials by myself. All pictures, tutorials and films belongs to me. Copyright 2018 Chromasie. All rights reserved. Please do not copy or publish them.
A lot of information in this post. Using Blender for creating crypto coins is very cool idea. I'm tempted to do something.
I needed some 3D coins. At the end I decided to do some cryptocurrency too. Yes. I tried to be as much detailed as possible. If I post something here, I want to give something to the reader. And I think quality is better than just one picture. Would be cool to have here a nice 3D/artist community. I checked your stuff and follow now. Cheers.