Create a Mobile Game with Flutter and Flame – Beginner Tutorial
Game-making Tutorial with Flutter and Flame Series: Part 1
Why create a mobile game? Most people would agree that games are fascinating pieces of software. These people, including myself, have played lots of games and discovered a different world or reality in-game. Games can range from having simple and linear gameplay to really complex involving 3D, almost real physics engines, realistic graphics, procedurally generated worlds, and storylines that adapt to the player’s choices.

Some people want to take things further and create their own games. If you belong to this category, this article should be a sufficient tutorial to get you started. This tutorial will be focusing more on concept instead of actually making a polished or release-ready game.
If you find something confusing at any step, please feel free to send me an email or join my Discord server.
Requirements (and Assumptions)
This article will assume you already are a developer and have a solid grasp of the concepts about developing software. If you’re totally new, that’s okay, this should be easy as long as you have an adequate amount of interest to go into game development.
You should also have a decent enough computer that can run an IDE, compile some code, and run an Android emulator. If your computer only has enough juice for the IDE and compiling the code, you can hook up an actual Android phone and run the app there while testing.
Apps written in Flutter can be compiled and built for both Android and iOS. This article will focus on developing for Android. Once you’re done though, you can just run a different version of the build command and you can play the game on iOS devices too.
In addition, you must have the following on your computer:
Microsoft Visual Studio Code – Any IDE or text editor will work if you know what you’re doing. If you’re a total beginner, stick to VS Code. Download Visual Studio Code from their official website. It’s also important, though not required, to install the Flutter and Dart plugins for Visual Studio Code.
Android SDK – This is required for developing Android applications. Download and install Android Studio to install everything needed to develop Android apps. If you don’t want to install the whole Android Studio and only interested in the SDK, scroll down to the Command line tools only section of the download page.
Flutter SDK/Framework – This and the Flame plugin is what we’ll be using to develop the game. Use this official guide from Flutter to set your box up. Make sure you follow the instructions up to the Test Drive Part.
Let’s Create a Mobile Game!
We’ll start off simple. Really simple. Our game will consist of a black screen with a white box in the middle. You click the box, it changes color to green and you win the game!
We won’t be using any external graphics (image files) for this game.
All the code for this tutorial is available for viewing and download on this GitHub repository.
Step 1: Set up a Flutter application
Open up a terminal (command line interface) and navigate to your projects directory. Once there, type the following command:
$ flutter create boxgame
This command uses the Flutter command line tool to initialize and bootstrap a basic mobile application for you.
You can choose any name other than boxgame if you want. Just make sure to replace all instances of boxgame with whatever you used as you follow along.
From this point, you can either open the generated boxgame folder in Visual Studio Code or immediately run your app using the following commands:
$ cd boxgame
$ flutter run
It might take a while the first time you run your newly created app. When the mobile app runs, you should see something like this:
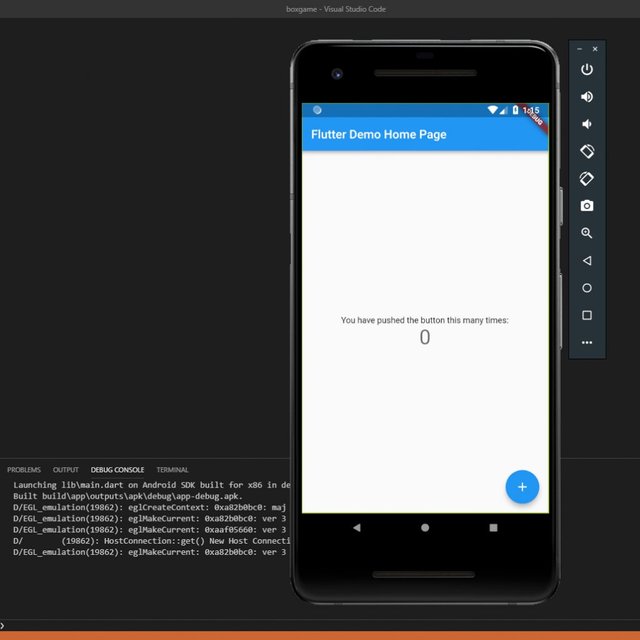
Note: You need to have an emulator running or an actual Android device plugged in to your computer with USB Debugging enabled.
View the code at this step on GitHub.
Step 2: Install the Flame plugin (and Clean the Project)
Note: From here on out, we’ll be referring to the project directory as ./. If your box game project is in /home/awesomeguy/boxgame, ./lib/main.dart refers to the file at /home/awesomeguy/boxgame/lib/main.dart.
Fire up Visual Studio Code and open the boxgame directory created from the previous step.
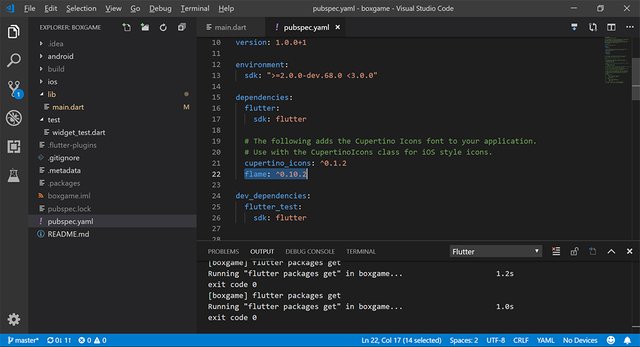
Since we will be using the simple yet powerful Flame plugin, we need to add this to the list of Dart Packages that our app will rely on. On the left-hand side of the IDE, you’ll see a list of the files in your project folder. Open up ./pubspec.yaml and add the following line just below the cupertino_icons line under dependencies (mind the indentation).
flame: ^0.10.2
You should have something that looks like this:
If you are using Visual Studio Code, the IDE will automatically install the plugin for you upon saving the file.
You can do it manually by opening up the terminal, navigating to the project folder, and running flutter packages get.
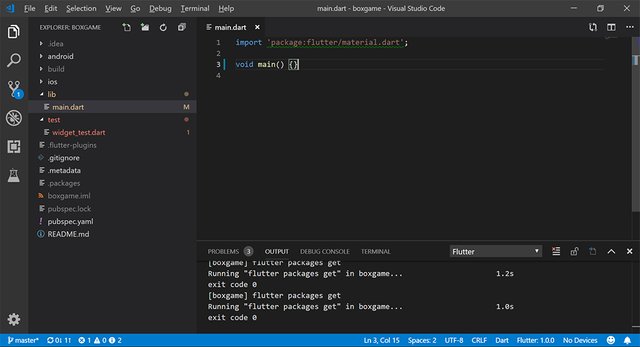
The next step is cleaning up the main code by discarding everything that Flutter set us up with, in the ./lib/main.dart file and replacing it with an empty program.
The empty program is just one line: void main() {}. One thing you’ll notice is we left the import statement at the top. We will be using the material library when we run the runApp method later when starting the game. You should now have something that looks like this:
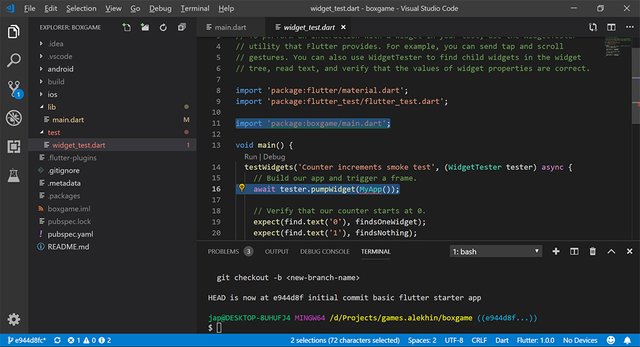
Another thing is that the file inside the ./test folder is showing an error. If you’re not using Visual Studio Code, this probably won’t show but your app will not run. Testing (and test-driven development) is outside the scope of this tutorial so to fix this, just delete the whole test folder.
View the code at this step on GitHub.
Step 3: Set up the game loop
Now we’re going to set up the game loop…
But what is the game loop?
The game loop is the meat of the game. A set of instructions that the computer runs over and over again.
Games usually have this metric called an FPS. It stands for frames per second. It means that if your game is running at 60 fps, the computer is running your game loop 60 times per second.
To put it simply: One frame = one run of your game loop.
A basic game loop is made up of two parts, an update and a render.
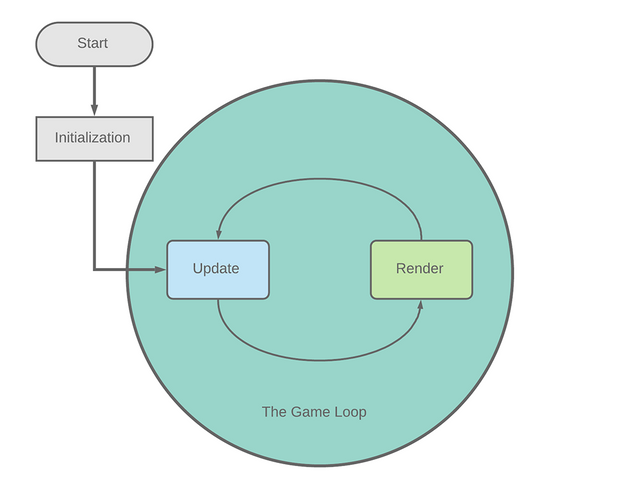
The update part handles the movements of objects (like characters, enemies, obstacles, the map itself) and other things that need to be updated (for example a timer). Most of the action happens here. For example, calculating if the enemy was hit by a bullet or calculating if an enemy touches the main character. Main characters don’t usually like that.
The render part draws all the objects on the screen. This is a separate process so that everything is synchronized.
Why the need to synchronize?
Imagine if you update the main character’s position. He’s fine so you render him unharmed.
But, there’s a bullet just a couple of pixels away though. You update the bullet and it hits your character. Now he’s dead so you don’t draw the bullet. By this time you should have drawn the first frame of the character’s dying animation.
In the next cycle, you skip updating the character since he’s dead. You instead render the first frame of his dying animation (instead of the second frame).
This will give your game a jerky kind of feel to it. Imagine playing a shooting game, where you shoot an enemy, he doesn’t fall down, you shoot again but before the bullet hits him he dies. The jerky performance of non-synchronized rendering may not be noticeable (especially when running 60 frames per second), but if this happens too often the game just feels unfinished.
You want everything calculated and when the states of all objects are calculated and finalized, only then will the screen be drawn.
Using Flame
Flame already has code that handles the scaffolding for these so we only need to worry about writing the actual update and render processes.
But first, there are two things that our app needs to be transformed into a game. One is to be full screen, the other is to be locked at portrait mode.
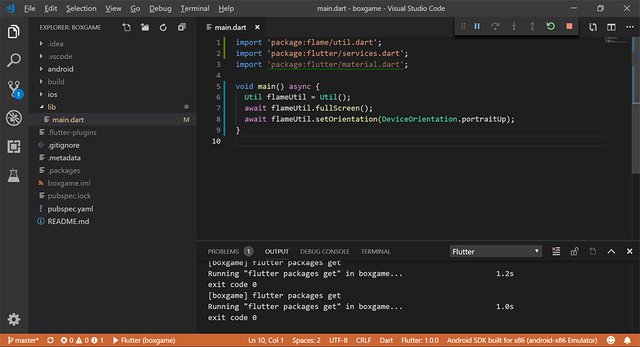
Flame also provides utility functions for these. So let’s just add them to our code. The following lines go to the top of the file:
import 'package:flame/util.dart';
import 'package:flutter/services.dart';
Then inside the main function, create an instance of Flame’s Util class. Next, call the fullscreen and setOrientation functions of this the instance you just created making sure to await them since these functions return a Future.
Util flameUtil = Util();
await flameUtil.fullScreen();
await flameUtil.setOrientation(DeviceOrientation.portraitUp);
Note: Futures, async, and await are coding practices that allow you to “wait” for a long process to finish on a different thread without blocking the main thread. If you are interested in learning about them, you can read this page from the Dart’s official website.
To be able to await Futures, the context must be inside an asynchronous function. So let’s convert the main function so it becomes an asynchronous function.
void main() async {
Finally, you should have something that looks like this:
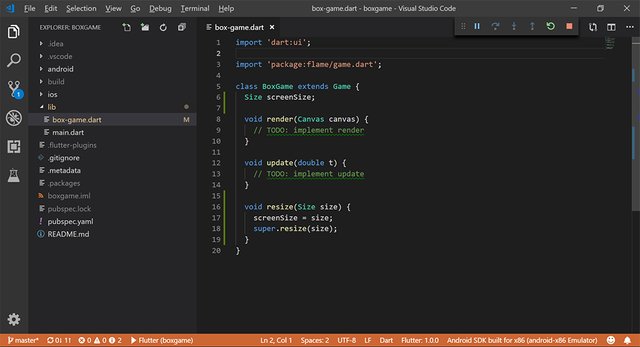
To utilize the game loop scaffolding provided by the Flame plugin, we must create a subclass of Flame’s Game class. To do this, create a new file under ./lib and name it box-game.dart.
Then we’ll write a class named BoxGame (you can use any if you know how classes work) that extends Flame’s Game class.
import 'dart:ui';

import 'package:flame/game.dart';

class BoxGame extends Game {
  void render(Canvas canvas) {
    // TODO: implement render
  }

  void update(double t) {
    // TODO: implement update
  }
}
That’s the whole class. For now.
Let’s break it down: We import Dart’s ui library so we can use the Canvas class and later the Size class. Then we import Flame’s game library which includes the Game class which we are extending. Everything else is a class definition with two methods: update and render. These methods override the parent class’ (also known as a superclass) methods of the same name.
Note: The @override annotation is optional in Dart 2, in case you were looking for it. The new keyword is also optional so we won’t be using that either.
The next step is to create an instance of this BoxGame class and pass its widget property to runApp.
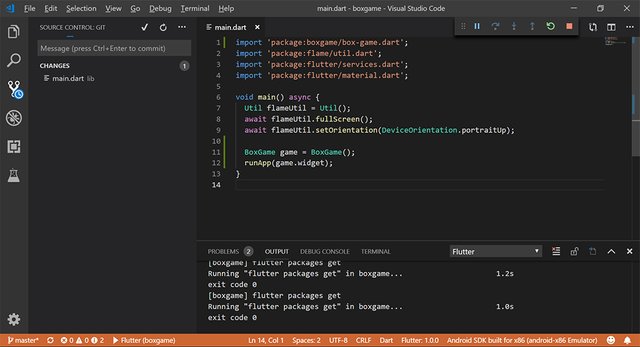
Let’s go back to ./lib/main.dart and insert the following line at the very top of the file:
import 'package:boxgame/box-game.dart';
That line makes sure that the BoxGame class can be used in main.dart. Next, make an instance of the BoxGame class and pass its widget property to the runApp function. Insert the following lines at the end of the main function (just above the closing brace }).
BoxGame game = BoxGame();
runApp(game.widget);
Now our mobile app is a game!
If you run the game though, you’ll just see a blank/black screen since nothing is being drawn on the screen yet.
Your main.dart file should look like this:
View the code at this step on GitHub.
Step 4: Draw the screen
Before being able to draw on the screen, we must know the size of the screen in advance. Flutter uses logical pixels when drawing on the screen so you don’t have to worry about sizing your game objects. For now.
An inch of the device contains about 96 logical pixels. So let’s say we’re targeting phones as our release platform. Most modern and mainstream phones are about the same size so again, because our game is so simple, we don’t have to worry about sizing.
Flame builds upon this sizing system and the Game class actually has a resize function that we can override. This function accepts a Size parameter and we can determine the size of the screen (in logical pixels) from this parameter.
First, let’s declare a variable in the class level. This variable (also known as an instance variable) will hold the size of the screen and will be updated only when the screen changes size (should only happen once for our game). This will also be the basis when drawing objects on the screen. The type of this variable should be Size. The same as what gets passed to the resize function.
class BoxGame extends Game {
  Size screenSize;
The screenSize variable will be initialized having a value of null. This will be helpful when checking if we know the size of the screen during rendering. More on this later.
Next, let’s add in an override for the resize function in ./lib/box-game.dart.
void resize(Size size) {
  screenSize = size;
  super.resize(size);
}
Note: The resize function for the superclass is actually empty, but it’s a good idea to call the super function of the one we’re overriding. Unless we fully want to override the function. Let’s leave it there for now.
Note 2: Instance variables are variables that are accessible from all methods/function of the class. For example, you can set it on resize then get its value on render.
Your code should look like this:
The canvas and the background
Now that the game loop is established, we can start drawing. We’ll leave the update function empty since we won’t really be updating anything.
Inside the render function, we have access to a Canvas. This canvas is already prepared and provided to us by Flame. Canvas is very much like an actual painting canvas that you can paint on. After we draw our game graphics (rectangles for now) on the canvas, Flame takes it and draws the whole canvas onto the screen.
When drawing on the canvas, always draw the bottom-most objects (like the background) first. Subsequent draw methods will draw on top of whatever is already on the canvas.
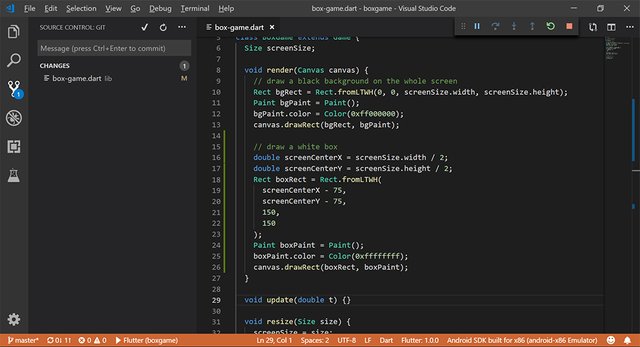
First, we draw the background. The background will just be a black screen. So we draw that first using the following code:
Rect bgRect = Rect.fromLTWH(0, 0, screenSize.width, screenSize.height);
Paint bgPaint = Paint();
bgPaint.color = Color(0xff000000);
canvas.drawRect(bgRect, bgPaint);
Let’s break it down: The first line declares a Rectangle that is as big as the screen where the Left and Top are at 0, 0 (upper-left corner of the screen).
Then the second line declares a Paint object followed by a line that assigns a Color to it. The color format is 0xaarrggbb which stands for Alpha (opacity), Red, Green, and Blue values. Fully opaque white is 0xffffffff and fully opaque black is 0xff000000. More on declaring colors later.
The last line draws a rectangle on the Canvas using the Rect and Paint instances defined on the previous lines.
Try it out!
Try to run your game, you should see a black screen. Flutter has this nifty little feature called hot-reload. It means that while your app is running, most changes you make on the source code will be reflected in the running app. Almost instantly!
Try experimenting with different values for the color to check it out.
Draw the target box
Next, we draw the target box at the center of the screen.
double screenCenterX = screenSize.width / 2;
double screenCenterY = screenSize.height / 2;
Rect boxRect = Rect.fromLTWH(
  screenCenterX - 75,
  screenCenterY - 75,
  150,
  150
);
Paint boxPaint = Paint();
boxPaint.color = Color(0xffffffff);
canvas.drawRect(boxRect, boxPaint);
Let’s break it down again: The first two lines declare variables that will hold the screen’s center coordinates. The values they get assigned are half the screen size. double is Dart’s data type for non-integer numbers.
The next six lines just declare a rectangle that is 150 by 150 pixels (logical) in size with its origin (upper-left corner) in the center of the screen but offset by 75 pixels to the left and 75 pixels towards the top.
Note: The statement is spread out vertically to six lines since writing the whole statement in one line will make it less readable.
The rest of the code is the same as drawing the background. The render function should now look like this:
When you run the game, you see something that looks like this:
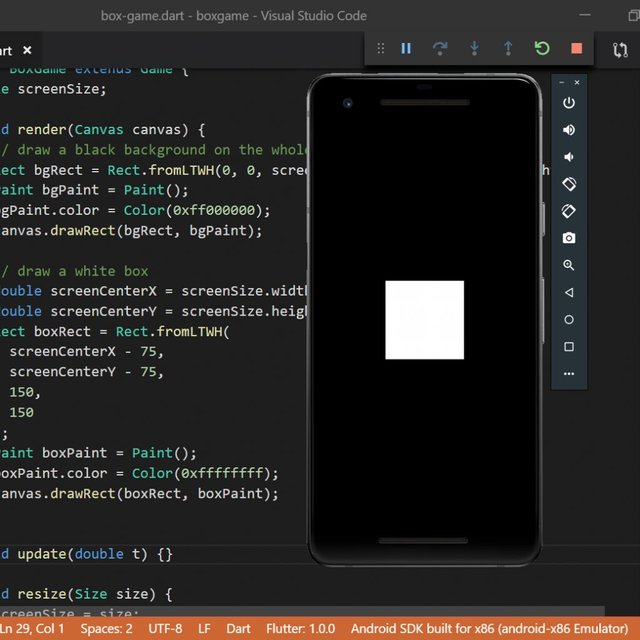
View the code at this step on GitHub.
Step 5: Handle input and the WIN condition
We’re almost done! We just need to accept player input. First, we need Flutter’s gestures library so let’s import that. Add the following line into the top of the game class file (./lib/box-game.dart) where all the other imports are.
import 'package:flutter/gestures.dart';
Then add a handler function for taps using the following code:
void onTapDown(TapDownDetails d) {
  // handle taps here
}
Then in ./lib/main.dart, let’s register a GestureRecognizer and link its onTapDown event to our game’s onTopDown handler. Remember we have to import Flutter’s gestures library at the top so we can use the GestureRecognizer class in this file too.
import 'package:flutter/gestures.dart';
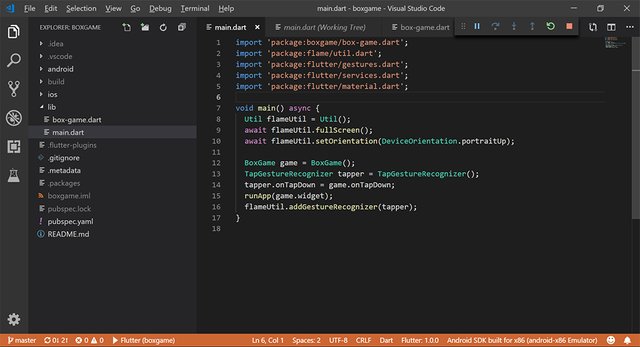
Then inside the main function, just below the BoxGame declaration, declare a TapGestureRecognizer and assign its onTapDown event to the game’s onTapDown handler. Finally, after the runApp line, register the gesture recognizer using Flame Util’s addGestureRecognizer function.
You should have a block of code that looks like this:
BoxGame game = BoxGame();
TapGestureRecognizer tapper = TapGestureRecognizer();
tapper.onTapDown = game.onTapDown;
runApp(game.widget);
flameUtil.addGestureRecognizer(tapper);
The whole ./lib/main.dart file should look like this:
Let’s go back to the game class (./lib/box-game.dart).
In preparation for winning the game, let’s add another instance variable that will determine if the player has won the game or not. A simple boolean variable with a default value of false will do. Put this below the screenSize declaration:
bool hasWon = false;
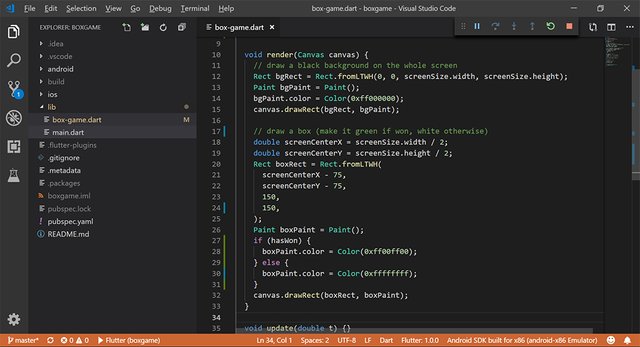
Then on the render function, let’s write a condition that will assign green to boxPaint‘s color if the player has won already; white otherwise.
Replace the color assignment line with the following block:
if (hasWon) {
  boxPaint.color = Color(0xff00ff00);
} else {
  boxPaint.color = Color(0xffffffff);
}
The render function should now look like this:
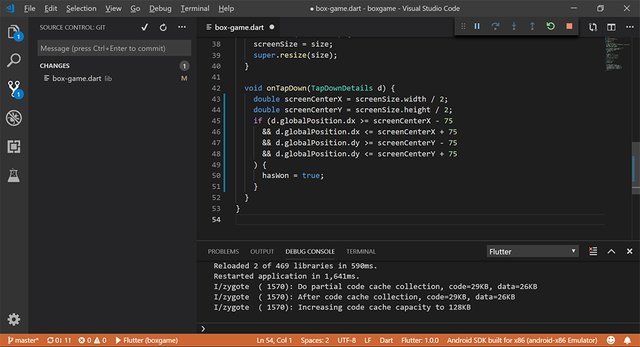
Now let’s handle the tap-down event (onTapDown function). Check if the player tapped inside the box. If the tap is inside flip the value of the hasWon variable into true.
double screenCenterX = screenSize.width / 2;
double screenCenterY = screenSize.height / 2;
if (d.globalPosition.dx >= screenCenterX - 75
  && d.globalPosition.dx <= screenCenterX + 75
  && d.globalPosition.dy >= screenCenterY - 75
  && d.globalPosition.dy <= screenCenterY + 75
) {
  hasWon = true;
}
Like the previous blocks of code, let’s break this one down: The first two lines (like drawing the box above) determine the coordinates of the screen’s center point.
The next five lines is a long if statement spread out vertically. It checks if the tap down point is inside the 150 by 150 logical pixels box that is centered on the screen.
If the tap is inside flip the value of the hasWon variable. This change is reflected the next time that render is called.
The final form of the onTapDown handler should look like this:
View the code at this step on GitHub.
Time to test the game!
Run your game and if you followed along, you should see something similar to the video below:
Conclusion
That’s a game right there. And you made it!
It may not be the hit of the decade but now you understand the concept of the game loop, drawing on the screen, and receiving input from the player. All games build upon these basic concepts. I hope you enjoyed learning how to create your own mobile game.
Feel free to drop a question in the comments section below if you have any.
Feel free to drop a question in the comments section below if you have any. You can also send me an email or join my Discord channel.
What’s next?
This is the introduction part of a series on how to develop or create a mobile game. The next parts of this series will build upon what we have discussed in this part and aim to build an actual playable and “shippable” game.
- Set up a playable game
- Graphics and animation
- Screens/views and dialog boxes
- Scoring, storage, and sound
- Finishing up and packaging
To be quite honest: when I first joined a "programming and games" in my highschool, I had the expectation we were going to be as technical and impressive as this post was. But unlike my class, this post shows me practical coding, reminds me of what to actually do as to avoid a simple fuck up from bad oversight of programming code, actually has a set (class of) functions that can be utilized and experienced on the go and a reminder that coding never truly ends even when you got a product working. And that's what kept me uncomfortably close to this post: all the details on how to code, reminders of what to do, pictures being the proof and a video at the end, even though it's quite simplistic, showing all my efforts had gone towards something which an error screen may be too vague to hint at on what to follow up on next.
If I were to be honest, I wish I had posts/tutorials like this when I started learning to program (decided to pick up on it after all this time, but for fun this time and nothing serious). Equally so, while you may not be a teacher, at least you know what to say and where we should all be generally going. In reference, which should've been provided earlier, my exposure to programming was python (and that alone has updated a whole lot by now) and other small things. Yet I became easily surprised with the introduction of coding like C#, C++ and a whole slew of other things which this post add another program to the list that I should investigate carefully whenever I got the freetime to meander about. And probably the one thing I am reminded of which still disgusts me to this day: the references to colours in anything other than the name alone. I shall never get over that even if I have still memberize the main colours of a colour wheel in their hexadecimal forms!~
Thanks for that ginormous essay of a reply! It could have been an article on its own. As for the colors, I had the choice of introducing named colors:
Colors.black,Colors.white, etc. I chose to use hex values because for named, I'll be introducing yet anotherimportto have access to theColorsclass. Ironically I did more explanation (and fell short on it) on constructing hexadecimal colors.Hahaahaha!~ Welcome for the comment!~ ^^
Damno mango on the explanation of hexadecimal colours, 'twould be a shame not to clean it up when you can. Withal, I'll consider subbing just to keep a tab on this all and maybe find a use for it when I have more time to be series and not take this as a fun lil' hobby.
Thanks again! I'll try to be better on the next parts when it comes to explanations.
Second part dropped btw, https://steemit.com/development/@japalekhin/2d-casual-mobile-game-tutorial-step-by-step-with-flame-and-flutter-part-1-of-5
Gonna read it now, I will leave a smaller comment since I'm not feeling well. Sorry if you were expecting a big one like this one ^^' - Without any a regard, let's get crack- I mean let's get reading.
This story was recommended by Steeve to its users and upvoted by one or more of them.
Check @steeveapp to learn more about Steeve, an AI-powered Steem interface.
Thanks steeve!
Nice article for coders👍👏
Posted using Partiko iOS
Thanks for dropping by. More of this is planned, building up to more advanced features.
Hi japalekhin,
Visit curiesteem.com or join the Curie Discord community to learn more.
Thanks @curie, I'll definitely join!
Personally I'm doing my mechanical but this is a thorough tutorial and if in the future I decide to swerve towards programming this can be very useful
Posted using Partiko Android
Thanks for visiting, I'll post more of this. Hope you try coding soon!
Hello @japalekhin! This is a friendly reminder that you have 3000 Partiko Points unclaimed in your Partiko account!
Partiko is a fast and beautiful mobile app for Steem, and it’s the most popular Steem mobile app out there! Download Partiko using the link below and login using SteemConnect to claim your 3000 Partiko points! You can easily convert them into Steem token!
https://partiko.app/referral/partiko
Congratulations @japalekhin! You have completed the following achievement on the Steem blockchain and have been rewarded with new badge(s) :
Click here to view your Board
If you no longer want to receive notifications, reply to this comment with the word
STOPYou have been scouted by @promo-mentors.
We are a community of new and veteran Steemians and we are always on the lookout for promising authors.
I would like to invite you to our discord group https://discord.gg/vDPAFqb.
When you are there send me a message if you get lost! (My Discord name is the same as here on Steemit)