Dare to learn with me! Step by step tutorial, Necklace or Choker made under the Soutache technique with my personal touch Part 2
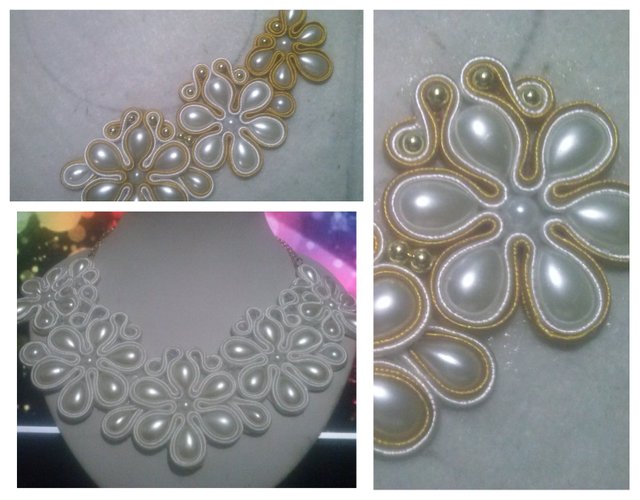
Hi, Thank you for giving me so much love in the previous posts I thank you and it makes me very happy to see that my content is valued and supported ... Today I will continue with the second part of this beautiful necklace step by step and detail so that everyone can learn, I hope you like it and if you need help write me I'll be happy to support you.
As explained above, we are developing it with the soutache technique, some already know what it is about, but there are still many people who are surprised to see it and even more when they hear the name. Well, the word Soutache comes from French and its meaning is "braid" and is based on sewing the threads little by little giving different and wonderful different shapes to finish what you want, although I do not use needle and thread I do not like me I use silicon liquid and I'm sticking until I'm forming what I want to make. If you have not read the first part of the tutorial you can find it

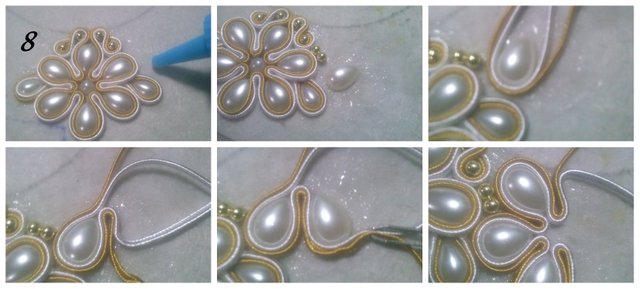
STEP 8: Already in this stage we have ready the central flower we begin the following one, on the half pearl that remains outstanding in the central flower we are going to place liquid silicon and we will stick a half pearl of the big ones of 1.8 cm, we are going to cut 2 threads of 60 cm each one of the color of your choice you will put tip with tip to stick them right in the middle and with the help of the clip we will stick the threads and giving it shape as I show you in the image and so we will continue placing half pearl of 1.8 cm giving the shape of the flower
STEP 9: With the help of an eyebrow tweezers or clip for jewelery you will bend the threads little by little and stick a half round pearl right in the center, then we continue arranging the threads until it is well stuck without space between them, we will place again liquid silicon and paste another half pearl in the form of drop of 1.8 cm so on until the flower is completed with 6 half pearl of 1.8 cm.
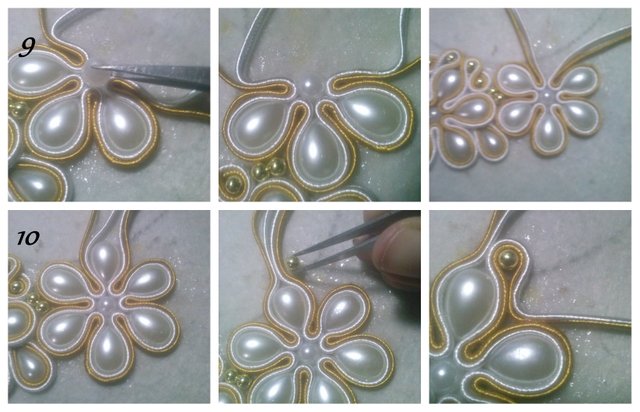
STEP 10: At this point we stick thread with wire right in the center we return to place silicon liquid and with the help of the clamp we will stick a small balin, we lower the threads and we arrange so that it sticks well we put a balin and we wrap it with the threads we bend the threads inwards and cut the burnt ends with the help of the lighter and put the threads under the balines that we just paste carefully, I show you in the next image.

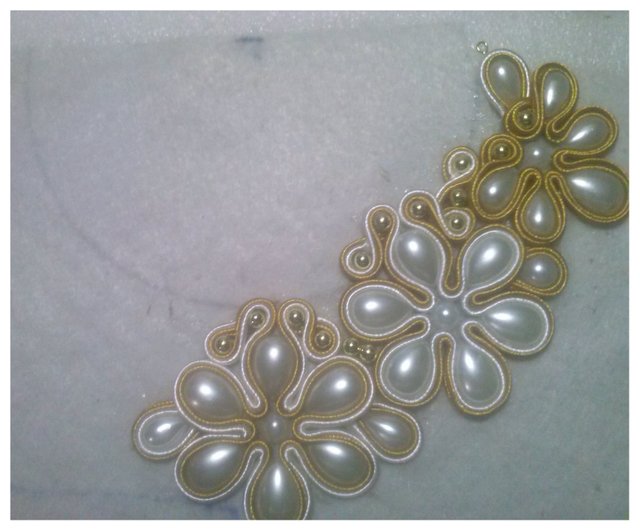
STEP 11: In this part we will perform the same step 10 only on the opposite side taking care not to soil the threads so that our piece has a good finish so we finish our second flower, now we will carefully lift without deforming the flower third half pearl in the image I marked it with a star so you can see what it is, cut two threads of approximately 3.5 cm each burns the tips with the help of a lighter and insert it below the half pearl that we put more silicon liquid and paste a half round pearl of 1 cm in diameter, wrap it with the remaining thread and introduce the next tip also below the half pearl that we raise, place more liquid silicone and once again stick the half pearl lifted, taking care not to dirty it or damage it with the silicon as I show you in the images.
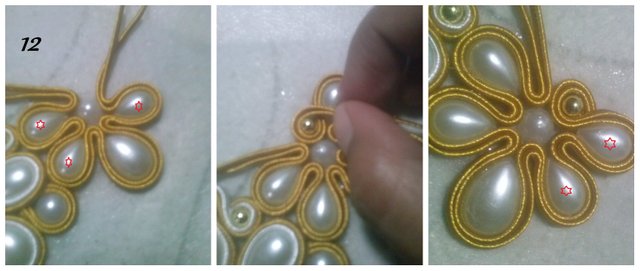
STEP 12: In this part we will perform the same procedure that we have done previously we will start just above the half round pearl left over that we paste in the previous step we are going to cut 2 threads of 50 cm approximately and with the help of the clamp we will begin to give shape to our flower with the difference that in this flower we will only use 5 half pearls with the difference that 4 will be half pearl of 1.3 cm you will be marked with a red star in the image so you can feel the difference, when you finish placing all the half pearls you must realize that there are no spaces between the threads and at the top we are going to stick the pellets the same procedure as in step 10 little by little and without rushing to make it beautiful.
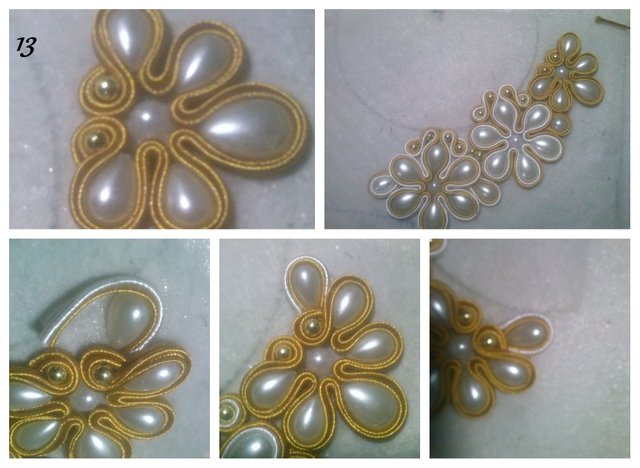
STEP 13: In this step we are about to finish we should see as the following image, now we will place liquid silicone on top of the second balin, we will paste a half pearl of 1.5 cm and cut 2 threads of approximately 4 cm each we will wrap it with the thread and the tips we will place it below the second balin, taking care that we do not deform what we have already stuck and they will look like it is remaining in the images.
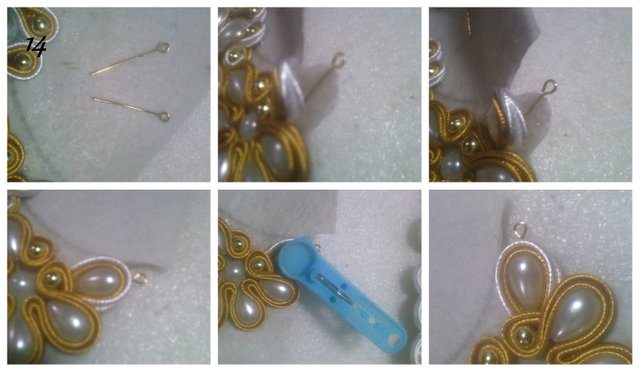
STEP 14: We are going to use 2 imitation jewelery pins like the ones I show in the image, we must cut the excess leather that is around the half pearl that we just hit and with great care you will lift the half pearl of 1.5 cm and below the same we will place the pin very carefully after this will re-stick the appliqué on the leather and with a little pressure so that it is fixed well I put a clothes hook that exerts the correct pressure does not harm and does not leave marks on the piece the other pin is for use at the other end.
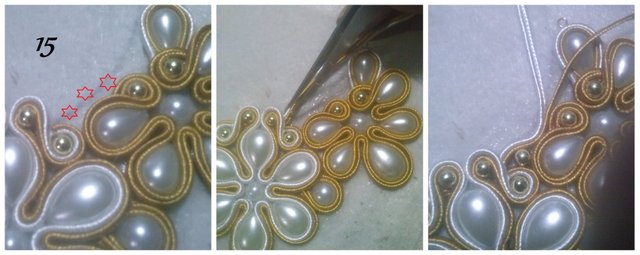
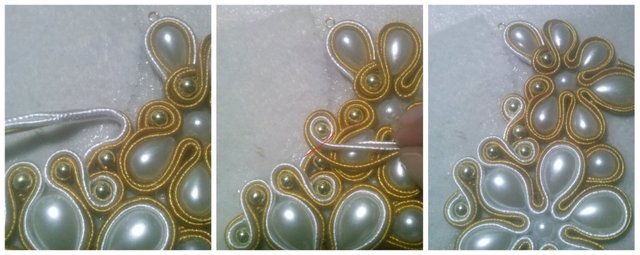
STEP 15: This will be our last step to finish half of our necklace. As you will see in the image I placed red stars where we should place liquid silicon, we are going to cut 2 threads of approximately 5 cm you can use the leftovers so you do not lose material you will enter it below the balines that we paste in the second flower little by little with the help of the clamp and put a balin, cover the balin with the thread we spreaded liquid silicon and again stick another balin we put the threads up and cut the leftovers burning the tips with the help of a lighter to then enter them down below with this we have finished half of this elegant necklace really I hope you liked it as much as I do for the second half you just have to follow these same steps on the opposite side everything is exactly the same and repetitive ... it will stay that way


Wao! Those are beautiful, thanks for taking us through the procedure. Yea! You are right, today we are students and tomorrow we will be masters.
Well done @marleyn
Thank you
Congratulations! This post has been upvoted from the communal account, @minnowsupport, by Marleyn from the Minnow Support Project. It's a witness project run by aggroed, ausbitbank, teamsteem, someguy123, neoxian, followbtcnews, and netuoso. The goal is to help Steemit grow by supporting Minnows. Please find us at the Peace, Abundance, and Liberty Network (PALnet) Discord Channel. It's a completely public and open space to all members of the Steemit community who voluntarily choose to be there.
If you would like to delegate to the Minnow Support Project you can do so by clicking on the following links: 50SP, 100SP, 250SP, 500SP, 1000SP, 5000SP.
Be sure to leave at least 50SP undelegated on your account.
OMG @marleyn, that’s some serious work! I could never do this! I’m not good at pasting. Everything is so precise in your craft, that’s why I’m so comfortable with my wire art. I never measure anything, ever! But you are soooo meticulous, I am impressed!
Thanks, I measure it for the tutorials I need to do it in a way that people who want to can learn and do it, although in reality for me I already do it without measures
That is some serious craftsmanship. I don't think I could do it.
Do not think negative, if you try you will achieve it with love and patience