The Sonic Instrument - Lo Strumento Sonico (Arduino project/English sub) [ENG/ITA]
[ENG]
Today I want to show you a small project I made with Arduino. For those who don't know, Arduino is a microcontroller, that is a small electronic card that is able to communicate with sensors, turn LEDs on or off, operate motors, etc etc; on which it is possible to load programs written with the Arduino programming language. With it it is therefore possible to make an electronic device interact with the outside world and make prototypes of all kinds, it is only necessary to have creativity and imagination (as well as obviously a little knowledge about electrical circuits and programming).
In my case I wanted to create a simple musical instrument similar to the one used by Pink Floyd, which emits notes based on the distance an object is placed from it. The farther the object is, the lower the frequency will be and the closer it is, the higher it will be. To measure the distance I used an ultrasonic sensor HC-SR04 compatible with Arduino and to emit sounds I took a small speaker recovered from an old cordless phone.
[ITA]
Oggi vi voglio far vedere un piccolo progetto che ho realizzato con Arduino. Per chi non lo sapesse Arduino è un microcontrollore, cioè una piccola scheda elettronica che è in grado di comunicare con dei sensori, accendere o spegnere dei led, azionare dei motori, ecc ecc; sul quale è possibile caricare dei programmi scritti con il linguaggio di programmazione di Arduino. Con esso è possibile dunque far interagire un apparato elettronico con il mondo esterno e realizzare prototipi di ogni tipo, bisogna solo avere creatività e immaginazione (oltre ovviamente ad una infarinata di conoscenze riguardo ai circuiti elettrici e alla programmazione).
Nel mio caso ho voluto realizzare un semplice strumento musicale simile a quello usato dai Pink Floyd, che emette delle note in base alla distanza a cui viene posto un oggetto da esso. Più l'oggetto è lontano e più la nota sarà di bassa frequenza, viceversa più sarà vicino e più sarà alta. Per misurare la distanza ho utilizzato un sensore ad ultrasuoni HC-SR04 compatibile con Arduino e per emettere i suoni ho preso una piccola cassa recuperata da un vecchio telefono cordless.
[ENG]
Its operation is very simple, in practice once an object passes in front of the sensor, it calculates the distance (the sensor continuously shoots ultrasound waves and waits for them to return by timing the time taken to return them, and takes the distance), communicates it to Arduino, which thanks to a function that I inserted in the program calculates the frequency relative to that distance and sends the signal to the speaker, which starts ringing at that frequency.
For technical reasons I set 622 Hz as the highest frequency, which should correspond to a D# of 5° octave and as a maximum distance of 1 meter, so that when the object is at a distance of 1 meter, the instrument plays the note lower and vice versa the higher note at a distance of 5 cm. Therefore the instrument will be able to emit frequencies from values close to zero up to 622 Hz in an approximately continuous manner, so it will be able to emit sounds comprised between the traditional notes and not simply the common C, C#, D, D#, E, etc. etc., but every little intermediate micro-variation.
For better clarity, I invite you to see this demonstration video I made to show you how it works.
Good vision!
[ITA]
Il suo funzionamento è molto semplice, in pratica una volta che un oggetto passa davanti al sensore, quest'ultimo ne calcola la distanza (il sensore spara continuamente onde ad ultrasuoni e aspetta il loro ritorno cronometrando il tempo impiegato da queste per tornare, e ne ricava la distanza), la comunica ad Arduino, il quale grazie ad una funzione che ho inserito nel programma calcola la frequenza relativa a quella distanza e invia il segnale alla cassa, la quale inizia a suonare a quella frequenza.
Per ragioni tecniche ho impostato come frequenza più alta 622 Hz che dovrebbe corrispondere ad un RE# di 5° ottava e come massima distanza 1 metro, in modo tale che quando l'oggetto si trova ad un 1 metro di distanza lo strumento suoni la nota più bassa e viceversa la nota più alta ad una distanza di 5 cm. Quindi lo strumento sarà in grado di emettere frequenze da valori prossimi allo zero fino a 622 Hz in maniera approssimativamente continua, cioè potrà emettere suoni compresi tra le note tradizionali e non semplicemente le comuni Do, Do#, RE, RE#,MI , ecc ecc, ma ogni piccola microvariazione intermedia.
Per migliore chiarezza vi invito a vedere questo video dimostrativo che ho realizzato per mostrarvi il suo funzionamento.
Buona visione!
Now below I leave the code written in the Arduino language that I used to make this nice musical instrument that I called "The Sonic Instrument" :)
Comments are written after the // symbol and the function tone(pin, frequency) is the one that sends the electrical signal to the case connected to Arduino pin 2 at the desired frequency.
Ora qui sotto vi lascio il codice scritto nel linguaggio di Arduino che ho utilizzato per fare questo simpatico strumento musicale che ho chiamato " Lo Strumento Sonico " :)
I commenti sono scritti dopo il simbolo // e la funzione tone(pin,frequenza) è quella che invia il segnale elettrico alla cassa connessa al pin 2 di Arduino alla frequenza desiderata.
#define echoPin 7 // Echo Pin is connected to the pin 7 - Il pin dell' Echo è connesso con il pin 7
#define trigPin 8 // Trigger Pin is connected to the pin 8 - Il pin del Trigger è connesso con il pin 8
int maximumRange = 100; // Maximum range 100 cm - Distanza massima 100 cm
double duration, distance; // Duration used to calculate distance - La durata è usata per calcolare la distanza
void setup() {
pinMode(trigPin, OUTPUT); //set trigPin in output modality - Imposta il pin trigger in modalità output
pinMode(echoPin, INPUT); //set echoPin in input modality - Imposta il pin echo in modalità input
pinMode(2,OUTPUT); // set pin 2 in output mod. to send electric signal to the speaker - Imposta il pin 2 in modalità output per inviare segnali elettrici alla cassa
}
// The following trigPin/echoPin cycle is used to determine the distance of the nearest object by bouncing //soundwaves off of it.
//Il ciclo seguente è usato per determinare la distanza dell'oggetto più vicino sparando onde sonore contro di //esso
void loop() {
digitalWrite(trigPin, LOW);
delayMicroseconds(2);
digitalWrite(trigPin, HIGH);
delayMicroseconds(10);
digitalWrite(trigPin, LOW);
duration = pulseIn(echoPin, HIGH);
distance = duration/58.2;
if(distance < maximumRange) {
tone(2, 622-((distance-5)*6.56 )); //Play all the micro variations of frequence between 0 and 622 Hz - Suona tutte le microvariazioni di frequenza comprese tra 0 e 622 Hz
}
else {
noTone(2);
}
delay(66);
}
Here is also the circuit diagram where apart from the sensor and the 165 Ohm speaker, I used a 350 Ohm resistance, making a current of about 9.7 mA circulate inside the circuit, widely tolerated by Arduino that has a tolerance maximum of 40 mA for each digital pin. (The voltage on the pins is 5V)
Ecco anche lo schema del circuito dove apparte il sensore e la cassa da 165 Ohm ho utilizzato una resistenza da 350 Ohm circa, facendo circolare all'interno del circuito una corrente di circa 9,7 milli Ampere, ampiamente tollerata da Arduino che ha una tolleranza massima di 40 milli Ampere per ogni singolo pin digitale. (La tensione sui pin è di 5V)
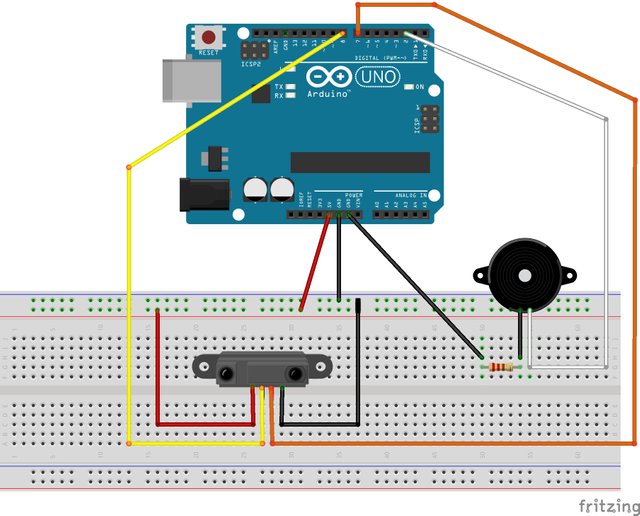
Image created by me with Fritzing - Immagine da me creata con Fritzing
I hope this post was to your liking, thanks for stopping by to read it, later I will show you another project made with Arduino.
Goodbye see you soon :)
Spero che questo post sia stato di vostro gradimento, grazie per esservi fermati a leggerlo, più avanti vi mostrerò un'altro progetto realizzato sempre con Arduino.
Ciao alla prossima :)
Sources - Fonti :
http://blog.whatgeek.com.pt/arduino/arduino-hc-sr04-ultrasonic-sensor/
https://www.critics-corporation.com/RaspberryPi/come-usare-sensore-ultrasuoni-hc-sr04-con-arduino
https://www.arduino.cc/reference/en/language/functions/advanced-io/tone/
▶️ DTube
▶️ IPFS
I have built something similar some years ago :) I love the ultrasonic sensors for these touch kind of feeling! I really want to see more of you here :) followed
Thanks for sharing this #awesomediycontent with us! It was really educating and interesting to see that you built the same thing as me :) only difference is that I didn't used a breadboard and I used it as a midi instrument for a DAW :) you can use the midi library and a combination of a virtual midi driver to control midi instruments in the next step if you want to continue on this project :)
Peace!
Oh that's awesome, the world is really small!! I wish to see your project!! Thanks for your tip I will take it in account. Here I wanted to create the simplest program possible just to experiment with sound and to have fun :) I also tried to create a mini amplifier to get a better and load sound, using some transistor but was easy at all. I managed just to raise the volume but I got a distorced noisy sound. Maybe one day I will take inspiration from some existing circuit.
Bye bye thanks for your support...have a good day :)
It was some years ago and unfortunately I don't have the little box anymore. But yeah.. it was quiet easy with all these well documented libraries :)
Keep going!
Peace!
Thanks a lot for your creative, inspiring and motivating video!
This post got curated by our fellow curator @tibfox and you received a >90% upvote from our non-profit curation service!
Feel free to check out our channel @diytube to:
@ghscollective
Hi, @lallo!
You just got a 0.44% upvote from SteemPlus!
To get higher upvotes, earn more SteemPlus Points (SPP). On your Steemit wallet, check your SPP balance and click on "How to earn SPP?" to find out all the ways to earn.
If you're not using SteemPlus yet, please check our last posts in here to see the many ways in which SteemPlus can improve your Steem experience on Steemit and Busy.
This post has been voted on by the SteemSTEM curation team and voting trail in collaboration with @curie.
If you appreciate the work we are doing then consider voting both projects for witness by selecting stem.witness and curie!
For additional information please join us on the SteemSTEM discord and to get to know the rest of the community!
Questo post è stato condiviso e votato dal team di curatori di discovery-it.
.
Congratulations @lallo! You have completed the following achievement on the Steem blockchain and have been rewarded with new badge(s) :
You can view your badges on your Steem Board and compare to others on the Steem Ranking
If you no longer want to receive notifications, reply to this comment with the word
STOPDo not miss the last post from @steemitboard: