Making Kefir for Health
I’ve been making kefir and kefir cheese for 10 years now. I have my original grain, still large and healthy. Making and eating kefir was life changing for me (that’s another post, some day) and so I pass on what I know about making it.
Of critical importance is keeping everything used in kefir production and raw milk usage immaculate. You are growing bacteria, etc. that are beneficial. But any introduced bad bacteria will be very happy to grow also.
Equipment Needed:
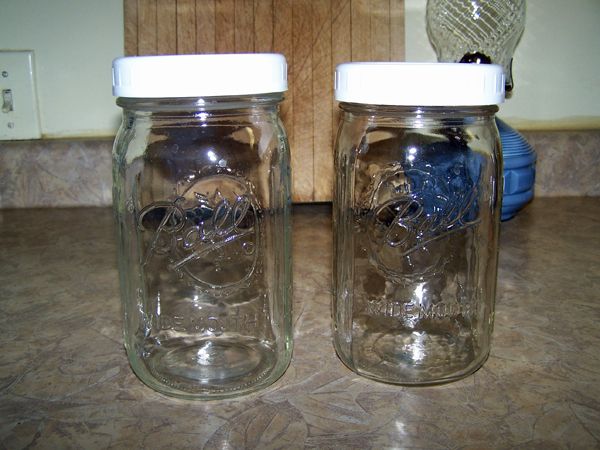
Find 2 very clean quart jars, preferably a Mason type. You will want to pick up the plastic covers that fit Mason jars.
You will need a clean plastic utensil (spoon) for moving the grains to the clean new jar.
You will need a good source of raw milk, preferably grass fed vs. grain fed. Also preferably Jersey vs. Holstein. Goat milk is fine also. You can use pasteurized but you will be making an inferior product and your grains will not be as healthy over the long run.
I have found my grain stays healthier if I removed the cream from the milk. This is how I dip cream with a cream ladle.
You will need a healthy kefir grain. You should have a solid looking clump that should fit in a teaspoon. This is the grain. They have a rubbery texture and should look more like a clump of cottage cheese than cooked tapioca. Any bits looking like tapioca are not healthy.
Use the clean utensil (spoon, etc.) to fish the grains out of the milk. They often, but not always, float on top.
Put them into the clean jar and add milk to ¾ full to the shoulder of the jar, leaving headspace for air exchange. Put the clean lid on, but not tightly, just enough to prevent stuff from falling in.
Place it in a warm place that does NOT have any sun. Light is ok, but no direct sun. A kitchen counter works well.
Every time you go by it, or a minimum of 3-4 times a day if you’ve left the cream in, screw the cover on tight and shake it a little, then loosen the cover again. Cream floats, as do the grains. The grains need to be in contact with milk, not cream in order to eat the lactose that sustains them. The cream will coat them and prevent this so shaking removes the cream. The cream also prevents air exchange so shaking allows air contact.
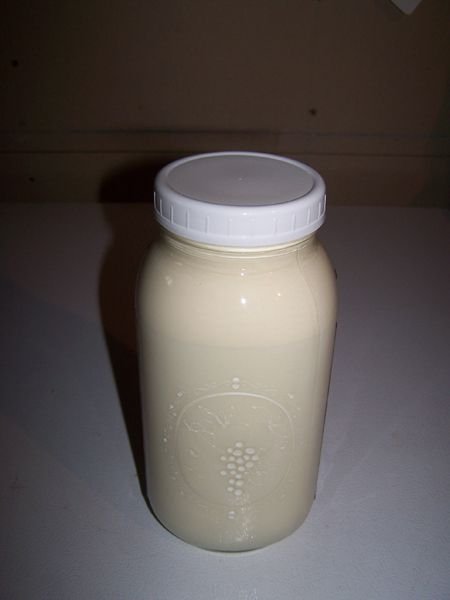
Leave the jar on the counter for the next 12 -18 hrs. Taste it after 8 hrs. and if you’ve noticed it has thickened a little. You can let it go as long as you like. The taste will just get stronger. If it goes too long, it will turn to curds, and the whey will eventually separate out.
Once it’s like you want it, you can lift out the grains which go back into fresh milk on the counter in a new clean jar. You can either leave the newly made kefir on the counter for another 8-12 hrs to finish lactose conversion, or refrigerate to stop the working. The fridge should be as cold as possible in the upper 30’s. Low 40’s can cause problems.
Making Kefir Cheese
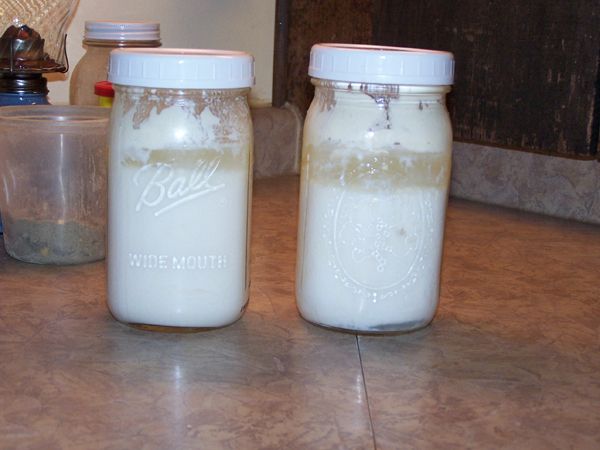
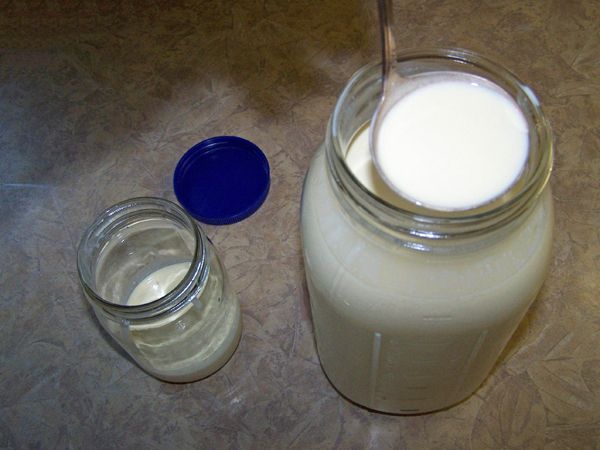
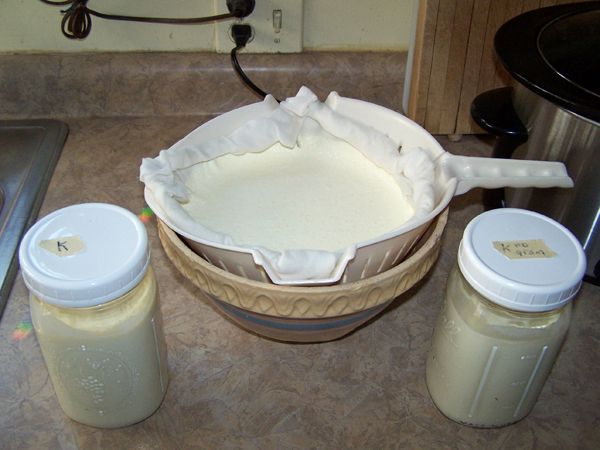
If your kefir gets too thick, you can turn it into cheese pretty easily. You can see the whey floating on top of the curds in these jars.
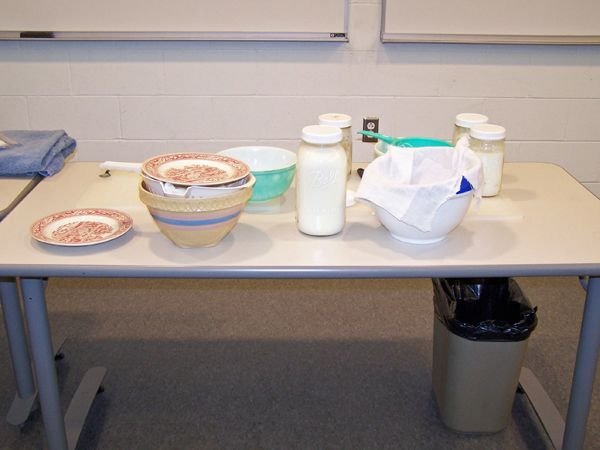
Equipment you will need: a clean Mason jar with a plastic lid, a plastic colander, a rubber spatula, a plastic spoon, cheesecloth or buttercloth, a non-metal bowl deep enough to allow the colander to drain, a medium sized non-metal bowl the colander will fit into, and a plate wide enough to cover the bowl/colander combo. Also a ½ gallon of raw milk, as above.
As you can see above, I use 2 colanders, 1 large one for straining through buttercloth, and the small green one for straining out the grains. You can get by with just 1 if need be.
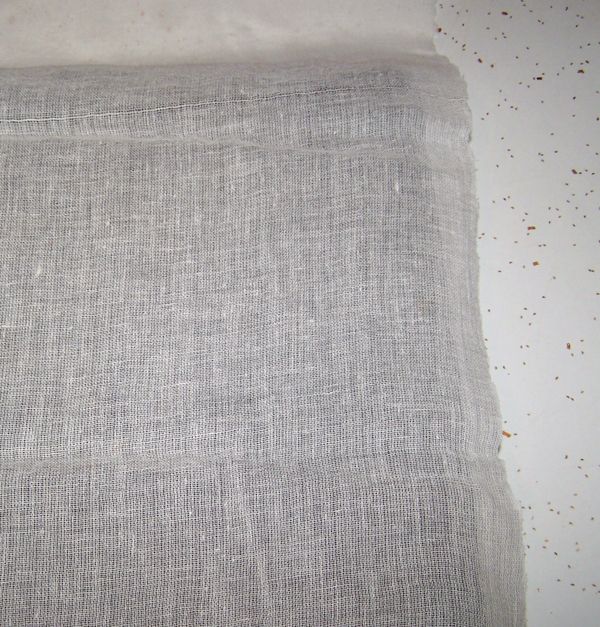
I prefer buttercloth over cheesecloth. Above is buttercloth. You can see the weave is much tighter, preventing the loss of small curd.
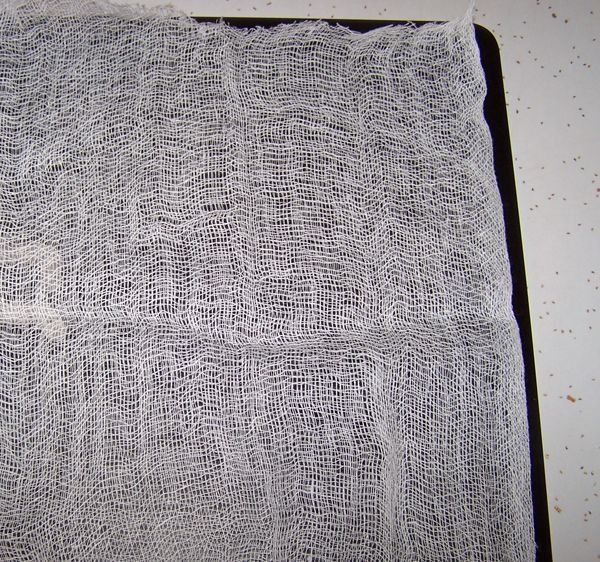
This is cheesecloth which has a much looser weave. There will be considerable loss of small curd through this cloth.
Process:
Place the colander over the top of the medium bowl and pour the cheesy stuff into it. Gently tap the sides of the colander against the sides of the bowl to get the cheesy stuff to drain out. If it’s real thick, you can use the spatula to break it up very gently. The grains usually stick together and resist breaking up as the curd will do. Remember they are rubbery to the touch and there may be several of them. They also calve (like icebergs), so you may find more as time goes on.
Take the grains out of the colander and put them into the clean jar. Then add new milk to ¾ full to the shoulder of the jar, leaving headspace for air exchange. Put the clean lid on, but not tightly, just enough to prevent stuff from falling in. Set it on the counter as before. Use the clean spatula to scrape the inside of the lid and the inside of the jar and the inside and outside of the colander.
Once the colander is empty, rinse it under hot water and either tap it or wipe it dry. Set it on the rim of the deep bowl and drape the buttercloth over it. Carefully pour the strained curds and whey into the buttercloth. Keep a good hold on the bowl. It’s amazing the mess it will make if it drops into the colander!
Do NOT leave the edges of the buttercloth dangling over the side, as they will wick the whey out and all over the counter. I roll them up and tuck them around the upper edge of the colander before covering it with the plate.
Cover with the plate and allow to drain about 24 hrs. or until solid looking, not jiggly like jello in the middle. Drain it on the counter, room temperature. Be sure to check the bowl to make sure the whey is not touching the bottom of the colander. Drain it off if it is.
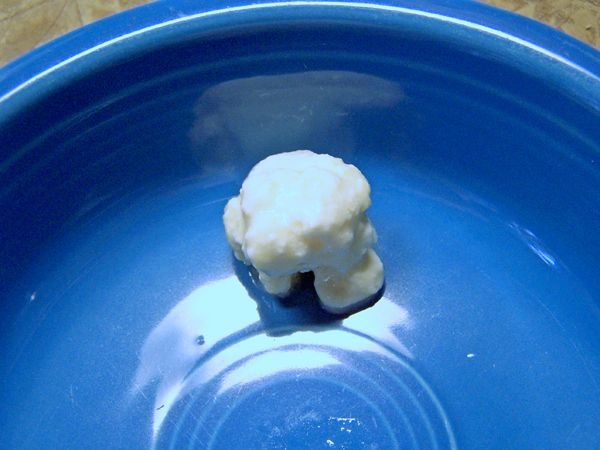
The cheese should be solid enough that it peels off the buttercloth when turned upside down. You can scrape the remainder off the buttercloth by laying it flat on a very clean surface and using a non metal utensil.
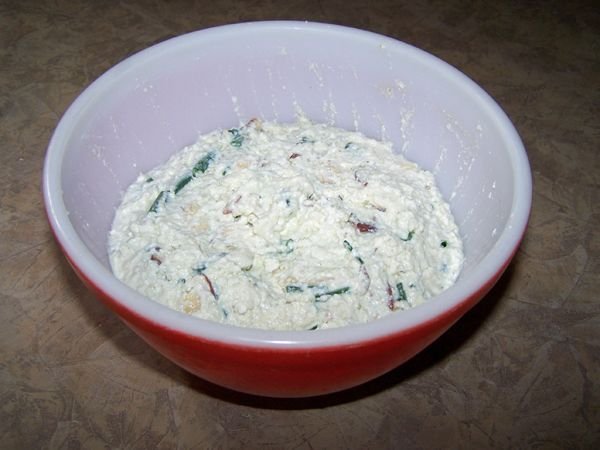
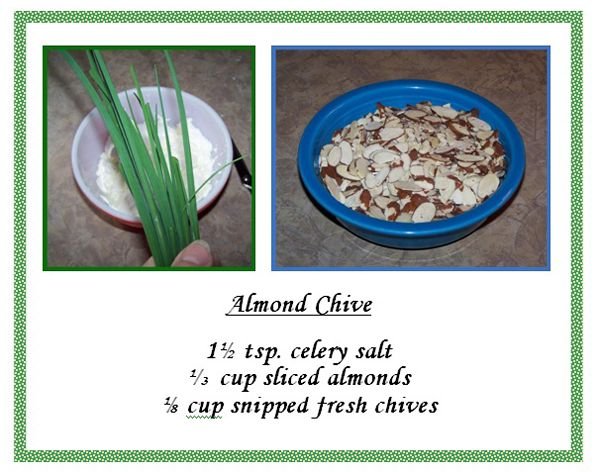
The cheese is fine just as it is, or you can add salt, or chives, or herbs, or nuts, just as you would cream cheese. This one is celery salt, fresh chives, and sliced almonds. Allow 24 hours for flavors to meld.
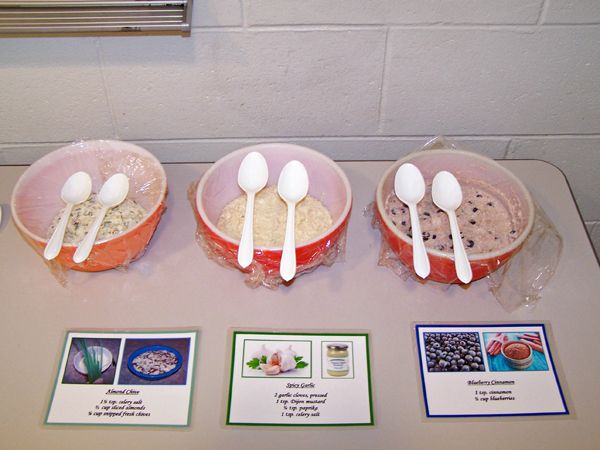
These 3, L – R, are:
Both kefir and cheese will keep for very long periods in the fridge.
The whey from the cheese can be saved and used in cooking, much as you would use milk. But be aware it’s a bit sour. It also will keep for long periods in the fridge. Both kefir and cheese, and whey can be frozen. But if you freeze the kefir, it may not make good cheese.
Touching kefir with metal damages some of the organisms. It’s important to not touch it with metal, except to eat it.
For more info about kefir:
http://users.sa.chariot.net.au
or type in Dom’s kefir in search and you will get his site.
Enjoy!
Weston A. Price Foundation: http://westonaprice.org/
Thank you for contributing your knowledge to help others! This post has been added to the Sotall.org Directory of Self Sufficiency & Survival posts. One of our goals is to provide access to the knowledge of our fellow Steamians, that will still be seen, long after the 7 day period is passed. If you write any future articles with instructions on how to do any tasks related to a homestead or survival, to ensure they are added to the directory, please submit them. They will be added as soon as possible.
May I submit past articles? There's a couple I wrote this week.
yes, please do!
I have submitted 4. I hope I did it correctly.
Congratulations @goldenoakfarm, this post is the second most rewarded post (based on pending payouts) in the last 12 hours written by a Dust account holder (accounts that hold between 0 and 0.01 Mega Vests). The total number of posts by Dust account holders during this period was 16472 and the total pending payments to posts in this category was $3495.79. To see the full list of highest paid posts across all accounts categories, click here.
If you do not wish to receive these messages in future, please reply stop to this comment.
Postingan yang sangat luar biasa.
Kalau boleh tau itu apa didalam botolnya
Wow! Thank you everyone who found my post interesting enough to upvote it! I hope you all are inspired to try making kefir and especially kefir cheese.
It looks very tasty and is certainly healthy, I only see a problem here. It's a bit hard to get such a nice milk ... But if I became something like this, I would devour it like a ham dog. Very nice post
Yes, finding quality raw milk is hard. It's often a good distance away, if available. One can use pasteurized, it is better than none.
I will be adding this post within a day or two, to the Sotall Directory. I made Kefir until I simly could not keep up with how quickly it was working and had TONS of grains. Almost went broke sending grains all over the country to people needing them.
Where I live, I did not have access to raw milk. Even now, trying to find raw milk without traveling 40 to 50 miles to the other side of Atlanta, or literally driving downtown, it is almost impossible to find.
I fully agree with everything @goldenoakfarm said about making it and the type of milk you use. HOWEVER, if you don't have access to raw milk, pasteurized milk is better than nothing. I would just hate for someone to not try because they don't have access to or cannot afford raw milk.
You can do it with pasteurized, just the grains don't seem to stay as healthy. We drive 45 mins one way each week to get our milk. As it's the best milk in the valley, it is worth it.
This is very informative. I make mozzarella cheese when I have fresh goat milk. We raise goats. I thought that was the easiest cheese to make but this looks even easier. I am going to try this as soon as I get my hands on some grains. I usually make kefir without grains. I finally have found a source of grains. I am quite excited to try this recipe of kefir cheese.
Thank you for sharing.
To the best of my knowledge, one can not make kefir without the grain, as it provides the 40+ strains of probiotics that make it kefir. One can make farmers cheese, which is similar, but without the probiotics. I am glad you found grains and hope you enjoy the cheese. By far the easiest to make of any I've tried.
I make kefir from kefir which I had gotten from a friend. Here they sell a kefir powder to make kefir with. It is probably less superior than kefir made with grains. It makes more like kefir milk.
Yes, this is true. I've heard they don't survive very long. The best bet is to contact a WAPF chapter leader in your area and see if you can get a healthy grain that way. That's what I did all those years ago.
Wonderful. Thanks for the information. I will get my hands on some grains.
Thanks so much!
De Venezuela para el mundo.
https://steemit.com/cooking/@carcol21/how-to-make-tequenos
Thanks for the information. I have been drinking Kefir for several months now, and I believe it does contribute to my overall health. I would like to make my own at home though. I see that you are a follower of Weston Price. I really like their information. Best!
It's the easiest of all the things to make! The hard part is staying ahead of the little grain's production. :)
This is fantastic! Thanks so much for sharing. I will have to ask around for some kefir grain and do some more reading. Cheers, A
If you have a Weston A. Price chapter near you the leader might be able to help. That's how I got my first kefir grain.
Last time I checked, there wasn't a chapter near me but it wouldn't hurt to check again. -Aimee