Wood Heat Is Cool! ~ Home Made Wood Stove: Part 2
"To my horrified surprise, I saw the seal beginning to burn!"
- @creatr -
Note: This series originally appeared on Whaleshares.
I absolutely love wood heat.
Wood heat is a renewable resource. You can saw, split, stock, stack, and store your supply of heat in advance. If you are resourceful and do the work yourself, your fuel source can be had at a very low out of pocket cost.
Having your own completely independent means of heat production makes you "winter proof," and free from worries about the utility company. Besides that, your sweat equity warms you even as you save.
In the first installment of this story, I told you why and how I built a home made wood stove from scrap material.
This chapter is about how I checked out the new wood stove and installed it in our little house in the woods.
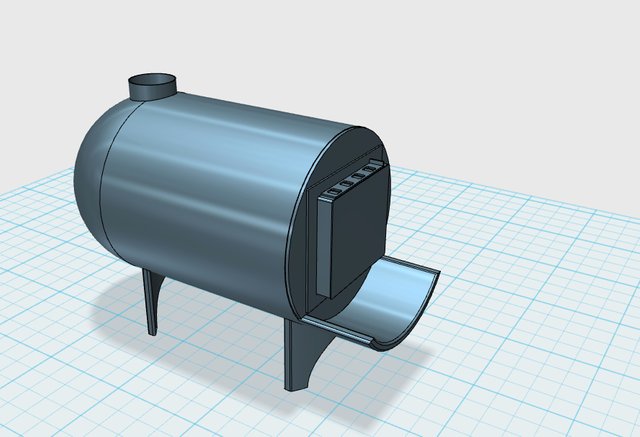
3D Model Replica of my Wood Stove ~ Original image by @creatr
How I Made My Own Wood Stove - Part 2
The image above was constructed from memory.
After deciding to write about my wood stove, it occurred to me that even though photos are hard to find, I could reconstruct a fairly close approximation using a 3D modeling program.
When the stove was finished,
more or less like you see it above, I was excited and eager to test it. In the interest of safety, I set it up in our front yard for initial testing.
I stacked four or five lengths of stove pipe on the output collar, straight up to create a tall enough test chimney for a draft. I filled the bottom of the firebox with a layer of rocks and sand to prevent hot coals from eventually burning through the bottom.
A good stove needs to be airtight so that the burn rate can be carefully controlled. I had bought some asbestos rope from a hardware store in Conway. I attached this around the inside edge of the stove door for a seal, held in place by pieces of copper wire passed through pairs of holes and twisted in place.
It was finally time for the "smoke test."
I put a few sticks of wood in the box, placed a handful of twigs and some crumpled up newspaper under the front of the wood, and struck a match.
Leaving the door ajar for a minute or two, I waited until I was sure that the wood had caught fire. Then I closed and latched the door.
The wood kept burning, the stove drawing air only through the openings in the front door. Smoke was rising up into the heavens above the chimney stack.
Hallelujah!
My stove was working!
After dancing around and shouting for a moment or two, I cautiously checked the surface of the firebox along the top and the sides. The stove was throwing off plenty of heat. I was ecstatic.
The surface of the stove continued to heat up as the wood burned. I could see flickering light from the flames when I looked down through the damper holes in the top of the door. I closed the damper slide a bit more to regulate the fire.
As I was making that adjustment, to my horrified surprise, I saw the asbestos rope seal beginning to burn!
Oh, no!
Apparently, the hardware store had sold me asbestos pump packing, and not the fire proof asbestos rope I had ordered.
When I called and complained, I learned that it would be a week or two before they could get me the proper asbestos rope I needed to seal the door. Not good. Winter was coming!
Necessity being the mother of invention, I had a grand inspiration. I borrowed a roll of heavy duty aluminum foil from the kitchen, pulled out a sufficient length, and twisted it into a "rope" long enough to surround the door.
I attached it the same way (copper wires) as I had the original, failed seal, and tried again. My "maker hack" worked great! The aluminum foil was flexible enough to conform to the door and the front of the firebox, and it sealed the door perfectly.
As I recall, the scrap tank I started with had been painted silver. While still outside, I ran a few more loads of wood through the stove to completely burn off the old paint, and then I got some stove black and applied it to the now bare metal surface.
Wood heat is awesome! ~ Image courtesy of tookapic
Now that it was tested,
it was time to install the stove inside our little house in the woods.
Of course, as a renter, I could not modify the house... And so I had to figure a way to vent the stove out through a window.
The house windows were of a design that slides open, leaving an unobstructed space. I opened a window at one end of the living room and removed and stored the window screen.
Then I made a sheet metal baffle that fit into the open space that remained when the window was slid open to the side. I think I cut it out of a piece of enameled siding from a discarded appliance. I cut a hole in the baffle at the right height to feed the stove pipe through.
The stove was spaced a couple of feet from the window wall, with lots of space on either side. It was raised slightly off the living room floor, resting on a sheet of cement board that served as a fireproof barrier between the stove and the floor.
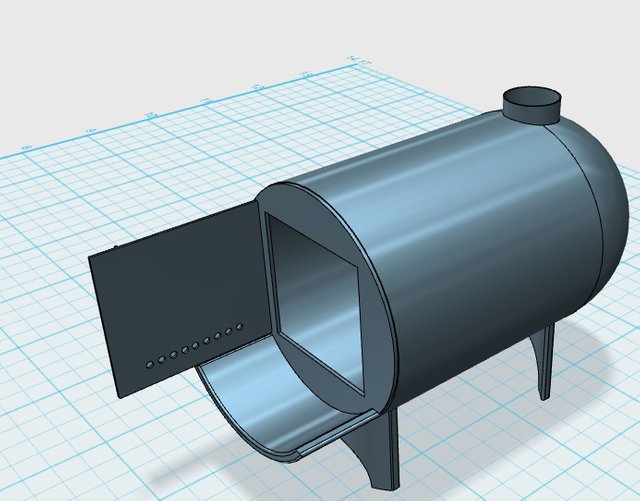
3D Model Replica of my Wood Stove ~ Original image by @creatr
I put a 90 degree elbow one length of stovepipe up from the top of the stove, then enough pipe to pass through the baffle to the outside, and a second 90 degree elbow to stack several vertical pipes on top. At the very top, I placed a spark arresting cap to keep sparks from flying up and out.
Later on during the cold New Hampshire winter, I did run into an issue with the stovepipe. Over time, creosote had built up in the pipes, causing considerable clogging problems.
This happened because I was using bare, uninsulated stovepipe. The winter chill froze the creosote, clogging the pipes.
I remember one night, smoke beginning to back up into the house. I had to go out in the cold and dark and disassemble the chimney to clean it out!
I drilled a small hole in the bottom of the outside elbow, and that helped drain the creosote over time... But this is definitely a problem to watch out for! Especially if you've got a temporary setup and don't have an insulated chimney.
Thanks for reading my wood stove story.
In the next chapter, I'll tell you about how well the stove worked, what I used for wood to feed the fire, and how we managed that winter with wood heat.
~FIN~
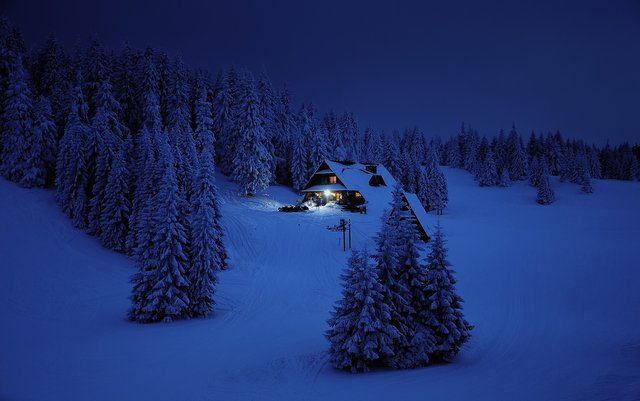
A shelter from the frozen elements... ~ Image courtesy of Jerzy Górecki
you can still reward it: CLICK HERE.

P.S. If you have an "in" with anybody at Steemit, Inc. - Would you please ask them to get rid of these damn, extremely annoying "off-website" arrow/boxes? The have, overnight, made Steemit ugly. There are much better solutions.
For an extensive collection of stories,
please check out our Library Stories Shelf - CLICK below:


Introducing: The SILVERengines proton - Image by @creatr
CONTACT US - Will Exchange for Steem
You are why I'm here on Steemit!
I have very eclectic interests and hope, over time, to write about them all.
⬇️To Check Out @creatr's World⬇️CLICK Each Image Below⬇️

|

|

|
That's super hot! Nice work, but I thought you were out in Cali? Did I miss this move to NH?
Thank you, my friend.
You're correct, I am in California... So, I guess you missed the first installment of this story? In which I said:
The move was in the other direction, an entire story in itself that I should tell sometime! ;)
Thanks for stopping by. :)
After reading this post, I couldn't resist (though I tried) a walk down memory lane.
First of all, let me compliment you on your industry and ingenuity. Survival skills in spades. Then, I have to share with you wood-burning-stove memories.
When I was a child, that was how we heated our house. There was no other heating device in the home and we lived in the foothills of the Shawangunk Mountains--quite cold winters. The stove was vintage 19th century, the home probably 18th century--no kidding. I've read that Revolutionary War patriots used to hold meetings in a house close to ours--I think it might have been ours :).
Anyway, wood or coal fueled the cast-iron stove. My brothers chopped the wood. Sometimes my uncles would drop off a load of wood, rarely coal. If this sounds idyllic, it was not. My mother would have to rise before we did to take the severe chill off the house. Paper and kindling to start, and then small pieces of wood before the large ones were added. Of course, at night the fire in the stove was killed and the whole process would start over again in the morning.
I had a great mother. And she was quite good at building a fire. These memories flooded back as I read your blog.
I've included a picture of my oldest brother (blurred his face out of respect for privacy) holding an axe. I'm not sure he chopped wood yet. Was probably in training at this point :)
I'm adding here that there was never a shortage of wood...we had a forest behind the house.
Thanks for sharing that story. I'm glad to hear I've "rekindled" some mostly good old memories.
We have been heating our California home with eucalyptus wood this winter, and so (between memories of the old wood stove and the present) I'm abundantly skilled in fire starting. I wish I had the old wood stove here, but our fireplace at least has a metal "heatilator" envelope that captures quite a bit of the heat and channels it (via convection) into the living space.
I had to look up your childhood mountain range, and pleasantly discovered that we were "neighbors" back in those days. I lived on Long Island, New York until I was 12 years old. I recall traveling one winter to a lodge in the Catskills area when my folks chaperoned a church youth group on a skiing trip.
I am also no stranger to rising in the cold and hastily starting up a fire on occasion. However, my wood stove was so efficient, it would run all night with no problem, and I could simply get a draft moving, open the door, and add more wood for the new day.
Thanks so much for sharing your memories, and the snapshot of your brother!
Thank you!
I used to basically burn for heat. Creosote and a chimney fire was always a worry.
Yep! Chimney fires...
Been there, done that! :O
Well done, a good, cheap, source of heat to get you through the winter.
Thank you, Len! :D
Here, most farmers have the occasional tree/branch that is blown over or fallen off in the wind, if they are asked, most farmers will allow you to enter their farm to clean up the wood as it helps both sides, he gets an empty paddock, you get the wood, and because you are prepared to get off your a*** and do something for yourself, they are happy to help.
I don't know about over there, but it might be worth a try.
My observation locally is that there is probably plenty of wood for anyone who, as you say, is willing to get off their butt and work for it.
In my case, I don't have far to go. My yard is full of eucalyptus trees that I have to keep after perpetually.
You have it made, and good burning wood as well.
That is really cool, @creatr! You are so handy! Very impressive work.
Actually, it's pretty hot! ... ;)
Thank you, Jayna!
There is of course some more to the tale to come... ;)
Thanks for using eSteem!
Your post has been voted as a part of eSteem encouragement program. Keep up the good work! Install Android, iOS Mobile app or Windows, Mac, Linux Surfer app, if you haven't already!
Learn more: https://esteem.app
Join our discord: https://discord.gg/8eHupPq
Loved the aluminum foil “maker hack.” Your design is something similar to what we used on the dairy farm so I can appreciate the on the fly modifications.
Thanks, Lydon...
As it turns out, I think the aluminum foil rope is probably a superior solution to the asbestos rope seal... ;)
I would love to live in a house in the woods, hopefully when i retire :)
Sounds good!