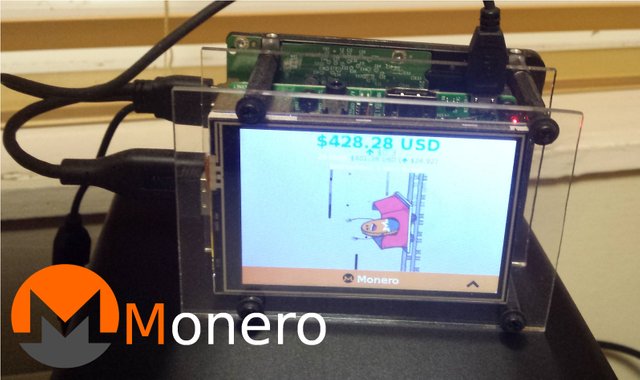
Build Your Own Monero Full-node, Raspberry Pi with 3.5" LCD display [Full Guide, simple steps]

*(Guide compatible for any single board computers with ARMv7 Processors, full list here )
Live price tracking display.
Compatible with your PC Monero GUI to have 0 sync time when opening your PC GUI wallet!
See my HARDWARE page on my website for a full parts list and assembly/build information. This guide will primarily deal with the software.
_________________________________________________________________________
Step (1) Preparing the Pi
There are some basic steps required to prepare the SD card for the Raspberry Pi Node installation in this guide. For this we require five (all free) programs. They are:
- Win32DiskImager For Windows Pc or Etcher for Mac OS
- 7-Zip for Windows Pc or The Unarchiver for Mac OS
- SDformatter for all Pcs
- PUTTY for Windows Pc. Not required on Mac as you already have "terminal"
- IPscanner for Windows Pc and Angry IP Scanner for Mac
To start with we'll erase (format) all the data from the SD card to start fresh. This is done with the SDformatter you just downloaded. The reason we need a special program to do this is that Raspberry Pi requires the card prepared (formatted) to something called Fat32, it's to do with how information is addressed on the card so it can be read. Without using this software Pcs will often restrict your options when formatting large cards and try to use a different addressing system that wont work on the Pi.
So:
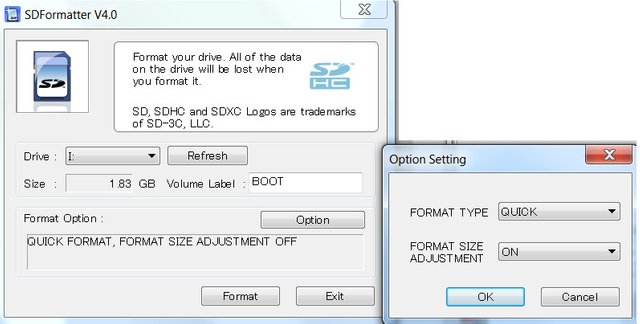
SDFormatter looks like this, and is very easy to use. Ensure the drive letter corresponds to the drive the card is inserted in.
Click "Option"
Change "Format size adjustment" to "ON"; Then "OK"
Then "Format"
It only takes a couple of seconds
Now the Card is empty, we need an operating system on it to give the Pi it's basic instructions. The easiest way to do this is to put an exact copy of an already working system onto the card. These exact copies are called "images" and are available to download from the Raspberry Pi website. We need the Stretch-lite 2Gb image click "download zip".
Because these images are large data files, they are compressed so they are quicker to download. We need to un-compress it.
For this we use 7-zip or The Unarchiver depending on if you're Windows or Mac.

Open either 7-zip or The Unarchiver, and navigate to where you downloaded the image. Open that file and it will look something like the picture on the left.
Select the file and then select "Extract".
It will ask you where you want to extract the file to and will take less than a minute to process it.
Now we have an image file ready to copy on to the card. We use Win32DiskImager next (or Etcher for Mac)
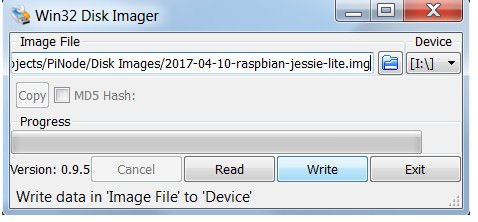
Select the Uncompressed image we just made, double check that the "device" is the correct drive letter of the SD card. And hit "Write"
It will give a series of warnings and they are to be acknowledged only once you have confirmed it is definitely the SD card you are writing to. If you accidentally over-write your Pc's main drive instead it will cause BIG problems. Check first and double check
Nearly ready!
To avoid the hassle of finding spare HDMI cables, keyboard etc, this guide uses something called SSH. It's what PUTTY is for (or Terminal on Mac).
What it enables you to do is take complete control of the Raspberry Pi and manage the installation of the rest of the guide, sending commands over the network. It also means you can put the node anywhere in the house once complete, and log in remotely with SSH and check it's progress/status without a TV or keyboard directly plugged into it. Much easier long-term.
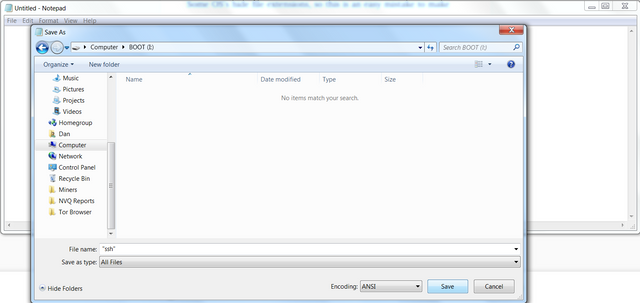
However, I just said that it enables complete control of it remotely. This is a security problem. To solve this the people that made the system have disabled SSH. We have to tell it to enable. Again it's really simple. All we need to do is make a file called ssh and put it on the card.
On a windows Pc open notepad, (found under the start menu and accessories)
Windows, Notepad
Select "file", "save as" and go to the drive with the SD card now called "BOOT"
Call the file "ssh" (with quotes, this stops it saving it as a .txt file)
Mac
Make a text file in same location and call it ssh
Then go to the file properties and delete it's extension.
The Pi will look in this location when it starts. If it sees a file called ssh it enables it.
So now we plug everything in.
Put the SD card in the Pi, an Ethernet cable will also be needed as Wifi isn't enabled yet and the power. The USB drive can be added now or later.
Turn on the Pi and give it a few seconds to start up.
We now need to know it's IP address. If you have plugged in the HDMI it will display it on the screen. The next easiest option is to look on your home router for the IP address of connected devices and identify the Pi. The third option is for people that can't do either of those.
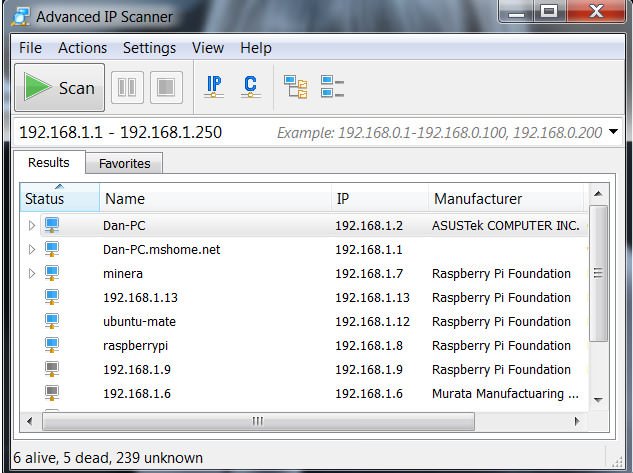
The default settings will find it unless someone in your house has customized the LAN settings. It's usually between:
192.168.1.1 - 192.168.1.250
In the example to the left it is showing connected devices with blue logos. I have a few connected but you should have just one called "raspberrypi"
We then take this number, (in my example '192.168.1.8' yours will probably be different) and put it in PUTTY
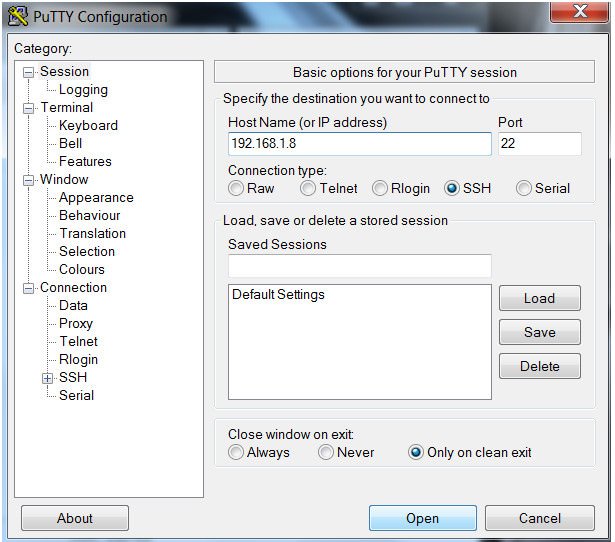
And that's pretty much it, this is the business end.
Enter the IP address from the step above into where it says "HostName (or IP address)" and click "open"
It ask for a username which is:
pi
and password:
raspberry
You are now logged in and ready to continue with the guide.
When you connect to Wifi later your IP address may change. You can find it again with IP Scanner.
Also now that SSH is enabled it is wise to change the default password of raspberry to something more secure. We do that near the end in a step called "Security" with a couple of other things.
If you need to pause when making these projects, it's good practice to use the command "sudo shutdown now" before turning off the power.
Step (2) Enabling WiFi
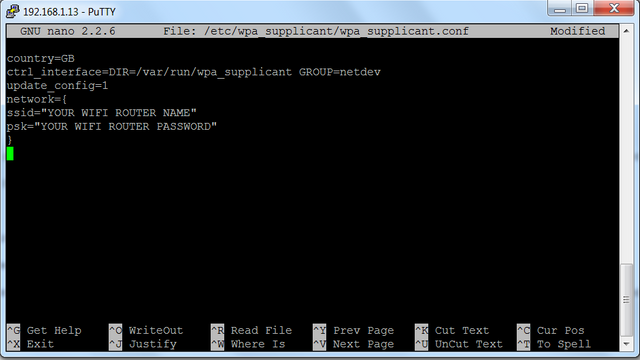
First WiFi network connections are stored:
sudo nano /etc/wpa_supplicant/wpa_supplicant.conf
Go to the bottom of the file and add the following text:
network={
    ssid="YOUR WIFI ROUTER NAME"
    psk="YOUR WIFI ROUTER PASSWORD"
}
**Note: Enter details between the quotes, leave the "" in
save and exit using
ctrl+O
Then 'enter'
ctrl+X
Step (3) Expand the file system, (making full use of the SD card) and changing the Password.
enter:
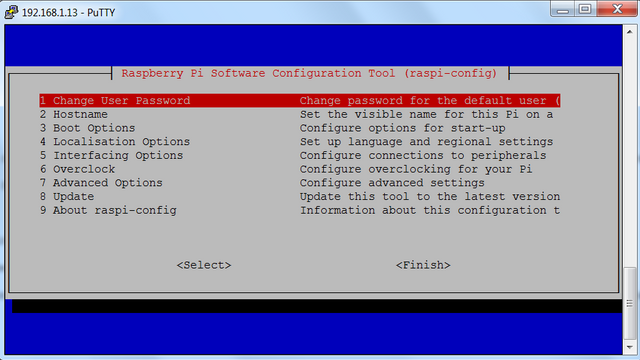
sudo raspi-config
The default password for obvious security reasons should be changed. That is done in this menu.
select "1 change user password", and follow the on-screen instructions. This will be the new password when using PUTTY to SSH into the Pi.
Because we installed a 2GB image onto the card, the Pi may think that the card is only 2GB in size. So we tell it to expand the file-system (returns it to it's full size allowed):
select "7 advanced options"
select "A1 expand filesystem"
select 'finish' system will reboot, (remove the ethernet cable if you didn't at the previous step). And log back in with SSH and PUTTY once reboot is complete.
Step (4) Updates
The image we downloaded may have an update or two since they released it:
sudo apt-get update
sudo apt-get upgrade
select 'y' to accept the storage requirement.
Step (5) Installing the screen
sudo wget http://www.spotpear.com/download/diver24-5/LCD-show-170309.tar.gz
sudo tar xvf LCD-show-170309.tar.gz
cd LCD-show/
Then pick and type one command from the list below depending on your screen size/resolution.
If your display is the Raspberry Pi 2.4inch, 2.8inch or Raspberry Pi 3.2inch
sudo ./LCD32-show
If your display is the Raspberry Pi 3.5inch
sudo ./LCD35-show
If your display is the Raspberry Pi 3.5 inch HDMI LCD
LCD35-HDMI-480x320-show
OR
LCD35-HDMI-800x480-show
If your display is the Raspberry Pi 4inch
sudo ./LCD4-show
If your display is the Raspberry Pi 4inch HDMI(800x480)
sudo ./LCD4-800x480-show
If your display is the Raspberry Pi 4.3inch
sudo ./LCD43-show
If your display is the Raspberry Pi 5inch
sudo ./LCD5-show
If your display is the Raspberry Pi 7inch (800x480)
sudo ./LCD7-800x480-show
If your display is the Raspberry Pi 7inch (1024x600)
sudo ./LCD7-1024x600-show
If your display is the Raspberry Pi 10.1inch (1024x600)
sudo ./LCD101-1024x600-show
This command takes some time ("LCD configure 0" displayed for a while) and it reboots when it is complete but reboots in the background so it confuses PUTTY. The reboot causes PUTTY to crash and is normal. I recommend waiting until the activity indicator on the pi has been lazy for a minute or two (an indication it has finished) then press enter. PUTTY will bring up an error and close. (This has been updated and did this twice on a rebuild) This is fine. Log back in with SSH and PUTTY
Now we tell the Pi to boot using the new display:
sudo nano /boot/config.txt
And at the bottom you will find
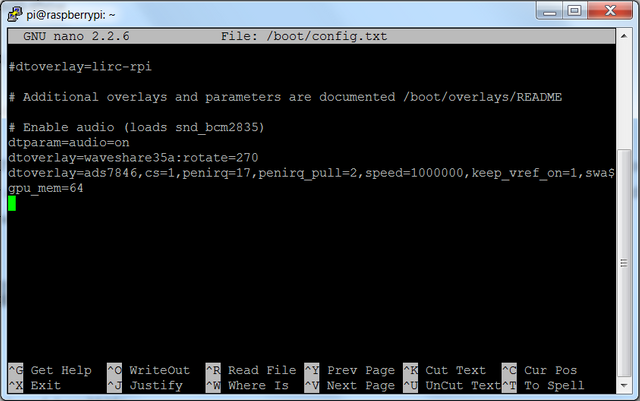
# Enable audio (loads snd_bcm2835)
dtparam=audio=on
dtoverlay=waveshare35a
dtoverlay=ads7846,cs=1,penirq=17,penirq_pull=2,speed=1000000,keep_vref_on=1,sw$
Adding a # before a line make the Pi ignore it and is called a comment.
Comment out the dtoverlay=ads7846...line by adding a #.
The line that we want active is the dtoverlay=waveshare35a
The rotation value should be changed here from now on too, by adding :rotate=0 as in the image above
Choose your rotation value. 270 is the HDMI port at the top. Use 0,90,180,270 as needed.
It should look like this after, (depending on rotation preferences)
# Enable audio (loads snd_bcm2835)
dtparam=audio=on
dtoverlay=waveshare35a:rotate=270
#dtoverlay=ads7846,cs=1,penirq=17,penirq_pull=2,speed=1000000,keep_vref_on=1,sw$
then, save and exit (CTRL+o, CTRL+x)
sudo reboot
And you will have your display working.
(If rotation is wrong, edit the config.txt again and change rotate=<###>. Reboot required for changes to take affect)
Step (6) Adding the GUI (the desktop)
A very easy copy/paste step:
sudo apt-get install --no-install-recommends xserver-xorg
sudo apt-get install --no-install-recommends xinit xserver-xorg-video-fbdev
sudo apt-get install lxde-core lxappearance
sudo apt-get install lightdm
sudo apt-get install --no-install-recommends matchbox chromium-browser
don't reboot just yet...
Step (7) Force the output to the LCD, not HDMI
sudo nano /usr/share/X11/xorg.conf.d/99-fbdev.conf
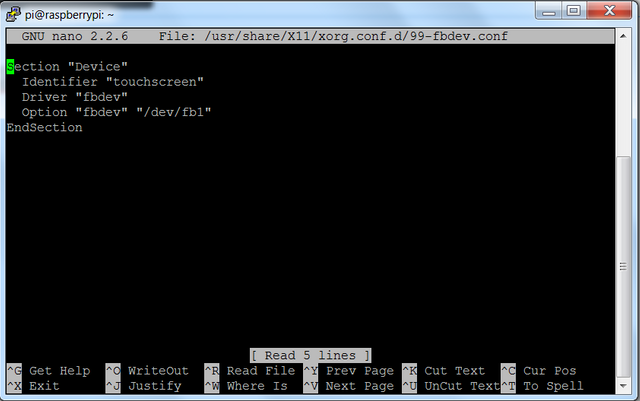
should be blank, add the following text
Section "Device"
Identifier "touchscreen"
Driver "fbdev"
Option "fbdev" "/dev/fb1"
EndSection
save, exit, ctrl+o ctrl+x
sudo reboot
pi will reboot and after about 1 min for initial setup will load GUI onto the display giving a desktop
If it prompts you for a login username and password it can be disabled via the PuTTY window with
sudo raspi-config

option 3 (Boot options)
option B1 (Desktop/CLI)
option B4 (Desktop Autologin)
Select finish and reboot again for changes to take effect.
Step(8) Disable screensaver, auto-boot chrome
Now it's booted to the GUI you can disable the screen saver with a USB mouse. Open the menu in the bottom left, preferences, screensaver. and select disable from the drop down list.
Then the via SSH
The file below contains setting for the GUI
sudo nano ~/.config/lxsession/LXDE/autostart
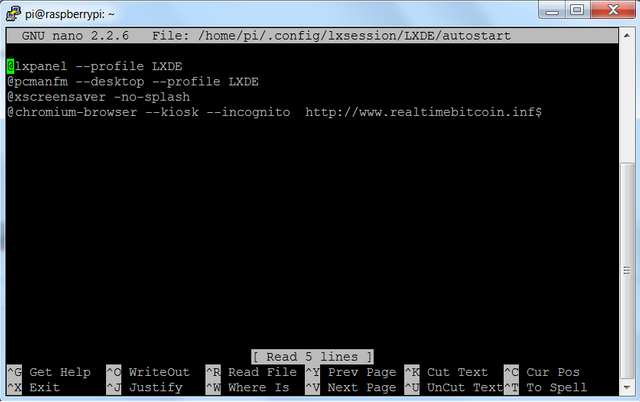
Change it to look like
@lxpanel --profile LXDE
@pcmanfm --desktop --profile LXDE
@xscreensaver -no-splash
@chromium-browser --start-fullscreen
This loads the chrome browser on boot in a full screen mode.
We will come back to this file later to tell it to auto boot the node.
Step (9) Moving everything to the USB drive
People have been making projects (not just nodes) on the raspberry pi for some time. A common failure point seems to be the SD cards. The constant read/write process 24/7 drastically shorten their life. We can reduce this by moving the entire file-system to the USB drive, and where possible using traditional platter HDDs. Check out HARDWARE for cheap solutions available to the Raspberry Pi.
For moving the file-system we need the "git" repository
sudo apt-get install git
Insert the USB drive if you havn't already, then check it is mounted to the Pi.
sudo lsblk
99% of the time it will be mounted as /dev/sda with a partition called sda1. However if it has found sda1 it won't let us continue until it is unmounted. (It would be telling it to make changes to the filesystem whilst it's in use. It won't let us and doesn't like it). So we unmount with
umount /dev/sda1
We need to delete this partition to stop raspbian from automatically using the drive on boot, at this point. The helper in the next step will automatically create a new partition to do it's job of moving the files.
 sudo fdisk /dev/sda

d
(deletes old partition)
w
(writes and commits the changes)
Now it's compatible with the helper script.
The folks at Adafruit have made a very useful helper to reduce the amount of commands you need. These next three lines create a new partition and move the entire file system onto the USB drive. It does warn you that any data currently written to /sda will be overwritten. If you are an advanced user and have called the partition something other than /sda, this is where it should be changed.
git clone https://github.com/adafruit/Adafruit-Pi-ExternalRoot-Helper.git
cd Adafruit-Pi-ExternalRoot-Helper
sudo ./adafruit-pi-externalroot-helper -d /dev/sda
It will ask you to check that you are writing to the correct partition, select y when you are sure. When I do this step it takes a little under 10mins. Please be patient.
Picture
This is our drives labels and addresses. We need to check that the PARTUUID long number (that's the USB), is entered into
sudo nano /boot/cmdline.txt
So everything has been copied over and the drive configured. We just need to change the boot file so it starts from the USB drive from now on. The helper untility should have done this automatically. But recently this has not been the case. Do this just to check, it's simple and is just a copy/paste action.
sudo blkid -o export /dev/sda1
The numbers will be different but it brings up something like the image on the left.
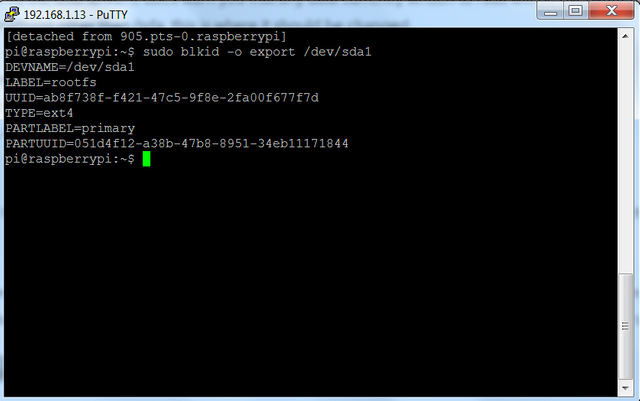
Enter:
sudo nano /boot/cmdline.txt
And ensure that the helper has changed
root=PARTUUID=
to match the one that was listed to you above. Yours will be different to mine. Then Save and exit using ctrl+o then ctrl+x.
Do another reboot with sudo reboot and when the Pi starts this time your USB activity light will blink like crazy, showing it's now getting it's data from there.
Step (10) Installing "Screen"
We are now very close to completion. Very soon we will be telling the node to start. However the node will be running in the PUTTY window on our Pc and if you close that screen, it closes the connection too, stopping the node. An easy solution is to use a nifty program called "screen". It runs the current session on the Pi and detaches you from it. This leaves you free to leave and re-join to check the node's progress as you wish, without disturbing it!
sudo apt-get install screen
Then, to use it, type…
screen bash
It will open another terminal instance that is running on the Pi. You can now start a process you want to be able to leave running and reconnect to later. In this case, this will be the node.
"Screens" can be rejoined (I'll show how to detach and re-attach to them later)
Step (11) Installing Monero
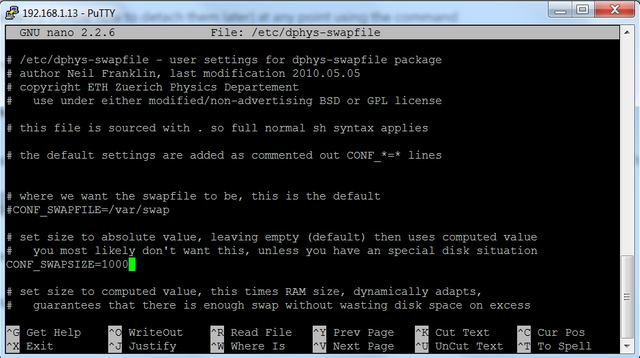
Enlarge something called a swapfile so the blockchain loads quicker (like artificially boosting available memory)
sudo nano /etc/dphys-swapfile
And change the default size of 100(MB, to 1000 as shown to the left
save, exit, ctrl+o ctrl+x
*If you wish you may make a 2GB swap file by entering a figure of 2000.
This is the upper configurable limit of a Pi3.
Then, to build the new swap file...
sudo dphys-swapfile setup
sudo dphys-swapfile swapon
Download the dependency Monero needs:
sudo apt install libboost-all-dev
We make a directory to download Monero files
mkdir ~/bin
cd ~/bin
Download Monero as a package with:
wget https://downloads.getmonero.org/cli/linuxarm7
Then open up that package
tar -vxf ./linuxarm7
Then if you want to now.... the moment of truth!!!
To run the node manually now for the first time type
./monero-v0.12.2.0/monerod --rpc-bind-ip=192.168.XX.XX --rpc-bind-port=18081 --confirm-external-bind --block-sync-size 50
**Where XX.XX is the IP address you have been using to SSH to the Pi.
The port number of 18081 can also be changed to anything that isn't reserved. I found it easier to specify a port here and avoid hunting the network if you leave it to be randomly assigned (although 18080 or 18081 seem common ports for Monero).
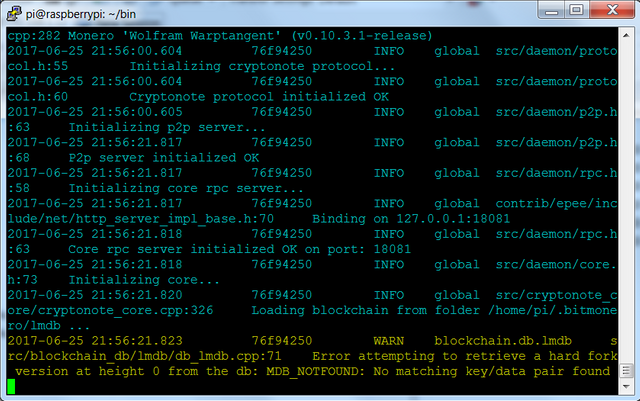
There is a handy command "--detach" that runs the node in the background, we will add it later. By leaving out the --detach flag on first start it is easier to check for any errors, if any, and at what stage they appear.
We'll add that flag to the auto-boot once we're happy with our settings.
The node does take time to initialize. Please be patient. I was also surprised by a lack of USB activity during this phase. It has most likely not frozen, it just takes a approximately 10mins to get going, (yes 10mins I've timed it, it's a long time). Mostly it takes it's time on the loading blockchain phase, even when empty on first boot.
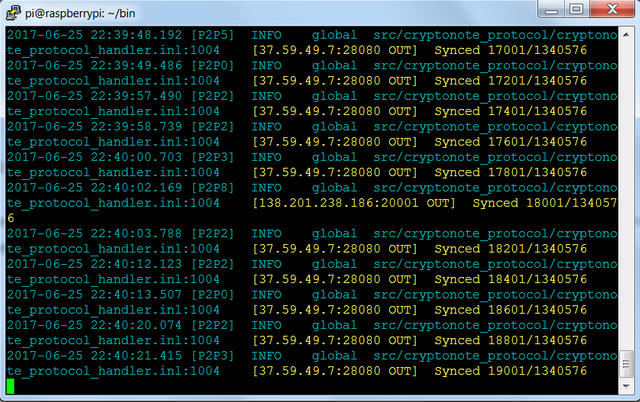
And this is what it'll look like running.
A constant stream of lines like this going upwards.
And now we are happy everything works we can add the Monero Node to the autostart file.
This will load the node on boot in the eventuality power is lost to the node and restored.
sudo nano ~/.config/lxsession/LXDE/autostart
and add the line:
@/usr/bin/python /home/pi/moneroautostart.py
Save+Exit (CTRL+o, CTRL+x)
The command above tells the Raspberry Pi to run a Python script on start. I've experimented with a few ways to auto-boot and this seems the most reliable. So next we make the file that holds the script.
cd
nano moneroautostart.py
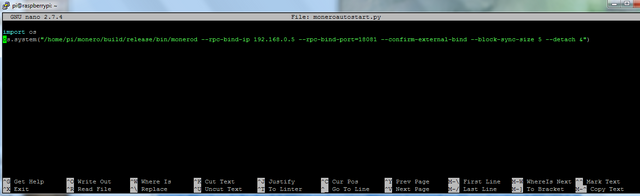
And in this blank file add:
import os
os.system("/home/pi/bin/monero-v0.12.2.0/monerod --rpc-bind-ip 192.168.xx.xx --rpc-bind-port=18081 --confirm-external-bind --block-sync-size 5 --detach &")
Replace xx.xx with the IP you are using to connect via PuTTY/SSH
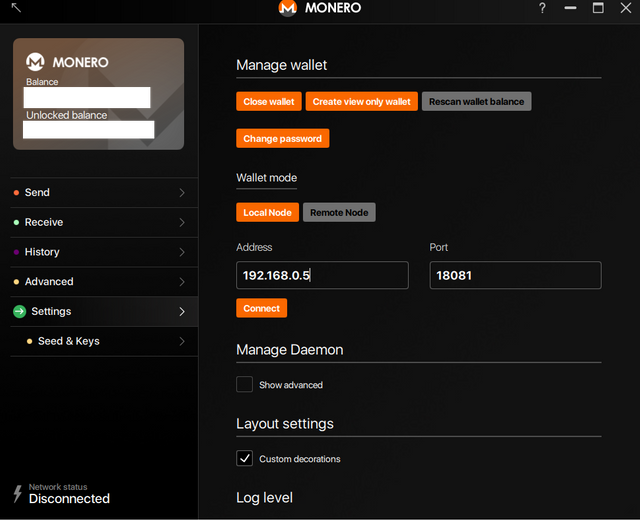
Now we're happy that the node is running on the Pi we can check our desktop Pc wallet can connect to it.
Open the wallet and enter your password as normal.
After a few seconds It will count down saying "starting daemon in 5...4...3"
Click the "use custom settings" box to prevent this.
If you miss it, don't worry, just tell it to "stop daemon" in the "settings" tab
If you haven't already navigate to the "settings" tab on the left.
This is where we enter our Pi node IP and Port we setup earlier.
Once entered click "connect"
Thats it!
On the left you should see the status change from "disconnected" to "Synchronizing" showing the progress of your Pi node.
The Pi on it's first load will take some time to download and process the 30GB+ blockchain. This is normal, but once it has then your GUI will appear to synchronize almost instantly!
Some final points for the Pi...
***Important, to leave the node running in the background. Press "ctrl+a" release just the "a" key and press "d"
That sends a command to "screen" to detach ("d") it so you can come back and check on it later. Use:
screen -r
To return to the screen and check it's progress, or:
./bin/monero-v0.12.2.0/monerod --rpc-bind-ip=192.168.XX.XX --rpc-bind-port=18081 status
and it will read back a summary of it's progress with a percentage of how far it's got through synchronizing, block height, and some other useful info. These commands can even be done from another computer in the same network at home!
To stop the node use
./bin/monero-v0.12.2.0/monerod --rpc-bind-ip=192.168.XX.XX --rpc-bind-port=18081 exit
Step (12) Security
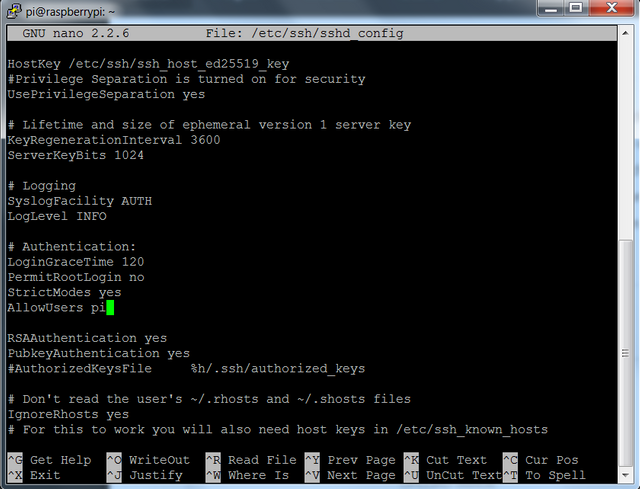
I've been made aware that there are some underlying defaults that can affect system security. One is to disable root login by ssh by editing
sudo nano /etc/ssh/sshd_config
and changing
PermitRootLogin without-password
to
PermitRootLogin no
and add the line below to only allow ssh access to user 'pi'
AllowUsers pi
Save, ctrl+o, enter, exit ctrl+x
then reboot just sshd by
sudo /etc/init.d/ssh restart
I will update any security recommendations as I become aware of them.
Enjoy
This guide created, by shermand100 of http://www.PiNode.co.uk
Guides also available for Bitcoin, Litecoin, Ethereum, Monero, Sia, Storj, Blackcoin, Pinkcoin, Dash, Doge and others
✅ @shermand100, I gave you an upvote on your post! Please give me a follow and I will give you a follow in return and possible future votes!
Thank you in advance!