How To: Make an Old Motorcycle Run by Cleaning The Carburetor
Most of the time the only thing preventing an old bike from running again is a DIRTY CARBURETOR.
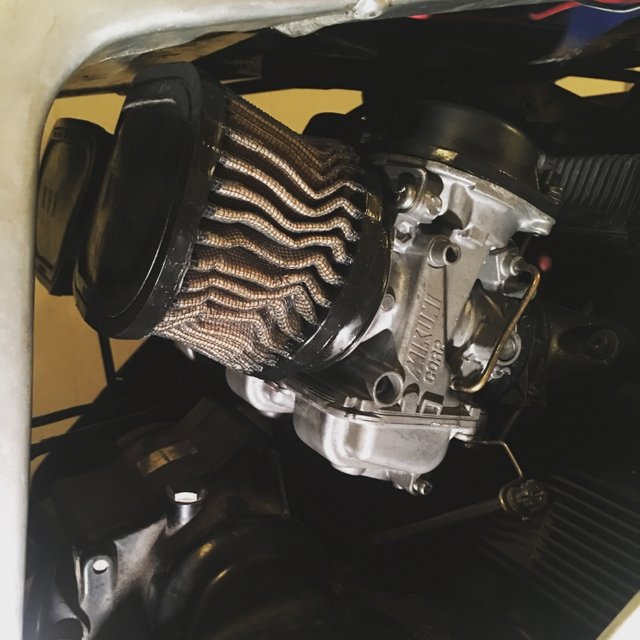
(GSXR750 carbs, no airbox, YES I know how to tune bikes w/o airboxes... LOL)
There are other things you may need to fix before you'll be able to ride your bike. It's a good idea to make sure the wheels are firmly attached to the fork and swing arm, that the brakes work, that the throttle doesn't hang up, etc.
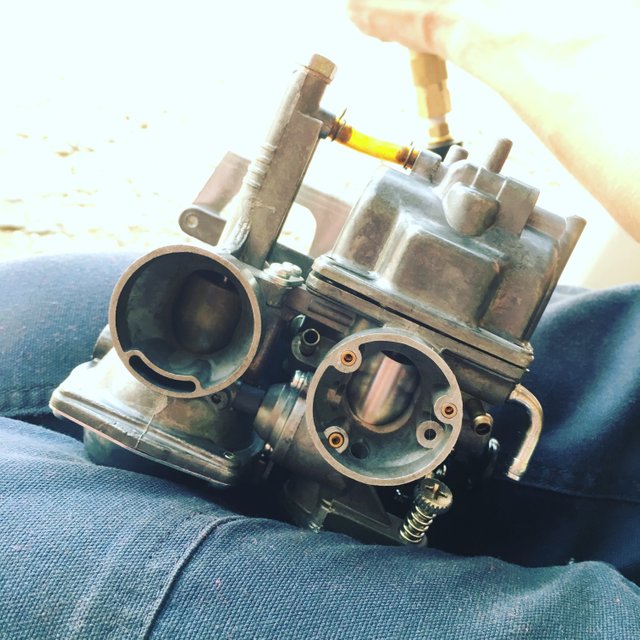
(Weird carb set from a Yamaha XT350)
This article is about CLEANING CARBURETORS, so I'm going to do my best not to get bogged down by all of the other aspects of restoring an old motorcycle. If you like this post and want to see more like it, let me know in the comments section.
How to Diagnose a Dirty Carburetor
NO, it's not as simple as looking at the carb and deciding whether it looks dirty or not. The exterior condition of the carburetor doesn't really matter as long as all of the parts are there and aren't damaged.
Your bike's engine needs three things to run. We call these things the HOLY TRINITY OF INTERNAL COMBUSTION because you need all three present and accounted for in order to make an engine run. It doesn't matter if you're working on a car or a truck or a motorbike or a generator or a Lycoming O-235 in a Cessna 152. If the trinity is incomplete, ye old engine aint gonna run.
The trinity is FUEL, SPARK, and COMPRESSION. There are ways of testing these things separately, but that's often not necessary if all we want to do is make an old motorcycle run. What if there was a way of testing all three at the same time? Well there is, though it's not very precise. You're going to need a can of carburetor cleaner in order to complete the BERKS!! AUSTINS!! Handy Dandy Carburetor Cleaner Test. You can buy a can of carburetor cleaner down at your local auto parts store.
Chances are you've already tried to start your bike, but nothing really happened. If your bike doesn't start normally, there's a good chance you have a FUEL DELIVERY issue. You may also have a SPARK or COMPRESSION issue. The Handy Dandy Carburetor Cleaner Test gives us a general idea about what's what and how it's working.
To perform the carb cleaner test, start by locating your carburetor and airbox. Turn your key to "ON" and/or your kill switch(es) to "RUN". If your bike has electric start, you should have already installed a fresh battery and made sure the engine turns without making any funny noises. If your bike has a kick starter, you can use that.
Now squirt a SMALL AMOUNT of carburetor cleaner inside the airbox. If you can't get in the airbox easily, free it from the carburetor and squirt a SMALL AMOUNT of carburetor cleaner directly into the intake side of the carburetor. Note that this is a TEST. Nothing about squirting carburetor cleaner into your carburetor actually does any cleaning to the carburetor. I get calls all the time where people say they've cleaned their carburetor only to find out all they did was squirt some carb cleaner into the airbox or carb or whatever. This is a test. All we're trying to find out is WILL THE ENGINE RUN AT ALL?
Once you've introduced some carburetor cleaner into the system, go ahead and try to start the bike. If it runs at all, even for just a few seconds, you now KNOW that you have spark and enough compression to make the bike run ON CARBURETOR CLEANER. We want the bike to run on GASOLINE, not CARBURETOR CLEANER. DO NOT continue to make the bike run on carburetor cleaner. It probably will, but you WILL DAMAGE YOUR ENGINE if you attempt to run it for any length of time on carburetor cleaner alone. Don't be THAT GUY who thinks carburetor cleaner blows up engines because you got stupid with a can of carburetor cleaner and blew an engine up one time.
If all goes well, your engine started and ran for a few seconds on carburetor cleaner. If it didn't start on carburetor cleaner, you'll want to check for spark. If the bike has spark but still doesn't run on carburetor cleaner, you need to do a compression test. Checking spark and compression is beyond the scope of this article, but that doesn't mean I won't write more BUT YOU NEED TO LET ME KNOW IN THE COMMENTS SECTION. LOL!
If the bike ran on carburetor cleaner, there's a good chance (but aint nothing guaranteed in this business...) it has enough compression to run on gas. It definitely has spark. It wouldn't run at all if it didn't have spark. The big issue here is fuel isn't getting to the engine the way it should, and the reason is because your carburetor is dirty as shit. Now let's make the bike run the way it should by CLEANING THE CARBURETOR.
Removing Your Carburetor
You're going to hate me for this, but I don't care. I'm not even going to try to tell you how to remove the carburetor(s) from your motorcycle. I'm not going to tell you how to identify a carburetor. Or an airbox. If you don't know how to identify basic parts, you have no business working on anything. Take your 'ish to a shop or something. Or stumble and fumble around until you have some clue about how your machine works. That's how all of us learned in the first place. We broke lots of shit. We fucked lots of things up. We forgot to put parts back where they went. We learned from experience. Ever wonder why it costs so much to hire a mechanic? It's because there's absolutely no way to learn everything you need to know in just a few minutes or by reading an article. I meet lots of people who think they can do what I do until they actually try to do what I do. Just because I can do it in my sleep with my arms tied behind my back doesn't mean you can, too. Turning wrenches is a skill; knowing what you're looking at takes some experience.
The basics though, to get your carburetor off, amount to loosening the hose clamps holding it to the intake manifold and the airbox. DO NOT remove the intake manifold from the cylinder head or cases. Then remove the vacuum and fuel lines from the carb. Remove the throttle cable. Wiggle the carburetor free from the bike. Use only as much force as necessary.
Disassembling Your Carburetor
Now for the fun part.
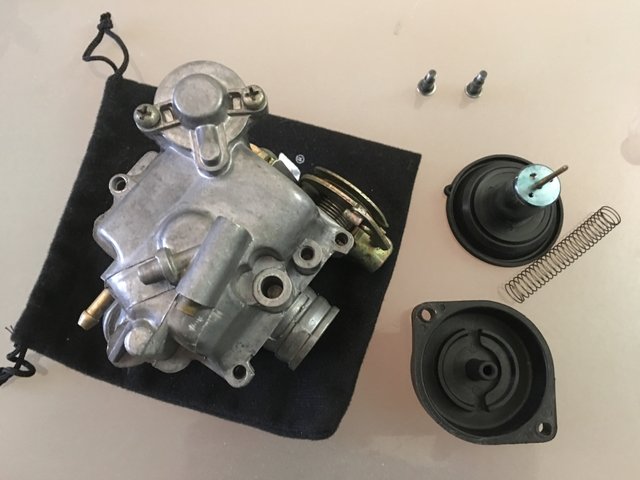
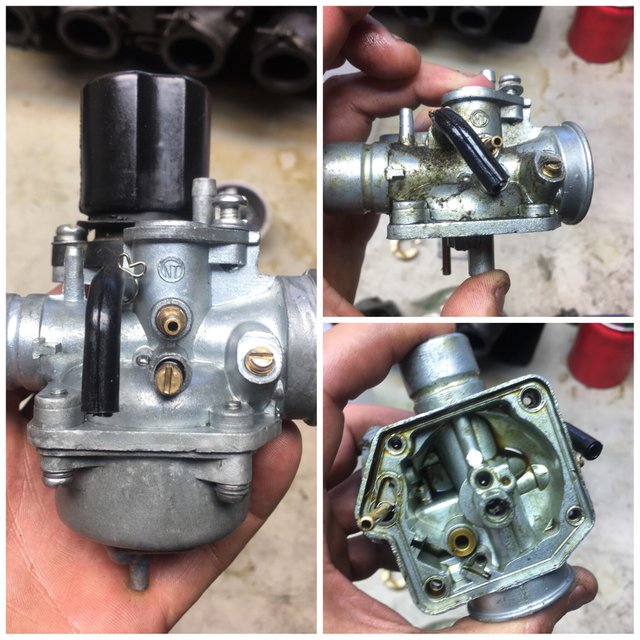
I like to start with the top of the carburetor. If you have a mechanical carburetor, where the slide is attached directly to the throttle cable, then you had to disassemble part of the carburetor in order to free it from the bike. Let the cable, return spring, slide, and needle hang there on the bike while you're working on the carburetor. If you have a vacuum-actuated carb, then you needed to remove an adjuster nut before you could remove the throttle cable from the carb. The slide and needle are still in the carb, under the top cap.
Remove the top cap, slide, and needle from the carb.
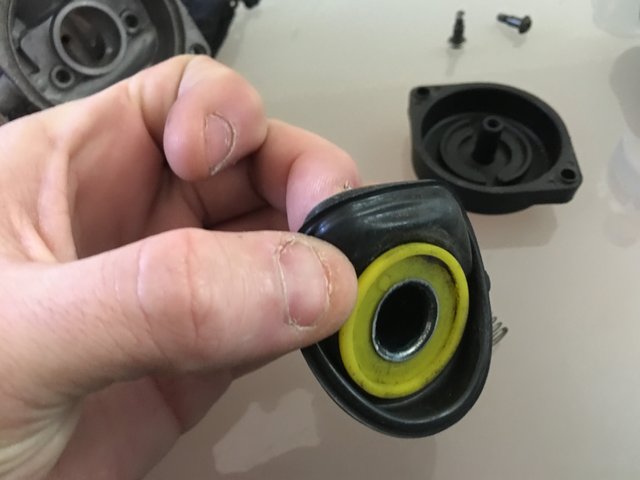
Have a look at the needle. Make sure there's not an excessive amount of wear on the needle from where it rests against the main jet. Make sure the rubber diaphragm doesn't have any holes in it. Clean the needle and condition the diaphragm with 2-stroke oil. There's no need to remove the needle from the slide at this point.

Now flip the carburetor upside down and remove the float bowl. There should be 2-4 screws holding the float bowl on. If the screws are mangled, there are all sorts of methods you can use to remove them. Use a dremel tool or a hacksaw to cut new slots in the screws. Use extractors or tiny channel locks if necessary. I have special screwdrivers I use to remove over-tightened float bowl screws. There is always a way to remove stuck screws. Use your imagination, buy tools, or ask a mechanically-inclined friend to help you if you get stuck on stuck screws.
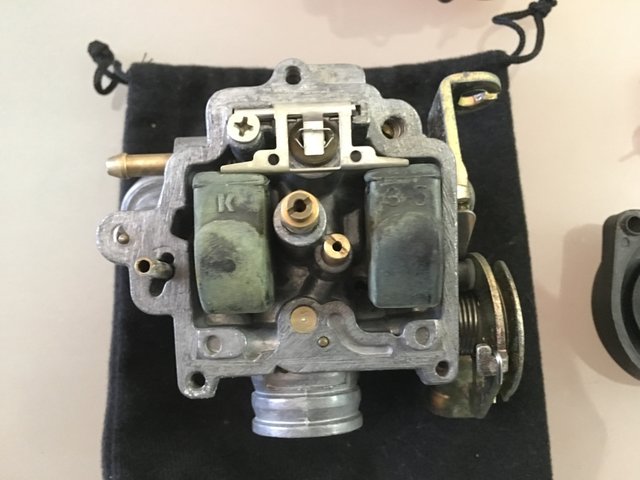
Once you have the float bowl off, you can look at and start cleaning the carb's "worky bits". These are the parts that matter.
You'll find a float, another needle (that looks very different from the needle mounted in the slide), a pilot jet, a main jet, and an emulsion tube underneath your float bowl.
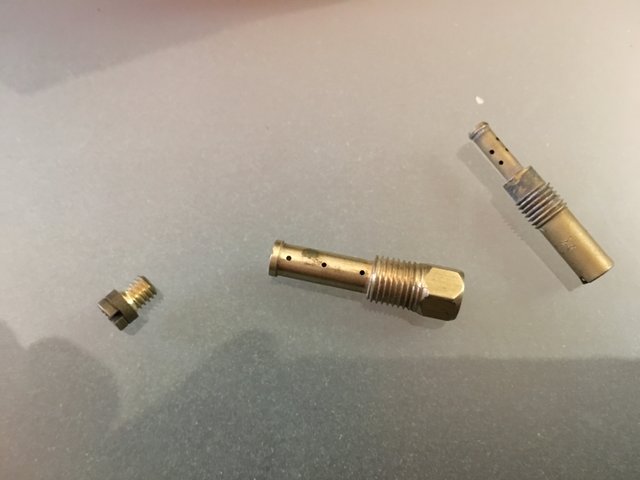
(From left to right: main jet, emulsion tube, pilot jet)
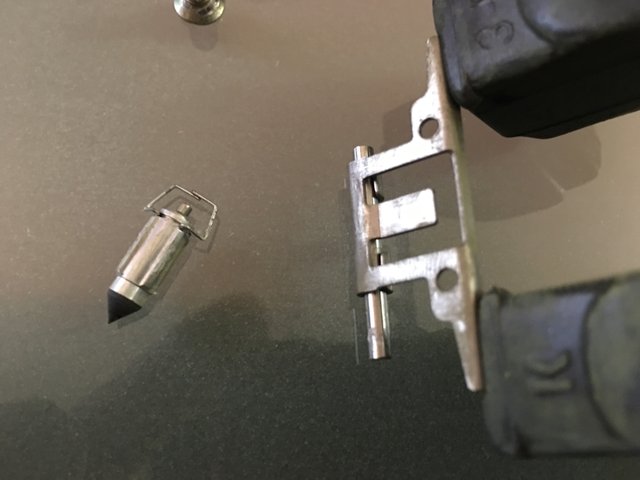
(From left to right: fuel needle, float pin inside float. The black part of the needle is rubber and needs to be supple to work properly. Condition it w/ 2T oil. The other side is the "nubbin" that needs to move freely. If your carbs leaks from the overflow, you have a needle/rubber/nubbin/float issue.)
There's also a gasket between the carburetor and the float bowl. This gasket might be made of paper, or it might be an o-ring. Either way, you can reuse it as long as it's not damaged and doesn't leak. I clean carburetors all the time, and I rarely need to replace parts or gaskets. A lot of people think they need to buy a "rebuild kit" with all new gaskets and parts in order to refresh their carburetors. It just isn't so. The only thing worth using in those kits are the gaskets. The needles and jets are often poorly made and don't work properly when installed in place of factory parts. If you want to replace your gaskets though, be my guest.
Now for the cleaning part of the carburetor cleaning. Before you start, be sure to remove the float, needle, main jet, emulsion tube, and pilot jet from your carburetor.
When we talk about dirty carburetors, what we're usually talking about is a dirty or plugged up pilot jet or circuit. The brass part is the pilot jet. The hole it goes into in the carburetor is the start of the pilot circuit. It's a good idea to soak your jets in a small pool of carburetor cleaner before you attempt to clean them.
While your jets are soaking, go ahead and spray ALL OF THE HOLES in your carburetor with a liberal amount of carburetor cleaner. Just go nuts with the stuff. Stick the tube in the pilot jet hole and spray the heck out of it. Do the same with the main jet hole. Turn the carb around in your hand and spray the heck out of everything you can see, paying special attention to the holes.
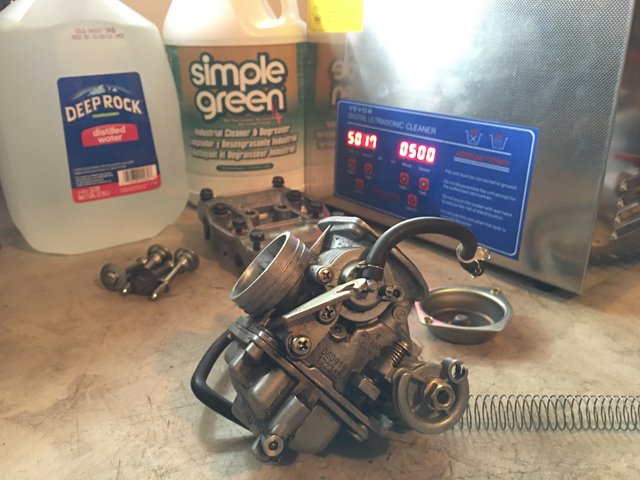
(^^ultrasonic cleaner, carburetor, distilled water, Simple Green)
If you get really into this stuff, you'll want a tool called an ultrasonic cleaner. They work really well for cleaning carburetors and other parts. I have one; most shadetree mechanics do not. Spraying the carburetor down with carburetor cleaner works just as well 98% of the time. It's that other 2% that can really throw you for a loop and make you think your bike's done for or needs a new carburetor when it isn't and doesn't.
Hold your main jet and pilot jet up to the light. If you can't see a tiny pinprick of light coming through it, soak it for another 10 minutes while you locate a TINY PIECE of brass or copper wire. You can find rolls of the stuff at hobby shops, or you can take apart a piece of scrap electrical cord to get the wire you need.
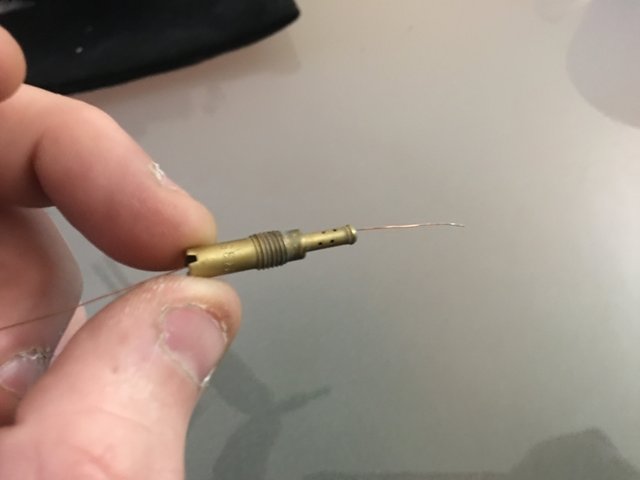
Now do your best to work the tiny piece of wire through the center of the pilot jet. You may need to hold the wire in one hand while you rotate the jet "into" or "over" the wire with your other hand. It may not pass through easily. You may need to be patient. Be steady and deliberate with your movements. Try soaking the jet for a little longer if it's being really stubborn. You may need a new pilot jet if you cannot get the wire to go through the old one.
The pilot jet is the most important part. It's the toughest to clean. It MUST be clean for your carburetor to work properly.
Once your pilot jet is clean, do the same thing with your main jet. Make sure the emulsion tube is clean, and all of its holes are clean. Make sure your float floats. If you hear or see any liquid in the float when you inspect it, you need a new float. The float won't work the way it should if it has holes or leaks. I like to soak the needle in 2-stroke oil to recondition the rubber on the end. Make sure the little "nubbin" on top of the needle moves freely. Replace the needle if the nubbin doesn't move freely.
Once you have everything clean, put it all back together, install the carb on the bike, and see if it'll start the way it should. If it still doesn't start, maybe you put something together wrong? Perhaps the bike has spark or compression issues? Is the petcock feeding fuel to the carb? There are about 1000 other issues that could be preventing your bike from running or running properly. Cleaning the carb is a good start. Let me know if you want to see more about motorcycle topics!!
(YOURS TRULY before I shaved last year!)
(And the MONKEY DOG! My best friend!)
Very good write-up.
I ride a Vespa GTS250ie so there is no carb. But I am looking for someone to service my bike in Atlanta. Seems that there are no authorized Vespa mechanics in the intown area. You have to go to the burbs.
I wish I was in Atlanta. I'm not a "certified" Vespa mechanic, but I've worked on enough modern Vespas to know what makes them tick. Basic service work is pretty easy to perform yourself, assuming you have the time. Many of my Vespa customers have the tools, know how, and work space, but they're so busy with their work they don't have time to monkey with their bikes. The GTS250ie is a terrific machine that does everything a motorcycle does without all of the hassle that comes with riding a motorcycle. I race dirt bikes and sport bikes, but I stick to scooters when it comes to riding on the street. Thanks for the reply and good luck back East!!
For sure...thank you, it's funny, Atlanta has a lot of scooters but not a lot of service outlets. And as you know these machines are mini car engines, so I hesitate to go with someone who only works on Chinese machines, for example.
I have really enjoyed my Vespa. It's ridden the streets, and highways, of Atlanta and New Jersey. The bike has never complained and always manages to lift my spirits.
Cheers
Congratulations @berksaustins, this post is the third most rewarded post (based on pending payouts) in the last 12 hours written by a User account holder (accounts that hold between 0.1 and 1.0 Mega Vests). The total number of posts by User account holders during this period was 2610 and the total pending payments to posts in this category was $9354.32. To see the full list of highest paid posts across all accounts categories, click here.
If you do not wish to receive these messages in future, please reply stop to this comment.