#needleworkmonday :: Simple beaded interchangeable dangling earrings - How-to
Happy, happy Monday again!! And Happy #needleworkmonday!!
Doesn't time zooms pass by like a bullet train? 🚄
Last week, I shared a little bit on some simple beaded earrings which I put together some couple of years back. @crosheille had mentioned that she would love a tutorial for them and so here I am 😁.
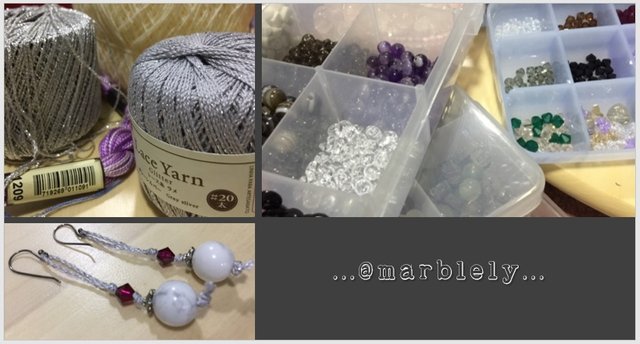
These beaded earrings are very easy to make, but first, you will need to get some supplies.
The string
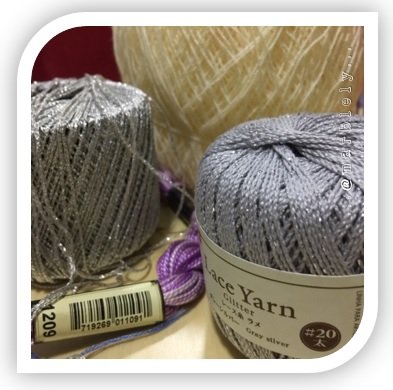
You may choose some lace yarns or embroidery threads, something that is thin but not too thin, sturdy and tough and can fit into the needle.

The needle
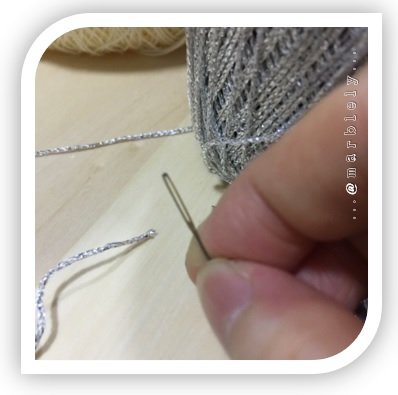
I used the cross-stitch needle that has a wider eye to enable the yarn to go through. It is very important to test that your needle can pass through the beads, stones and blings of your choice.
A needle that is the right size will make the stringing and assembly of the beads much faster.
Earwires
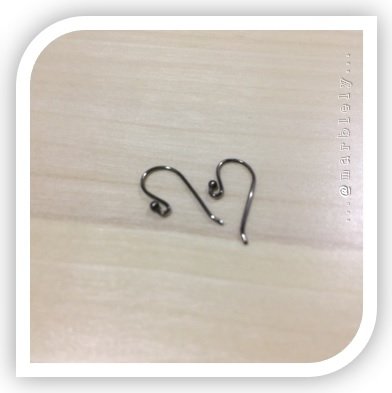
This is a pair of "earwire with loop and ball" which you should be able to find in an online store near you. I bought mine from a local online store. You can find something like this near you.
EDIT: You will need to make sure that you get something similar with the opening where ball is (or make one yourself using wires and pliers) so that you can easily attach and detach the earrings that you assembled.
Beads, stones and blings
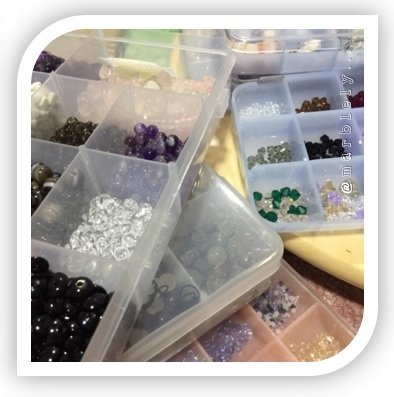
You will need some beads, gemstones, crystals, bling blings, alphabet beads, anything really, to mix and match to your heart's desire.
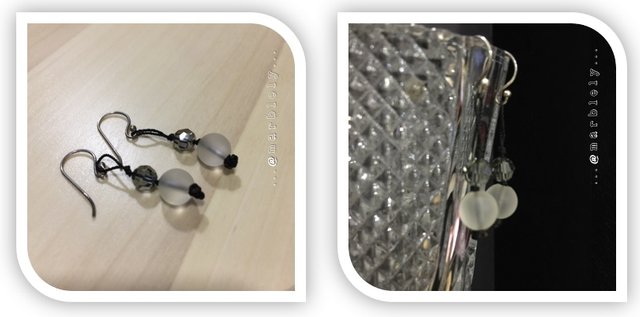
For this tutorial, I will be showing you this assembly:
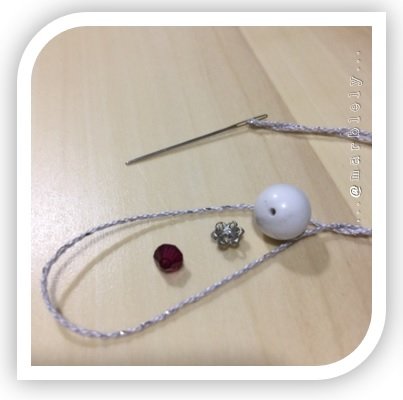
- The bottom will be a Howlite stone
- The middle will be a silver bead cap
- At the top, will be a dark red bicone Swarovski crystal
Your choices can be anything you fancy. Just place them in the order that you would like them to be positioned (which stone goes first, which bead goes last, et cetera).
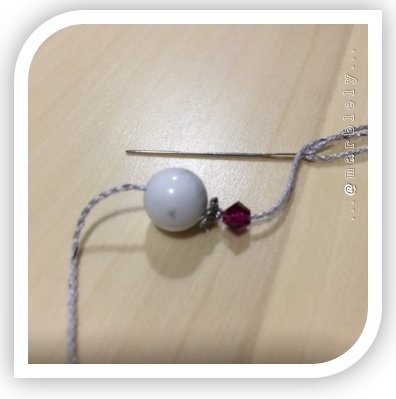
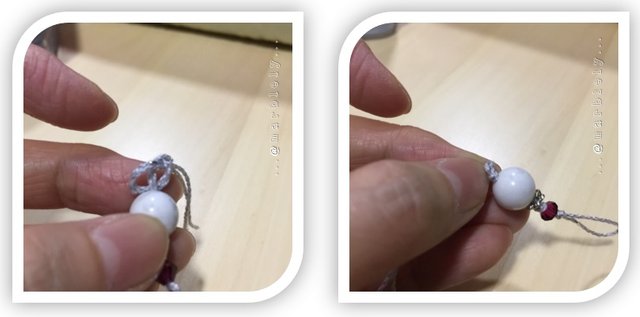
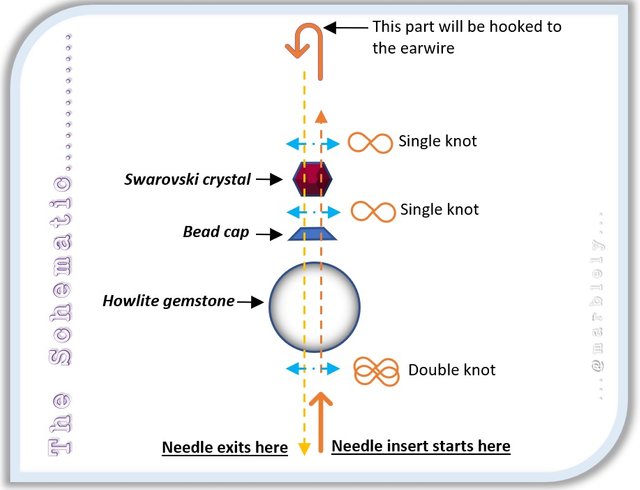
Insert the needle from bottoms up (start from the Howlite stone, then the bead cap and then the Swarovski crystal).
Then, you do a U-turn and insert the needle back into the Swarovski crystal, followed by the bead cap and finally the Howlite stone.
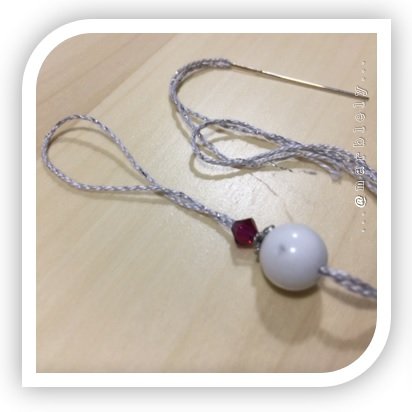
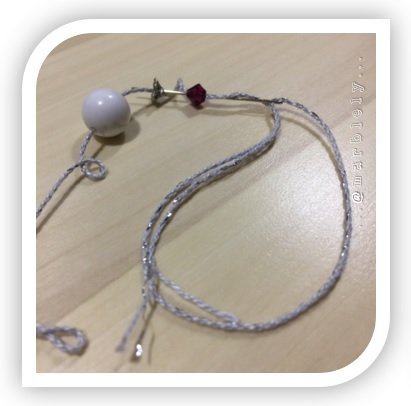
After the U-turn insert, you should have a loop at the top of the assembly. The loop will be hooked to the earwire later.
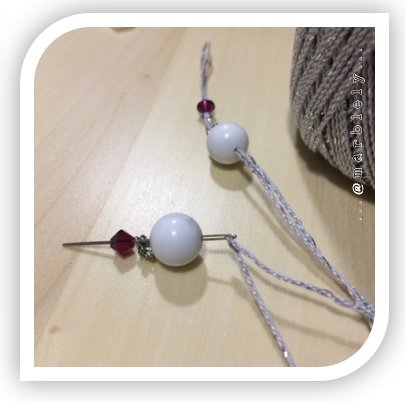
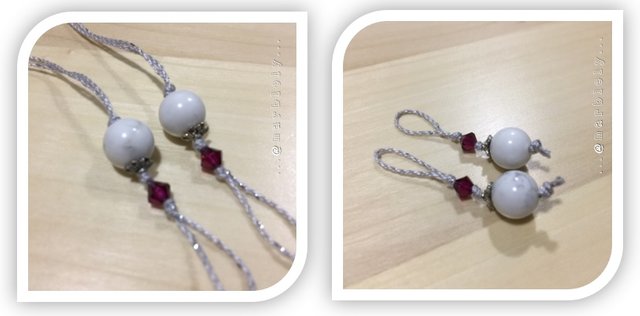
Repeat the stringing for the other earring.
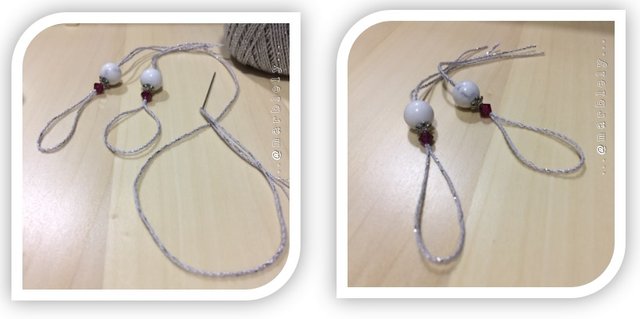
Adjust the length for both the earrings and cut the ends. Be generous with the length of the yarn to make it easier to tie knots later.
Note: Knots are recommended for the bottom of the earrings and the top to secure the beads and stones so that they don't fall off. You can choose to add knots in between the beads and stones of your choice to keep them in place or you can leave them loose. Either way is fine.
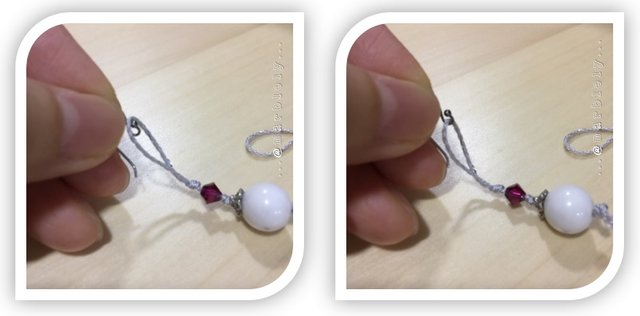
Start the knot at the top of the earring where the loop is.
This is where you adjust how long do you fancy the dangle.
We start at the top because it will be easier to adjust as you knot the bottom and cut off the excess.
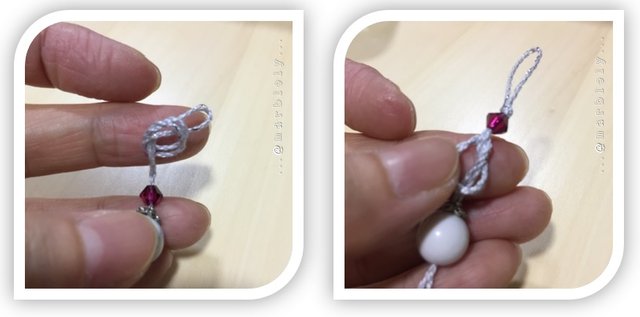
I also chose to knot in between the Swarovski and the bead cap, for the fun of it. But it depends on your taste. It looks nice without the middle knot too. I just wanted to secure the beads and stones.
Tighten all the knots and make sure the lengths for both the earrings are the same before you tighten the 2nd earring.
At the bottom of the Howlite stone where the strings are in excess, do a double knot for each earring.
Once the knots are done and you are happy with the length and the look of both earrings, you can cut off the excess yarn at the bottom of the Howlite stones.
If your yarn is the type (like plastic) that can be burnt to seal, you may do so. Mine cannot be burn because it is cotton which will just disintegrate and turn into ashes in fire.
Remember the loop where we did a U-turn when we inserted the needle to string the earring? That is the part of the earring where we insert into our earwire. Just place the loop in between the opening between the earwire loop and ball and press it down.
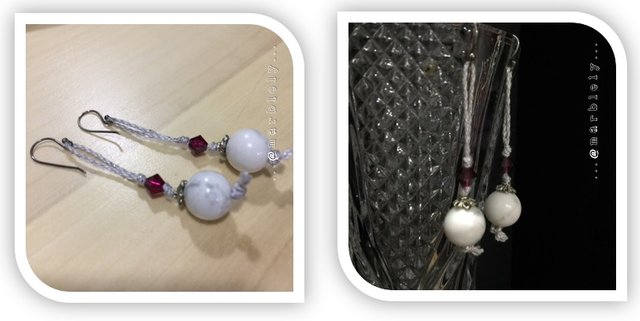
Done!😎
You can mix and match with other stones and beads and crystals and bling blings to create multiple of this earrings which you can then just attach and detach from the earwires as you please, i.e. you just need to buy maybe 2 pairs of the earwires and you can have like 10 pairs of different colours and shapes and sizes dangling earrings. Isn't that funky?!
And in case, you got confused along the way, I hope the following schematic diagram can help explain a bit more:
I hope you will give this a try 😊

Thank you again to @crosheille for starting and hosting this wonderful community and to @crystalize for co-hosting it! If you love any craft that uses needles, come and join the fun with us here every Monday at #needleworkmonday! Or if you would like to share your needlework on other days, you can do so with the tag #needlework!


@marblely, thank you for sharing. I like beading as well but long time didn't touch it. My beads and all the supplies become dusty :p You have a lot of beads and very organized. I love how you kept your beads. It never came across my mind, a string also can replace wire. I love the howlite earring. Can I have one :P
Thank you @oliviackl 😘😘😘 Ah time to wash your beads and get into it again! I got into crystals and gemstones because of you, remember? 😜
Of course! What colour of crystal do you like with the howlite? 😁
@marblely, Opps hehehe yaa.. i was the culprit that time. But you were the one made me into beads lover. The small crystals which I bought still laying there with begging eyes. Want me turn them into some lovely and cute earring or bracelet. Felt guilty now after saw your tutorial. I must start it again
Yay, I trust your instinct with color. You very good in color matching.
These look so nice and a great idea for a group project. Your tutorial is fabulous, too. Congratulations on the curie vote!
Thank you @shanibeer 😊 Thank you for your support always 😘.
You are right, it is a pretty neat activity for a group project, for kids especially. Ooo.. they can do bracelets and necklaces too.
Hello @marblely, What a great tutorial, it reminded me of my weaving season and my grandmother who was an excellent weaver.
creativity has no limits, I like the simplicity and purity of the design you bring us, as with few elements you can make real jewelry.
Have you ever tried to make or make your own threads? and instead of using stones and ornaments, use seeds, well in my case that I live in a tropical country, you can get a variety of seeds to be made into necklaces or earrings.
same is the same ancestral tradition, weaving and making clothing is millenary, great art, thank you for sharing this publication.
Thank you for dropping by @arrozymangophoto! Ooo weaving. I love watching people weave, I do hope to pick it up one day. I do simple weaving but I would like to do more serious ones with a cricket and loom kind. I love bags made with woven cloth.
I have not tried making my own thread nor use seeds. I do get a lot of different seeds here but the idea of poking a whole on each is quite a bit of work.
Oo
I have it @marblely, there must be some kind of natural hemp that you can find in a store, to make my thread use a natural hemp called moriche is like a palm that grows in the rainforest in South America, then unravel the hemp process in the following way in my foot attaches to the big toe 3 strands of hemp and then step I'm twisting by friction to get the thread, the aborigines taught me another technique that is similar but as I am hairy in the legs I have a hard time, it is the same but you need 2 people one that weaves the 3 shadows and the other person goes as amazan with the hand in his leg and with the torques achieves the thread.
the seeds is another story, you can get dry seeds, which obviously makes drilling difficult, but if you know at least the seasons in which those seeds grow in the trees then you can choose them yourself, select them, to be the season and adding that the uprooting of the tree itself or those that fall to the ground naturally, the seeds are white and easy to drill, only a hot needle would suffice to pierce without much effort and then with a preheated frying pan with vegetable oil the sofries, this is done to seal the seeds and give them durability, seeds that are not sealed are usually damaged by contact with sweat, water or weevils can make a feast by eating the seeds or the rodents themselves.
I hope to stay in touch could exchange knowledge at a distance, follow me <3
peace and love, greetings
Oh wow.. thank you for the details @arrozymangophoto! Appreciate it :)
Did you write a post on how to make thread or planning to write one? That would be really interesting. I try to imagine what you described and I think it is cool.
And the seeds, aaah.. it is about the right timing, is it? Usually what I see are seeds that are already harden. A very interesting idea. Thank you friend. I have followed you :)
@marblely, Nothing as long as it is to massify knowledge... there I will be.
you are right I will make a post about how to make your own thread.
as far as seeds are concerned, it is a question of getting access with a botanist or agronomist who knows how to tell you in which season of the year the seeds are ready.
if you live in a country of 4 seasons probably in autumn is already late, because in that date and the seeds are in the ground hard. and for spring blooms the vegetation so it should be before autumn ... to reference I take by the country where I live, although there are 2 seasons, one rainy and another dry before the start of the season that would come being spring is that I collect the seeds ... anyway look for information.
and when I have time and materials I make the video if necessary how to make your own thread.
greetings, I already started to follow you also <3 peace and love
What a great tutorial. I actually like making beads and need to get back into that. What fun! Thanks for posting this @marblely
Thank you @rebeccabe! It is fun to do :) I hope you will be able to find time to get back to it.
Thank you for sharing us this tutorial on how to make one. I'm just curious do you also sell some of the crafts that you make? My guesses are with your talent you would sell a lot! Thanks again for sharing this and have a great day!
Thank you @sgbonus for dropping by. I don't sell, I just make them for fun or as gifts :)
I don't wear jewellery, but I really like the presentation of your tutorial, @marblely :D
Thank you @cryptocariad :D I like shinies but subtle ones hehe.
I had to copy this link and save it somewhere so I can easily locate and read again. You did an awesome tutorial, make me want to try it. You make it looks so easy and simple like its something anyone can do
Thank you for that and I hope to join the community soon.
Thank you @peachyladiva for the kind words :) I hope you will try this. It is easy... Just need a little more energy to push through the needle and string through the holes of the beads if the holes are small. But if it is too small, just change to thinner string. Hope you will join the community too. Just follow @needleworkmonday and you will get to read the details :)
Alright
thanks
I will do just that
I'll be honest, I'm not much of a needlework person, but after reading through your post it really brought me back to my childhood. When I was a kid there was this craze at my school with all the students making bracelets. You'd use beads or not and do different braids and twists. I love it as a kid!
Oh my god I'm just realizing I did these crochet things too hahaha I totally forgot about it until I started writing this comment. They were like pre-made crochet kits that you just followed the instructions for and the final product was an image of a cartoon or something.
Guess I know more about needle work than I thought. Thanks for sharing and giving me a little nostalgia this evening.
Thank you @jocqua for dropping by. Haha, yup looks like you do :)
Oo yes, bracelets with different braids and twists.. friendship bands, love those too. Glad my post brought you down the memory lane :)
Absolutely! Thanks so much for that. It was a nice nostalgic moment for me hahaha
Awesome!!! Thank you so much for this step by step beaded earring tutorial! I love that you can customize these and play around with the blingage as desired! You literally can customize earrings to match your outfits!
Okay see this is the danger of Monday’s...I want to do it ALL!!! 🤣😝
I love the diagram you gave us to help better explain plain the process! You did great as always! Thanks so much!! I really like that second pair you showed too!! Lovely ~
Thank you, thank you @crosheille!! This tutorial is for you :) The diagram was a last minute addition because I was worried that the photos were not clear enough to show where the needle goes in and out.
Yes yes, it really is fun to do, especially with daughters or nieces and yes, you can totally customize to match your outfits. The possibilities are endless!!
#needleworkmondaydanger! hehe.
I love subtle dangling blings :D Thank you so much for your support and encouragement always!! 😘😘😘
I really enjoyed it! And look at you with another curie vote...it was well deserved as always! I love reading your posts!! Thanks again for a wonderful tutorial and showing all this blingage!! 😍😛
Absolutely...likewise for sure. I appreciate your support and participation! 💗
Your tutorial is as ever amazing. You even made a schematic 😍😍😍 And, the earrings are beautiful, and you make it look so simple (But I assume I would kill them while trying to get the yarn two times through the pearls) I have never seen such ear wires here around, but perhaps I simply did not look carefully. I am sadly super allergic at my ears, gold is sometimes ok, but mostly I get red and inflamed earlobes from wearing jewellery. But your technique could perhaps be adapted to make necklaces or bracelets. (Oh noooo then I must buy little boxes full of shiny pearls…. Noooo temptation 😅😅)
Thank you @neumannsalva!! 😘😘😘
It is simple!! But yah, to get the yarn through two times does require some push and pull 😅 or just press the needle onto an old table (or a surface that can handle needle pokes 😁), needle tip facing upwards, and then firmly press the bead or pearls down through the eye.
I know what you mean, I have to wear genuine or almost genuine metal such as gold or sterling silver or stainless steel. Anything else will give me red and inflamed earlobes too or if it is a bracelet or necklace, I will have a string of rashes following where the jewellery touches the skin. I stay away from wearing any alloy metal.
Yes yes, you can use the same technique wif necklaces or bracelets. When it comes to handmade jewellery, I prefer using strings because of my allergy and also because sterling silver parts will tarnish and are more expensive.
Hehe temptation!! I gave in so many times!! 🤪💸