There’s an old saying
it’s a woman’s prerogative to change her mind
and I fully intend to make use of that liberty for this post.
If you read my last post “Hobbies on the Homestead”, I invited you to follow along with me on Fridays for the Farmer’s Wife Quilt by offering a few tutorials for some of the blocks from the book I mentioned in the post. My hope is I can help you get started on your way to making your own quilt; an heirloom to pass down through the generations from one loved one to another.
If you are interested in making the blocks for a quilt or other project, you will need to have access to the book in order to get the pattern templates.
The book does show how to do the blocks, but I find beginners may need a little more hand holding if one has never made “classic” blocks before, thus I offer up this tutorial.
After writing that post, I was subsequently invited to
#needleworkmonday by
@muscara and
@needleworkmonday, and I have decided to present the tutorials on Mondays instead of Fridays in order to offer up a contribution to their initiative.
No harm done because you will have access to the post any time that is convenient for you to participate. Win-win-win, how awesome is that?
Well, let’s get on with it, shall we?
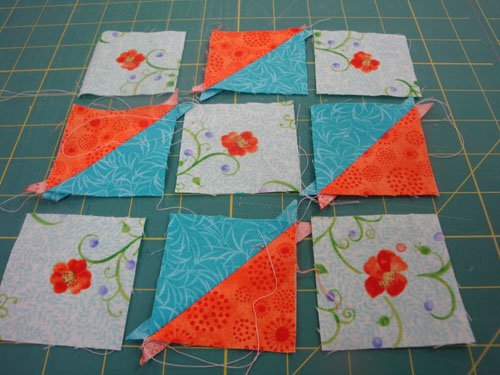 Image 1
I have created several blocks and have tried to label them as
easy,
moderate, or
difficult from the perspective of a beginner. I’ll also try to give you some tips along the way.
I personally use a sewing machine to sew my blocks, but if you don’t have a sewing machine, you can still participate by using hand sewing as was done before machines were invented. Whichever method you chose, I know you'll have a blast.
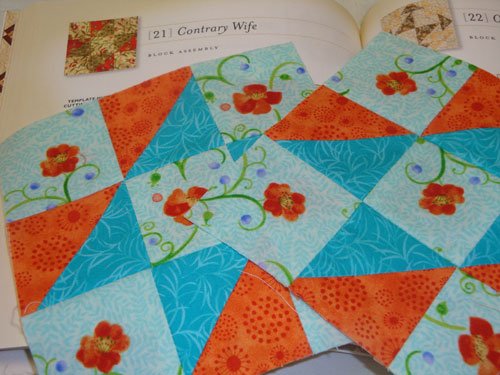
The first block we shall work on is
#21 Contrary Wife. Level of difficulty:
Easy.
 Image 2
This block requires only two pattern pieces, numbers 1 and 3, along with three color ways of fabric.
Using your three fabric choices, cut out your pattern. Four triangles in one colour, four triangles in a contrasting colour, and five squares in your third alternate fabric.
Note how I "fussy cut" my fabric to ensure a flower within each small square, not necessary, just a design choice.
After cutting your fabric, sew two different colours of the triangle pieces together to make your squares. You will end up with four squares consisting of two triangles joined together and five squares of your third colour choice.
See Image 1.
Trim off the “dog ears” which are the little extra bits you see poking out of the triange/squares. The result as shown in
image 2 compared to image 1.
Lay the sewn pieces and other squares out as shown in
image 2.
Next sew each row together. Starting at the top, join the top left square to the middle square, then sew the other side of the middle square to the top right square, competing one row. Do the same for the next two rows, until you have completed all three rows. See image 3.
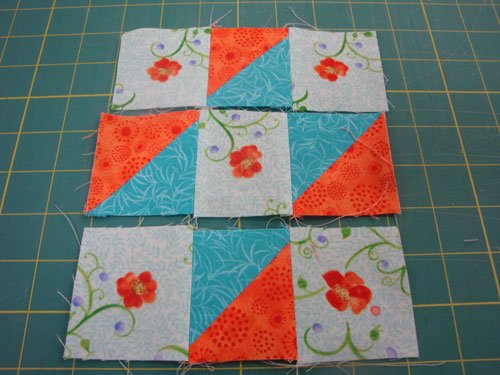 Image 3
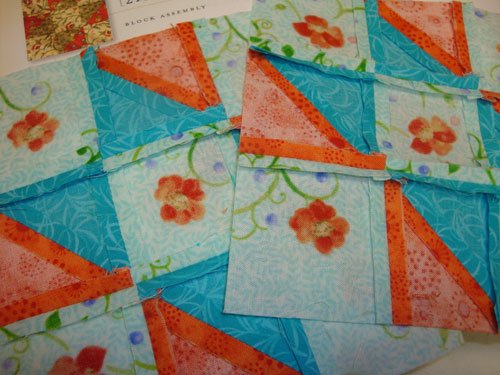 Image 4
Once you have three rows, you can now sew the rows together to form one larger square. Sew the top row to the middle row, then sew the middle row to the bottom row.
See image 4 showing the reverse side.
Square up your block as best you can, which should end up being 6.5 x 6.5 inches (the resulting 6 inch block is after you sew your completed blocks together to create a quilt).
Your block is done. Aren’t you happy?
Tips:
Never iron, always press. Ironing stretches the fabric and causes distortion.
In quilting, seams are usually pressed to one side or the other, usually with lighter fabrics being pressed to the darker side so it does not show through the other side. I personally do not always follow this rule, especially when resulting blocks have many pieces causing too much thickness. Sometimes it is trial and error. As a rule for myself, I usually press open as often as possible unless the fabric obviously shows through on a lighter fabric. It is probably stronger to press to one side, however, I prefer my squares to lay more uniformly flat and I do not feel it is compromised once the quilt is quilted, however, you may choose the other. Each block is different, and you may have no choice in which way you have to press the seams. Use your best judgement and preference.
Dig in your recycling bin and cut your template out of a sturdy piece of plastic or cardboard because you will use the pattern many times and it will last longer than just paper. Use clear plastic if you intend to “fussy cut” any pieces.
Well, that's it for the first block. If you have any questions, pop it in the comments. Have fun!
Full Disclosure: I originally offered up these tutorials on my now defunct blog which was located at acherishedlife.blogspot.com. I present them here for you fully updated and with much more detail than before.
*********************************************
See my needle arts  See my artsy endeavours
  Purchase my colouring book pages
I've never run across "press" vs "iron". I had thought they were interchangeable. Can you explain exactly how "iron" is different than "press"?
Hi @goldenoakfarm... your question is a valid one.
Pressing fabric the fabric entails a person takes their iron and presses down in one spot on the fabric, then lifting the iron and moving it to a different spot, continuing on in this fashion until you have pressed the desired item.
Ironing entails pushing or running the iron in a back and forth motion over the fabric, which is what we normally do when ironing clothes, sheets etc.,. This back and forth motion pushes the fabric in one direction then the other which essentially causes stretching.
When we quilt, we do not want to iron often, especially in the beginning stages because even the slightest stretch of 1/16th inch can really cause your blocks to be out of whack since 1/16th on one block and 1/16th on another block has now altered your overall design by 1/4 combined.... so as you can see, over the whole size of a quilt, it can really skew the design.
Hopefully that makes complete sense, lol.
Thanks for visiting and asking your question.
An excellent reply! And it makes sense. I must remember this when sewing things...
Drat! The resteem button is there but it will not let me do it... I wanted to save this answer...
Glad I could be of help 😊
I have been wanting to try quilting @thistle-rock. I am inspired by your post now :)
Well thank you kindly @marblely! I am pleased you have found benefit in my post.
I intend to publish several tutorial on blocks, enough to at least get a start on a quilt where one could continue on with blocks from the book or double up on some until enough are created to make a small lap quilt.
Thanks so much for visiting.
Yay! Thank you! Looking forward to your tutorials :)
You are very welcome @marblely... and I hope to offer tutorials in other styles of needlework too... you name it, I've probably done or tried it, lol.
Thanks for popping in.
Welcome to #needleworkmonday, lovely to have you here.
This is a very beautiful heirloom gift. I don't sew much now, but I live collecting ideas 😊
Thank you for sharing.
Thank you @shanibeer, I am so happy I joined Steemit and #needleworkmonday, I only wish I had joined when the platform first came to be.
I sew when I can, paint if I have the time, build when necessary, but I too love collecting ideas for inspiration... sometimes the work of someone else can trigger an emotion and a desire and we are motivated once again to pick up where we left off. Stay tuned, I will eventually post how I used one of the blocks for something other than a quilt, and I think it is little out of the ordinary. 😉
Thanks for visiting, I appreciate it.
I love quilts. I tried my hand at quilting a while back, and I found out that it was a lot of work but that it yields wonderful results that last for years.
@jluvs2fly.... it is true, quilting can be a lot of work, as can so many hobbies, but oh so much fun!
Thanks for your comment and for visiting!
Thank you.. you made me smile when I saw your dogs on the pillow too. lol
Thank you.. you made me
Smile when I saw your dogs on
The pillow too. lol
- rebeccabe
I'm a bot. I detect haiku.
Orange and blue are my favourite colour combinations. That is a stunning quilt @thistle-rock. I wish I had the time to sew a quilt. As is I barely get sewing repairs done. It's been a long time since I joined the #needleworkmonday fun
Thank you so much @buckaroo and thanks for visiting.
Gone are the days from years gone by when no one would ever think of putting certain colours together...today, almost anything goes. Truly, if we only take a tip from Mother Nature, we shall find all colours go well together if we match in similar hues.
I don't quilt often either, heck I barely find the time for any crafts with all the work needing to be done around the homestead; but I try as often as I can because I have a wide range of interests and my mind becomes senseless when I cannot work in one art form or another.... and repairs, yeah, who has the time for those when there are so many more fun projects to be done, lol 😉 😛
Thanks so much for taking the time to visit.
Nice color combination..and the floral design too..i love anything floral..i like quilts..but i havent made one..thanks for the tutorial..i learned from it.. thanks for sharing @thistle-rock. 😊
Posted using Partiko Android
Nice color combination..and the floral design too..i love anything floral..i like quilts..but i havent made one..thanks for the tutorial..i learned from it.. thanks for sharing @thistle-rock. 😊
Posted using Partiko Android
Thank you @dizzyapple for visiting and commenting, I am glad you were able to learn something from it.
I hope you visit again for my future posts.
This is a very clear and easy tutorial. It also looks like the sewing it goes very fast as there are not that many components. I'm looking forward to seeing more difficult sewing as well :)
Thank you for sharing!
Thank you @delishtreats for visiting and commenting.
This is definitely an easy block compared to some others within the book, and a nice introduction for beginners who have never tried quilting before.
Many of the ones I prepared are on the easy side, however, there are a few more challenging ones too.
I hope you stick around to see more of my tutorials and my other needleworks.
Congratulations @thistle-rock! Your post has been placed in the spotlight for this weeks @NeedleWorkMonday Featured Post!
Thank you for your quality post and for being a part of the needlework community!
#NeedleWorkMonday is an initiative that supports and rewards the needlework community while inspiring the Steemit blockchain. You can read more about us here.