HDR TUTORIAL – How I make an HDR
There are several steps to HDR photography. We’ll cover the basics first; what HDR is, when you’d likely want to use it, equipment, software, the best camera settings to get the best results, and post processing.

What is HDR?
HDR stands for High Dynamic Range. Have you ever found an interesting scene, photographed it and only later discovered when downloading the picture from your camera that the image has come out a bit flat and doesn’t look at all how you remembered it? HDR compensates for this. The human eye and brain tend to pic up more light and is able to correctly interpret that light better than your camera. To give you a little perspective, the human eye can see 11 stops of light, where your camera can only pic up 3 stops.
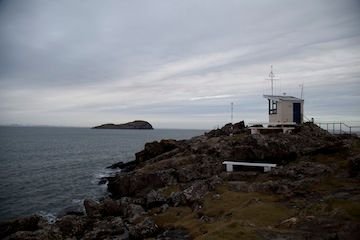 Normal Exposure Normal Exposure | 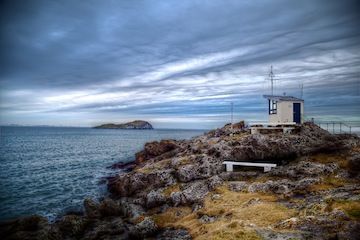 HDR HDR |
|---|
With HDR you can compensate for this and produce photos that reflect what you actually saw more accurately. This is especially helpful when confronted with a scene where there are different exposure levels that cause part of the image to be either over or under exposed. For example, id you have taken a picture of a scene where the ground and buildings are properly exposed but the sky is complete over exposed and washed out.
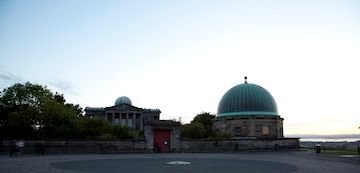 Normal Exposure Normal Exposure | 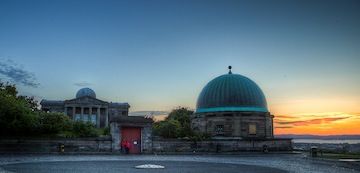 HDR HDR |
|---|
There are two major steps in HDR photography, the actual taking of the photo, and the post processing. We will deal with taking the picture in this tutorial, and in the follow up tutorial we will cover post processing.
What do you need?
First off you need the right camera equipment:
- A camera that can manually control the iso, f/stop and exposure time settings (preferably a DSLR or one of the new fancy mirrorless cameras.
- A tripod
- a remote/cable shutter release or self timer.
You also need the right software to do the job:
- Photomatix Pro
- Lightroom
- Aurora HDR
- Some people say that Lightroom is optional but that in my opinion is a personal preference. I use lightroom to clean up and sometimes even go into photoshop for further adjustments.
Optional software extras:
- Adobe Photoshop
- Noiseware professional – excellent noise reduction software
- Topaz Adjust – photoshop plugin software that gives a bit of extra ‘pop’ to your HDRs
These three I would consider to be completely optional and you have to make a judgement call on whether the HDR you are creating needs it or if it would be overkill.
Camera Settings and taking the Shot
So here we get to the action. When taking the shot in HDR you are actually taking 3 shots. That is our baseline, you can take more and that is up to your personal preferences and what the situation ideally calls for as well as what your camera and equipment is capable of delivering. Nikons have the capability of 5 bracketed shots where a Canon can do 3.
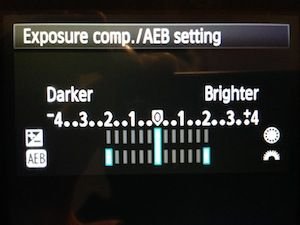
WAIT A MINUTE! WHAT’S A BRACKET?
-so glad you asked. On your camera (if you are using a DSLR) you can set it to not only take a particular exposure, but to take more shots straight away at an exposure adjusted setting. The most common being -2, 0, +2. This is bracketing; You press the shutter once, and three images are taken at these different exposure levels. You can choose though so if you really wanted you could do -3, -1, +1 or -1,0,+1. Whatever, its up to you. I have so far found that -2,0,+2 is a robust combination and it is what most HDR photographers recommend. Well, that’s a half truth.. It depends on your camera’s capabilities. For me that’s 3 bracketed exposures. Many Nikons can do 5 and with software you can make it as much as you want. I manually did 9 once but the thing is, 3 - 5 is generally enough. 5 is better than 3 usually.
Here are the camera settings you should use for best results:
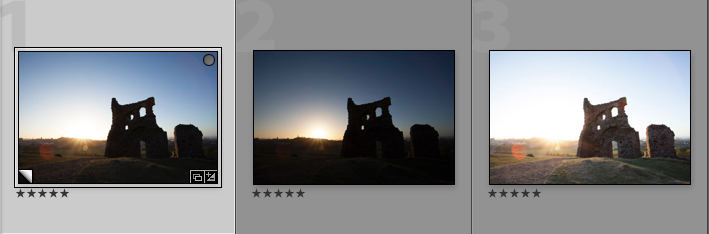
- Frame your scene
- Lock down you focus (once focused, switch to manual to avoid mishaps from the autofocus drive trying to be clever)
- Use a consistent f/ stop throughout (I tend to go for f/18 to get as sharp a shot as I can).
- Set a specific white balance, do not use AWB.
- If you use in camera auto enhancements, switch ’em off.
- Shoot in RAW
- Use the lowest ISO setting you camera has, mine is 100. (this helps reduce noise, HDR processing can produce a lot of it)
- Dial in an exposure time to normally expose the scene
- Setup your bracketed exposures - check your camera's manual to see how to do it for your camera
Now you're ready to shoot! This is what I do, I use a remote trigger and listen as my camera takes three shots in quick succession, each one taking a different exposure time depending on the bracket settings. I might take another for good luck and move on to my next planned shot.
Now comes the part where you turn your shots into an HDR. There are many techniques and different software packages that will help you accomplish this as mentioned above. As well as many different levels to editing. I'll just share with you my workflow:
HDR Post Processing
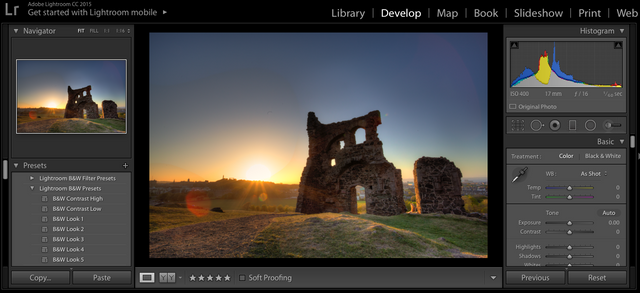
First off I import my photos into lightroom..
Then I select them all and right click the selection. You get a menu and you navigate to the 'export to photomatix pro' option. Like so:
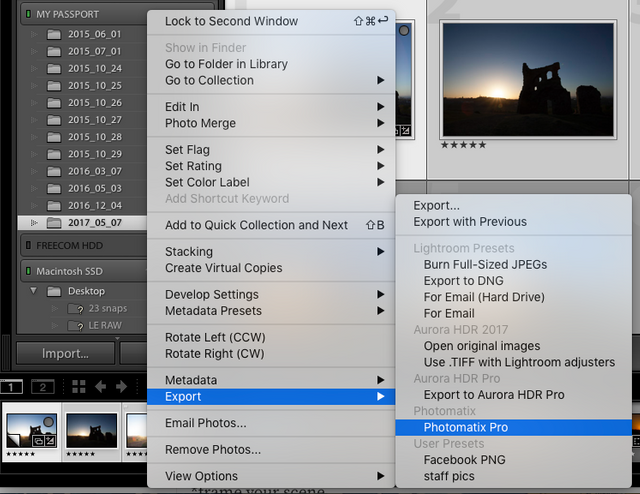
You can see on there I also have Aurora HDR which is a really great and far more powerful alternative. You can do a lot with it. Somehow I still prefer Photomatix Pro.
Once you export you get a menu screen that asks you particular import questions. Here are the settings I use:
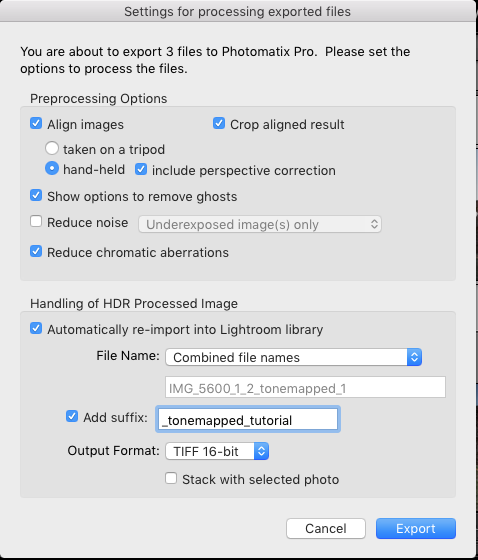
I select for it to align the shots as though I shot hand held, even though I used a tripod. I have found through trial and error that it gives me better results.
I leave show options to remove ghosts on all the time as you can skip it at the next screen and for some images you do need it. I won't go into here though for the sake of simplicity.
Always leave the 'remove chromatic abberations' selected and then choose settings for your filename and I set it to re-import into lightroom.
Next you get the ghosting screen, we skip that. Then the program does its magic and applies the HDR algorithms to the 3 exposures, rubs some voodoo on it and then combines them.
Hey Presto! We have an HDR!
OH
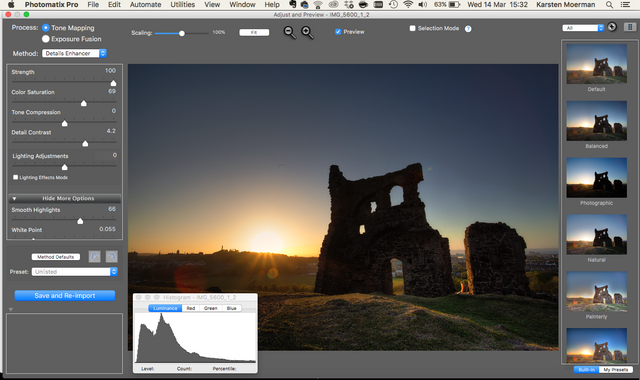
We still have work to do. So the 3 exposures are combined and now we have to play with the settings to get the look we want. Now this greatly depends on individual tastes and many who are new to HDR often go for the overcooked look. I'm guilty there too.. What is that you ask? Its when you do an HDR with lots and lots of colour and deep saturation and bring out every insane detail. It becomes sensory overload and is not very pleasing to the eye. I'm not going to show you that, if you want to see it then do a google image search for the term "overcooked hdr" and try not to get a migrane.
Back to this image
So for this image it's a bit dark and the colours are a bit dull. So what I am going to do is work to brighten up the image and boost the saturation a little. Now with HDR the only thing you can really do is experiment with the sliders until you get the look you want (or opt for one of the presets). As you get to know what each slider does to effect the image your experimentation will go a little more quickly.
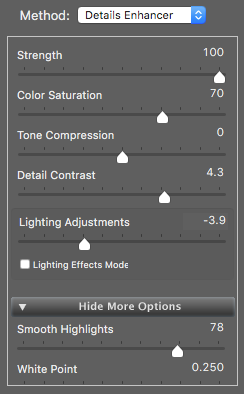
General rules I go by are that I keep the strength in the high 90s, and saturation between 50 - 75. You rarely need go higher and often with HDR you might want to consider lowering the saturation to prevent the image from looks too unrealistic (unless that's what you want).
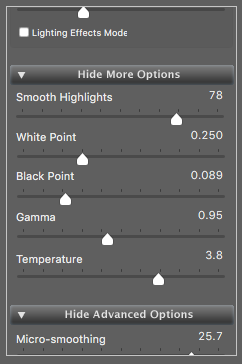
To brighten the image I had to boost the gamma, which I did until it reached a nice brightness level, and increased the smooth highlights slightly. All the other settings remained the same (they were saved from before).
Here are the settings used:
 |  |
|---|
This resulted in:
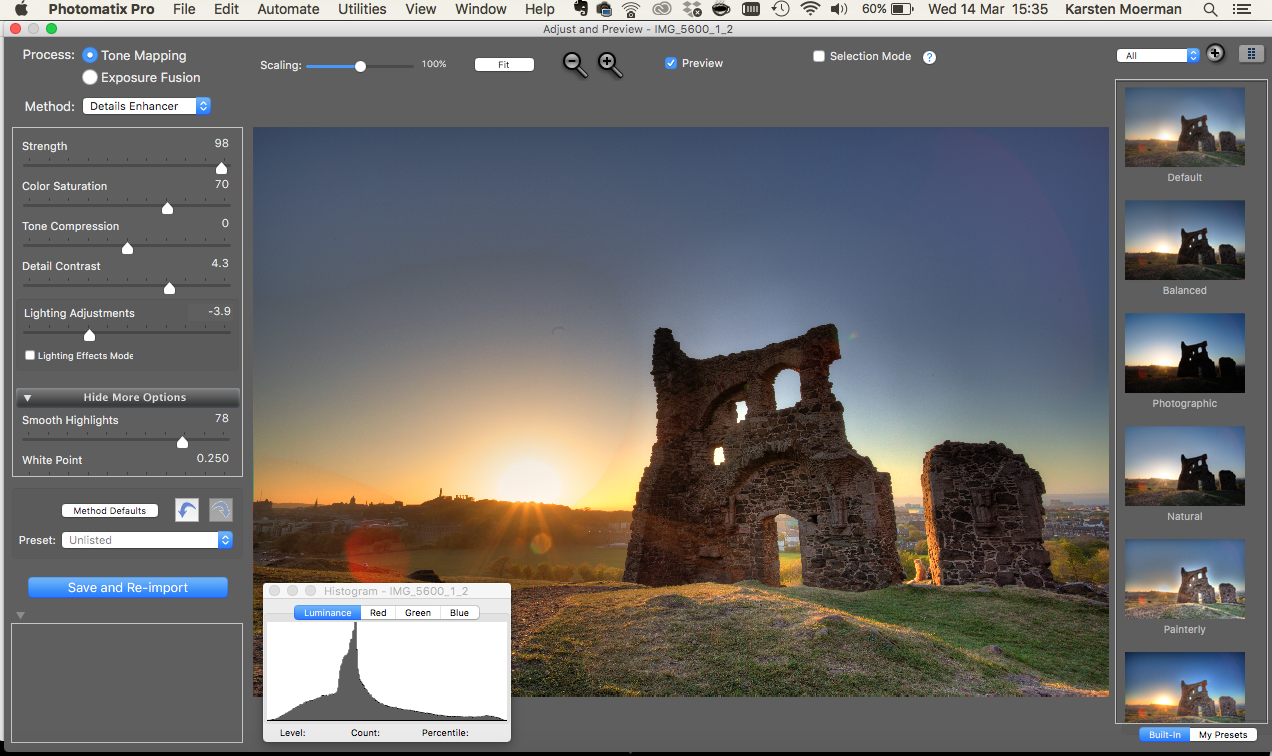
That's better! I can see some dust spots and marks in the shot but that can be fixed when we go back to lightroom. Which is what I do next, I go to lightroom and make some final edits to the image, including cleaning off dust spots, adjusting sharpness etc.... let's go! Click the Save and re-import button and head back to lightroom. Sometimes it takes a while to reappear but when it does you go into developer mode.
So here we are, and I can see I just need to make a few tiny adjustments. I've been lucky with this one so all I do is up the exposure just a little, lower the highlights a tad, up the shadows and the clarity as seen in the settings to the right here:
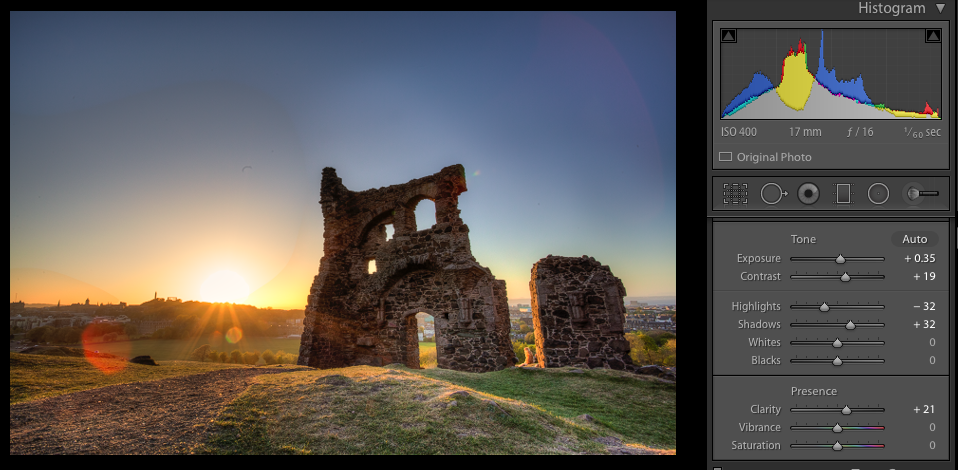
Now all that's left is to take out the dust spots and we are done! I won't show that here but there are plenty of instructions online on what to do. Chances are, if you have 'em in your images, then you already know how to fix them! ;)
The completed Image:
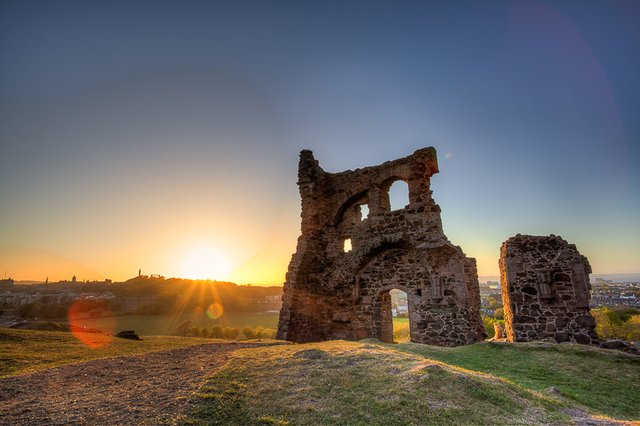
So that's all I do with an HDR to get the shots I get and it should be a good starting point to get you going. Remember, this is just my workflow for HDRs. There are many different ways to get the same, better or just different results. Find an HDR program that's comfortable to you and have fun. I use photomatix because I've been using it a long time, it's familiar, the controls are simple and it gets me the look I am after. Anyway, have fun and don't forget to share your shots with us!

Thanks for Looking.
Follow me and read more of my posts here: @fiftysixnorth

Congratulations! Your post was selected by the @dropahead Curation Team (dCT)
Ok, this post is one of the finest jewels I have come across on Steemit :)
Since I am totally new in photography I would like to ask a few questions:
Best regards.
@dropahead - Supporting your STEEM adventure
Quality review by the dropahead Curation Team
According to our quality standards(1), your publication has reached an score of 96%.
Congratulations for your excellent work!
(1) @dropahead's quality standards:
- Graphic relation to the text (Choice of images according to the text)
- Order and coherence
- Style and uniqueness (Personal touch, logic, complexity, what makes it interesting and easy to understand for the reader)
- Images source and their usage license
Thank you so much for using our service! You were protected from massive loss up to 20%
You just received 12.99% upvote from @onlyprofitbot courtesy of @joelsegovia!
More portion of profit will be given to delegators, as the SP pool grows!
Comment below or any post with "@opb !delegate [DelegationAmount]" to find out about current APR, estimated daily earnings in SBD/STEEM
You can now also make bids by commenting "@opb !vote post [BidAmount] [SBD|STEEM]" on any post without the hassle of pasting url to memo!
* Please note you do not have to key in [] for the command to work, APR can be affected by STEEM pricesYou got a 22.22% upvote from @whalecreator courtesy of @joelsegovia! Delegate your Steem Power to earn 100% payouts.
You got a 20.00% upvote from @redlambo courtesy of @joelsegovia! Make sure to use tag #redlambo to be considered for the curation post!
Thanks so much @joelsegovia! :)
Thank you for this well presented post. I have been learning a little bit over the last year with my camera and am glad to see some software recommendations, and a nice tutorial on HDR.
You are most welcome :) I hope it is helpful to you!
It was useful, and well written. I am now hunting for a photo-processing standalone program. It is unfortunate so many are charging monthly fees and require internet connection to play with pictures.
Yes, I find that super annoying. I use photomatix pro 5 for hdr and it is standalone, and I don't know if you can still get lightroom 4 anywhere but that version (though older now) is standalone and still an excellent photo-processing tool.
Pretty comprehensive article that i'll have to re-read once I do some HDR stuff. Thanks @fiftysixnorth
Thanks :) I hope it is useful to you :)
Very comprehensive learning about HDRI. Voted & resteemed. Thank you for sharing your knowledge to the Steem community @fiftysixnorth🤘😊👏
Posted using Partiko Android
Thanks so much @photocircle :)
You're welcome @fiftysixnorth😊
Posted using Partiko Android
The detail the shot it`s self the rays from the Sun, the blades of grass love it. Thank you mate.
Thanks @chadstretton :)
This is excellent 56N - love to see and support such interesting, informative and well-written stuff! Thanks for putting this tutorial together. I look forward to more 🔆
Thanks @barge :) I appreciate all the kind words. I hope this tutorial he;lps people out :)
This post was shared in the Curation Collective Discord community for curators, and upvoted and resteemed by the @c-squared community account after manual review.
@c-squared runs a community witness. Please consider using one of your witness votes on us here
Thanks @c-squared :)
Really great tutorial! Thanks so much for sharing this, always great to see some behind the scenes posts!
Thanks :)