Curved drawing lessons # 4: Deep into the Equirectangular grid (and II)
07 August 2018
Introduction
In lesson #1 we have introduced the concept of geometry above an art work. We have been describing the Euclidean geometry as the most common geometry used in art.
In lesson #2 we have bypass the Euclidean geometry and introduce a new one: the spherical geometry which gives more FOV power to the artist.
in lesson #3 we have introduce the notion of E.G.G (Equirectangular Geodesical Grid) and we have shown how to refer a point P through its latitude and longitude angles. Since the E.G.G it is just a piece of paper (with ratio 2:1) Lesson #3 shifts from Cartesian coordinates (x,y,z) to spherical coordinates (latitude,longitude). This is a disruptive understanding of the space thus it changes the way our mind works when we are drawing. Instead of indexing visual information through its length, height and deepness (that is Cartesian space) we are referring the same point with two angles. So, when the next time you will draw from observation, I would like you to consider these two angles. Say your drawing a table just in front of you, this table is then located at a range of [-10º,+10º] in longitudes and a range of [+5º,0º] in latitudes ranges. It get some time to integrate this new habit, but, we are already getting paid by posting! So the new revolution also spreads to different activities in life :)
In this lesson, we are going to focus on how objects are printed in the E.G.G when we are close to them or they are located just in front of our head. I will show you a powerful technique that will make you love the poles equirectangular distortion.
So, let's start, this class is going to be very very practical!
Understanding distortion
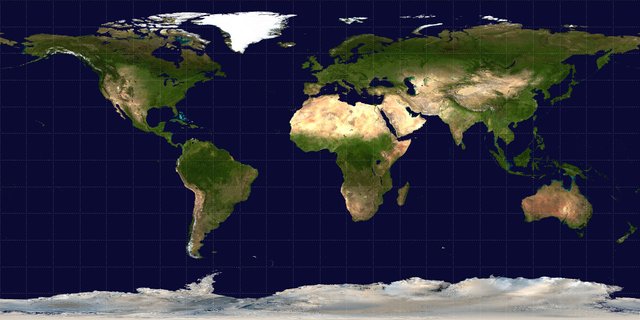
I guess this is not the first time you see this projection of the Earth:
Yes! This is the E.G.G of our lovely planet. See how it goes more and more distorted when we are getting closer of the poles?
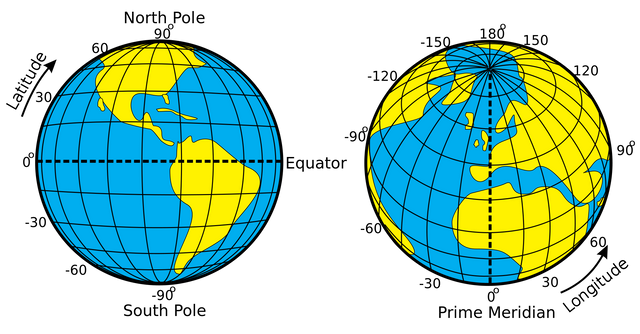
Let's call our mathematician inside us :
Now, let set a latitude of 90º, take your anorak because we are just freezing in the North Pole. And, question for geeks, what is the longitude of the North Pole?
- 10º! -one says
- 0º ! -another answer
Come on! we are in steemit this is not FB! so please, use your brains!
Yes, North Pole and South Poles are the only two points which can be referenced only by its Latitude.
Remember, in Lesson 3 6 vanishing points where announced, and 2 of them were not a point but a line:
from lesson 3:
[...] We have 6 vanishing points in our Egg.
- Front, just in the middle
- Right, at 90º from the front
- Left at -90º from the front
- Back vanishing point which is half on the left side and half on the right side
- Finally, up and down. See those to thick lines next to the border of the Egg? Those are up and down vanishing points.
So, when we project both North and South poles in the equirectangular file we obtain lines instead of vanishing point.
Block and triumph!
In this section, we are going to describe a powerful technique to deal with this particular distortion.
We are going to sketch different boxes in our E.G.G file. If you want to try with your own boxes, you can download a clean Egg file here.
For each sample, I have typed the VR link in order to compare between VR support (that is, inside the sphere) and Egg supports.
(feel free to register in veer.tv until our development guys enable us a viewer in steemit.com)
Now, plot 4 points in your egg file and connect them following the geodesic grid lines, this should build the table plane. Complete with another 2 points to give same deepness to the box. You should obtain a box like this:
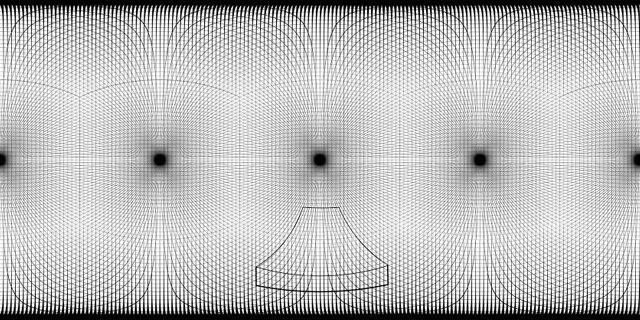
Next, imagine you are sitting in your desk, very close to the table so that the ends of the table make 180º, that is , you should turn left and right your head to see the borders. When you turn left your head, tipically you may turn 90º so, plot two points under the -90º vanishing point. Do the same when you turn right- You have to obtain the funny figure in the bottom of the E.G.G
No, click on the link below to really see how is the desk when it comes to the sphere. You can recognize it? :)
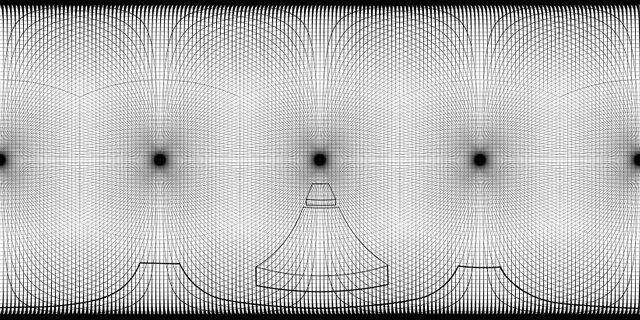
You can also plot boxes in the orientation you like into the Egg. The process is always the same, plot the points and then connect them through a geodesic line. This remains me a book a read long time ago: Point and Line To Plane from Wassily Kandinsky. This Russian painter used to say that a good drawing ends when there are no irrelevant points or lines. I think I have to go visit his grave and make him an advise: Lines? what lines? G-E-O-D-E-S-I-C-S man, G-E-O-D-E-S-I-C-S !! (you can ask your fellow math and he will show you that a geodesic is also a straight line).

VR Support
Finally, let's draw something on the top of our heads: Always the same principle, plot points and connect them with the geodesics.
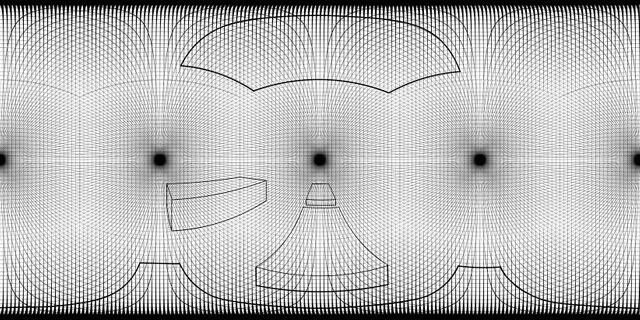
VR Support
Conclusions
In this lesson, we have explained the singularity of the poles in the equirectangular projection and we have practiced with a very easy technique to draw boxes in our Egg file.
Now, you have all the background to practice and make your owns 360º or panoramic degrees.
More to come in next lessons, I have not decided yet the content of Lesson 5, but, for sure, I have to talk about 3 point persepective and how does in work in the Egg, I could also talk about _ spherical anamorphic_ grid, which is a kind of grid more an more popular in some Koreans cartoonist. We'll see.
Thank you for reading and have a lot of fun, 360º fun!
Curved drawing lessons published so far:
- curved drawing lessons 1 # geometry beyond planar perspective
- curved drawing lessons 2 # The spherical geometry
- curved drawing lessons 3·# Deep inside the equirectangular grid
Other curved drawings related with the subject
To ensure that your images have the right license you need to add a hyper-link to the copyright-page. Mentioning (source: Wikicommons) is insufficient for steemstem.
Ok, thanks for advise.
Good job on the corrections :)
This post was shared in the Curation Collective Discord community for curators, and upvoted and resteemed by the @c-squared community account after manual review.
Some pretty mad skills you've got man. Keep. It up!
thank you @pangoli!
Another wonderful lesson, @javier.dejuan :D You really combine math and art in a wonderful union !!!
thank you
It is a very thorough technical art article, Javier, well done :D.
thank you@scrawly
This post has been voted on by the steemstem curation team and voting trail.
There is more to SteemSTEM than just writing posts, check here for some more tips on being a community member. You can also join our discord here to get to know the rest of the community!