[Week 3] Google IT Support Professional Certificate #17 || Course 3 WEEK 3 Operating Systems and You: Becoming a Power User{Part 1}

I just completed 3rd week of course 3 in 3 days.
What I (We) learn in the 3rd week of this course?
In the third week of this course, we'll learn about package and software management in Windows and Linux OS. It's important to know how package installs work and how devices and drivers are managed within these operating systems. We will also learn about different packaging and file compression methods. By the end of this module, you will know how to create, update, and remove software by using the Windows GUI, Windows CLI and Linux shell.
To Join this course click on the link below
.jpg)
Google IT Support Professional Certificate http://bit.ly/2JONxKk
Our main objectives.
- Differentiate between different packaging and file compression methods.
- Understand how Windows and Linux package installs work.
- Understand how devices and drivers are managed in Windows and Linux.
Meet Our trainer(s) for Course 3
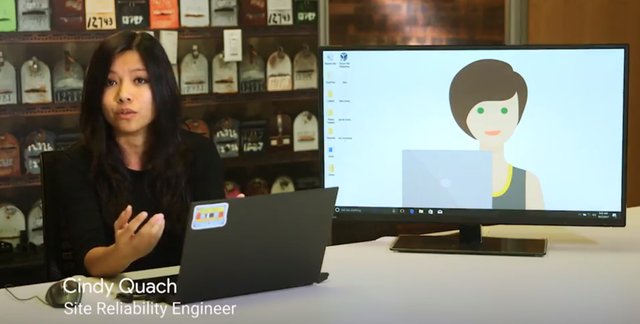
Cindy Quach
Her name is Cindy Quach, and She is a site reliability engineer at Google. The team I work on is responsible for the management and support of Google's entire internal mobile fleet; Android OS, iOS, and chrome OS. Before focusing on mobile, she was a systems administrator on the Linux team, and before that, she was an operations engineer. But like a lot of the Googlers you've met and with her, I started my career as an IT support specialist. She have been working in IT for seven years now.
Theory covered in Week 3
1. Windows: Software Packages
Have you ever wondered how we get software, like the apps in the App Store, or packages on the Internet to install on our devices? Wonder no more. Developers and organizations that make the software we use, generally package them up nicely for us. In most cases, all we need to do is click install and the package gets installed for us. Packaging comes in all sorts of shapes and sizes. It's just like how you'd package a gift for someone. You could put it in a box or a bag, but the contents are what really matter. Developers have different ways to package software using software compiling tools. But at the end result is a package. In the next few we'll discuss some of the most common package types you'll see when you work in IT support. In Windows, software is usually packaged as a dot exe or executable file. Executable files contain instructions for a computer to execute when they're run, like copy this file from here to here, install this program, or more generically, perform this operation. The concept of an executable file isn't unique to Windows, but Windows has its own special implementation of them in the form of the exe's. They're created according to Microsoft's portable executable or PE format. Although we won't get into the details of the PE format, it's good to know that exe files don't just contain instructions for the computer to perform. They also include things like text or computer code, images that the program might use, and potentially something called an msi file. A Microsoft install package or msi is used to guide a program called the Windows Installer in the installation, maintenance, and removal of programs on the Windows operating system. Besides using the GUI setup wizard to guide the user in installing the program, the Windows installer also uses the msi file to create instructions on how to remove the program, if the user wants to uninstall it. Windows executable files are usually used as starting points to bootstrap the Windows installer. In this case, they might just contain an msi file and some instructions to start the Windows installer and read it. Alternatively, executables can be used as stand-alone, custom installers, with no msi file or usage of the Windows installer. If they're packaged this way, the exe file will need to contain all the instructions that operating system needs to install the program. So, when would you use an msi file and the Windows installer? And when would you use an executable with a custom installer packaged in something like setup.exe? Great questions. If you want precise granular control over the actions Windows takes when installing your software, you might go the custom installer route. This can be tricky though, especially when managing things like code dependencies, which we'll talk about later. On the flip side, using the Windows installer guided by an msi file takes care of a lot of the bookkeeping and set up for you, but it has some pretty strict rules about how the software gets installed. As of Windows 8, Microsoft has introduced a platform to distribute programs called the Windows Store. The Windows Store is an application repository or warehouse, where you can download and install universal Windows platform apps. Those are the applications that can run on any compatible Windows devices like desktop PCs, or tablets. These programs use a format called appx to package their contents and act like a unit of distribution. We won't go into detail about appx packages, but it's good to know they're out there giving you another option for packaging software. Feel free to read more about appx packages and how to make them in the supplemental readings I've included after this . We learned how to install exe packages in an earlier course. To install an exe from the GUI, all we need to do is double click on the executable then go through the installation process provided, either by the executable itself or the Windows installer. That's pretty straightforward, but what about installing software from the command line? And why would you need to do this in the first place? Hold onto your desktops because you're about to find out. Installing executables from the command line can be handy in lots of IT support scenarios, including automatic installations. You might want to write a script or use a configuration management tool to install some software automatically without needing a human to click buttons in an installation wizard. So, how can you install an executable from the command line? The answer, it depends. Pretty unsatisfying, I know. Running exe files from the command line is pretty simple. You open up a Command Prompt or PowerShell, change in to directory where the executable is, and type in its name.

For more information on the topics presented in this lecture please check out the following links: portable executable, Installation Package, Windows Store, and App packager (MakeAppx.exe).
https://en.wikipedia.org/wiki/Portable_Executable
https://msdn.microsoft.com/en-us/library/windows/desktop/aa369294(v=vs.85).aspx
https://en.wikipedia.org/wiki/Windows_Store
https://msdn.microsoft.com/en-us/library/windows/desktop/hh446767(v=vs.85).aspx
For a description of the command-line switches that are supported by a software installation package, an update package, or a hotfix package that was created by using Microsoft Self-Extractor click here.https://support.microsoft.com/en-us/help/912203/description-of-the-command-line-switches-that-are-supported-by-a-softw
You could also just type the absolute path of the exe from wherever you are in the file system, like this, C:\users\cindy\desktop\hello.exe. Running from an installer from the command line is similar, but will potentially have more options for installation. Depending on the installer, you might have flags for things like a silent installation, where nothing shows up on the screen and the package is installed quietly, or you might get an argument to have the computer reboot automatically after the package is installed. You can check out the options for packages created by using the Microsoft Self-Extractor in the supplemental reading for a better idea of what we are talking about. A given installer might have these kinds of options for installing from the command line, but they vary from vendor to vendor. The options available for a Microsoft package might differ from the options for a Mozilla package. Pro tip, try using the slash question mark parameter when running a package from the command line to see what kinds of sub commands the package might support. If the package doesn't have any help related options, your best bet is to check out the vendor's documentation for what kinds of installations their software packages support.
2. Linux: Software Packages
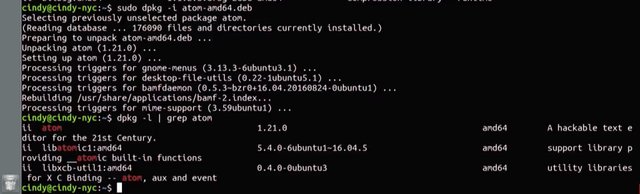
In Linux, there are lots of different distributions and each might have different package types. For example, in the Linux distribution or Distro, Red Hat, the packages that are used are.rpm or Red Hat Package Manager packages. We won't cover how to work with RPM packages, but just be aware that packet types can change when you're working with different Linux distributions. If you're interested in learning more about RPM packages, I've included a link in the supplementary reading. In this course, we'll be working with Debian packages which Ubuntu uses. A Debian package is packaged as a.deb file for Debian. You've already learned how to install a Linux package using the help of a package manager in the first course on technical support fundamentals. We'll dive deeper into this later, but let's focus now on how to install a single standalone Debian package. You'll have to work with standalone Debian packages, especially when developers package and release their software on different websites. To install a Debian package, you'll need to use the D package or Debian package command. There is a standalone package here for the open source text editor, atom. Let's go ahead and install it using D package. We have to use the iFlag for the install, and that's it. Now it's installed on this computer. How about if we wanted to remove a package? To do that, we use the R or remove flag.
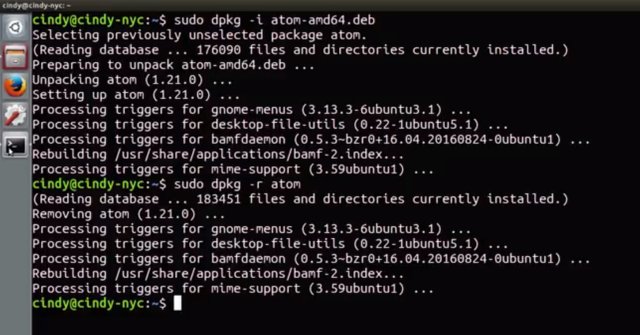
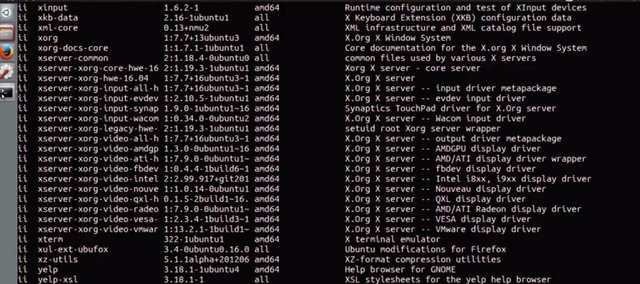
And that's how you install and remove a standalone Debian package. Pretty simple, right? You can also list the Debian packages that are installed on your machine with a D package dash L. The L is for list. There are lots of programs on here. It looks kind of messy
Can you think of another command that we've used before that would help us search if a certain package is installed? That's right. The grep command. Let's say we want to search for the atom package we just installed. Keep in mind I just uninstalled it, so am just going to install it really quickly. Now let's run D package dash L grep atom. Here, we have the D package dash L command that's been piped to grep. Remember, the pipe command takes the standard output of one command which in this case is the output of the D package dash L. Then, it sends it to the standard input of the command it pipes to. In this case, grep. If we run this command, it shows us that atom is definitely in the list of packages here. Just remember that when using grep, it lists other results that have the search terms in the name. Just like that, we've learned how to install any Debian package in Linux. We're really cooking now. Great work.
3. Windows: Archives
One type of package that we haven't discussed yet isn't really a package at all, it's an archive. An archive is comprised of one or more files that's compressed into a single file. Package archives are basically the core or source software files that are compressed into one file. When we install software from a source archive, it's referred to as, installing from source. Popular archive types you'll see are .tar, .zip, and .rar. To install software found in an archive, you first have to extract the contents of the archive so you can see the files inside. Then, depending on what type of code it was written in, you have to use a specific method to install it.
We won't discuss how to install from source, since it changes depending on what language the software was written in. But we'll discuss how to extract the contents of an archive, which you'll have to do a lot as an IT support specialist.
It's not just software that's stored in an archive, anything can be archived, like pictures or music files. You'll see these a lot in IT support.
To make things more complicated, archive types have lots of different way they can be extracted. Luckily, there's a very popular tools in windows for file archiving and unarchiving different file types, like .rar .zip and tar. This is the open source tool 7-zip. It's already installed on my computer.
If you want to download it yourself, I've included a link in the supplemental reading.
There's an archive on my desktop called colors.zip.
Let's go ahead and extract this archive so that we can see the files inside. I'm just going to right click, 7-Zip, extract, here. It looks like there are a bunch of files inside of this archive.

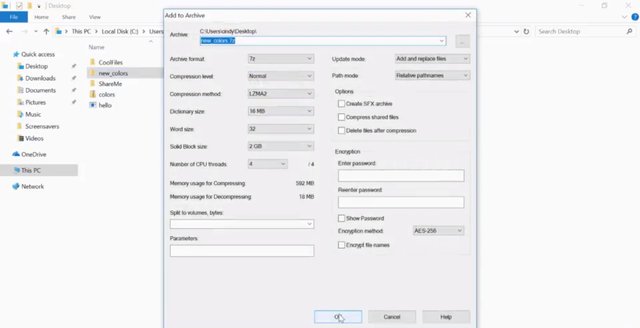
Besides unarchiving files, you can also archive files. I'm going to make a new folder called new colors.
Then, I'm going to add this new blue dot text file and the old colors in this folder.
Then, I'm just going to archive it with 7-Zip and Add to archive. Click OK.
Pretty cool, right? Now, if you wanted to send someone a bunch of files in an email, you don't have to send them one by one. Instead, you can combine them all in one archive and send one single file. If you're using PowerShell version 5.0 of greater, you can actually extract and compress archives right from the command line. Let's say you've got a bunch of files in a folder called cool files on your desktop, that you'd like to add to the new zip file.
After you've opened up the PowerShell command line interface, you can issue this command, Compress-Archive.path.
CoolFiles, and then we're just going to make a new archive in the desktop called CoolArchive.zip. Now, if we check our desktop.
There you should see it, CoolArchive.zip. This will take everything from the desktop CoolFiles directory, and compress it into this CoolArchives.zip

If you're interested in downloading 7-Zip, check out the link here.http://www.7-zip.org/download.html
For more information about creating an archive or zipped file using Windows PowerShell, check out the link here.https://docs.microsoft.com/en-us/powershell/module/microsoft.powershell.archive/compress-archive?view=powershell-5.0
4. Linux: Archives
7-Zip is also available to use in Linux. We've already installed the package p7zip-full, which is what the Linux version of 7-Zip is. To extract a file using 7-Zip, use the command 7z and the flag e for extract and then the file you want to extract. For example, let us extract this tar file in my home directory.
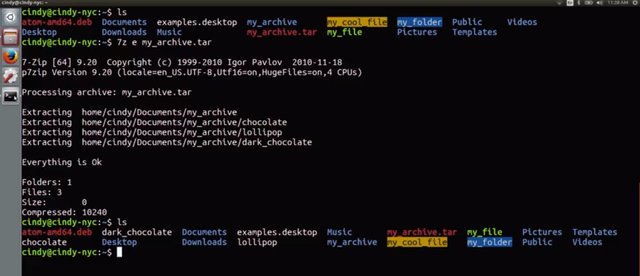
And just like that, we now have the extracted contents. There are lots of other tools out there for archiving and unarchiving files. One tool that lots of people use, that's already installed on most Linux distros is the tar command. We won't go over how to use this command, but if you'd like to read more about it, check out the next supplemental reading. You'll see lots of different types of archives as you work with Windows and Linux. Just keep in mind that different archive types might require different commands to extract. So, you've learned what the standalone packages are for Windows and Linux along with some of the common archive types. Well done. Next we'll dive a little deeper into packages and some issues you might encounter when you install a standalone package.
For more information about the Linux tar command, please check out the following link here.
http://www.linfo.org/tar.html
5.Windows: Package Dependencies
Packages of software usually rely on other pieces of code in order to work. Let's say you're installing a game on your Windows computer. The program might need to do some calculations to make the physics of the game work properly and render the results in the form of graphics on the screen. To perform these tasks, the game might have a dependency on a physics engine to do the calculations and a rendering library to show the sweet graphics on the screen. In order for the game to work, you'll have to have all that software available to the game. Counting on other pieces of software to make an application work is called having dependencies since one bit of code depends on another in order to work. In our example, the game depends on both the physics engine and a rendering library to run. But wait, what do we mean when we refer to a library?
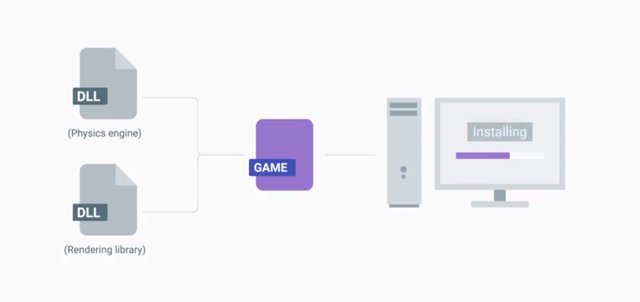
You can think of the library as a way to package a bunch of useful code that someone else wrote. This code is bundled together into a single unit. Programs that want to use the functionality that the code provides can tap into it if they need to. In Windows, these shared libraries are called dynamic-link libraries, or DLL for short. You can find out more details about dynamic link libraries in the next reading.
One super useful feature of a DLL is that the same DLL can be used by lots of different programs. This means all that shared code doesn't need to be loaded into memory for each application that wants to use it, so less memory overall is used. Windows applications typically have many dependencies all located together in a single installation package. Along with something called an MSI file that tells the Windows Installer how to put it all together.
This means that a given installation package will have all the resources and dependencies like DLLs, right there in the package. The Windows Installer will also handle managing those dependencies and make sure they are available to the program. In the old days, things weren't always so great. Imagine this scenario. A video player you've been using to play movies on your computer uses a graphics DLL to display films on your screen. A new game just came out that you want to play, so you install that too.
The game comes along with a new version of that graphics library. So the game installer updates the existing version with the new DLL. All of a sudden, your video player stops working. It turns out the video player doesn't know how to use the new version of the DLL, which is a pretty big bummer. On modern Windows Operating Systems though, DLL hell is a problem of the past. To fix it, most shared libraries and resources in Windows are managed by something called side-by-side assemblies or SxS.
Most of these shared libraries are stored in a folder at C:\Windows\WinSxS. If an application needs to use a shared library to perform a task, that library will be specified in something called a Manifest. This tells Windows to load the appropriate library from the SxS folder. The SxS system also supports access to multiple versions of the same shared library automatically. So when you install software, you don't pull the rug out from underneath the programs you've already got. In addition to manifest, the SSX system and installers bundling dependencies together in their installation packages. You can use a Windows Package Manager to help install and maintain the libraries and other dependencies that your installed software needs to use. We'll talk about this in more detail in our lesson on Windows package managers. We'll give you preview using the Windows package management feature for PowerShell. Using a Windows package management cmdlet called Find-Package, you can locate software, along with its dependencies right from the command line.
By the way, a cmdlet is basically the name we give to Windows PowerShell commands that use the verb-noun format. We've already used lots of cmdlets such as get-help, select-string etc. There are hundreds of cmdlets built into Windows and you can even write your own. Okay, back to my task at hand. Let's say you wanted to install the Sysinternals package. Which is a set of tools released by Microsoft that can help you troubleshoot all sorts of problems on your Windows computers.
You could download the Sysinternals package from the Microsoft Website or you could use the package management feature.
First we'll need to open up a PowerShell terminal by typing in PowerShell from the start menu.
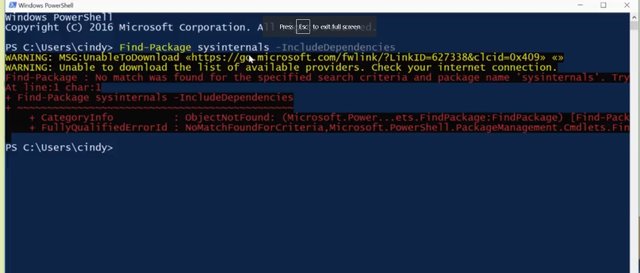
Then we can try to locate the sysinternals package by executing this command. Find-Package sysinternals-IncludeDependencies.
An error. No match found. What's that all about?
This exception was generated because the default source of packages in PowerShell is the PowerShell gallery, which doesn't contain the Sysinternals package.
Luckily, all we need to do is tell PowerShell about a place where it can find the Sysinternals package. And that's a package repository called Chocolatey. We'll dip into more about Chocolatey in the package manager . But for now, just know it's a place where all kinds of windows software packages live.
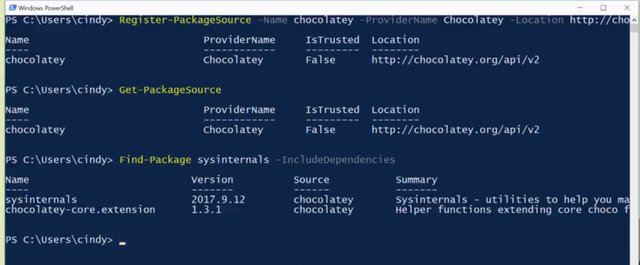
So, before we can install any packages, we need to add a package source that tells our computer where it can find the packages we want to install. Since we want to use Chocolatey to find our packages, we need to add it as a package source. We're going to do that with the PowerShell command Register-PackageSource. Let's go and type Register-PackageSource-Name chocolatey-ProviderName Chocolatey-Location,
.org/api/v2.
We can verify both sources of software are now good to go with the Get-PackageSource command.
And then, try to locate our package and its dependencies again with Find-Package, sysinternals-includeDependencies. Sweet! Now that we know that’s the package we want, we can use a cmdlt called Install-Package to actually install Sysinternals and its corresponding dependencies. We’ll do that in a later lesson. Now it's time for snack break. All this Chocolatey talk made me hungry.
6. Linux: Package Dependencies
Let's see what a package dependency would look like and Linux. We learned how to install a standalone package in Linux using dpkg in the last lesson. Let's install one more package. I downloaded the Google Chrome browser here in my desktop and I want to install it with sudo dpkg -i google - chrome. Wait a minute, what's this error I'm getting? Dependency problems prevent configuration of google chrome stable.
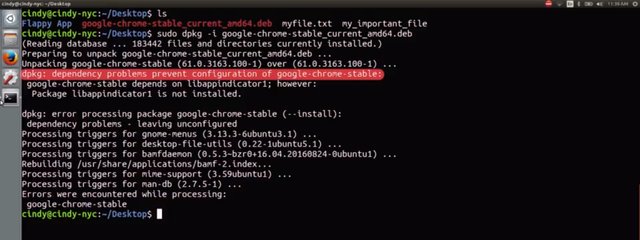
This is saying it can't install Google Chrome because it's dependent on another package that isn't currently installed on this machine. So before we can install Chrome, we have to install this package lib app indicator one. While a standalone package installer like dpkg may be quick to use, it doesn't install package dependencies for us. In Linux, these dependencies can be other packages or they could be something like shared libraries. Linux shared libraries similar to Windows dlls are libraries of code that other programs can use. So what do you do if you're stuck with a dependency error? You could install the dependencies one by one. Sure. But in some cases, you might see more than just one dependency. You might even see 10. This is especially true in Linux. It's not that fun to continually install programs just so you can get one program to work. Luckily for us, that's where package managers come in. Package managers come with the works to make package installation and removal easier, including installing package dependencies. We'll talk about package managers in the next lesson but for now, it's enough to know that if you install a standalone package, you won't automatically install its dependencies.
dpkg is a package manager for Debian-based Linux systems like Ubuntu. For more information about dpkg commands, check out the link here.https://help.ubuntu.com/lts/serverguide/dpkg.html
7. Windows: Package Manager
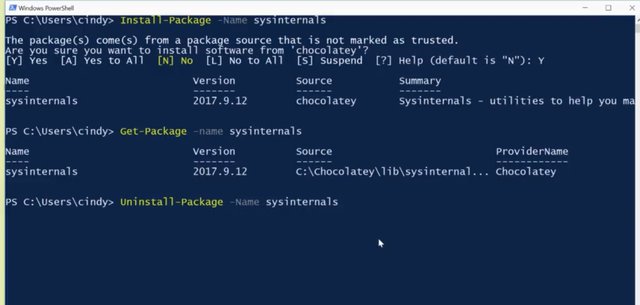
TNow that we know a bit about installing software and dependencies from individual executables or package files, let's take a look at a different way to manage software installations using tools called package managers. You've actually already seen a package manager in action. Remember the apt or advanced package tool we talked about earlier ? Well, the advanced package tool is actually a package manager for the Ubuntu operating system. We'll talk about apt in a little bit. But you might be curious about what options you have for Windows package management. A package manager makes sure that the process of software installation, removal, update, and dependency management is as easy and automatic as possible. Think about the normal way you might install a new program on your Windows computer. You might search for it in a search engine, go to the program's website, download the installer, then run it. If you wanted to update the software, you might open up the program and use whatever mechanism it provides for you to install the new version. Lots of programs give you a way to perform automatic updates and Microsoft takes care of the ones it writes through Windows update. But you might even need to go back to the website you downloaded the software from originally to grab another installer for the new version. Finally, if you wanted to remove the software, you might use the windows Add/Remove programs utility. Or maybe run a custom uninstaller if it provides you with one. Some installation technologies like the Windows installer can take care of dependency management. But they don't do much to help you install software from a central catalog of programs or perform automatic updates. This is where a package manager like Chocolatey can come in handy. Chocolatey is a third party package manager for Windows. This means it's not written by Microsoft. It lets you install Windows applications from the command line. Chocolatey is built on some existing Windows technologies like PowerShell, and lets you install any package or software that exists in the public Chocolatey repository. I've included links to both in the next reading. You can add any software that might be missing to the public repository. You can even create your own private repository if you need to package something like an internal company application. Configuration management tools like SCCM and Puppet, even integrate with Choclatey. That helps make managing deployments of software to the Windows computers in your company, automatic and simple. We've talked about a few ways we can install packages earlier . Let's add Chocolatey to the mix, which supports several methods of software installation itself. First, you can install the Choclatey command line tool and run it directly from your PowerShell CLI. Or you can use the package management feature that was recently released for PowerShell. Just specify that the source of the package should be the Choclatey repository. Remember this from our talk about installing software? We use this command to locate the Windows Sysinternals package after adding Choclatey as a software source. Just a refresher, the command was Find-package sysinternals include dependencies. That's all well and good. But how do we actually go about installing this package? Well, that's where the Install-Package command-let comes into play. We can use this tool to install a piece of software and its dependencies. Let's get installing that sysinternals package we found earlier shot. I'm just going to go install, package-name sysinternals. Yep, I'm just going to confirm. And just like that, we've got our package. We can verify it's in place with the Get-Package command-let. Get-Package -name sysinternals. You can also uninstall a package using the Uninstall-Package -Name sysinternals.
9. Linux: Package Manager Apt
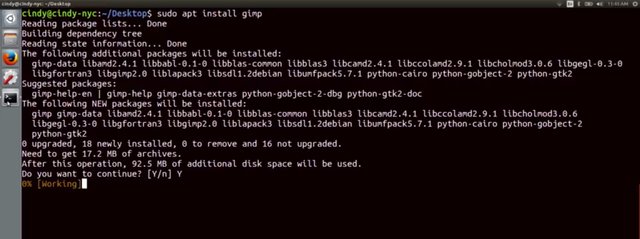
Okay. Now, to talk about the package manager used in Ubuntu called the APT or Advanced Package Tool. We've actually already used APT in an earlier course, so hopefully, this won't look new. The APT package manager is used to extend the functionality of the package. It makes package installation a lot easier. It installs package dependencies for us, makes it easier for us to find packages that we can install, cleans up packages we don't need, and more. Let's see how we will install the open source graphical editor, Gimp, using APT. And if you want to follow along on your own machine, I've included a link to the Gimp download in the next reading. So, sudo apt install gimp. Let's take a look at what this command is doing. APT grabs the dependencies that this package requires automatically and asks us if we want to install it. You can see this line here, 0 upgraded, 18 newly installed, 0 to remove, and 16 not upgraded. This gives us a good overview of what we're doing to the packages on our machine.
Now, let' s remove this package. It's sudo APT remove gimp.
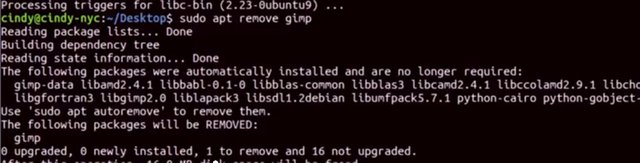
You can see that it removes dependencies for us that we're not using anymore because we don't need Gimp. You also noticed that when installing this package, we didn't have to download the gimp package. It was just on our system. How is that possible? Well, thanks to something known as a package repository, we don't have to manually search for each and every software we want online. We've already seen the chocolatey package repository in action. Repositories are servers that act like a central storage location for packages. Lots of software developers and organizations host their software on the internet, and give out a link to where that location is. You can add that link to your own machine, so it references that package or list of packages. You've already seen this with The Register-PackageSource commandlet where we added this location of the chocolatey repository. So on Linux, where do you add a package or repository link? The repository source file in Ubuntu the /etc/APT/sources.list. Your computer doesn't know where to check for software if you don't explicitly add the package or repository links to this file. Let's just open this up real quick and take a peek.
There's some extra information in here that isn't important. But you can see here that there are links here. If you navigate to those links, you'll see a directory that holds lots of packages. Ubuntu already includes several repository sources in here to help you install the base operating system packages, and other tools too. If you work in a Linux environment, there are also special repositories called PPAs or personal package archives.
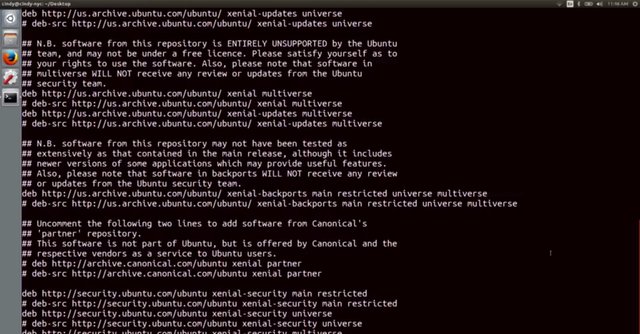
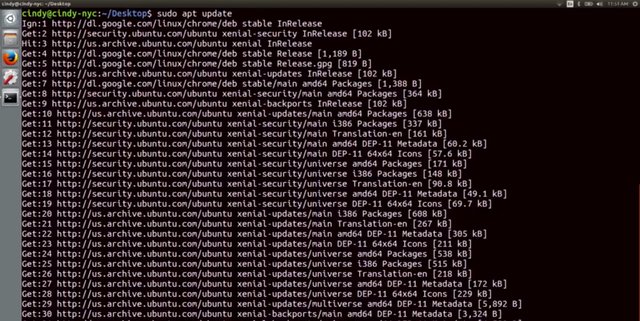
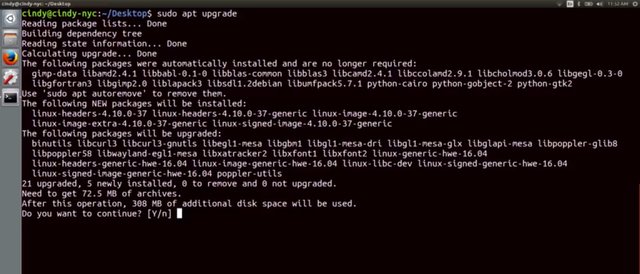
PPAs are hosted on Launchpad servers. Launchpad is a website owned by the organization, Canonical Limited. It allows open source software developers to develop, maintain, and distribute software. You can add PPAs like you would a regular repository link, but be a little careful when using a PPA instead of the original developer's repositories. PPA software isn't as vetted as repositories you might find from reputable sources like Ubuntu. They can sometimes contain defective, or even malicious software. One more thing to call out about repositories is that the repository managers update their software pretty regularly. If you want to get the latest package updates, you should update your package repositories with the APT update, and then, APT upgrade commands. The APT update command updates the list of packages in your repositories, so you get the latest software available. But it won't install or upgrade packages for you. Instead, once you have an updated list of packages, you can use APT upgrade, and it will install any outdated packages for you automatically. Before installing new software, it's good to run APT update to make sure you're getting the most up-to-date software in your repositories.
You'll also want to run APT upgrade to install any available updated packages on your machine.
You can use the apt--help command to learn more about the commands available with APT. We won't cover them all, but you can list packages, search packages, get more information about packages, and more. There are lots of different package managers you can use with Ubuntu. We chose APT because it's a popular package manager, but you can read up on an alternative package manager in Ubuntu, in the next supplemental reading. Awesome. Now that you've entered the APT command to your toolkit, your ready to maintain packages in Linux. This is a skill you'll be using a whole lot in the IT support world. We'll talk about that more in the next lesson.
If you work in a Linux environment, there are also special repositories known as PPAs or Personal Package Archives. PPAs are hosted on Launchpad servers. For more information about PPAs, check out the link here.https://help.launchpad.net/Packaging/PPA

For part 2 of Course 3 Week 3.
Check out here...........http://bit.ly/2Om8Aqv
To Join this course click on the link below
Google IT Support Professional Certificate http://bit.ly/2JONxKk
LInks to previous weeks Courses.
[Week 2] Google IT Support Professional Certificate #16 || Course 3 WEEK 2 Operating Systems and You: Becoming a Power User
http://bit.ly/2nhSKBA
[Week 1] Google IT Support Professional Certificate #15 || Course 3 WEEK 1 Operating Systems and You: Becoming a Power User {Part 2}
http://bit.ly/2naOweX
[Week 1] Google IT Support Professional Certificate #14 || Course 3 WEEK 1 Operating Systems and You: Becoming a Power User {Part 1}
http://bit.ly/2M4pn3C
[Week 6] Google IT Support Professional Certificate #13 || Course 2 WEEK 6 Troubleshooting and the Future of Networking
http://bit.ly/2O1750T
[Week 5] Google IT Support Professional Certificate #12 || Course 2 WEEK 5 Connecting to the Internet
http://bit.ly/2AskNrx
[Week 4] Google IT Support Professional Certificate #11 || Course 2 WEEK 4 Networking Services
http://bit.ly/2LGQrpN
[Week 3] Google IT Support Professional Certificate #10 | Course 2 WEEK 3 Peer-graded assignment|
http://bit.ly/2JRgzJy
[Week 3] Google IT Support Professional Certificate #9 | Course 2 WEEK 3 The Transport and Application Layers |
http://bit.ly/2NEphwQ
[Week 2] Google IT Support Professional Certificate #8 | Course 2 WEEK 2 The Network Layer
http://bit.ly/2v4FqnN
[Week 1] Google IT Support Professional Certificate #7 | Course 2 WEEK 1 The Bits and Bytes of Computer Networking
http://bit.ly/2LJsg6G
[Week 6] Google IT Support Professional Certificate #6 | | Course 1 WEEK 5 Troubleshooting | A Moral Week
http://bit.ly/2Ll866U
[Week 5] Google IT Support Professional Certificate #5 | Course 1 WEEK 5 Software | All basic knowledge about software.
http://bit.ly/2NIWebL
[Week 4] Google IT Support Professional Certificate #4 | |Course 1 WEEK 4 Networking | All basics about networking.
http://bit.ly/2mFsbWJ
[Week 3] Google IT Support Professional Certificate #3 | | Course 1 WEEK 3 Operating System | Installing Windows & Linux.
http://bit.ly/2OglOWH
[Week 2] Google IT Support Professional Certificate #2 | | [Google + Coursera] Course 1.Hardware | The main components & how to assemble these
http://bit.ly/2LJALPi
[Week 1] Google IT Support Professional Certificate #1 | | WEEK 1 Introduction to IT | Kevin Limehouse | An overall View
http://bit.ly/2OerzUI
Google IT Support Professional Certificate #0 | Why you should do this Course? | All details before you join this course.
http://bit.ly/2Oe2t8p
#steemiteducation #Computerscience #education #Growwithgoogle #ITskills #Linuxcommands #powershell #googleitsupportprofessional
Atlast If you are interested in the IT field, this course, or want to learn Computer Science. If you want to know whats in this course, what skills I learned Follow me @hungryengine. I will guide you through every step of this course and share my knowledge from this course daily.
Support me on this journey and I will always provide you with some of the best career knowledge in Computer Science field.
.gif)