[Week 4] Google IT Support Professional Certificate #19 || Course 3 WEEK 4 Operating Systems and You: Becoming a Power User

I just completed 4th week of course 3 in 2 days.
What I (We) learn in the 4th week of this course?
In the fourth week of this course, we'll learn about how filesystems work for Windows and Linux OS. We'll learn about filesystem types and why they're different for certain OS. We'll learn about disk partitioning and virtual memory and why these are so important for an IT Support Specialist's role. We'll also cover ways mount and unmount filesystems, read disk usage, and repair filesystems. By the end of this module, you will partition and format a disk drive yourself in both Windows and Linux.
To Join this course click on the link below
.jpg)
Google IT Support Professional Certificate http://bit.ly/2JONxKk
Our main objectives.
1.Format and partition a disk in Windows.
- Use common tools to repair a filesystem and disk.
- View disk usage and free space.
- Format and partition a disk in Linux.
Meet Our trainer(s) for Course 3
Cindy Quach
Her name is Cindy Quach, and She is a site reliability engineer at Google. The team I work on is responsible for the management and support of Google's entire internal mobile fleet; Android OS, iOS, and chrome OS. Before focusing on mobile, she was a systems administrator on the Linux team, and before that, she was an operations engineer. But like a lot of the Googlers you've met and with her, I started my career as an IT support specialist. She have been working in IT for seven years now.
Theory covered in Week 4
1. Review of Filesystems
You may remember that we introduced the concept of a filesystem in the Technical Support Fundamentals course. Here's a refresher. A filesystem is used to keep track of files and file storage on a disk. Without a filesystem, the operating system wouldn't know how to organize files. So when you have a brand new disk or any type of storage device, like a USB drive, you need to add a filesystem to it.
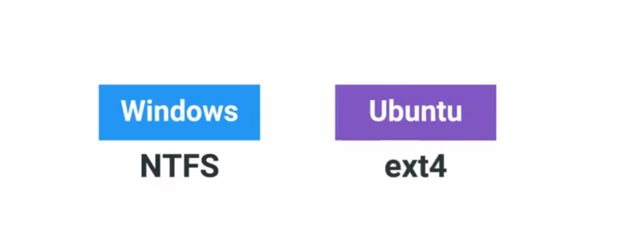
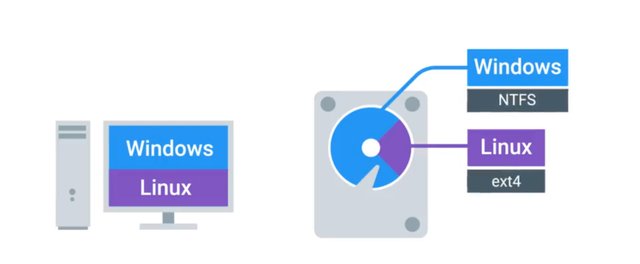
There are lots of file systems out there, but the two that we'll talk about in this course are recommended as default filesystems for Windows and Linux. For Windows, we use the NTFS filesystem, and for Linux, it's recommended to use ext4.
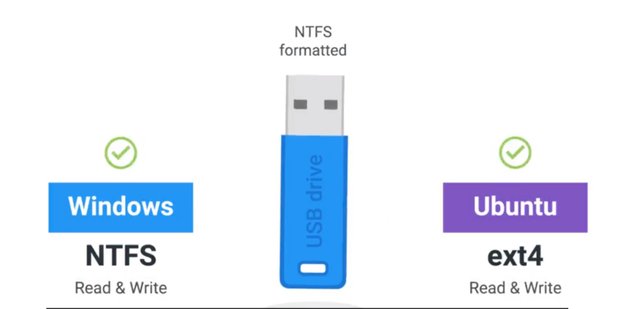
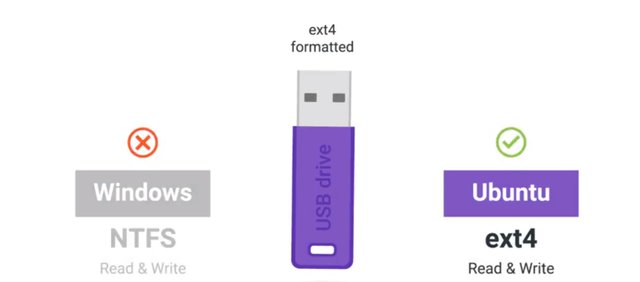
Filesystems have different compatibilities with different OSes. Most of the time, cross operating system support is minimal at best. Let's say you have a USB drive that's using an NTFS filesystem. Both Windows and Linux's Ubuntu can read and write to the USB drive. But if you have an ext4 USB drive, it'll only work on Ubuntu and not on Windows, at least without the help of third party tools.
It's pretty likely that you'll encounter this situation in an IT support role. Let's say you have some important files on that same USB drive that you want to copy over to your Windows, Linux, and Mac OSes, what would you do then?
This is a pretty common situation. You'd have to reformat or wipe the USB drive and add a filesystem that's compatible with all three operating systems.
Luckily, there are filesystems like FAT32 that support reading and writing data to all three major operating systems.
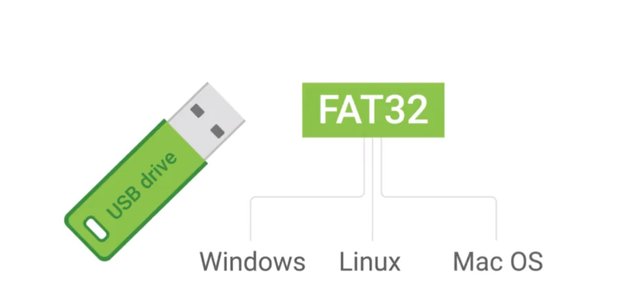
FAT32 has some shortcomings though. It doesn't support files larger than 4 gigabytes, and the size of the filesystem can't be larger than 32 gigabytes. This might be enough for a small USB drive, but it's not really great for anything else.
You can learn more about FAT32 in the next supplemental reading. This still begs the question, what if you wanted to be able to share files between multiple OSes and don't want to deal with filesystem limitations? Don't worry, we've got you covered. In the next course on system administration and IT infrastructure services, we'll discuss another filesystem type called network filesystems that solves this exact problem.
All right, now that you've got a quick refresher on filesystems, let's spend the next few lessons discussing how you actually set them up.
For more information about the FAT32 File System, please check out the link here.https://support.microsoft.com/en-us/help/154997/description-of-the-fat32-file-system
2. Disk Anatomy
Before we start adding a filesystem to a disk, let's do a rundown of the components of the disk that allow you to store and retrieve files. A storage disk can be divided into something called partitions. A partition is just a piece of the disk that you can manage.
When you create multiple partitions, it gives you the illusion that you're physically dividing a disk into separate disks.
To add a filesystem to a disk, first you need to create a partition. Usually, we just have a single partition for our OS, but it's not uncommon to have multiple partitions for different uses. Let's say you want to have two partitions on a disk, one for a Windows OS and one for a Linux OS. Instead of using two machines to use both operating systems, you can just use one machine and switch between the two OSs on boot-up.
You can also add different filesystems on different partitions of the same disk. Partitions essentially act as their own separate sub-disks, but they all use the same physical disk. One thing to call out is that, when you format a filesystem on a partition, it becomes a volume. Volume and partition are sometimes mistakenly used synonymously, but we want to make sure that you understand this distinction.
The other component of a disk is a partition table. A partition table tells the OS how the disk is partitioned. The table will tell you which partitions you can boot from, how much space is allocated to partition, etc. There are two main partition table schemes that are used, MBR, or Master Boot Record, and GPT, or GUID Partition Table.
These schemes decide how to structure the information on partitions. MBR is a traditional partition table, and it's mostly used in the Windows OS. MBR only lets you have volume sizes of 2 terabytes or less. It also uses something called primary partitions. You can only have four primary partitions on a disk. If you want to add more, you have to take a primary partition and make it into something known as an extended partition.
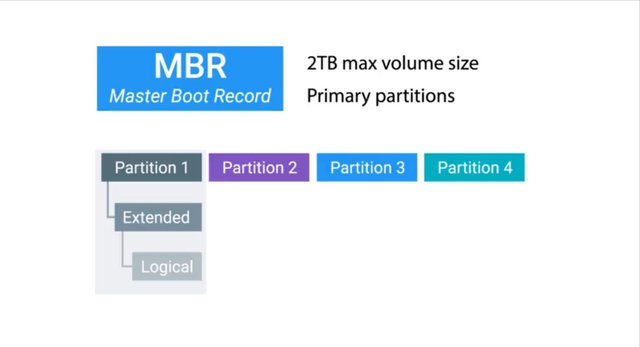
Inside the extended partition, you can then make something called a logical partition. It's a little odd to get at first, but that's just how the partition table was created.
MBR is an old standard, and it's slowly being faded out by the next partition table scheme we'll talk about, GPT. GPT is becoming the new standard for disks. You can have a volume size greater than 2 terabytes, and it only has one type of partition. You can make as many of them as you want in a disk. In an earlier lesson, we learned about a new BIOS standard called UEFI that's become the default BIOS for newer systems. To use UEFI booting, your disk has to use the GUID Partition Table.
Now that you know what you need to do to make a partition, let's partition an actual disk. In the next few lessons, we're going to learn how to partition and format a USB drive for each respective OS.
3. Windows: Disk Partitioning and Formatting a Filesystem
Now that we've got a little theory under our belts, how can we actually partition a disk and format a file system in Windows? Although a quick web search will turn up all kinds of third party disk partitioning programs other people have written, Windows actually ships with a great need of tool called the Disk Management Utility. Like most things in Windows, there are a few ways to get to disk management. We'll launch it by right clicking this PC, selecting the "Manage" option then clicking the "Disk Management" console underneath the storage grouping. We should see a display of both the disks and disk partitions along with information about what type of file system they're formatted with. There are all kinds of good things to know here too. Like the free and total capacity of disks and partitions. One super-cool property of the disk management console is that from here, you can also make modifications to the disk and partitions on your computer.
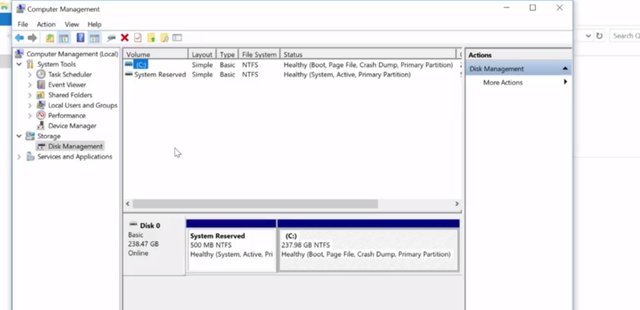
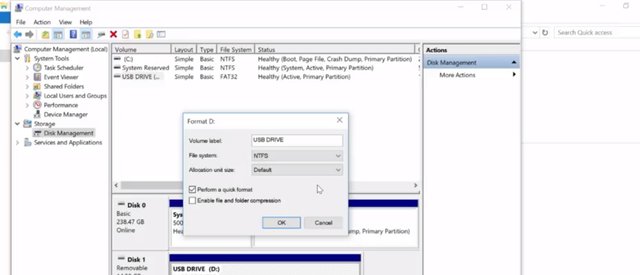
Messing with the partition or the Windows operating system is installed probably isn't the best way to demonstrate the partitioning and formatting abilities of the disk management console. So let's use a USB drive instead. Once the drive has been inserted and the plug and play service does the work of installing the driver for it, you should see it show up in the disk management as an additional disk. The USB drive is currently formatted using the FAT32 file system. Let's go ahead and reformat partition using NTFS instead. To do this, we right click on the partition and choose format.
From this window, we can choose the volume label or name we'd like to give the disk. Let's just stick with USB drive. You can also specify the file system which will change to NTFS. That's pretty straightforward, but there are also some other options that might not be so clear. Like what's that allocation unit size thing? Well, the allocation unit size is the block size that will be used when you format the partition in NTFS. In other words, this is the size of the chunks that the partition will be chopped into. Data that needs to be saved will spread out across those chunks. This means that if you store lots of small files, you'll waste less space with small block sizes. If you store large files, larger block sizes will mean you'll need to read less blocks to assemble the file. We'll pick the default, which is fine in most cases. You'll also see the option to perform a quick format is available. The difference between a quick format and a full format is that in a full format, Windows will do a little extra work to scan the disk or USB drive in our case, for errors or bad sectors. This extra work will make the formatting process a little longer, so we'll just stick to quick for now. We're on our own, we don't want anything to slow us down. The last option on the format screen is whether or not to enable file or folder compression. The decision to enable or disable compression comes with a trade-off. If you enable compression, your files and folders will take up less space on the disk, but compressed files will need to be expanded when you open them, which means the computer's processor will need to do some extra work. We are particularly concerned with squeezing out every last bit of disk space, so we'll leave this box unchecked. Finally, we can hit "okay" to proceed with the format. Windows will warn us first that formatting the volume will erase any data that might be on it. Once we let it know that it's okay it'll start the formatting process.
After a little bit of processing, we should see the label on the partition turn to healthy. Using the GUI is pretty intuitive, but there's also a command line way to accomplish the same task. This can come in handy if you need to automate disk partitioning. To do disk manipulation from the CLI we'll dive into a tool called Diskpart. Diskpart is a terminal based tool built for managing disks right from the command line. Let's format our thumb drive again but using Diskpart instead of the GUI. First of we'll plug in our thumb drive, then to launch Diskpart all we need to do is open up a command prompt, in this case command.exe and type Diskpart into it.
This will open up another terminal window where the prompt should read Diskpart. You can list the current discs on the system by typing "list disk". Next, we identify the disk we want to format. A good signal is the size of the disk, which will be much smaller for a USB drive. Then we can select it with select disk and then disk one, now we'll wipe the disk using the "Clean command" which will remove any and all partition or volume formatting from the disk. With the disk wiped, we now need to create a partition in it. This can be done with the create partition primary command, which will create a blank partition for our file system.
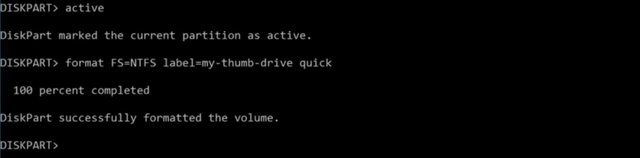
Then let's select the partition with select partition one. That's the number of our freshly created partition and now we'll mark it as active by simply typing active.

If you guess that the next step is to format the disk with the NTFS file system, you're right? We can do this by running this command at the Diskpart prompt format FS for file system NTFS and the the label. I'm just going to call it "my thumb drive". And then the formatting type, we'll want to make it quick. This command will format the thumb drive with NTFS in quick mode, which we talked about earlier and we just gave it the name "My thumb drive".
Congratulations, you've just formatted a USB drive from the command line. If you want to learn more about the options and tasks you can accomplish with Diskpart, check out the Diskpart link in the supplementary reading I've included. And there you have it, that's how you form a disk with the NTFS file system in the Windows operating system using both the command line and the GUI. If you want a refresher, feel free to watch this lesson again before heading to the next one.
For tips about setting the allocation unit size when formatting a disk, check out the link here.
https://support.microsoft.com/en-us/help/140365/default-cluster-size-for-ntfs--fat--and-exfat
You can also learn more about DiskPart command-line options here.https://technet.microsoft.com/en-us/library/cc766465(v=ws.10).aspx
Now that you've formatted your new file system, there's one more step left. You have to mount your file system to a drive. In IT, when we refer to mounting something like a file system or a hard disk, it means that we're making something accessible to the computer. In this case, we want to make our USB drive accessible so we mount the file system to a drive. Windows does this for us automatically. You might have noticed this if you plug in a USB drive, it'll show up on your list of drives and you can start using it right away. When you're done using the drive, you'll just have to safely eject or essentially unmount the drive by right clicking and selecting eject. We'll talk about why this is important in a later lesson.
4. Linux: Disk Partitioning and Formatting a Filesystem
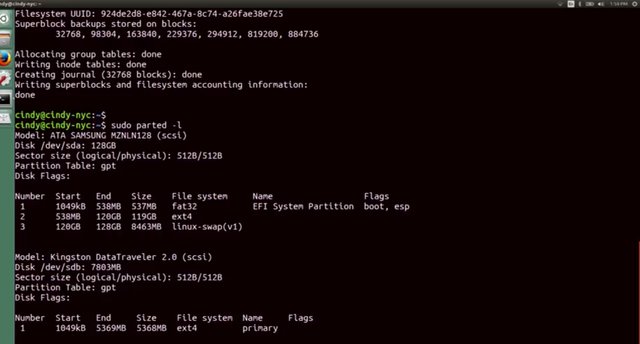
In Linux, there are a few different partitioning command line tools we can use. One that supports both MBR and GPT partitioning is the parted tool. Parted can be used in two modes. The first is interactive, meaning we're launched into a separate program, like when we use the less command. The second is command line, meaning you just run commands while still in your shell. We're going to be using the interactive mode for most of this lesson. Before we do that let's run a command to show what disks are connected to the computer using the command line mode. We can do this by running the parted - l command. So sudo parted - l. This lists out the disks that are connected to our computer. We can see that the disk /dev/sda is 128 gigabytes.
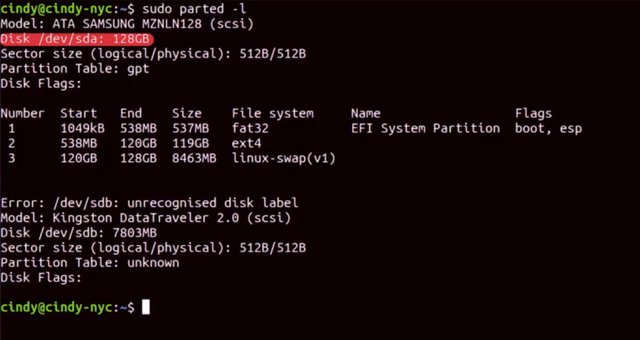
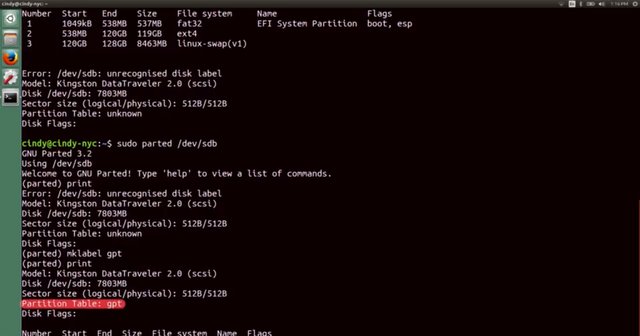
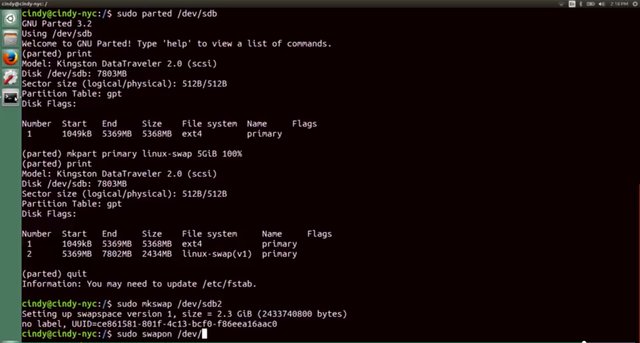
I've also plugged in a USB drive and you can see that, /dev /sdb is around 8 gigabytes. Let's quickly go through what this output says. Here we can see the partition table is listed as gpt. The number field corresponds to the number of partitions on the disk. We can see that there are three partitions. Since this disk is /dev/sta, the first partition will correspond to /dev/sta 1 and the second will correspond to /dev/sta 2 et cetera. The start field is where the partition starts on the disk. For this first partition we can see that it starts at 1,049 kilobytes and ends at 538 megabytes. The field after that shows us how large the partition size is. The next field tells us what file system is on the partition. Then, we have the name and finally, we can see some flags that are associated with this partition. You can see here that /dev /sdb doesn't currently have any partitions, we'll fix that in a minute. Let's select our /dev/sdb disk and start partitioning it. We want to be super careful that we select the correct disk when partitioning something so we don't accidentally partition the wrong disk. We're going to use the interactive mode of parted by running sudo parted /dev/sdb. Now we're in the parted tool. From here, we can run more commands. If we want to get out of this tool and go back to the shell then we just use the quick command. I'm going to run print just to see this disk one more time. It says we have an unrecognized disk label. We'll need to set a disk label with the mklabel command. Since we want to use the gpt partition table let's use this command. Mklabel gpt. Let's look at the status of our disk again to do that we can use a print command. Here we can see the disk information for the selected /dev/sdb disk. Now it says we have the partition table gpt. All right.
Let's start making modifications to the disk. We want to partition the /dev/sdb disk into two partitions. Inside the parted tool we're going to use the mkpart command. The mkpart command needs to have the following information, what type partition we want to make, what file system we want to format, and the start of the disk and the end of the disk like this.
The partition type is only meaningful for mbr partition tables. Remember, the mbr uses primary, extended, and logical partitions. Since we are formatting this using gpt, we're just going to use primary as the partition type. The start point here is one mebibyte and the endpoint is five gibibytes. So our partition is essentially five gibibytes. Remember from the earlier course, that data sizes have long been referred to in two different ways, using the exact data measurement and the estimated data measurement. Remember that one kibibyte is actually 1,024 bytes while one kilobyte is 1,000 bytes. We haven't really had to care about this distinction before. Some operating systems sometimes measure one kilobyte as 1,024 bytes which is confusing, but when dealing with data storage we want to make sure we're using the precise measurements so we don't waste precious storage space. Let's opt to use mebibyte and gibibyte in our partition. Next, we're going to format the partition with the file system using mkfs. So I'm just going to quick, sudo mkfs type is ext4.
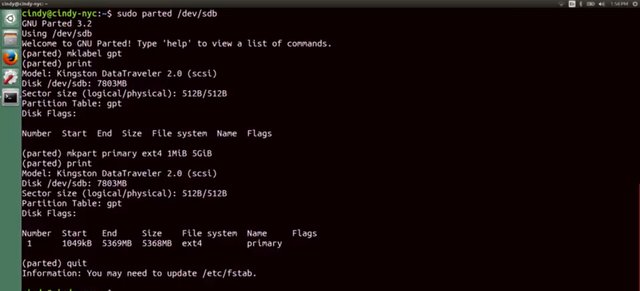
And I want to format the partition, so sdb1. We also left the rest of the disk unpartitioned because we're going to use it for something else later.
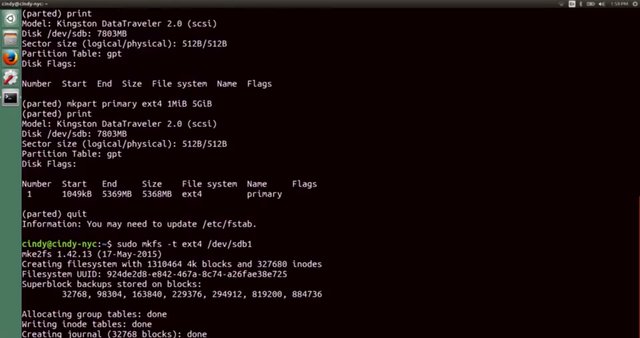
With that, we've created a partition and formatted a file system on a USB drive. Remember to always be careful when using the parted tool. It's very powerful and if you modify the wrong disk on here it could cause a pretty big mess. Even though we've partitioned our disk and formatted a file system on here, we're not actually able to start reading and writing files to it just yet. There's one last step to get a usable disk in Linux. We have to mount the file system to a directory so that we can access it from the shell.
5 . Linux: Mounting and Unmounting a Filesystem
To begin interacting with the disk, we need to mount the file system to the directory.
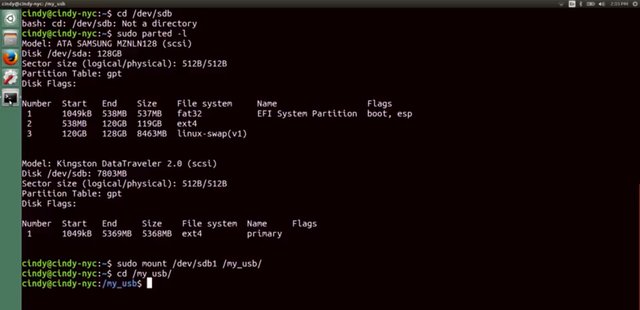
You might be thinking, why can't we just cd into /dev/sdb? That's the disk device, isn't it?
It is, but if we try to cd into /dev/sdb like this
We'd get an error saying the device is not a directory, which is true. To resolve this, we need to create a directory on our computer and then mount the file system of our USB drive to this directory.
Let's pull up where our partition is with sudo parted -l. Okay, I can see that partition that we want to access is /dev/sdb1. I've created a directory already under root called my_usb. So let's give this a try. So sudo mount /dev/sdb1 /my_usb/. Now if we go to my_usb, we can start reading and writing to the new file system.
We actually don't need to explicitly mount a file system using the mount command. Most operating systems actually do this for us automatically, when we plug in a device like a USB drive.
File systems have to be mounted one way or the other, because we need to tell the OS how to interact with the device. We can also unmount the file system in a similar way using the umount command. Unmounting is the opposite of mounting a disk. So now let's unmount the file system. I can either use sudo umount /my_usb, or sudo umount /dev/sdb1. Both will work to unmount a file system. When you shut down your computer, disks that were mounted manually are automatically unmounted. In some cases, like if we were using a USB drive, we just want to unmount the file system for the USB drive without shutting down.
Always be sure to unmount a file system of a drive before physically disconnecting the drive. In the case of the USB drive, we can run into some interesting file system errors if we don't do this. We'll talk more about this in the upcoming lesson. Also, keep in mind that we when we use the mount command to mount a file system to a directory, once we shut off the computer, the mount point disappears.
We can permanently mount a disk though if we needed to automatically load up when the computer boots.
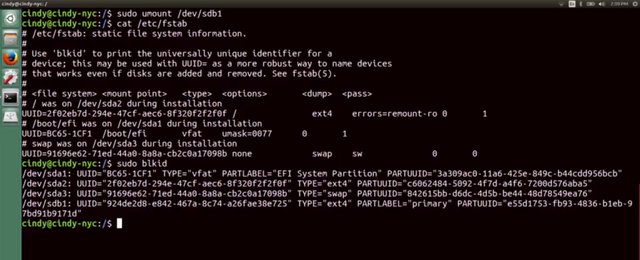
To do this, we need to modify a file called /etc/fstab. If we open this up now, you'll see a list of unique device IDs, their mount points, what type of file system they are, plus a little more information.
If we want to automatically mount file systems when the computer boots, just add an entry similar to what's listed here.
Let's go ahead and do that really quickly.
The first field that we need to add for /etc/fstab is the UUID or universally Unique ID of our USB Drive. To get the UUID of our devices we can use this command, sudo blkid. This will show us the UUID for block device IDs, aka storage device IDs, and that's it. We've covered a lot of essential disk management tasks. So far we've partitioned a disk, added a file system, and mounted it for use. If you're curious and want to learn more about the /etc/fstab file and its options, check out the next supplemental reading. Otherwise, let's move on
6. Windows: Swap
One term you might have heard in relation to disks and partitions, is swap space. Before we talk about swap space, let's talk about the concept of virtual memory. Virtual memory is how our OS provides the physical memory available in our computer (like RAM) to the applications that run on the computer. It does this by creating a mapping, a virtual to physical addresses. This makes life easier for the program, which needs to access memory since it doesn't have to worry about what portions of memory other programs might be using. It also doesn't have to keep track of where the data it's using is located in RAM. Virtual memory also gives us the ability for our computer to use more memory than we physically have installed. To do this, it dedicates an area of the hard drive to use a storage base for blocks of data called pages. When a particular page of data isn't being used by an application, it gets evicted. Which means it gets copied out of memory onto the hard drive. This is because accessing data on RAM is fast, much faster than the hard drive where space is at a premium. Because of this, the operating system wants to keep the most commonly accessed data pages in RAM. It then puts stuff that hasn't been used in a while on the disk.
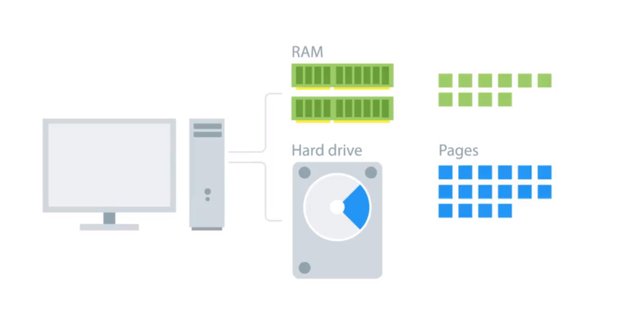
This way, if a program needs a page that's not accessed a lot, the operating system can still get to it. But it has to read it from the comparatively slow hard drive and put it back into memory. Almost all operating systems use some kind of virtual memory management scheme and paging mechanism. So how does it work on windows? The Windows OS uses a program called The Memory manager to handle virtual memory. Its job is to take care of that mapping of virtual to physical memory for our programs and to manage paging. In Windows, pages saved to disk are stored in a special hidden file on the root partition of a volume called page file dot sis. Windows automatically creates page files and it uses the memory manager to copy pages of memory to be read as needed. The operating system does a pretty good job of managing the page file automatically. Even so, windows provides a way to modify the size, number and location of paging files through a control panel applet called System Properties. You can get to the system properties applet by opening up the control panel.
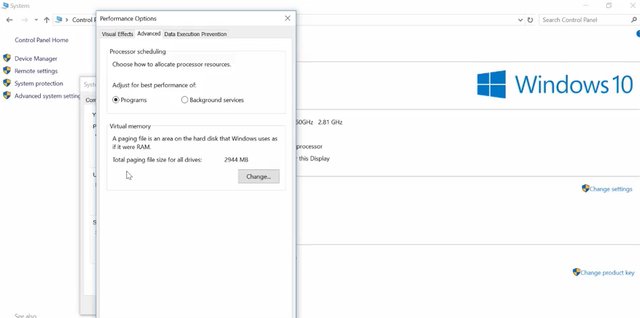
Going to the system and security setting, and clicking on system. Once in the system pane, you can open up the advanced system settings on the left hand menu.
Pick the advanced tab, then click on the settings button in the performance section. One last time, click on the advance tab and you should see a section called virtual memory which displays the paging file size. If you click the change button, you can override the defaults Windows provides, so you can set the size of the paging file, and add paging files to other drives on the computer. Microsoft has some guidelines for setting the page in file size that you can follow. For example, on 64 bit Windows 7, the minimum paging file size should be set to 1x, the amount of RAM in the machine. Unless you have a specific reason to change it, it's generally fine to let windows automatically manage the paging file size itself.
7. Linux: Swap
In Linux, the dedicated area of the hard drive used for virtual memory is known as swap space. We can create swap space by using the new disk partitioning tools that we learned. A good guideline to use to determine how much swap space you need is to follow the recommended partitioning scheme in the next supplementary reading. In our case, since we just have a USB drive which doesn't need swap, we're just going to partition the rest of it as swap to show you how this works. In practice, you would create swap partitions for your main storage devices like hard drives and SSDs. Okay. Let's make swap space. First, go back into the parted tool and select /dev/sdb, where our USB is. We're going to partition it again this time to make a swap partition. And then we'll format the Linux dash swap file system on it. So, mkpart primary Linux swap 5 gibibytes 100 percent. You'll notice that the end point of the drive says 100 percent which indicates that we should use the rest of the free space on our drive. We're not done yet. Swap isn't actually a file system, so this command won't be enough. I know I'm sorry, I just lied to you like five seconds ago. If you think about it, it makes a lot of sense since pages go into swap and not file data. Anyways, to complete this process, we need to specify that we want to make it swap space with the mkswap command. Let's quit out of parted and run this command on a new swap partition. So, sudo mkswap dev, and our new swap partition is on dev sdb2. Finally, there's one more command to run to enable swap on the device, swapon. So, sudo swapon dev sdb2. If we want to automatically mount swap space every time the computer boots up, just add a swap entry to the /etc fstab file like we did earlier.
For more information about swap, please check out the link here.https://access.redhat.com/documentation/en-US/Red_Hat_Enterprise_Linux/6/html/Installation_Guide/s2-diskpartrecommend-ppc.html#id4394007
8. Windows: Files
Now that we've gone a few practical things out of the way with disk partitioning and file system creation, we can talk about concepts for a bit. Remember when we talked about how our OS handles files? It actually manages the actual file data, file metadata, and file systems. We've already covered file systems. In this , we're going to cover the file data and file metadata. When we talk about data, we're referring to the actual contents of the file; like a text document that we saved to our hard drives. The file metadata includes everything else, like the owner of the file, permissions, size of the file, it's location on the hard drive, and so on. Remember that the NTFS file system is the native file system format of windows. So how exactly does NTFS store and represent the files we're working with on our operating system? NTF uses something called The Master File Table or MFT to keep everything straight. Every file on a volume has at least one entry in the MFT, including the MFT itself. Usually, there's a one-to-one correspondence between files and MFT records. But if a file has a whole lot of attributes, there might be more than one record to represent it. In this context, attributes are things like the name of a file, it's creation time stamp, whether or not a file is read-only, whether or not the file is compressed, the location of the data that the file contains, and many other pieces of information.
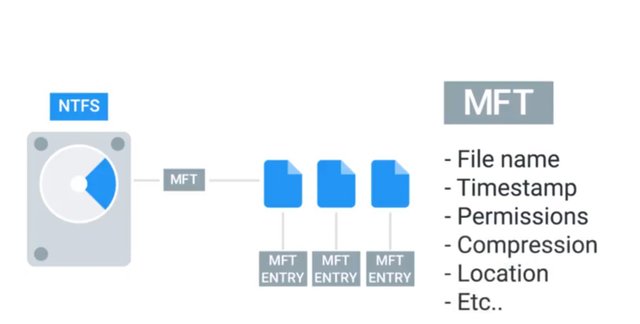
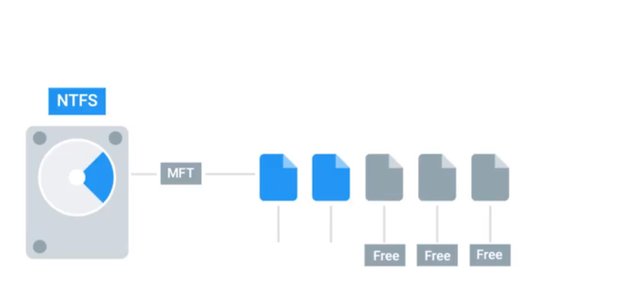
When you create files on an NTFS file system, entries get added to the MFT. When files get deleted, their entries in the MFT are marked as Free so they can get reused.
 One important part of a file's entry in the MFT is an identifier called the file record number. This is the index of the files entry in the MFT. A special type of file we should mention in Windows is called a shortcut. A shortcut is just another file and another entry in the MFT. But it has a reference to some destination, so that when you open it up, you can get taken to that destination. You can create a shortcut by right-clicking on the target file and selecting the Create Shortcut option.
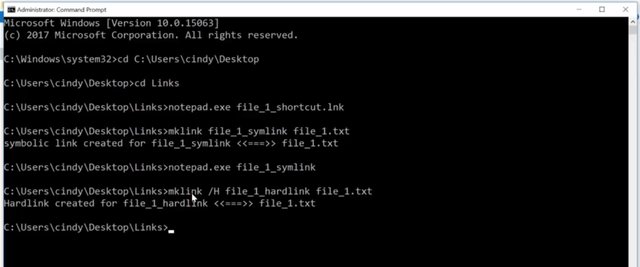
There it is. Besides creating shortcuts as ways to access other files, NTFS provides two other ways using hard and symbolic links. This might get a little weird but stay with me. Symbolic links are kind of like shortcuts but at the file system level. When you create a symbolic link, you create an entry in the MFT that points to the name of another entry or another file. This might seem like just another way to make a shortcut but symbolic links have a key difference. The operating system treats them like substitutes for the file they're linked to in almost every meaningful way. This is the part that sounds strange. So, let's demonstrate. Let's create a directory on the desktop called Links.
Inside of it, we'll create a text file called file_1.
And inside of that, let's add the word, Hello! And then, let's make a shortcut that points this file called file_1 - Shortcut.
Next, let's open up a command prompt and navigate to this directory.
Let's try to open up file_1 through its shortcut with Notepad. What do you think will happen?
If you expect the Notepad to display, Hello! Then you'd be disappointed. Instead, notepad opened up the shortcut file which has some text in there that isn't readable by us. Instead of a shortcut, let's create a symbolic link. You can create symbolic links with the Make Link program from the command prompt. Let's make one called file_1_symlink with the following command and then open it up a Notepad and see what happens. All right, let's open it up in Notepad. This is what we mean when we say the operating system treats the symbolic link just like the original file. There's another type of link worth mentioning called a hard link. When you create a hard link in NTFS, an entry is added to the MFT that points to the linked file record number, not the name of the file. This means the file name of the target can change and the hard link will still point to it. You can create hard links in a way that's similar to symbolic links, but with the /H option. So mklink /H file_1_hardlink file_1. Since a hard link points out the file record number and not the file name, you can change the name of the original file and the link will still work.
9. Linux: Files
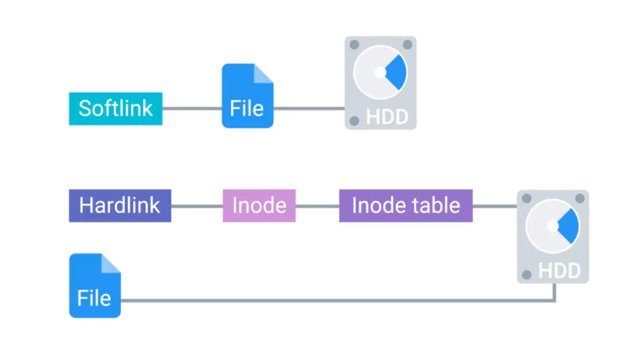
In Linux, metadata and files are organized into a structure called an inode. Inodes are similar to the Windows NTFS MFT records. We store inodes in an inode table and they help us manage the files on our file system. The inode itself doesn't actually store file date or the file name, but it does store everything else about a file. In the last lesson, we learned how to create file shortcuts, symbolic links, and hardlinks in Windows. Well in Linux we have the same concept. Shortcuts in Linux are referred to as softlinks, or symlinks. They work in a similar way symbolic links work in Windows, in that they just point to another file.
Softlinks allow us to link to another file using a file name. They're great for creating shortcuts to other files.
The other type of link found in Linux are hardlinks. Similar to Windows, hardlinks don't point to a file. In Linux, they link to an inode which is stored in an inode table on the file system.
Essentially, when you're creating a hardlink, you're pointing to a physical location on disk or more specifically on the file system.
Essentially, when you're creating a hardlink, you're pointing to a physical location on disk or more specifically on the file system.
But if you deleted a file of a hardlink, all other hardlinks would still work.
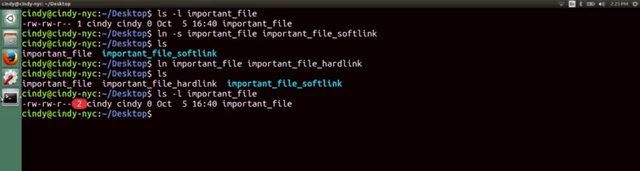
Let's actually see where hardlinks are referenced. If we did an ls-l on this file, important_file,
You'll notice the third field in the details, this field actually indicates the amount of hardlinks a file has. When the hardlink count of a file reaches zero, then the file is completely removed from the computer.
To create a softlink, we can run the command ln with the flag -s for softlink. So ln-s important_file important_file_softlink.
To create a hardlink, we can run the ln command without the -s to specify a hardlink. So ln important_file important_file_hardlink.
Now, if we check ls-l important_file, we'll see that the hardlink count was increased by one.
Hardlinks are great if you need to have the same file stored in different places, but you don't want to take up any additional space on the volume.
This is because all the hardlinks point to the same space on the volume. You could use softlinks to do the same thing. But what if you moved one file, broke the softlink, and forgot about all the other places that you used it? Those would be broken too and may take some time to clean up. You may not see a use for making your own softlinks or hardlinks right now, but they are used all throughout your system, so you should be aware how they work.
10. Windows: Disk Usage
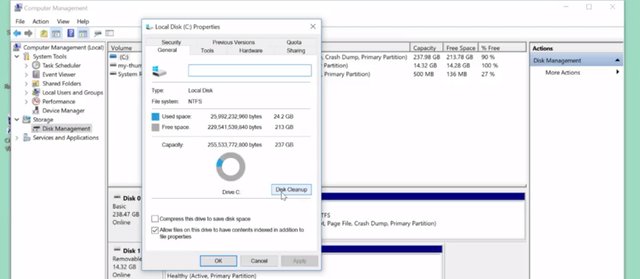
Now that we've taken a good, hard look at files in different file systems, let's turn our attention to how we can monitor the number and size of those files in Windows. You seen how there are loads of third party programs out there to partition and format discs on Windows. Well, there are also lots of applications you can download that can check and visualize disk usage on a Windows machine. But you can use the disk management council we examined in an earlier lesson to get a sense of your disk capacity usage. To check disk usage, you can open up the computer management utility. Then head to the disk management console. From there, right click on the partition you're interested in and select properties.
This will bring up the general tab where you can see the used and free space on the drive. In addition to using this graphical user interface to check the disk usage, Windows provides a command line utility called disk usage as part of it system internal tool offering. That DU utility can print out the usage of a given disk and tell you how many files it has. It can be useful for creating scripts which might need text based output instead of visual reports like the pie chart in disk management. You can find a link to the DU tool in the next supplemental reading. On the same tab in the disk management console, you might notice a button that says disk cleanup. If you press this button, Windows will launch a program called CleanManager.exe which will do a little housekeeping on your hard drive to try and free up some space.
This housekeeping includes things like deleting temporary files, compressing old and rarely used files, cleaning up logs and emptying the recycle bin. Another task related to disk health is called defragmentation. The idea behind disc defragmentation is to take all the files stored on a given disk and reorganize them into neighboring locations. Having files ordered like this will make life easier for rotating hard drive disks that use an actuator arm to write to and read from a spinning disk. The head of the actuator arm will actually travel less to read the data it needs. I should call out that this is less of a benefit for solid state drives since there's no physical read write head that needs to move around a spinning disk. For these kinds of drives, the operating system can use a process called Trim to reclaim unused portions of the solid state disk. We won't go into details of how trim works but it's good to know that exists. I've included a link to more information on trim in the reading. Defragmentation in windows is handled as a scheduled task. Every so often the operating system will defragment the drive automatically and you don't need to worry about it but you can manually defragment a drive in Windows if you want to. To kick off a manual defragmentation, open up the disk defragmenter tool bundled with the OS. Type disk defragmenter.
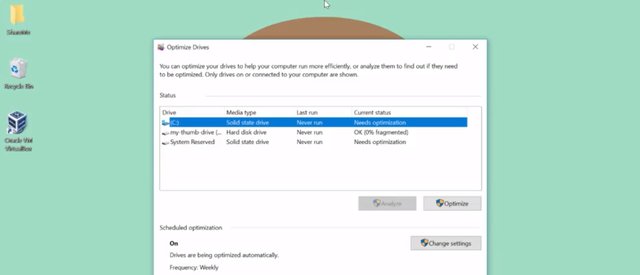
When it launches, you'll be given a list of disks which can be defragmented along with buttons to analyze the potential gains from running a defrag or defragmentation and to run the defrag itself.
For more information about disk usage in Windows, check out the following links: Disk Usage, How to start Disk Cleanup by using the command line.https://docs.microsoft.com/en-us/sysinternals/downloads/du
https://support.microsoft.com/en-us/help/181701/how-to-start-disk-cleanup-by-using-the-command-line
11. Linux: Disk Usage
In the last lesson, we saw how to view the disk utilization on your computer in Windows. In Linux, we do this using the du -h command.
The du or disk usage command shows us the disk usage of a specific directory. If you don't specify a directory, it'll default to your current one.
The -h flag gives you the data measurements in human readable form. You should use the du command if you want to know how much data space is being used by files in a directory.
Another command you can use if you want to know how much free space you have on your machine is the df command, or disk free.
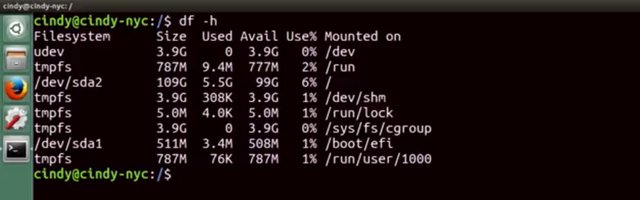
This shows you the free space available on your entire machine. The -h flag gives you the data measurements in human readable form.
You should use the df command if you want to know how much free space you have on your entire system.
You might have noticed that we didn't really touch on file system defragmentation for Linux. Linux generally does a good job of avoiding fragmentation more than Windows. We won't get into this in depth, but you can learn more in the next supplemental reading. In common IT scenarios, you might find yourself running low on disk space.
It's up to you to investigate what files and folders are taking up space, and if you need to, to remove these files. As always, make sure to be super careful when removing files.
To learn more about why Linux doesn't need defragmentation, check out the article here.https://www.howtogeek.com/115229/htg-explains-why-linux-doesnt-need-defragmenting/
12. Windows: Filesystem Repair
In an earlier lesson, we talked about the dangers of unplugging a USB device without ejecting or unmounting it from the computer. You might have seen error messages like this yourself, when the system alerts that you must safely eject this flash drive. Why do we need to do this? When we copy over files to a flash drive and we see that the file copied successfully, why can’t we just unplug the drive without unmounting or hitting the eject button in the OS? Turns out, it may not be finished copying over that data. It's not just yelling at us for fun. When we read or write something to a drive, we actually put it into a buffer, or cache, first. A data buffer is a region of RAM that's used to temporarily store data while it's being moved around. So when you copy something from your OS to your USB drive, it first gets copied to a data buffer because RAM operates faster than hard drives.
So if you don't properly unmount a file system and give your buffer enough time to finish moving data, you run the risk of data corruption.
Data corruption could happen for lots of reasons, other than unsafely removing a disk drive.
Let's say you're working on your computer and the power to the building went out, causing your computer to suddenly shut off. This kind of crash also causes data corruption. System failure or software bugs can cause data corruption as well. The NTFS file system has some advanced features built into it that can help minimize the danger of corruption, as well as, try to recover when the file system does get damaged.
One of these features, through a process called journaling, logs changes made to a file metadata into a log file called the NTFS log.
By logging these changes, NTFS creates a history of the actions it's taken. This means it can look at the log to see what the current state of the file system should be.
If a crash or bug does cause corruption, the file system can initiate recovery process that will use that log to make sure the system is in a consistent state.
In addition to journaling, NTFS and Windows implements something called self-healing. As you might guess from the name, the self-healing mechanism makes changes to minor problems and corruptions on the disk automatically in the background. It does this while Windows is running so you don't need to perform a reboot.
If you want to check the status of the self-healing process on your computer, you can open up an administrative command prompt and use the fsutil tool, like this.
Fsutil repair query, and I want to query my C drive.
Finally, when things get really bad and there's some serious or catastrophic disk corruption, like bad disk sectors, disk failures, and more, you can turn to the NTFS check disk utility. The recovery features NTFS has built into it mean that you don't usually need to run check disc. But it's available in emergencies. To run check discs manually, you can open up an administrator command prompt and type check disc onto the command line. By default, check disc will run in read-only mode. So it'll give you a report on the health of the disk, but won't make any modifications or repairs to it. You can tell check disk to fix any problems it finds with the /F flag. You can also specify the drive you want to check like this. chkdsk/F I'm going to check my thumb drive, which is on the D.
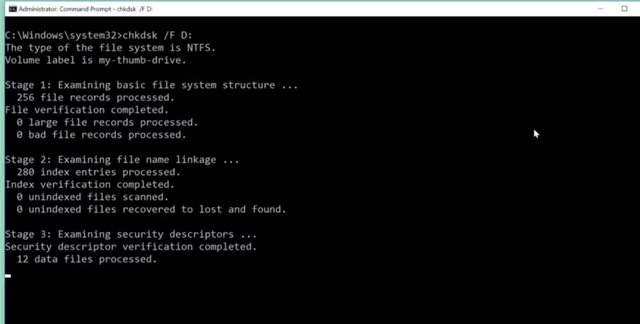
A lot of times, you won't need to run check disc manually, though. If the operating system detects that some data's been corrupted or that the disc has a bad sector, it'll set a bit in a metadata file on the volume that indicates there's corruption. When the system boots, the check disk utility will check this bit. If it's set, it'll execute and try to repair the corruption by reconstructing the broken bits of the file system from the NTFS log. As you can see, the Windows NTFS file system has some pretty robust measures and features in place to recover and prevent corruption from breaking your partitions. Next, let's have a look at how you can perform file system repairs in Linux.

13. Linux: Filesystem Repair
To try and repair a file system manually in Linux you can also use the fsck or file system check command.
Just make sure the file system isn't mounted. I won't run this command, but this is what it would look like.
If you run fsck on a mounted partition, there's a high chance that it'll damage the file system. File system repair isn't always a guaranteed fix, but it can help in most cases. Just be nice to your hardware and it will be nice to you, in most cases.

Another thing to call out is that on in some versions of Linux, fsck actually runs on your computer when you boot it to check for any issues and attempt to auto-repair the file system. You can learn more about how to enable this and about some advanced features that you can use with fsck in the next supplementary reading. We've covered a lot of essential disk management and filesystem concepts in this lesson. You learned how to partition a disk, how to format a file system, and how to mount a file system.
We even talked about how you could repair a corrupt file system. In an IT support role, knowing how to work with disks is essential. Your customers store their precious data on these disks. And they don't want to lose those photos of their children, important presentations, their collection of music, or whatever it may be.
Knowing how to work with disks and the data on them is a vital part of an IT role.

To Join this course click on the link below
Google IT Support Professional Certificate http://bit.ly/2JONxKk
LInks to previous weeks Courses.
[Week 3] Google IT Support Professional Certificate #17 || Course 3 WEEK 3 Operating Systems and You: Becoming a Power User{Part 1}
http://bit.ly/2AYxJ8Z
[Week 2] Google IT Support Professional Certificate #16 || Course 3 WEEK 2 Operating Systems and You: Becoming a Power User
http://bit.ly/2nhSKBA
[Week 1] Google IT Support Professional Certificate #15 || Course 3 WEEK 1 Operating Systems and You: Becoming a Power User {Part 2}
http://bit.ly/2naOweX
[Week 1] Google IT Support Professional Certificate #14 || Course 3 WEEK 1 Operating Systems and You: Becoming a Power User {Part 1}
http://bit.ly/2M4pn3C
[Week 6] Google IT Support Professional Certificate #13 || Course 2 WEEK 6 Troubleshooting and the Future of Networking
http://bit.ly/2O1750T
[Week 5] Google IT Support Professional Certificate #12 || Course 2 WEEK 5 Connecting to the Internet
http://bit.ly/2AskNrx
[Week 4] Google IT Support Professional Certificate #11 || Course 2 WEEK 4 Networking Services
http://bit.ly/2LGQrpN
[Week 3] Google IT Support Professional Certificate #10 | Course 2 WEEK 3 Peer-graded assignment|
http://bit.ly/2JRgzJy
[Week 3] Google IT Support Professional Certificate #9 | Course 2 WEEK 3 The Transport and Application Layers |
http://bit.ly/2NEphwQ
[Week 2] Google IT Support Professional Certificate #8 | Course 2 WEEK 2 The Network Layer
http://bit.ly/2v4FqnN
[Week 1] Google IT Support Professional Certificate #7 | Course 2 WEEK 1 The Bits and Bytes of Computer Networking
http://bit.ly/2LJsg6G
[Week 6] Google IT Support Professional Certificate #6 | | Course 1 WEEK 5 Troubleshooting | A Moral Week
http://bit.ly/2Ll866U
[Week 5] Google IT Support Professional Certificate #5 | Course 1 WEEK 5 Software | All basic knowledge about software.
http://bit.ly/2NIWebL
[Week 4] Google IT Support Professional Certificate #4 | |Course 1 WEEK 4 Networking | All basics about networking.
http://bit.ly/2mFsbWJ
[Week 3] Google IT Support Professional Certificate #3 | | Course 1 WEEK 3 Operating System | Installing Windows & Linux.
http://bit.ly/2OglOWH
[Week 2] Google IT Support Professional Certificate #2 | | [Google + Coursera] Course 1.Hardware | The main components & how to assemble these
http://bit.ly/2LJALPi
[Week 1] Google IT Support Professional Certificate #1 | | WEEK 1 Introduction to IT | Kevin Limehouse | An overall View
http://bit.ly/2OerzUI
Google IT Support Professional Certificate #0 | Why you should do this Course? | All details before you join this course.
http://bit.ly/2Oe2t8p
#steemiteducation #Computerscience #education #Growwithgoogle #ITskills #Linuxcommands #powershell #googleitsupportprofessional
Atlast If you are interested in the IT field, this course, or want to learn Computer Science. If you want to know whats in this course, what skills I learned Follow me @hungryengine. I will guide you through every step of this course and share my knowledge from this course daily.
Support me on this journey and I will always provide you with some of the best career knowledge in Computer Science field.
.gif)
Hello hungryengine!
Congratulations! This post has been randomly Resteemed! For a chance to get more of your content resteemed join the Steem Engine Team
Good one bro. Thanks for sharing, this is exactly what i need, this is a timely post. Thanks a million.
Welcome bro follow me so that you will get updates for this.