Tie-Dye Project: An Awesome Gift Idea For Father's Day
I’m obsessed with tie-dying things, in fact, I drive my hubby nuts because I colour everything I get my hands on, from old shirts, tablecloths to soft toys and cushion covers. It’s safe to say that my looks like it came straight out of 60s and has a hippie-like appeal, he he! Anyway, this Father’s Day I am on a super strict budget, so my tot and I had to brainstorm and come up with a gift that we could make at an affordable cost. I have tons of blue tie-dye left over from a previous project so I decided to by a plain white shirt from one of our cheaper clothing stores (cost me 30 rand) and with a little bit of innovation, my kiddo and I created this designer-wear masterpiece.
I thought that I would share my idea with you guys, perhaps I can inspire you to make one as a gift for your loved ones too, doesn’t have to be made for Father’s Day, although that is coming up quite soon!
LEARN HOW TO TIE-DIE A SHIRT
- Prepare your shirt or fabric by putting it on a rinse cycle in the washing machine. You want it to be slightly damp before continuing with the next steps.
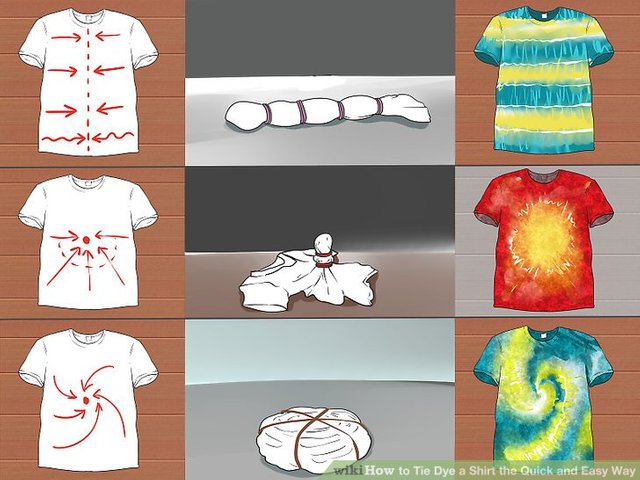
- Spread your garment to that it lies flat on a hard surface. Twist pieces of the fabric and then secure the twists with elastic bands or string. You can play around and fold your fabric into all sorts of shapes really, this will make a variety of tie-dye patterns.
- I prefer to use dyes that require hot water to be used, I find it works much better than other options. Fill a bucket with about four litres of very hot water, add the dye and mix (add salt to the water to help set the colour). If you are bleach dying coloured fabrics, simply add about 80ml bleach instead. I immerse the entire garment into the water and soak it for about an hour or until the water is cold.
- Take the garment out and drain the colour out under clean running water until it runs free of colour. Remove your rubber bands or string. (This is the fun part! This is where the SURPRISE pattern is first visible.) I put it on a spin cycle to dry it out a bit before hanging it up to dry outside.
- Once dry put it on a quick wash with some washing powder, leave it to dry again and iron.
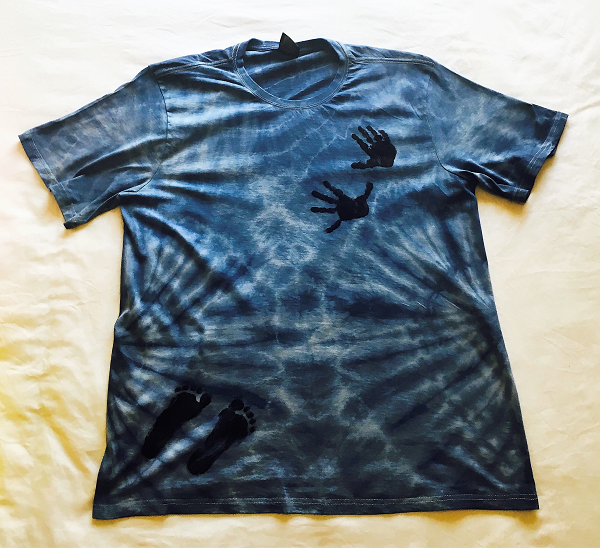
- You can then paint your little ones hands and feet with a non-toxic fabric paint and press them onto the garment, so that they have a lovely sentimental pattern!
Tie-dye Patter Ideas:
This activity can also be done with older students at school! I remember when I was a kid we tie-dyed our mess-kits at girl guides, it was so much fun and I even earned a creativity badge for it!