An Ethical Hackers Guide: Part 7 - Whonix-Tor Gateway. Anonymize Your Network Traffic
Hello Steemstemers, Utopians, Future Hackers and Crackers :]
%20(1).jpg)
.jpg)
As promised, today we will be getting into the process of Web Traffic Anonymization. Before I start showing you what or how, I'd like to take a moment to talk about some important Do's and Dont's when using the TOR Network to anonymity your traffic. Some of the greatest hackers of all times, have been caught due to one or more of the reasons within the following list.
Tor: Rules to Remember
Stay away from unencrypted(http) websites, particularly when disclosing sensitive information. Tor is only responsible for the routing of traffic, and therefore not the encryption. SSL, or TLS, are both secure methods of end to end encryption, that are enforced in most any HTTPS website. If you are boggled by this concept (http vs https), simply reply below and I will help.
NO Javascript, Flash, or Java! Ever. These are just insecure and vulnerable languages, with far too many ways to disclose your exact location. All of these languages within the browser, run with user privilege, (Who you are signed in to your computer as.), and are able to access file storage.
NO Torrents! Tor is not designed to be run with the P2P Network that uTorrent or other clients run on. BitTorrent and the like of them, are all designed to share your exact IP address with the other users.
Cookies, and Local Data. ALWAYS clear all Cookies and Local Browsing data every time you are changing "Locations" or nodes.
Google = Bad. Use DuckDuckGo.com. They store no user information.
Obvious I would hope, but NEVER ever sign in to any account that is previously tied to you. When using Tor, always ensure to create a new account from a secure location. Be careful with accidental sign ins. This is why we use tor through a VM, that we will never use for anything besides hacking, and which we can delete once we are done.
_.png)
Gateway Setup
So, now that we are in the meat of it, lets talk about what were actually going to do here. We will be doing something somewhat similar to the process in Part 3 of my Ethical Hacking Guides, only this time, we will be creating a different type of Virtual Machine. (While you're reading, download the Whonix Gateway with the previous link.)
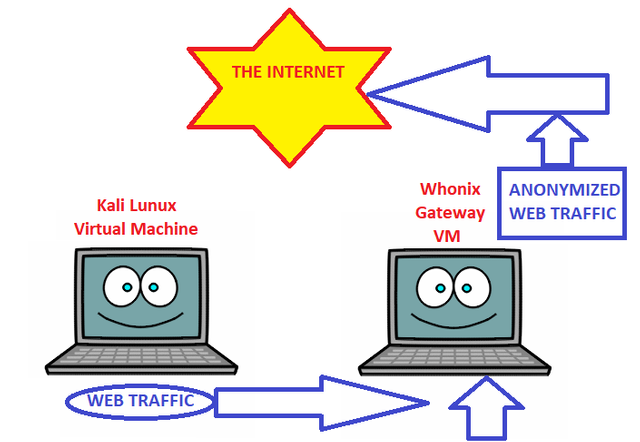
This time around. we will be creating what is know in the industry, as a 'Whonix Gateway'. A Whonix Gateway, is a virtual machine that we will be routing all of the traffic from our Crack-box(Kali VM's) through. Whonix, is a system designed to ONLY connect through the Tor network, thus when we route traffic through it, said traffic will act the same.
Simply put, once we have this system set up, and are using it appropriately, all web traffic, that leaves your Kali Virtual Machine, will be forced through your Internal Whonix Gateway, further forcing said traffic through the Tor Network. With this system, there is almost no chance for any kind of leaks. Any traffic that does not make it to the whonix gateway, would simply be lost in the local net, with no chance of eavesdropping from an ISP. With that being said, This is not a Be-All-End-All method of anonymity, however it provides a very functional base, and most things can be accomplished at this level.
One thing I like to keep in mind, getting caught, largely depends on how powerful a person you have pissed off. My suggestion - Keep things ethical, and you should always be okay.
Now then, the file I had you download, is a Virtual Box file of the Whonix Gateway. Yes that's right, we are downloading a computer lol. Once the file has completed downloading, I will ask anyone following along to start up your Virtual Box now, and by that I mean simply the main menu.
Gateway Creation
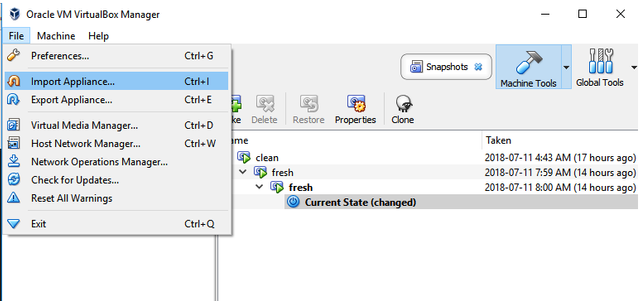
This is actually a fairly simple setup. The first thing we will be doing, once we have our virtual box programs open, is going to 'File > Import Appliance' through the top menu bar of the program.
Screenshot)
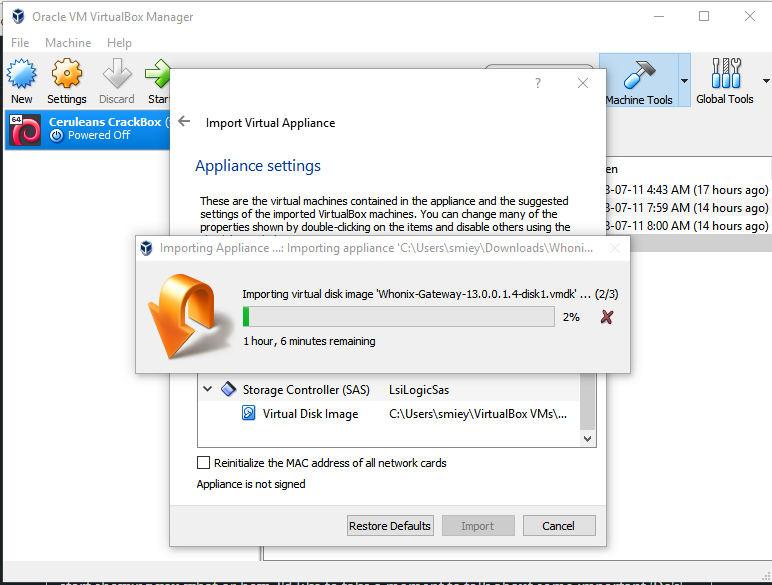
Once you select this option you will be brought to a popup, and asked to select the appliance you would like installed. Now find the .ova file I had you download, and open that here. This will bring you to a next page with a bunch of configuration options. Nothing NEEDS to be changed here. For now, simply 'okay' your way through the installation. The steps are quite short, however your computer will spend the next little while 'importing' the appliance. (Importing does not take anywhere near an hour.)
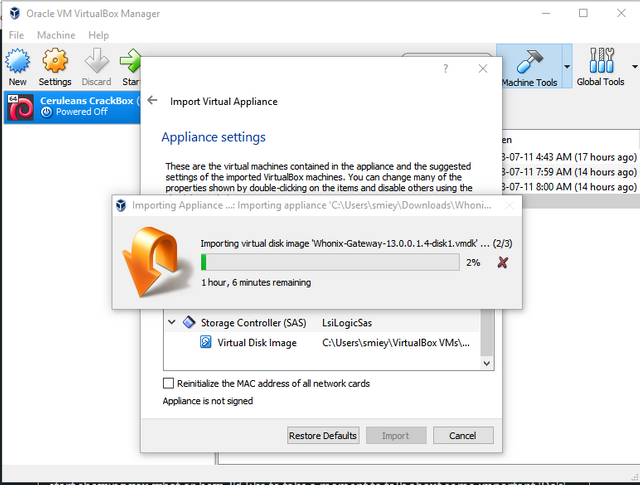
Screenshot
This process doesn't generally take more than twenty minutes. Once the Gateway has been imported, you will be presented with your VirtualBox Home Screen, only now there will be a new device there for you to use. For the next step, we will need to power on and update our system, so lets get that going now. Press the green 'start' arrow, with the Whonix Gateway machine selected.
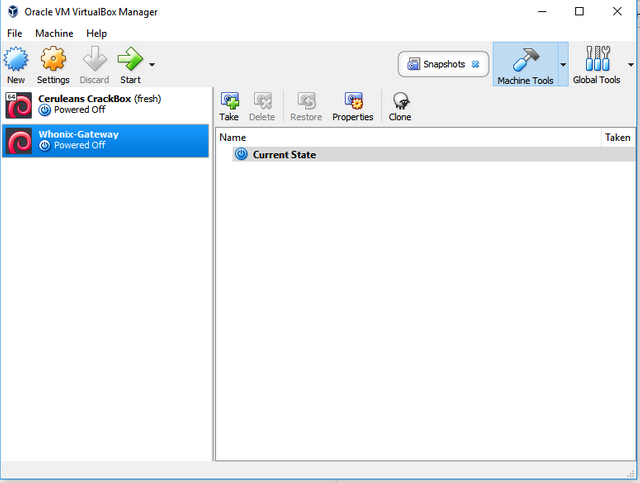
Screenshot
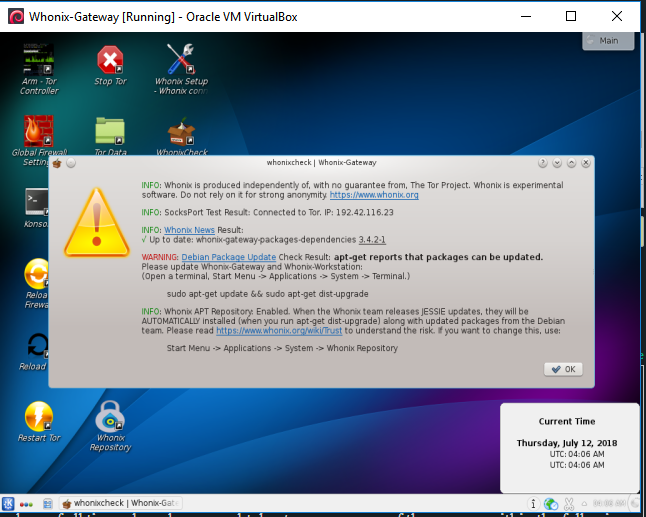
This will begin the start-up process for your machine. Once the Desktop has loaded, you will be presented with a few informational pages, as well as an option about when to connect to TOR. Most of you should be able to get away with simply selecting 'I am ready to enable Tor' However if you are living in heavily censored areas, you may need more help, which I will always be happy to provide in the comments below :)
The next page, will ask you if you would like to install updates now, which is something we definitely want to do. When asked which repository to use, you will select the 'Whonix Stable Repository', and select Next. Once you select 'Finish' on the next page, the system will do something called a 'Whonix Check', and basically ensure that your connection to the Tor Network is solid.

Screenshot
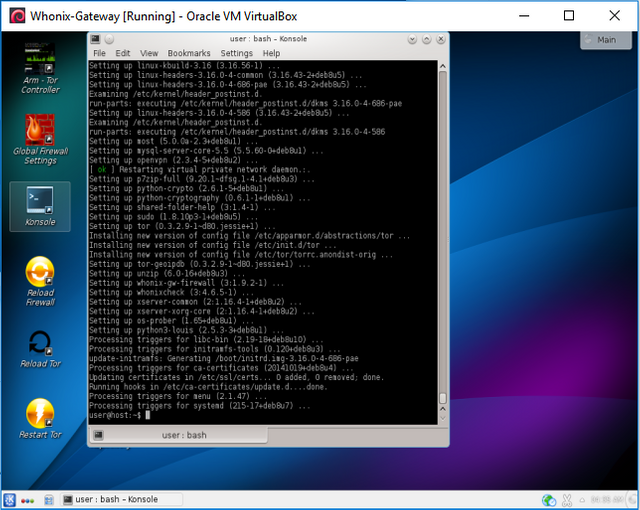
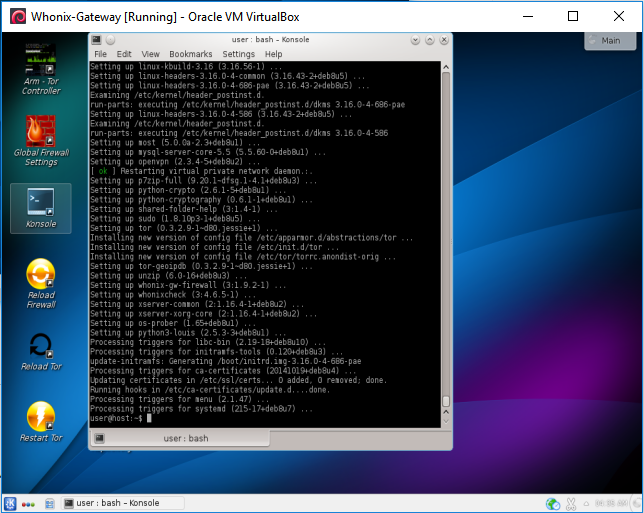
As you might be able to tell from the above image, and as is common after a fresh OS Installation, though we have connection to the Tor Network, we are advised to update our software. So, just like with Kali, lets do that now. The code you will need to run may seem a bit familiar. As I told you previously, the code is fairly similar across distributions. Enter the following lines, into a Whonix 'Konsole' now.
sudo apt-get update && sudo apt-get dist-upgrade
As you might remember from before, 'sudo' is a term used to assume administrator rights. The Administrator account on Whonix, is 'user' and the password, is 'changeme' and you really should, before you start doing anything sketchy. Once update has found all available packages to update, you will need to enter 'Y' for yes, so as to finish installing them.
This process will take another little while, though like most of the installation steps in these guides, you will only need to do them once, or at least once per machine. Once you have gotten through this, you're Konsole (Terminal) will stop moving, and yours will look quite similar to mine below.
Screenshot
At this point, we will close or terminals, and click on the 'X' to send a shutdown signal to our VM. Not to worry, as all of our updates are fully installed, and we are now simply restarting the system. Allow the system to shut down properly, and then power it back up. Once in, we will be doing one last 'Whonix Check', so as to ensure that we are still connected to the Tor Network, after all of these updates have been installed.
When you have reached the Desktop, and all is done loading, double click on the 'Whonix Check' Icon, and lets see how we're doing. The process will span a loading bar, and check everything that needs checking on, the process of which will take ~3 minutes. Once finished, the red 'x' from earlier, should now be a green checkmark :)

Screenshot
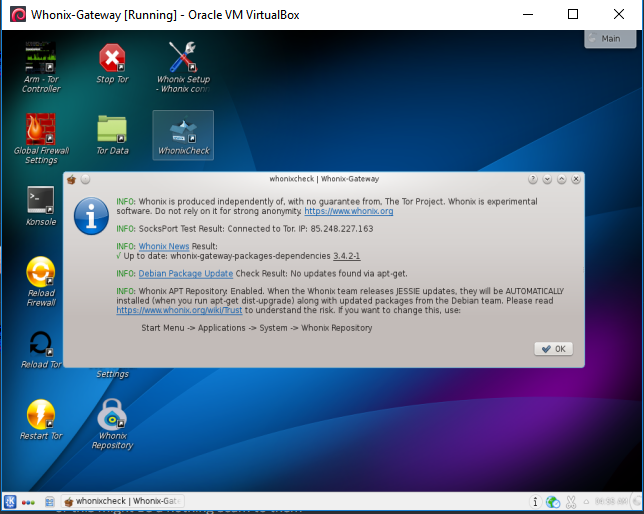
This ensures us that we have a strong, secure connection to the Tor Network, so we will now finish the last few steps. Remember, this machine is only acting as our gateway. It is in essence, a router within our computer. This machine will always be running, at least while we have our Kali Crackbox active.
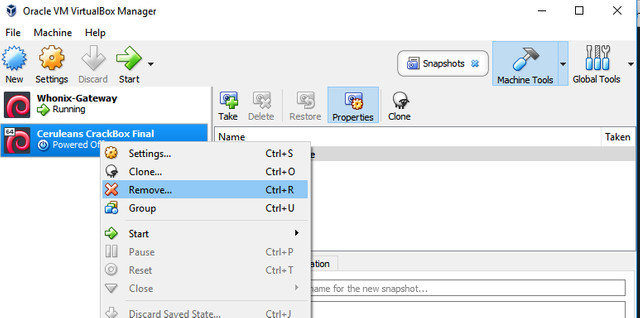
Delete My Kali VM?
This is the part where I must say I hate to inform you, but we will have to back track a little bit. This is my fault, and I do apologize, but it seems that in this new version of Kali, there is a different method of configuration. It may seem painful, but the step to take now, is either to delete your original Kali Machine, or simply create a new one, if you would rather not lose the old VM.
It is unfortunate, but the configuration is completed during OS installation now, thus I should technically have put out this guide first. Whether you are deleting your old Kali (NOT Whonix) VM, or just creating another, the next step to take is simply re follow your steps through my last guide, part 5. Remember to update & upgrade your system as well.
Screenshot
I will not carry on with the kali VM installation, other than to say that this time,your network configuration will sort itself out during setup. Once you have run through installation, and the portions have completed formatting, we should be pretty much done. After all of this work, I would strongly advise you to take a snapshot of your VM, clean and secure, so that we can return quickly to this point in the future. Will show you how later on in this guide.
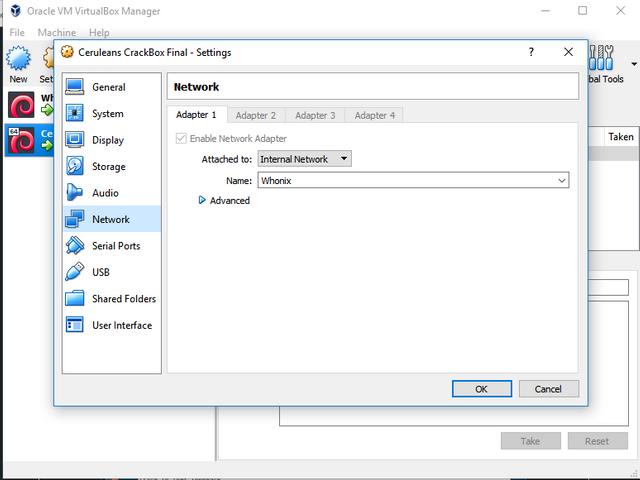
Now before we turn on our Kali VM's, select them, and then select settings in the top menu. Once in the settings page, go to 'Network' in the left side menu. Under 'Attached to:' select 'Internal Network', and under 'Name:' select 'Whonix'. As you might be able to imagine, right now we are telling our Kali VM to route all traffic through our Whonix Gateway. Select 'OK' and start your Kali VM up now.
Screenshot
Kali VM 2.0: Reinstallation
(Installation may take a little longer, simply due to the fact that we are now running off of the Tor Network, however, this makes me feel safer and is probably largely part of the reason they did this. So no downloads can be tied to your machine. Again, just my opinion there.)
Installation will 'break' giving you notifications about the DHCP Server, however, simply select configure my network, and find the IP address found in your Whonix Gateways terminal, when you enter the command 'sudo ifconfig' as well as the password 'changeme' which again, you really should lol. My IP given in Whonix, and yours should be similar, is '10.152.152.11', Netmask is '255.255.255.0', and Gateway IP should be set to '10.152.152.10'.

Screenshot
This is the hardest part, and where I'm sure some of you will have some trouble so again, never feel discouraged, just hit me up in the comments and we'll figure it out together. Once you have completed these steps properly, and the network accepts your device, installation will carry on and finish. You can not move forward using Whonix, without correctly associating your device to the network, so if you have past that page, you have done all you needed to do.
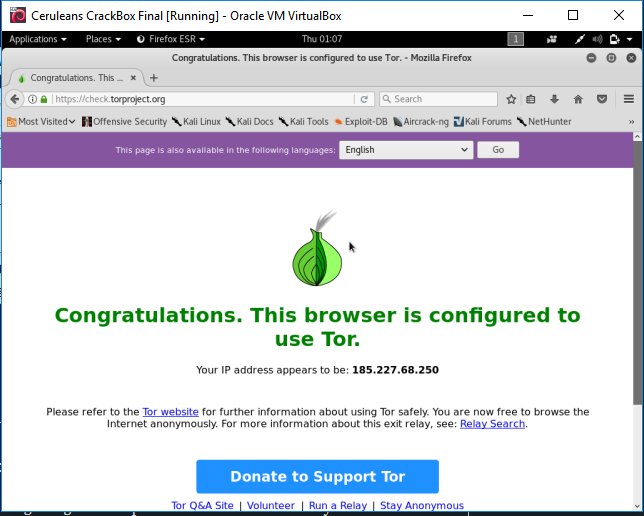
Once you the installation is finished, and you are sitting at your once again fresh Kali Desktop, We will do a final test to ensure we are finished, and secured. The last test, will be to open a browser, and head over to https://check.torproject.org, or you can check your IP Address at https://whatsmyip.com/.

Screenshot
As you can see from the above image, all steps have been completed, and our Kali Virtual Machine is no longer capable of communicating with the regular internet. Only the Tor Network from now on. Feel free to close out of here, but if you do ensure to save a snapshot when exiting. Aside from that - the world is your oyster now!
Feel free from preying governmental eyes, for they can see you no longer. Think about this for a second. You just created a machine with a near complete anonymous connection to the internet, and you're clearly a member of the most popular decentralized social network, Steemit :P Just think of all the things we can post now.
Again, you would not want to log in to YOUR Steemit account, as your probably browsing the platform from your home IP Address right now. I will consider doing a complete guide on using the Tor Network, however for now, just remember the things I've taught you, and you will be okay. I hope you all found this enjoyable, informative, and I am excited to see you all next time.
Happy Hunting,
Cerulean
@ceruleanblue yes that's why myetherwallet site is SSL certified and our assest is secure there :)
They also store your wallet offline so that's a plus :)