Who Says You Cannot Build Your Own Airplane? Series #11: Yo Nigga! You Don't Mess With Flight Instruments
How about I start by asking @StemNG guys how the meetup event went in the city of Lagos? Oh c'mon, I heard you guys did rock the event. I learned about how @eurogee refused to dance with @funmiakinpelumi and how @gentleshaid was being hugged by all the ladies that graced the event. I am loosing weight over missing this awesome event already. Work is really a silly thing you know... It got me tied up and my silly boss refused to grant me an off-day. I will pay him back, trust me.
Okay, enough of that already. Can we just take a look at a brief recap of our previous series for Steem and SBD sake!
Well, not just in flight, you have got to plan your movement especially when you are engaging in a cross-country travel. But yet, flight takes that more serious than any other means of transportation. I mean you have got to use the transverse locator projection with the scale of 1:500,000 to plan your route but before that, you have got to take present and anticipated weather, terrain distance and your competence as a pilot into account. Flight logs does not only help you with an organised record and schedule, it also reduces the possibility of forgetting important data and having to compute problems in flight.
You know what nigga, tis cannot take much of the time we have got here, check full post here.
Just joining us for the first time? Now I tell you what, I am going to fine you for that but first check out the previous series: Series 1 | Series 2 | Series 3 | Series 4 | Series 5 | Series 6 | Series 7 | Series 8 | Series 9 | Series 10.
Okay, let us be serious now. It is time to have a real cool discussion. On this series, you will be shown how basic instruments operate and how to read them. You will also learn when errors in reading may occur.
Pixabay image - (CCO Licensed)
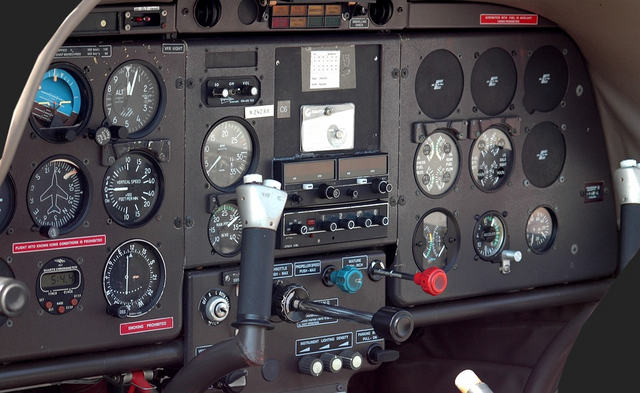
Categorisation Of The Aircraft Instruments
Aircraft instruments can be divided into three groups according to their functions. They are:
- Pitch instruments.
- Bank instruments.
- Power instruments.
The pitch instruments include the Attitude Indicator, the Altimeter, Airspeed Indicator and the Vertical Speed Indicator.
There are three bank instruments. The Attitude Indicator, the Turn & Bank Indicator and the Heading Indicator.
The two power instruments are the Tachometer and Airspeed Indicator.
Several of the instruments are connected to the Pitotic Static System. Others use the Gyroscope. Instruments connected to the Pitotic Static System include the Airspeed Indicator, Vertical Speed Indicator and the Altimeter. This system include a Pitot Tube and the Static Pressure Tube.
The Pitot Tube is usually found on the underside of the wing. It is located in the spot where it is clear of slipstream and other air disturbances. The opening of the tube faces the line of flight. As you are flying, the atmospheric pressure in the tube increases due to the movement of the aircraft through the air. The only instrument directly connected to the Pitot Tube is the Airspeed Indicator. The Airspeed Indicator is also connected to the Static Pressure Tube. Also connected to this line is the Altimeter and the Vertical Speed Indicator.
The Static Pressure Tube allows the atmospheric pressure to equalize during changes in altitude. There are usually two vents. An opposite side of the fuselage where they will not be affected by turbulence or air pressures. Having two vents also compensate for errors which might develop from a steep turn or rapid changes in attitude. Errors in the Pitot Static System can result if the Pitot tube is blocked by dirt, water or ice.
As part of your pre-flight check, the Pitot Tube and Static Point opening should be inspected to make sure they are clear. Many aircraft have electric heater system to prevent ice buildup in the Pitot Tube, all of these systems can fail. During a climb, a partly clear Pitot system will give you a lower than actual airspeed. It also causes a lower readings on the Vertical Speed Indicator and Altimeter.
In descent, the readings are exaggerated. This problem can be spotted while in flight if you have noticed the readings slowly catching up when you resume straight and level flight following a climb. If you ever suspect blockage of the Static System while in flight, open the Alternate Static Source found on most aircraft. If you notice a significant change in the position of the needles, there is a Static Pressure blockage. Also, always make sure that the Pitot Heat is on while icing is suspected. You can appreciate that a blockage of this System will be dangerous if you are flying in low cloud or high moisture conditions such as snow or rain.
Airspeed indicator
Wikimedia image - (Public Domain, Author: Cel 84)
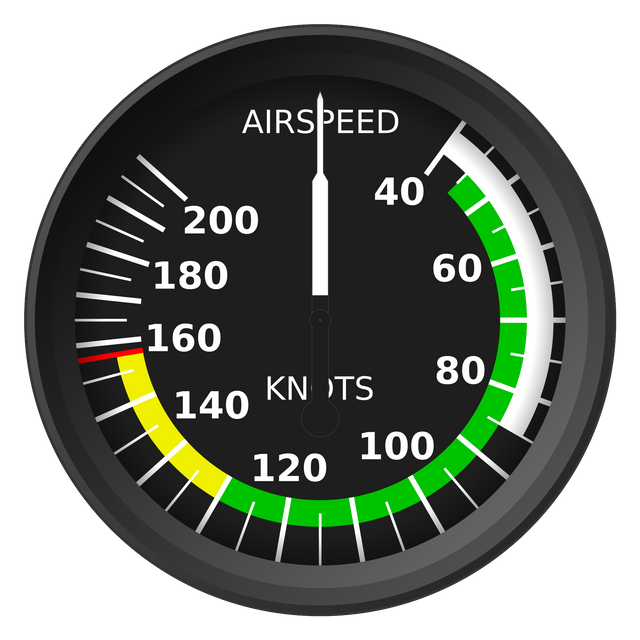
Airspeed Indicator
As mentioned earlier, the Airspeed Indicator is connected to both the Pitot Tube and the Static Pressure Tube. This is to maintain the difference in air pressure between the two tubes. While on the ground, not moving, the pressure in the two lines will be the same and and that is registered as zero on the airspeed gauge. But while in motion, the pressure builds in the Pitot Tube. This pressure differential is shown on the gauge as the indicated airspeed.
Indicated Airspeed is the speed the aircraft is travelling through the air, not over the ground. Now, examine the face of the gauge and notice this calibrated in both knots and miles/hour.
The gauge also has color coded markings. These markings tell you the safe operating ranges and limits. The red line is placed on never exceed speed and tells you the maximum speed at which the aircraft can be operated without sustaining damage.
The yellow arc indicates the caution speed range, the lower limit of which indicates the maximum structure cruising speed limit. The aircraft should only be flown in this range in smooth air. Because of the unpredictability of turbulence, you should never fly at speeds in the yellow zone.
The green arc is the normal operating range. The lower limit is the power-off stalling speeds with the flaps and gear up, the upper limit of the green one is the maximum speed during normal operation.
The fourth marking is white and indicates speeds in which fully extend flaps may be used.
Errors on the airspeed readings may be caused by overriding factors and will have to be corrected. As air density varies, so also does marginal air. The standard for calibrating this instrument is normal sea level pressure of 15 degrees C. A good rule to be remembered is that of every 1000 of pressure altitude, add 2% to the indicated airspeed. For example, you are flying at 9000ftt with an indicated airspeed of 120knots. To correct the error, multiply 9000 by 2% which equals 18%. Now, take 18% of 120knots which equals to 21.6, then add this value to the indicated speed of 120knotsto arrive at the true airspeed of 141.6knots.
More accurate corrections to take temperature into account can be made using a Circular Slide Rule. Some aircraft have speed indicator with a computer built into them. You may also have an airspeed error due to the position of Static Pressure vent and the Pitot Tube on the aircraft. This is corrected by using an airspeed correction table which is supplied by the aircraft manufacturer.
Friction from the working part of the instrument may also cause error as will ice and water. The icing problem can be eliminated by using Pitot Heater and avoid getting water into the system by keeping the Pitot head covered when the aircraft is standing in the open.
Vertical speed indicator
Wikimedia image - (Public Domain, Author: Cel 84)
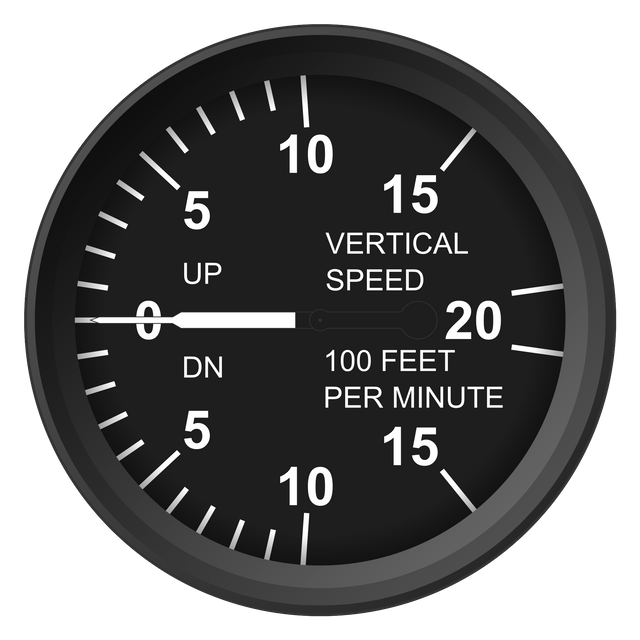
Vertical Speed Indicator
The Vertical Speed Indicator shows the rate of climb or descent. It uses the Anerold Capsule connected to the Static Pressure line to measure change in Barometric pressure. As the airplane descends, the pressure in the Static line increases. The opposite is true for gaining an altitude. During level flight, the pointer remains at zero. The instrument is calibrated inft/min. Keep in mind that the Vertical Speed Indicator measures the rate of climb and descent, not the altitude of the airplane. Also note that there is a Lag Time of 69 seconds for this instrument to register changes. The Lag Time increases the more rapidly pitch change are made. More sophisticated Vertical Speed Indicator that registers changes almost simultaneously are available.
Altimeter
Wikimedia image - (Public Domain, Author: Cel 84)
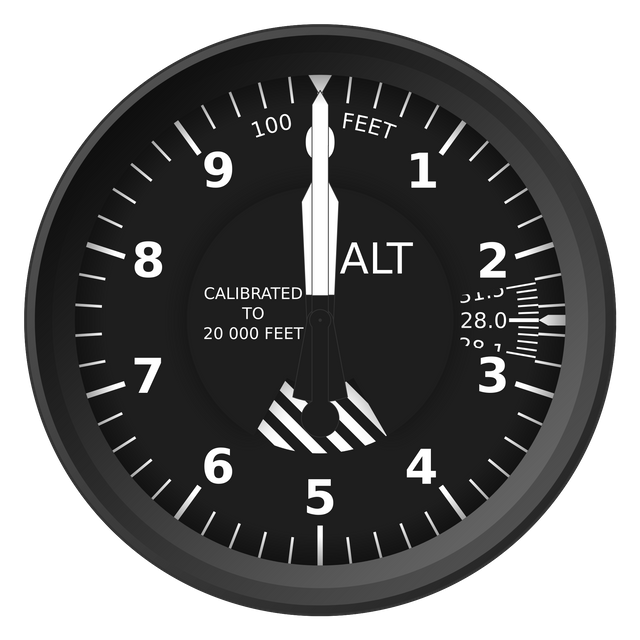
Altimeter
This is the final instrument connected to the Pitot Static system. It is the Anerold Barometer that measure air pressure. Decreases in air pressure are shown as increases in height. Altimeters are calibrated to a tolerance of pressure line as 20ft at sea level. If your Altimeter setting compare to a known Altimeter reading is out by more than pressure mine at 50ft, have a check. The face of the Altimeter has three hands. The largest hand records Altitude in hundreds of ft. The next larger hand shows Altitude in thousands of ft. The smallest hand records unit of ten thousand ft. The Altimeter is subject to errors caused by Pressure, Temperature and effects of Mountains.
Pressure error occurs when the Altimeter is not calibrated to correct Barometer readings. Remember, this instrument measures height above sea level. On a long cross-country flight, Barometer pressure can vary. The Altimeter has a Barometric scale calibrated in inches of mercury which allows you to keep the Altimeter setting count. Here is a rule for pressure air:
For very point 1" of mercury added to the Altimeter setting, the indicated Altitude changes by about 100 feet.
Follow this example. You are flying over mountain range of 4800ft high. You have selected an Altitude of 5800ft to climb the mountains. The altimeter setting of the airport of departure is 29.85. The setting of the destination airport is 29.35, that is 0.5" left. If you did not reset the Altimeter, you will climb the mountains by 500ft, not the 1000ft you planned on.
Remember, an Altimeter that is set too high gives readings too high and vise versa. Also keep in mind that when going from an area of high pressure to low pressure, unless the altimeter has been reset, it will read too high. At normally high pressure, above 31" of mercury occurs in Cold Dry Air masses. Most Altimeter scales do not go beyond 31". In these cases, the indicated Altitude is lower than the true Altitude. Under these conditions, leave the instrument set at 31". Air traffic control will help you with actual Altimeter setting.
Because Altimeter is calibrated to indicate true Altitude in standard atmospheric conditions, temperature errors can occur. Extremely Cold Temperature error can produce Altimeter error of as much as 20%. Use your flight computer to correct the temperature error. This correction will be based on Pressure Altitude, not the indicated Altitude. To find the pressure Altitude at any given time, simply set the barometric scale to 29.92.
Mountains can affect the operation of the Altimeter resulting in readings that are as much as 3000ft too high. The mountain effect occurs when wind is deflected around large mountain picks or through valleys. Remember in Ballouine Principle which states that increase in airflow causes decrease in pressure, you can well expect the effect on the Altimeter. The instrument, sensing a lower pressure gives you a false readings which is too high.
Winds blowing over a mountain range can create a phenomenal known as Mountain Wave. This effect can extend as far as 100miles downwind of the range and the Altitude above the actual elevation of the mountains. Generally, Mountain Waves cause turbulence but sometimes they may be very smooth. as a result, you can find yourself in a downdraft without warning. The Altimeter will show no decrease in height until it reaches altitude level equals the level caused by the Mountain Wave.
Gyro Instruments
The three Gyro instruments we are going to discuss are the Heading indicator, the Attitude Indicator and the Turn & Bank indicator. To understand how these instruments work, you must understand the Gyroscope. A Gyroscope is a spinning wheel which rotates at a very high speed. It is mounted in a gimble to allow its actions to be pointed at any given direction.
The gyroscope has two characteristics that impact on aircraft instruments. They are Gyroscopic Inertia and Precession. Gyroscopic Inertia means the rudder will remain fixed regardless of how the base of the gyroscope is moved. Precession occurs when a force is applied to a spinning object. The spinning object will react as if force applied is pointed at 90 degrees from where it was actually applied.
Note the followings:
- Because the Gyro is a precise instrument, it requires a special care.
- Gyro driven instruments should be caged before aerobatics to avoid damage to the bearings. Also avoid abrupt braking since this can also put unnecessary strain on the bearings.
- The air filters of the air driven units should be clan to avoid contamination by dust.
- If the instruments are venturi driven, make sure that the venturi system is free of ice. Ice blockage may cut off the air supply and disable the instrument.
- If the instruments are been removed for repair, they must be handled carefully.
Now, let us look at the instruments individually.
Heading indicator
Wikimedia image - (Public Domain, Author: Josh Baumgartner)
Heading Indicator
The Heading Indicator is sometimes referred to as the Directional Gyro. This instrument indicates the heading of the aircraft and assist the pilot in maintaining that heading with a least effort. The face of this instrument is a compass rolls and the heading is read opposite the nose of the airplane pointer. Just like the compass, the figures are printed with the last zero left off. The 3 stands for 30, 12 for 120 and so on.
The Gyro is synchronised with the magnetic compass at the beginning of a flight. The heading Indicator is subjected to procession errors because of the functional forces in the system. The amount of errors is about 3 degrees in 15 minutes. It is also subjected to apparent procession caused by the earth rotation. This varies according to latitude, ranging from 0 degrees at the equator to 15 degrees per hour at the poles. Both types of procession error should be corrected regularly about every 15 minutes.
Now, if the gyro on your aircraft is vacuum driven, it should not be used for take-off until it has run for 5 minutes to allow the vacuum ability in the system. Also remember that if maneuver exceeds 85 degrees, the Heading Indicator will give incorrect readings and must be reset.
Attitude indicator
Wikimedia image - (Public Domain, Author: US Army employee, Peter Boxman)
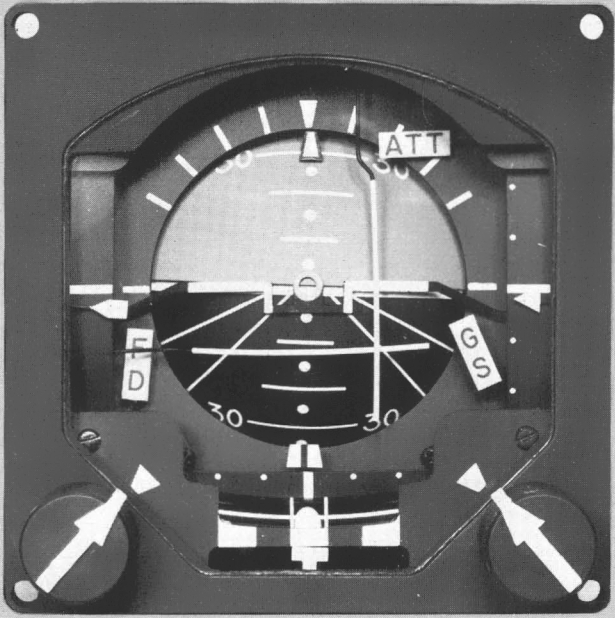
Attitude Indicator
This instrument is also known as the Artificial Horizon*. This instrument gives the pilot a horizon of reference when the actual horizon is not visible. It will shown you the relationship of the nose and wings to the earth. The face of this instrument has a horizon bar or a spot bar on the military plane to represent the attitude of the aircraft. The degree of bank is indicated by a scale at the top of the instrument. When the aircraft is in nose-down attitude, the military plane drops below the horizon bar. In a nose-up attitude, the plane rises above the artificial horizon. In a level flight, it is lined up with the horizon.
As mentioned before, bank is indicated by the scale at the top of the instrument. When you bank the aircraft, the military plane on the instrument banks and the pointer indicates the degree of bank on the index scale. The military plane can be adjusted to match the horizon bar should it be necessary to fly slightly in nose-up or nose-down attitude because of altitude, power or load.
Again, if the Attitude Indicator on your aircraft is vacuum driven, make sure it is running for 5 minutes to build up enough vacuum.
Pixabay image - (CCO Licensed)
Turn & Bank indicator
This happens to be the final Gyro instrument we are you are going to be shown. This instrument is sometimes called the Turning Slip Indicator. This is two instruments in one. The needle indicates direction and rate of the turn and the ball shows you whether there is any skipping or skitting. When using this instrument, remember that the Turn Indicator shows you the rate of turn, not the amount. The standard rate of turn is 3 degrees per second. In a straight and level flight, both the ball and needle are centered. If one wing drops uncorrected with the rudder, the ball will roll to the side of below wing.
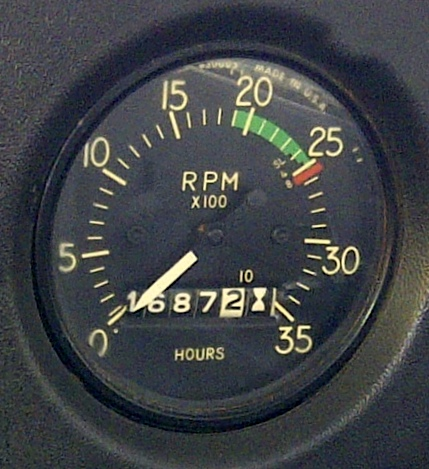
Tachometer
Wikimedia image - (Public Domain, Author: Abuk SABUK)
Tachometer
The final instrument you will be shown is neither the Pitot Static nor Gyro instrument. The Tachometer shows the speed at which the engine is after turning in hundreds of revolutions per minute. This instrument usually includes the recording device which also keeps track of the number of hours the engine has been operating. The RPM is directly proportional to the power output of the engine.
On aircraft of fixed pitch propeller, the Tachometer is the only instrument that displays information about engine power settings. The RPM and the gauge is controlled by the throttle. On aircraft with variable pitch propeller, the Tachometer and Manifold Pressure Gauge displays display power information. In this case, the RPM of the Tachometer is controlled by the propeller control and the Manifold Pressure settings are controlled by the throttle.
Departing Thoughts
Aircraft instruments are responsible for the control of the aircraft as it flies through the air. These instruments are not only used to control but are used in monitoring the attitudes in which the aircraft operates as it is flown by the pilot. Faults or blockages cause the instruments to give incorrect readings, either lower or higher than the actual readings. They are expected to be handled with care when they are being removed for repairs as they are easily damaged.
By now, it is my believe that you can handle an aircraft by yourself. The previous series have helped us understand how to become a friend with aircraft starting from the very basic - taxiing. Also we have learnt about take-off, climbing, flight attitudes and maneuvers, dangers that can threaten smooth flight and how to control and recover from them, descending and landing under different conditions.
I am happy that by now, although this lesson is focused on how we can build an aircraft from scratch by ourselves, we have learnt how to pilot an aircraft safely. Surely, it is my honor to have you following my series ever since I commenced them. Behold, this is the beginning of a new chapter. We are meeting again soon!
References
Previous Lessons In The Series
- Series #10: Pilot Navigation - Flight Planning, Flight Logs, Map Readings, Correcting Heading Errors & Actions To Take When Lost
- Series #9: Understand The Concept Of Flight Approach And Landing
- Series #8: Understanding The Airport Circuit, Control Zone & Dealing With Flight Conditions Illusions
- Series #7: Understanding The Aerodynamics; Spin, Spiral, Slip And The Concept Of Take-Off
- Series #6: Understanding The Concept Of Slow Flight and Stall
- Series #5: Understanding The Flight Maneuvers; Climbing, Descending & Turns
- Series #4: You've Got Attitudes, Aircraft Got Some Too
- Series #3: Understanding How Jet Engines Work And Effect Of Atmosphere In Flight
- Series #2: Understanding The Thrust Mechanism And How The Engine Works
- Series #1: Understanding The Mechanism Behind Airplanes And The Misconceptions

Hey! Do you write posts that are related to Science, Technology, Engineering, and Mathematics (STEM)?
Then join #steemstem on on discord. Click here.
Check this blog post by @steemstem to understand the guidelines on how to become a member of @steemstem.
Also check on this post by @steemstem to understand the use of images so as to avoid copyright infringement.
And in case you are writing from Nigeria, you can include #stemng tag in your posts. Details on @stemng blog.
Thinking of delegating SP to @steemstem to support this great initiative? All you have to do is to use the links below:
50 SP | 100SP | 500SP | 1,000SP | 5,000SP | 10,000SP | 50,000SP
However, ensure you have at least 50 SP left in your wallet.
I am @teekingtv, the no.1 Global Meetup analyst

Hi @teekingtv!
Your post was upvoted by utopian.io in cooperation with steemstem - supporting knowledge, innovation and technological advancement on the Steem Blockchain.
Contribute to Open Source with utopian.io
Learn how to contribute on our website and join the new open source economy.
Want to chat? Join the Utopian Community on Discord https://discord.gg/h52nFrV
Nice information about building airplane and nice to know about you.
Thank you for using eSteem and you have been chosen by eSteem curators for Encouragement Program .
Please join our growing community using this link and check our Mobile and Surfer (desktop) apps using this link.
This is so humbling. I have joined the eSteem community on Discord and I do follow the information being passed through there. Thank you for visiting my blog @coolguy123.
Congratulations! This post has been upvoted from the communal account, @minnowsupport, by teekingtv from the Minnow Support Project. It's a witness project run by aggroed, ausbitbank, teamsteem, theprophet0, someguy123, neoxian, followbtcnews, and netuoso. The goal is to help Steemit grow by supporting Minnows. Please find us at the Peace, Abundance, and Liberty Network (PALnet) Discord Channel. It's a completely public and open space to all members of the Steemit community who voluntarily choose to be there.
If you would like to delegate to the Minnow Support Project you can do so by clicking on the following links: 50SP, 100SP, 250SP, 500SP, 1000SP, 5000SP.
Be sure to leave at least 50SP undelegated on your account.
Congratulations! Your post has been selected as a daily Steemit truffle! It is listed on rank 2 of all contributions awarded today. You can find the TOP DAILY TRUFFLE PICKS HERE.
I upvoted your contribution because to my mind your post is at least 27 SBD worth and should receive 212 votes. It's now up to the lovely Steemit community to make this come true.
I am
TrufflePig, an Artificial Intelligence Bot that helps minnows and content curators using Machine Learning. If you are curious how I select content, you can find an explanation here!Have a nice day and sincerely yours,

TrufflePigThis post has been voted on by the steemstem curation team and voting trail.
There is more to SteemSTEM than just writing posts, check here for some more tips on being a community member. You can also join our discord here to get to know the rest of the community!