Teardown of Solar Power System: A guide to Successful Design & Installation
Good day Steemians, It's nice to write this time again. It's been a while I put something up here regarding the awesome world of solar technology. Now you have me on this, I hope you would learn a few things as I share the experience of the design and installation of solar power system.
Solar Power System is an alternative form of having power supply harnessed from solar energy. Solar Energy being a renewable energy, is of the cleanest source of energy we've been blessed with. Solar Power System provides a non-polluting form of having electricity, it's an unconventional way of generating power for use in achieving day-to-day activity. It's inexhaustible, requires low maintenance and sustainable, fitting in application such as household or residential use, industrial use and for commercial purposes.
To start with, I'd like to get you a bit familiar with basic components or materials required for solar power system. Basically, the major materials that make up the system includes the photovoltaic module ( solar panel), inverter, battery and the charge controller. Others will be mentioned during the course of the installation breakdown.
The solar panel is the outdoor component installed on rooftops or any suitable area exposed to sunlight, it is made of up of silicon cells responsible for trapping solar irradiance for conversion to direct current. They come in different types and sizes. The sizing (Power & Voltage) of the photovoltaic module largely depends on the system design which I will later touch as we move on with the discussion.
The solar panel like I said, are capable of getting us direct current from solar irradiance, so we need the battery to come in. Batteries hereby, are used, serving as power bank(s) to store the energy harvested from the solar panel. Batteries used in solar power system are the deep cycle type specially designed to be able to discharge most of their capacity while in use. You can learn more on deep cycle batteries in this previous post focusing on the deep cycle battery technology.
Moving on, I now believe we understand the process of getting the direct current (DC) stored in the batteries. But direct current are not mostly supplied to the electrical installation system of a building. Alternating current (AC) are used for major functions including lightning of bulbs, Fan, air conditioners, power supply to electronic appliances adapters and other appliances used residentially or industrially. The inverter basically function by converting direct current to alternating current. Here's the reason inverter makes a critical component in solar power system technology. Without the invention of the current inverting technology, we might not have been able to fully harness the power of solar energy for major use.
So inverters are used to convert the direct current stored in the battery to useable alternating current. Inverter is such an important components of the system as a wrong choice of inverter could cost a lot thereafter. This is what I mean; Conversion of direct current to alternating current by the inverter should be a pure sine wave alternating current output as it is produced by utility supply. Generally, regarding electricity, a sinusoidal motion (sine wave) is the standard waveform produced mathematically in the generation of voltage. However, some Inverters offer an impure or modified sine wave of AC signal which does not really do good with our appliances. Inverters with impure sine wave output operates less efficient, harmful to sensitive appliances and consume more energy. Pure sine wave Inverters gives a better alternating current output as the utility supply would give which is the best the electrical appliances are engineered to work smoothly with. So it's quite important to choose a right choice of inverter.
Now to the Charge Controller; here's a component that comes in-between the photovoltaic module and the battery. We can't just connect our solar panels to the battery without controlling the charge, the charging definitely has to be monitored. Solar charge controller is that component that you'd wish you can use when charging your phone, such that you don't have to worry about overcharging your battery, call it a smart charger if you want. Solar Charge controller simply works by monitoring the charging process. It automatically regulates the charge by disconnecting the photovoltaic module from the battery when battery gets full so as to prevent the battery from overcharge and also makes or connect the circuit back to charging state when power is being drawn from the battery for charging to get continued.
Not just that is what charge controller does, it also prevent reverse flow of current from the battery to the solar panel during the time no charge is coming from the solar array. Charge controllers also perform a great function of extracting maximum power from the solar panel, optimizing the solar panel efficiency for best use. Though this technology is limited to special type of solar charge controllers.
I guess by now we can proceed onto the installation process, having explained the fundamental components that will make us have a good picture and understanding of the process.
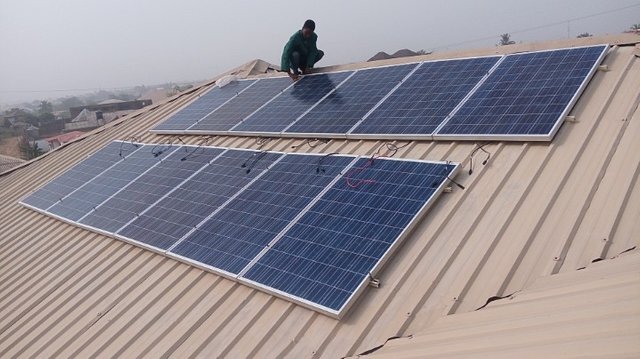
Firstly, survey is done on the site where the installation is to be setup so as to have the best orientation of the solar panel. Having a good arrangement of solar panels is a key part of the installation which ensures that solar irradiance is captured by the photovoltaic module at every time of the day for a very efficient charge. This is achieved by studying the direction of where the sun rises and sets. The collection of the photovoltaic module (Solar array) should be mounted in a direction where the irradiance will be captured during the movement of the sun all through the day. Failure to get this right makes the first problem encountered in installing solar power system as a result of poor design which makes the solar array efficiency to be less optimized.
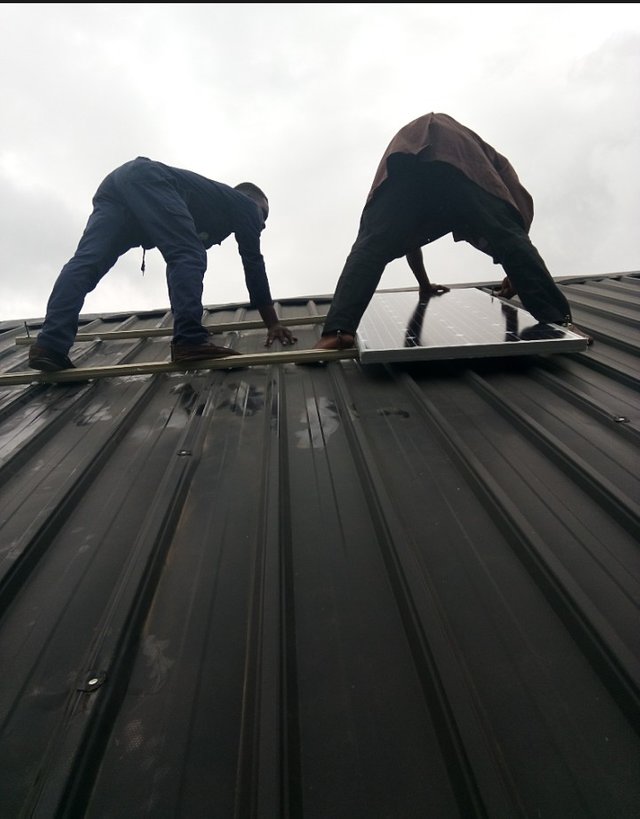
After getting this right, the solar array is mounted (a case of a rooftop) on the rooftop using piece of aluminum as rail to hold the solar array.
rail: Image by me @olajidekehinde]
The aluminum rail is firmly nailed and glued to the zinc and the photovoltaic modules are arranged and screwed tightly to one another and to the aluminum rail serving as the frame or holder. Photovoltaic array can as well be installed on car-ports or dedicated rack made for the array setup in which photovoltaic modules are laid into.
Taking it from here, the photovoltaic modules are connected according to the system design by the use of special DC cables designed to minimise loss of current during transmission. DC cables are also a determining factor in getting good efficiency from the solar array. It is one of the material that shouldn't be overlooked in installing solar power system. If loss of current during transmission is minimised, good harvest will be gotten from the array setup which enhances fast charging. By so doing, the solar panel array
are connected together and the final terminals are brought by the DC cable to the battery. Wait a minute, don't forget in a hurry, no one connects solar panel directly to the battery. Remember it has to go through the solar charge controller before being terminated to the battery bank.

I hope we get the gist so far, Solar array final terminals connected to the charge controller before being terminated to the battery bank. Okay? After this, the battery bank setup would also have its final terminals connected to the inverter. A quick reminder; all we have to the point of battery bank is a direct current (DC) power. Here's where the inverter comes in to take power from the battery so as to convert to usable pure sine wave alternating signal.
I forgot to mention another beautiful function of the Inverter. How amazing the inverter technology is. Inverter also, at the same time does the AC-DC conversion to compensate to charge the battery, taking alternating current from utility supply or other alternative source of power available, converts to dc and charge the battery alongside the charge from solar array.
Don't get confused, the inverter needs to convert the utility supply which is an alternating current to direct current so as to charge the battery. Remember batteries only takes in DC, so the inverter in this case also serve as a charger (converting from AC-DC to charge the battery) and at the same time gives us the pure sine wave alternating current from DC current stored in the battery for power use.
Then the inverter output having the pure sine wave alternating current power is then terminated to the electrical distribution board of the building distributing the power appropriately to required fuses in the box.

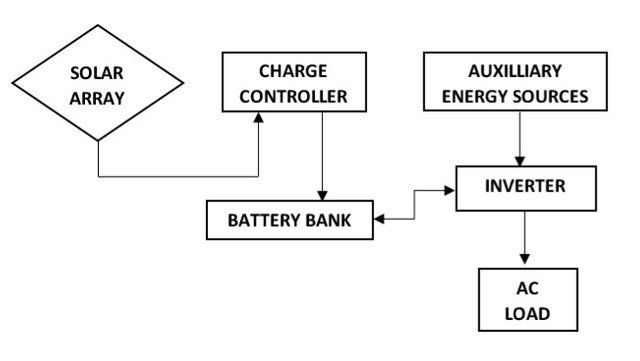
The figure below summarises the installation process of solar power system.
Let's now move onto the design of a typical 400W-1000W solar-inverter system.. Here, I would explain how the design is achieved and what to expect from such typical design.
Designing a solar based system starts with inverter sizing, the total load to be powered is estimated and an inverter large enough to accommodate the total load at at time is chosen, and it's much better to choose an inverter with a little percentage bigger than the power of the overall load. For example, if the total load audit of a building to be powered by an inverter is 600Watt, an inverter of 1000W will be recommended for use as this will provide a large enough capacity and have some capacity for tolerance for unforeseen circumstances.
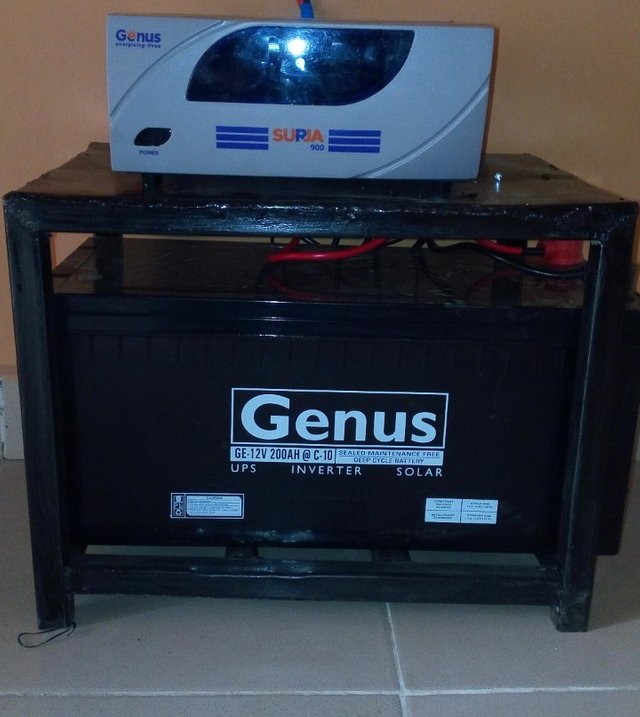
So, let's continue using a 1000W inverter as a case study in the design. For a 1000W inverter, they often come as a 12V system, meaning a single 12V battery will be required to power the inverter.
Using a 12V, 200Ah(Ampere-hour) battery, here's a simple calculation of the total capacity:
12V200Ah= 2400Whr(VAh=Whr)
2400Whr is the total capacity that will be available for a 1000W inverter of 12V voltage system when the battery size of a single 200Ah is used with it, at a fully charged condition.
So at a fully charged state , the battery offers a total capacity of 2400Whr. Applying a constant load of 400Watt at fully charged state of the capacity give us a backup of 6hours during the night when there's no irradiance from the daylight, charging the battery as at this time.
2400Whr/400W = 6hrs
However, this backup could be increased by adding batteries in parallel to the existing battery. let's quickly see how this works:
Having two batteries in parallel increases the amperage of the battery bank. You can visit this previous post to learn about connection of batteries.
Adding two of 200Ah batteries in parallel give a total capacity of 400Ah, so with a 12V voltage inverter system( the 1000W case), we will have a total capacity increased to;
12V*400Ah = 4800Whr
Applying a constant load of 400W on this gives a backup time of 12hrs, doubling the backup time i.e.
4800Whr/400W = 12hrs
Finally, let's now determine the photovoltaic module sizing for getting battery charged, still with the 1000W, 12V system case study.
Using a single battery, of 200Ah capacity, we already know our capacity at fully charge rate which is 2400Whr. So, regarding to this part of the world, (Nigeria ). Good solar irradiance is said to be observed between the 10am to 4pm (6hrs).
Having an estimated 6hrs of solar irradiance, doing this little mathematics again shows that;
2400Whr/6hr = 400W
a power of 400W will be needed to charge the battery fully within 6hrs
So, this implies that a minimum of 400W photovoltaic array will be required to fully charge the battery within 6hrs. Reason I used a 400W-1000W solar-inverter system as a case study here. However, it is required to have solar array overdimensioned when it comes to off-grid solar power design where utility supply doesn't come in at all to complement the solar charge. Similarly, in the same vein of adding batteries in parallel, the rate of charge can be increased by adding more Photovoltaic modules.

In summary, the higher the capacity of the battery bank, the larger the back-up provided and the rate of charge of the battery is also a function of the capacity of the solar array.
Invariably, we were able to learn and achieve with the case study that a 400W-1000W solar-inverter system with a battery of 200Ah as bank, gives a total capacity of 2400Whr with the backup time depending on the total load applied on it, which applies to all solar power system sizing design.
Solar Power System is one of the best alternative source of power that has come clean, non- polluting and
which we can't exhaust. Solar technology has brought us one of the best gift by just plugging to the sun and enjoy power all day and night. Till next time when I bring you another fascinating post on solar technology. Thanks for Stopping-by
REFERENCES
If you write STEM (Science, Technology, Engineering, and Mathematics) related posts, consider joining #steemSTEM on steemit chat or discord here. If you are from Nigeria, you may want to include the #stemng tag in your post. You can visit this blog by @stemng for more details. 
I'm a proud member of @promo-mentors where you get mentored and guided on how to make quality posts on steemit amongst other benefits. Do join us on discord. We anticipate your arrival.

Great effort here @olajidekehinde for this comprehensive guide on owning a household solar system. I feel like I can take charge of my own installation now.
Kudos man!
Still get a professional nearby when you want to DIY.
I'm sure @olajidekehinde will be ready to lend a hand...😊😊😊
Solar tech has an expiry date. What would you say, among the components you describe, is the first thing to go? I'm just wondering whether it's the batteries, seeing as how we seem to have reached a point where we can't improve them. In the case of phones and laptops, for instance, batteries are usually the first thing to go.
It's usually the batteries. After a year or two, the batteries, depending on quality and how it's used, is already on its way to failure.
I now understand how you do your design calculations.. This is great.
If one needs a guide on solar system installation, they need look no further.
You have done an excellent job here.
I had this skill development thing in camp and i went for Solar installation. Believe me, what we learnt in a week is what you just explained. I flowed really well reading.
Wonderful post!
BTW, do you think it'd be cool if I get a certificate on solar installation for a token?
Yes brother, do go ahead and have your certificate.
Thanks for stopping by
Hmmm. Thank you!
This article was some impressive breakdown of the solar power system. You guys did some neat roof installation using standard roof mount that allows the panel some distance off the hot roof to improve performance. I also like the simple math behind estimating the required backup hours from battery.
Yes, Keeping some distance between the roof and the array, allowing air flow helps in better performance as too much heat lowers the panel efficiency..Thanks for pointing this out @greenrun
Thank you too.
Hello! I find your post valuable for the wafrica community! Thanks for the great post! @wafrica is now following you! ALWAYs follow @wafrica and use the wafrica tag!
Hi @olajidekehinde!
Your post was upvoted by utopian.io in cooperation with steemstem - supporting knowledge, innovation and technological advancement on the Steem Blockchain.
Contribute to Open Source with utopian.io
Learn how to contribute on our website and join the new open source economy.
Want to chat? Join the Utopian Community on Discord https://discord.gg/h52nFrV
Mr Solar! Nice one coming from you sir.
Solar power is like the best thing to happen to us in Nigeria. A lot of us cannot handle the noise of rattling generators.
Nice job. You know I tell you that once I blow, I'll call you to come fix my solar!
Thanks Man, I pray you blow sooner than expected.