Part 6 - Build Steem blockchain application with Vue.js: input forms and handling REST API calls

Repository
Vue.js: https://github.com/vuejs/vue
What Will I Learn?
- How to implement input form in Vue.js
- How to handle REST API calls in Vue.js
Requirements
- A Node.js environment (Ubuntu 18 + Node.js is used in this tutorial)
- Basic HTML/CSS/Javascript knowledge
Difficulty
Basic level
Tutorial contents
In last tutorial, passing information between components, state management in Vuex, and vuex-persist were discussed. In this tutorial, various aspects to implement an input form in Vue.js will be discussed. In addition, how to handle REST API calls in Vue.js will be demonstrated.
Implement input forms in Vue.js
In this section, a new form to post content to Steem blockchain will be added and the underlying features, e.g. data binding, validation check and event handling will be implemented in the Vue.js way.
Add basic HTML form
First, add a new component, e.g. components/NewPost.vue. Within this component, add the following into the “template” section:
<template>
<div class="post_form">
<h4>New post</h4>
<div class="row post_field">
<div class="col-sm-3 col-xs-12">
Username
</div>
<div class="col-sm-9 col-xs-12">
**Username**
</div>
</div>
<br/>
<div class="row post_field">
<div class="col-sm-3 col-xs-12">
Posting key
</div>
<div class="col-sm-9 col-xs-12">
<input type="password" class="form-control" id="postingKey">
</div>
</div>
<br/>
<div class="row post_field">
<div class="col-sm-3 col-xs-12">
Title
</div>
<div class="col-sm-9 col-xs-12">
<input type="text" class="form-control" id="postTitle" placeholder="Enter post title">
</div>
</div>
<br/>
<div class="row post_field">
<div class="col-sm-3 col-xs-12">
Content
</div>
<div class="col-sm-9 col-xs-12">
<textarea class="form-control" id="postContent" row="10"></textarea>
</div>
</div>
<br/>
<div class="row post_field">
<div class="col-sm-3 col-xs-12">
Category
</div>
<div class="col-sm-9 col-xs-12">
<input type="text" class="form-control" id="category">
</div>
</div>
<br/>
<div class="row">
<div class="col-sm-12 col-xs-12">
<button>Submit</button>
</div>
</div>
<br/>
</div>
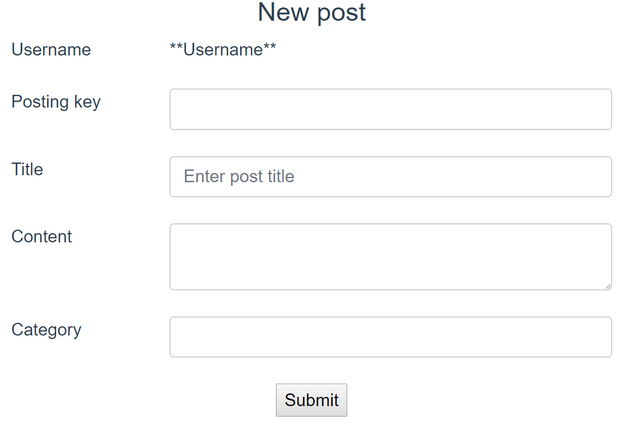
</template>
The form should look like:
Add data attributes and link them to HTML elements
username
As discussed in previous tutorials, username is defined/managed in ‘User’ mixin, so ‘User’ mixin needs to be imported into this component, e.g.
import User from './mixins/user'
And the component should be defined like:
export default {
  name: 'NewPost',
  mixins: [User]
  ......
}
So the username part in the template can be changed to:
<div class="col-sm-9 col-xs-12">
  {{username}}
</div>
Other data attributes and link them to HTML elements
To match with the fields defined in the template, the following data attributes need to be defined in the component code:
data () {
  return {
    posting_key: '',
    title: '',
    content: '',
    category: ''
  }
},
In the above code, ‘posting_key’, ‘title’, ‘content’, and ‘category’ link to the HTML tags in the template. By using ‘v-model’, the HTML tags in the template can be refactored to:
<input v-model="posting_key" type="password" class="form-control" id="postingKey">
......
<input v-model="title" type="text" class="form-control" id="postTitle" placeholder="Enter post title">
......
<textarea v-model="content" class="form-control" id="postContent" row="10"></textarea>
......
<input v-model="category" type="text" class="form-control" id="category">
The above code means, as long as user entered data in the HTML fields, the associated data attributes will be updated automatically.
Data validation
To validate the form inputs, a data attribute needs to be added first, e.g.
data () {
  return {
    ......
    errors: []
  }
},
Then, ‘v-on:click’ can be used to register an event handler, e.g. “submit” function to handle the click events:
<button v-on:click="submit">Submit</button>
The implementation of ‘submit’ method is as shown below:
methods: {
  submit () {
    let valid = true

    if (!this.username) {
      this.errors.push('Username required.')
      valid = false
    }
    if (!this.posting_key) {
      this.errors.push('Posting key required.')
      valid = false
    }
    if (!this.title) {
      this.errors.push('Title required.')
      valid = false
    }
    if (!this.content) {
      this.errors.push('Content required.')
      valid = false
    }
    if (valid === false) {
      return
    }
  }
}
From the code above, whenever an invalid input value is found, an error message is pushed into the array.
Now it is the time to display the error message. Add the following code into the template:
<div v-if="errors.length" class="row error_field">
  <div class="col-sm-12 col-xs-12">
    <b>Please correct the following error(s):</b>
    <ul>
      <li v-for="error in errors" :key="error">{{ error }}</li>
    </ul>
  </div>
</div>
The above code checks if there is any messages in the data attribute “errors”. If any messages exist, use ‘v-for’ to show all messages in an unordered list. If any required fields are missing, the page should look like:
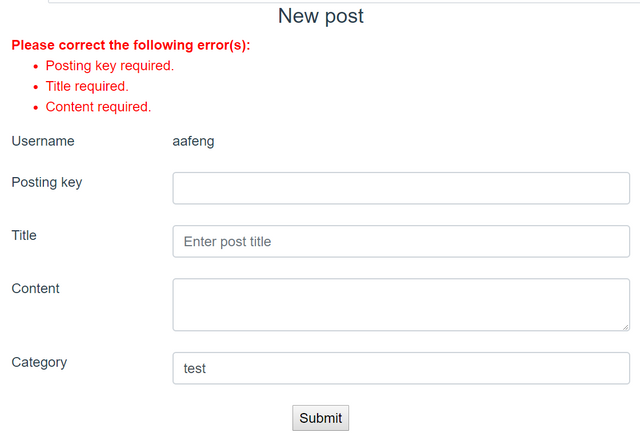
This example demonstrate one of the fundamental feature of Vue.js: developers do not need to update DOM - they just need to manipulate the data.
Post to Steem blockchain
Once the data validation is passed, it is the time to post to Steem blockchain. For demo purpose, this application only provides very basic functionalities, e.g. only main category is supported. More fancy features can be added later.
The following code can be added to post an article to Steem blockchain:
steem.broadcast.comment(
  this.posting_key,
  '',
  this.category,
  this.username,
  new Date().toISOString().replace(/[^a-zA-Z0-9]+/g, '').toLowerCase(),
  this.title,
  this.content,
  { tags: [this.category], app: 'utopian-test/aafeng' },
  function (err, result) {
    if (err) {
      alert('Failure! ' + err)
    } else {
      alert('Success!')
    }
  }
)
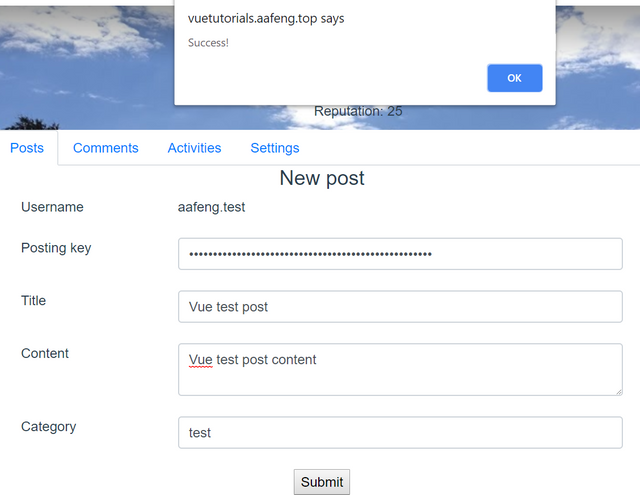
Once the post is published, a popup window confirms that the post operation has been successfully, as shown below:
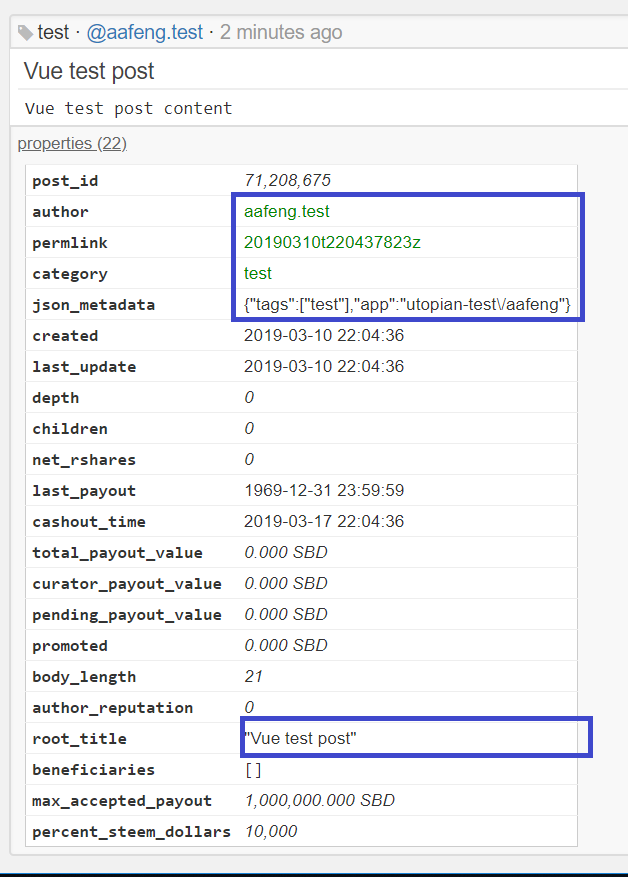
Steemd.com can be used to check if the post properties have been submitted properly, e.g. for the demo post:
Add ‘New post’ button in Posts component
A ‘New post’ button needs to be added to navigate users to the new post form. To do so, first add the button to template part of components/Posts.vue:
<div class="row post_new">
  <button v-on:click="newPost">New post</button>
</div>
In the newPost method, the route needs to be updated, as shown in the following code:
newPost () {
  // Update Vue.js route
  this.$router.push({ path: '/@' + this.username + '/new_post' })
}
By this way, users are able to use the ‘NewPost’ component:
Handling REST APIs with axios
Nowadays, it is very common to have a pure client side application working with RESTful APIs. How to use axios to make calls to REST APIs, and how to handle responses in Vue.js will be discussed in this section. Poloniex’s price ticker API will be used for demonstration.
Install axios
The installation of axios is very easy, just run this command:
npm install --save axios
Create SteemPrice component
Add a new file, e.g. components/SteemPrice.vue which will make REST API calls via axios and display current STEEM/SBD price pairs within the component.
<script>
let axios = require('axios')

export default {
  name: 'SteemPrice',
  data () {
    return {
      info: ''
    }
  }
}
</script>
In the above code, a data attribute, e.g. ‘info’ is used to store the price pairs.
Send request to poloniex REST API
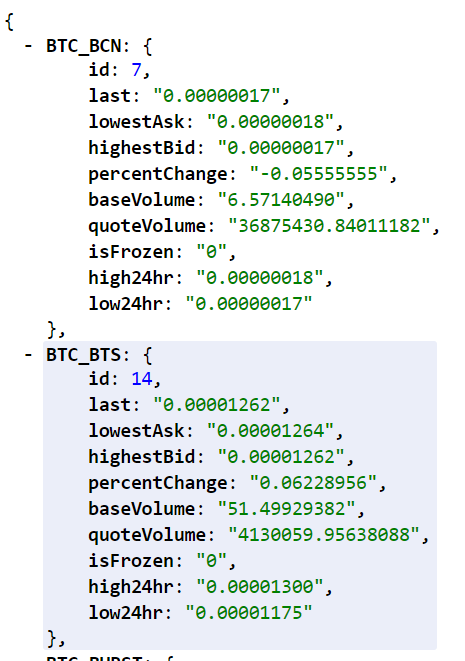
Poloniex REST API will be used in the demo application. The poloniex REST API endpoint is: https://poloniex.com/public?command=returnTicker. Open a browser and enter the above URL in the address bar then hit ‘Enter’, the result will be presented with JSON format:
While the SteemPrice component is loaded, some additional work needs to be done to make the REST API call and parse the returned JSON data and store it in the data attribute ‘info’. The code is shown as follows:
mounted () {
  let priceComponent = this
  // Make poloniex REST API call
  axios.get('https://poloniex.com/public?command=returnTicker')
    .then(function (response) {
      for (let p in response['data']) {
        // only store STEEM/SBD price pairs
        if (p.endsWith('_STEEM') || p.endsWith('_SBD')) {
          priceComponent.prices = priceComponent.prices + p + ': ' + response['data'][p]['last'] + '/'
        }
      }
    })
    .catch(function (error) {
      console.log(error)
    })
}
In this application, only ‘STEEM’ and ‘SBD’ price pairs will be displayed, so some processing logic has been added into the above code.
To display the returned price pairs, add the following code to the template:
<div class="row" v-for="p in prices.split('/')" :key="p">
  <div class="col-sm-12">
    {{p}}
  </div>
</div>
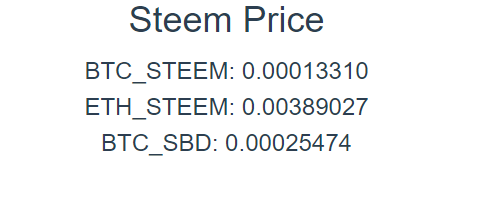
The page looks like:
To make other REST API calls, please read axios documentation for more information.
Curriculum
This is the 6th tutorial.
Previous tutorials
Part 1 - Build Steem blockchain application with Vue.js: installation and first demo
Part 2 - Build Steem blockchain application with Vue.js: components, computed properties and build/deployment process
Part 3 - Build Steem blockchain application with Vue.js: using Bootstrap, nav component, mixins, and first iteration of Posts component
Part 4 - Build Steem blockchain application with Vue.js: dynamic route, and event handling
Part 5 - Build Steem blockchain application with Vue.js: Passing data among components, state management via Vuex, and data persistent in Vue.js
Proof of Work Done
Source code for this tutorial: https://github.com/aa-feng/VuejsTutorial/tree/t06
Master branch of the source code (will be updated with ongoing tutorials): https://github.com/aa-feng/VuejsTutorial
The live demo of latest iteration: https://vuetutorials.aafeng.top
Thank you for your contribution @aafeng.
We've been reviewing your tutorial and suggest the following points below:
Tutorial very well structured and explained.
Basic HTML code does not need to be presented in the tutorial. The reader can check on your proof of work.
We really like the possibility of seeing the demo. It is very important for readers, they can experiment and see how the features that you have developed work.
Why didn't you use the required parameter in the HTML code?For example:
Thank you for your work in developing this tutorial.
Looking forward to your upcoming tutorials.
Your contribution has been evaluated according to Utopian policies and guidelines, as well as a predefined set of questions pertaining to the category.
To view those questions and the relevant answers related to your post, click here.
Need help? Chat with us on Discord.
[utopian-moderator]
Thanks for your suggestions. Yes, you are right, 'required' can be use to do basic checks while more complex checks can be implemented in Vue.js
Thank you for your review, @portugalcoin! Keep up the good work!
Hi, @aafeng!
You just got a 0.9% upvote from SteemPlus!
To get higher upvotes, earn more SteemPlus Points (SPP). On your Steemit wallet, check your SPP balance and click on "How to earn SPP?" to find out all the ways to earn.
If you're not using SteemPlus yet, please check our last posts in here to see the many ways in which SteemPlus can improve your Steem experience on Steemit and Busy.
Hi @aafeng!
Your post was upvoted by @steem-ua, new Steem dApp, using UserAuthority for algorithmic post curation!
Your post is eligible for our upvote, thanks to our collaboration with @utopian-io!
Feel free to join our @steem-ua Discord server
Hey, @aafeng!
Thanks for contributing on Utopian.
We’re already looking forward to your next contribution!
Get higher incentives and support Utopian.io!
Simply set @utopian.pay as a 5% (or higher) payout beneficiary on your contribution post (via SteemPlus or Steeditor).
Want to chat? Join us on Discord https://discord.gg/h52nFrV.
Vote for Utopian Witness!
Congratulations @aafeng! You have completed the following achievement on the Steem blockchain and have been rewarded with new badge(s) :
You can view your badges on your Steem Board and compare to others on the Steem Ranking
If you no longer want to receive notifications, reply to this comment with the word
STOPTo support your work, I also upvoted your post!
Do not miss the last post from @steemitboard:
Vote for @Steemitboard as a witness to get one more award and increased upvotes!