Create a forum application using django #13:Slug Protection, Use form and Add comment
Repository
What Will I Learn?
- Slug Protection
- Create form and Add comment
Requirements
- Basic Python
- Install Python 3
- Install Django
Resources
- Python - https://www.python.org/
- Django- https://www.djangoproject.com/
- Bootstrap 4 - https://getbootstrap.com/docs/4.0/getting-started/introduction/
Difficulty
Basic
Tutorial Content
Hi all. we will continue with this tutorial, we are almost at the end of this tutorial series and I think you already have basic knowledge of the Django system and maybe this tutorial can be your basic guide to creating your own application, in previous tutorials we have completed a series of CRUD systems (Create, Read, Update, and Delete). This system is a must-have for dynamic applications, in this tutorial I will add a new feature that is commenting on our forums. for that,we just start the following tutorial.
Protection Slug
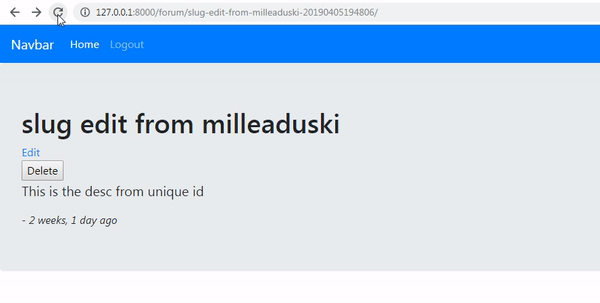
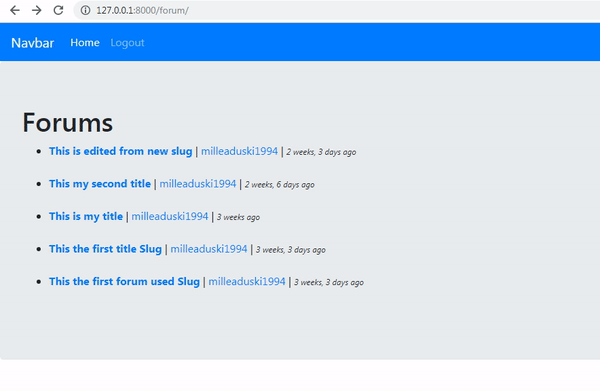
Before we get to the main, which is making a comment feature, there are things we must pay attention to first. Maybe you are not aware of a dynamic slug effect. You can read more about the dynamic slug that we have made in the previous tutorial.The slug system that we have created now uses the title and unixtime to be unique. we can see an example like the picture below:
The URL is unique like this http://127.0.0.1:8000/forum/slug-edit-from-milleaduski-20190405194806/, This Slug system works well, but note the Slug when we have edited the forum. We can see the example in the following picture:
- Edit forums
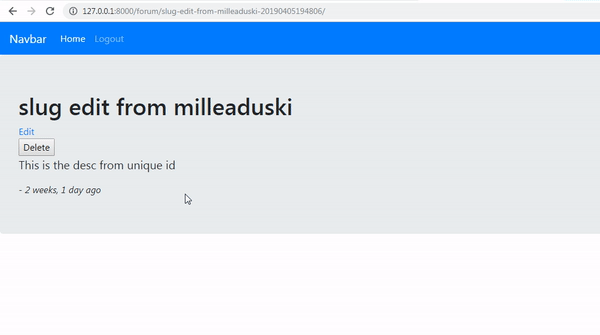
Now it can be seen in the picture above, we have edited the forums, but the problem is that the slug changes, this is because of unixtime when we update also changes, See this picture:
The new URL results from generating Slug with different Unixtime http://127.0.0.1:8000/forum/this-is-edited-from-new-slug-20190407103036/. Of course, this is something we don't want, when we edit the forums, the URL changes, we can't access the URL before. Because it has been generated with a new slug. to solve the problem we can check the Primary key (pk) in the forum model.
- Protection with primary key
We can use the primary key(PK) to be used to check whether the primary key already exists or not. If there is already one we do not save the slug data, but if it is not there we will generate a new slug and save the data. We can add the check to the save() function. For more details, we can see the example below:
forums/models.py
def save(self, *args, **kwargs):
        if self.pk is None: // check with the primary key method
            self.slug = slugify(self.title) + '-' + time.strftime("%Y%m%d%H%M%S")
            super(Forum, self).save(*args, **kwargs)
if self.pk is None: If you have followed the beginning of this tutorial, you can see the primary key from this forum. In this way we have been able to solve the problem, You can see the results as shown below:
.gif)
We can see in the picture above when we edit the URL remains the same, that is http://127.0.0.1:8000/forum/this-is-edited-from-new-slug-20190407103036/.
Add Comments
Now we will add comment features to the forums, of course, our forums will be less interesting if no comments are added to make interactions between users. There are two ways we can use the first one we will add comments via the Admin dashboard. we have created an admin dashboard in the previous tutorial and second we will add comments through the forums.
- Add comments via the dashboard admin
In Django, there is a good feature that can be used to manage the application of our forums. We have discussed the admin dashboard in the previous tutorial. Here's how to add comments to our forums application:
.gif)
Can be seen in the picture above, we have done to add comments via the admin dashboard. This feature can be used by admin to add comments to the application forums.
- Display comments in the forum
We have added comments via the admin dashboard now we will display the comments on our forum application. we can add the comment in the template forums/forum_detail.html.
{% extends "base.html" %}

{% load humanize %}

{% block title %} {{object.title}} {% endblock %}

{% block content %}
<div class="jumbotron">
  <h1>{{object.title}}</h1>
  {% if request.user == object.user %}
  <a href="{% url 'forum-edit' object.id %}">Edit</a>
  <form method="post" action="{% url 'forum-delete' object.id %}">
    {% csrf_token %} <input type="submit" value="Delete">
  </form>
  {% endif  %}
  <p style="font-size: 20px;">{{ object.desc }}</p>
  - <span><i>{{object.created_at | naturaltime}}</i></span>
  <hr>
    (html comment removed:  Display comment )
  {% for comment in object.comment_set.all %}
    <p>{{comment.desc}}</p>
  {% endfor %}
</div>
{% endblock%}
- We can display comments by using object variables. to get comment data we can use
object.comment_set.all. We can loop{% for %}the comments. Because 1 forum can have many comments. Well in theobject.commentwe can print out the value from the description{{comment.desc}}. For those of you who are just following this tutorial, we can see the structure of the Comment model as below:
Comment model
class Comment(models.Model):
    user = models.ForeignKey(settings.AUTH_USER_MODEL, on_delete=models.CASCADE)
    forum = models.ForeignKey(Forum, on_delete=models.CASCADE)
    desc = models.TextField()
    created_at = models.DateTimeField(auto_now_add=True)
.gif)
- Add comments via the application
Now we will start adding comments via the application. I will start by creating a Form that will be used to type in the comments. We will create a forms.py which we will use to collect from the forms that will be used in the application that we are developing. But before we make the forms class, I will first make a URL to add comments. For more details, we can see the following example:
from django.urls import path
from .views import (ForumCreate, ForumListView, ForumUserListView,
                   ForumDetailView, ForumUpdateView, ForumDeleteView, CommentCreateView) // Import all the class view

urlpatterns = [
    path('', ForumListView.as_view(), name='forum-list'),
    path('add/', ForumCreate.as_view(), name='forum-add'),
    path('edit/<int:pk>', ForumUpdateView.as_view(), name='forum-edit'),
    path('delete/<int:pk>', ForumDeleteView.as_view(), name='forum-delete'),
    path('<slug:slug>/', ForumDetailView.as_view(), name='forum-detail'),
    path('by/<username>/', ForumUserListView.as_view(), name='forum-by'),

    ## Commet path
    path('add-comment/<int:pk>', CommentCreateView.as_view(), name='add-comment'),
]
We will create a new URL with the name
'add-comment/<int: pk>'. At this URL I will pass parameters that are of type integer and primary key<int: pk>. This parameter is for form id and then at this URL, we will use the view class CommentCreateView.
Create forms
We will start creating the form, I will create a file whose contents are a collection of forms that we will use in our application. The following is the file:
forms/form.py
from django import forms // Import Forms

class CommentForm(forms.Form): // Defined the class view
    desc = forms.CharField(widget=forms.Textarea)
Django has provided a form, to use it all we have to do is import it as follows
from django import forms. At the top we have used CommentCreateView, now this is where we define it, we can use the forms in this classclass CommentForm(forms.Form).Of course in a form we have an input element for the user, now we can define what input we use, in this tutorial I use the text area
desc = forms.CharField(widget=forms.Textarea).
Display the form
We have created the form but haven't shown it in the form of an interface to the user. here we will learn how to display it. For more details, we can see the code below:
forums/views.py
from .forms import CommentForm // import the form

class ForumDetailView(DetailView):
    model = Forum
    def get_context_data(self, **kwargs):
        context = super().get_context_data(**kwargs)
        context['form_comment'] = CommentForm()
- To pass the form, we must import it first like this
from .forms import CommentForm. .forms is the file name and CommentForm is the class* that will be used.
- We will render it on the forums_detail.html page, so we will pass the form here using the
context ()function that we learned in the previous tutorial. We will pass the form with the variablecontext ['form_comment'].
Now we will display the form in the template, Because we will do the post method, we can wrap the form in the<form>tag. like the following
forums/forum_detail.html
<form method="post" action="{% url 'add-comment' object.id %}">
        {% csrf_token %}
        {{ form_comment }}
        <input type="submit" name="Add Comment">
    </form>
We make regular forms with method
method="post"and actionaction="{% url 'add-comment' object.id %}". our action will go to the alias of theadd-comment path/<int: pk>and don't forget to pass the parameter and what we will pass as a parameter is the id from the forum that we can get onobject.id.We have to use
{% csrf_token%}so that our post method is recognized by the system and the last one you can render the form using{{form_comment}}this is the name of the context we have passed in thecontext ['form_comment'].
If all steps have been completed we can see the results like the demo below:
.gif)
Curriculum
- Forum app
django#1, django#2, django#3, django#4, django#5, django#6, django#7
Thank you for your contribution @duski.harahap.
After reviewing your contribution, we suggest you following points:
The tutorial is very interesting to explain the editing of posts and insertion of comments in a forum with django.
Using GIFs to show results is definitely better than standard still images.
We suggest you try to modify the structure of your tutorial, it still seems a bit confusing. Use the titles for example with the
<h1></h1>tag and the subtitles with the<h2></h2>tag instead of the bullets.Thanks for following our suggestions in your previous tutorials.
Looking forward to your upcoming tutorials.
Your contribution has been evaluated according to Utopian policies and guidelines, as well as a predefined set of questions pertaining to the category.
To view those questions and the relevant answers related to your post, click here.
Need help? Chat with us on Discord.
[utopian-moderator]
Thank you for your review, @portugalcoin! Keep up the good work!
Hey, @duski.harahap!
Thanks for contributing on Utopian.
We’re already looking forward to your next contribution!
Get higher incentives and support Utopian.io!
Simply set @utopian.pay as a 5% (or higher) payout beneficiary on your contribution post (via SteemPlus or Steeditor).
Want to chat? Join us on Discord https://discord.gg/h52nFrV.
Vote for Utopian Witness!
Congratulations @duski.harahap! You have completed the following achievement on the Steem blockchain and have been rewarded with new badge(s) :
You can view your badges on your Steem Board and compare to others on the Steem Ranking
If you no longer want to receive notifications, reply to this comment with the word
STOPVote for @Steemitboard as a witness to get one more award and increased upvotes!