Create a RESTful API with Flask #2 : Make database migration, interact database to API ( Insert data and show data in JSON)
Repository
What Will I Learn?
Make database migration
Interact database to API ( Insert data and show data in JSON)
Requirements
- Basic Python
- Install Python 3
- Install Flask
Resources
- Python - https://www.python.org/
- Flask - http://flask.pocoo.org/
- Peewee - http://docs.peewee-orm.com
Difficulty
Basic
Tutorial Content
This tutorial is a continuation of the previous tutorial. In this tutorial, we will learn more about the database in the RESTful API that we use. Previously, In this tutorial, we created a model as an abstraction from the table in the database. Now we will make migration from the model we have created. there will be many things that we can learn from the database that we created for the application RESTful API. For that, we just start this tutorial.
Make database migration
To make a database migration, all we have to do is create an abstraction from the table in the database. after initializing we need to migrate. for more details, we can see the code below:
models.py
import datetime
from peewee import * // import all function in peewee

DATABASE = SqliteDatabase('coments.db') // select database

class Message(Model):
    context = TextField()
    create_at = DateTimeField(default=datetime.datetime.now())

class meta:
    database = DATABASE

def initialize():
    DATABASE.connect()
    DATABASE.create_tables(Message, safe = True)
    DATABASE.close()
We have learned how to make a model for a more complete explanation you can follow my previous tutorial.
Connection to the database: to migrate, of course, we need to connect to the database. We have initialized our database in the DATABASE variable
DATABASE = SqliteDatabase('comments.db'). So we can use the instance to use theDATABASE.connect()Database migration: After making a connection then we can migrate to the model class that we have created with the
create_tables()function. This function accepts two parameters, The first is the class of the model from the table abstraction and the second is optionalDATABASE.create_tables(Message, safe = True). We setsafe = Trueto handle if the migration was made beforehand so as to avoid the risk of double migration.Import
Modelsin api.py: After making a migration we have to run it on api.py. We import theinitialize ()function into the main function that is in api.py.
api.py
from flask import Flask, request
from flask_restful import Resource, Api

import models // import models

app = Flask(__name__)
api = Api(app)

users = {}

class User(Resource):
    def get(self, user_id):
        return {'name' : users[user_id]}

    def put(self, user_id):
        users[user_id] = request.form['user']
        return {'name' : users[user_id]}

api.add_resource(User, '/user/<string:user_id>')

if __name__ == '__main__':
    models.initialize() // run migration in api.py
    app.run(debug = True)
to migrate we can run api.py file. If the migration is successful we can get the comments.db file.
Database to API
We will learn to use a real database on our API. I will separate some parts of the code into one new file to make it easier for us to understand and implement the code. I will create a new file to separate the code that we have made in the previous tutorial. I created a new file with the name messages.py.
messages.py
from flask import jsonify
from flask_restful import Resource

import models

class MessageList(Resource):
    def get(self):
        # Get all data from table
        messages = models.Message.select()

        return jsonify(messages)
We move it into the messages.py file, in this code we will import the
jsonify()function to change the data in JSON form and import the modelsimport models.We can retrieve all existing data in a table database by using the
select ()function.messageis the name of the class in whichmodelsfiles we have imported. I will return the data that we get in JSON form which is commonly used in the APIreturn jsonify(messages).
Insert data in SQLite with peewee
Please note we will use the sqlite3 driver for that I hope there is already installed it on your device. if you have not installed you can visit this page http://www.sqlitetutorial.net/download-install-sqlite/. After you have finished installing I will enter some database data to become dummy data. To enter the database we can use the command prompt as shown below. In the previous section we created the comments.db database.
The following is how to insert data in the database.
    INSERT INTO Message (context, created_at) VALUES('This is the first comments', '13-01-2019')
    INSERT INTO Message (context, created_at) VALUES('This is the second comments', '13-01-2019')
Message is an abstraction of the table that we created as the name of the class and the columns we have created in the class Message ().
- use messages.py
We have separated the api.py file into a new file, namely messages.py, for that we need to make changes to the file api.py.
from flask import Flask, request
from flask_restful import Resource, Api

import models
import messages

app = Flask(__name__)
api = Api(app)

api.add_resource(messages.MessageList, '/messages')

if __name__ == '__main__':
    models.initialize()
    app.run(debug = True)
At api.py I will only replace the new routing ie
/messagesand then I will use theMessageList ()class that we created in the messages.py file. We can use the class by importing the file firstimport messages.After everything is done we can run our application python api.py and we hope the results will be in the form of JSON.
We can see the results in the picture above there is an error when the application wants to display data in JSON form. even though kite has used the jsonify() function we can't immediately use it like this:
messages = models.Message.select()
        return jsonify(messages)
- Show data in a database in JSON form
To display data in JSON form we need to do a loop on our database query variable. For more details, you can note the code below.
messages.py
from flask import jsonify
from flask_restful import Resource

import models

class MessageList(Resource):
    def get(self):
        # Get all data from table
        data = {}
        messages = models.Message.select()
        for row in messages: // for each data
            data[row.id] = {'context': row.context}
        return jsonify({'messages' : data})
- I will create a variable
data = {}that will be used to store the looping results. We will use the id as an automatic generation when we enter data into the database as a keydata[row.id] = {'context': row.context}and display JSON data in with key messagesreturn jsonify({'messages' : data}).The following is the demonstration
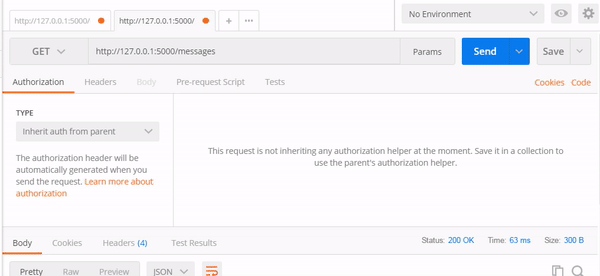
As we saw in the picture above we have succeeded in connecting our RESTful API with the SQLite database and we also managed to interact with the database by entering data and retrieving data from the database. enough, until here, this tutorial may be useful for you, thank you
Curriculum
- Web development with flask
Web developement with python #1 : Flask initialization and Routing system
Web development with python #2 : Templating jinja2 and Method POST on routing system
Web development with python #3 : Get method, Query parameter and Navigate Routing
Web development with python #4: Store cookie and Get cookie in template
Web development with python #6 : Use flash message and combine it with framework boostrap
- File in python
File in python #1 : Read file and Write file and Modes file
File in python #2 : The interaction between user input, Read CSV file
File in python #3 : Write CSV file, Read and Write JSON file
- Class-based views
Tutorial Django - Class based view #2 : Use Class based view method and Get and Post method
Thank you for your contribution @duski.harahap.
After reviewing your tutorial, we suggest the following points:
In the next tutorial try to bring something innovative to the open source community.
Your contribution has been evaluated according to Utopian policies and guidelines, as well as a predefined set of questions pertaining to the category.
To view those questions and the relevant answers related to your post, click here.
Need help? Chat with us on Discord.
[utopian-moderator]
I want to bring readers to know about the whole series of my tutorials from basic to advanced. but it's okay. I understand what you mean. thank you for review @portugalcoin :)
Thank you for your review, @portugalcoin! Keep up the good work!
Hi @duski.harahap!
Your post was upvoted by @steem-ua, new Steem dApp, using UserAuthority for algorithmic post curation!
Your post is eligible for our upvote, thanks to our collaboration with @utopian-io!
Feel free to join our @steem-ua Discord server
Hey, @duski.harahap!
Thanks for contributing on Utopian.
We’re already looking forward to your next contribution!
Get higher incentives and support Utopian.io!
Simply set @utopian.pay as a 5% (or higher) payout beneficiary on your contribution post (via SteemPlus or Steeditor).
Want to chat? Join us on Discord https://discord.gg/h52nFrV.
Vote for Utopian Witness!