How to create a Sound Recording Application using ObjectBox as DB in android studio (PART 1)
![]()
Repository
https://github.com/objectbox/objectbox-java
What Will I Learn?
- How to create a Sound Recording application using ObjectBox DB
- How to add ObjectBox Dependencies to your Android application
- How to create and intanciate ObjectBox objects.
- How to access ObjectBox from a service.
- How to save recording paths to ObjectBox.
- How to use the
@NameInDb()anotation
Resources
- ObjectBox Website https://objectbox.io/
- ObjectBox Github - https://github.com/objectbox/objectbox-java
Difficulty
- Intermediate
Tutorial Duration - 40 - 45Mins
Tutorial Content
In this tutorial series, we are going to be developing a sound recording Application that will be using ObjectBox as its Database, Users will be able to record new Sounds and then save then, play them, rename saved recordings and then be able to also delete them.
In this tutorial series, we are also going to be learning how to use ObjectBox with Android Architecture Components which are a set of libraries that help in making application developments clean and easy to maintain individual modules.
In today's tutorial, we are going to be learning how to setup our recording application and then letting the user record and also save the recordings to the users phone and alo save the recording path to ObjectBox
Outline
- Dependencies Used.
- Setup Application main Landing Screen (MainActivity).
- Setup RecordFragment.
- Setup ObjectBox Database.
- Setup Recording Service.
Dependencies used
implementation 'com.jakewharton:butterknife:8.8.1'
annotationProcessor 'com.jakewharton:butterknife-compiler:8.8.1'The ButterKnife dependency should be placed in your application level gradle file - "build.gradle" which is used to make view injection easy.
implementation "com.jpardogo.materialtabstrip:library:1.1.0"
materialtabstrip is an Interactive paging indicator widget, compatible with the ViewPager from the Android Support Library.
sourceTo add the ObjectBox dependency to your android project,
- Head to your app level build gradle file and include the line -
apply plugin: 'io.objectbox'
just below the -
apply plugin:'com.android.application'line and then include the following line in your dependenncy block -
implementation "io.objectbox:objectbox-android:2.0.0". - In your project level dependency file, add the line -
classpath "io.objectbox:objectbox-gradle-plugin:2.0.0"
in your dependency block.
- Head to your app level build gradle file and include the line -
Once are done with add the dependencies, you can now sync your project.
Setup Application main Landing Screen (MainActivity)
We head over to our activity_main.xml file and then edit to the below code -
<LinearLayout
    xmlns:android="http://schemas.android.com/apk/res/android"
    xmlns:app="http://schemas.android.com/apk/res-auto"
    xmlns:tools="http://schemas.android.com/tools"
    android:id="@+id/main_activity"
    tools:context=".MainActivity"
    android:layout_width="match_parent"
    android:layout_height="wrap_content"
    android:orientation="vertical">

    <include
        android:id="@+id/toolbar"
        layout="@layout/toolbar" />

    <com.astuetz.PagerSlidingTabStrip
        android:id="@+id/tabs"
        android:layout_width="match_parent"
        android:layout_height="64dp"
        android:background="@color/colorPrimary"
        android:elevation="4dp"
        android:textColor="@color/white"
        app:pstsIndicatorColor="@color/tab_strip"
        app:pstsIndicatorHeight="5dp"
        app:pstsShouldExpand="true" />

    <android.support.v4.view.ViewPager
        android:id="@+id/pager"
        android:layout_width="match_parent"
        android:layout_height="0px"
        android:layout_weight="1"
        android:background="@android:color/white" />

    <FrameLayout
        android:id="@+id/fragment_container"
        android:layout_width="match_parent"
        android:layout_height="match_parent" />

</LinearLayout>
Code Explanation
- The root widget is a LinearLayout view having the orientation of
verticalwhich means its children widget will be displayed from top to bottom and also the id ofmain_activity. - We include a layout with the name -
toolbarwhich will be explained next. - We then include a
PagerSlidingTabStripwidget with the id -tabs, background color of white and then the expand property to true. - We then include a viewPager widget below our PageSlidingTabStrip which will be set as the viewpager of the PagerSlidingTabStrip.
- Lastly, we include a FrameLayout with the id -
fragment_container.
Create a new layout file and name it - toolbar.xml and then edit its code to the following, this will serve as our toolbar since we wont be using the default actionBar provided in our application.
toolbar.xml
<?xml version="1.0" encoding="utf-8"?>
<android.support.v7.widget.Toolbar
    xmlns:android="http://schemas.android.com/apk/res/android"
    xmlns:app="http://schemas.android.com/apk/res-auto"
    android:id="@+id/toolbar"
    android:layout_width="match_parent"
    android:layout_height="wrap_content"
    android:elevation="4dp"
    android:background="@color/colorPrimary"
    app:popupTheme="@style/ThemeOverlay.AppCompat.Light"
    app:theme="@style/ThemeOverlay.AppCompat.Dark.ActionBar" />
--NB:--
The above code creates a toolbar using the android.support.v7.widget.Toolbar widget.
Setting up the MainActivity.java file
Once we have our layout file finished, next we want to head to our MainActivity.java class file and then inject the widgets we created using Butterknife and also setup our viewPager with our PagerSlidingTabStrip widget.
MainActivity.java
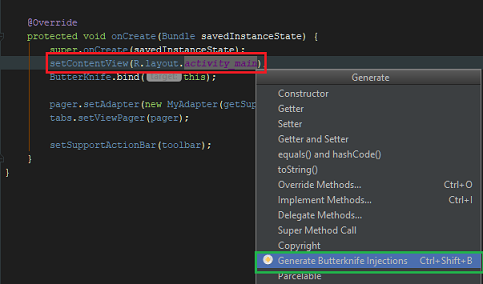
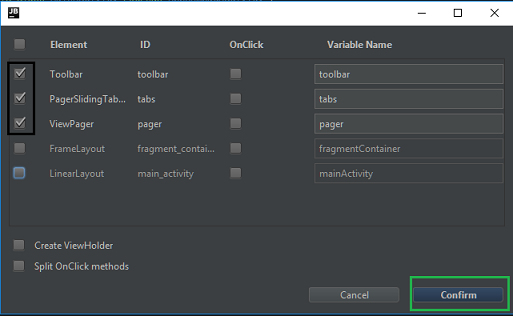
Firstly, we need to inject our views using butterknife, inorder to do that place your cursor on the line - setContentView(activity_main.xml) and then hit the keys - alt + ins and click on the Generate Butterknife Injections and select the following indicated in the image below.
Next, in the onCreate() method of the MainActivity.java class file, we add the following lines beneath the setContentView() method.
pager.setAdapter(new MyAdapter(getSupportFragmentManager()));
tabs.setViewPager(pager);

setSupportActionBar(toolbar);
> Code Explanation
We set the Adapter of the viewPager widget to a new MyAdapter class and then set the viewPager of the PagerSlidingTabStrip wiget to the above pager and lastly, we set the support ActionBar to our injected toolbar.
NB
The MyAdapter class is a class extending the FragmentManagerAdapter class which simply returns the Fragment based on the user swipe.
MyAdapter.java
public class MyAdapter extends FragmentPagerAdapter {
    private String[] fragment_titles = {"Record","Saved Recordings"};

    public MyAdapter(FragmentManager fm) {
        super(fm);
    }

    @Override
    public Fragment getItem(int position) {
        switch(position){
            case 0:{
                return RecordFragment.newInstance(position);
            }
            case 1:{
                return SavedRecordingsFragment.newInstance(position);
            }
        }
        return null;
    }

    @Override
    public int getCount() {
        return fragment_titles.length;
    }

    @Override
    public CharSequence getPageTitle(int position) {
        return fragment_titles[position];
    }
}
Setup RecordFragment
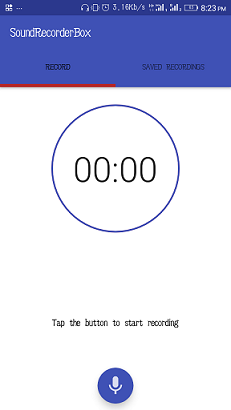
The record fragment will be hosting our recording functionality for the application where the user can click our floatingActionButton to start recording a new audio and then once the recording starts, the user can click the floatingActionButton again and then the recording is saved automatically.
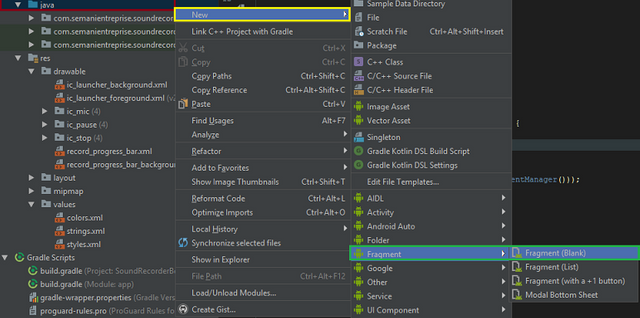
We then need to create a blank fragment, to do that you need to right click on the java => New = > Fragment => Fragment(Blank) and name it RecordFragment as shown in the image below.
The code of the RecordFragment layout - fragment_record is as below :
<RelativeLayout
    xmlns:android="http://schemas.android.com/apk/res/android"
    xmlns:app="http://schemas.android.com/apk/res-auto"
    android:id="@+id/fragment_record"
    android:orientation="vertical"
    android:layout_width="fill_parent"
    android:layout_height="fill_parent"
    >

    <com.melnykov.fab.FloatingActionButton
        android:id="@+id/btnRecord"
        android:layout_width="wrap_content"
        android:layout_height="wrap_content"
        app:fab_colorNormal="@color/colorPrimary"
        android:layout_marginBottom="10dp"
        android:layout_alignParentBottom="true"
        android:layout_centerHorizontal="true"
        android:src="@drawable/ic_mic" />

    <Chronometer
        android:layout_width="wrap_content"
        android:layout_height="wrap_content"
        android:id="@+id/chronometer"
        android:textSize="60sp"
        android:fontFamily="sans-serif-light"
        android:layout_alignBottom="@+id/recordProgressBar"
        android:layout_centerHorizontal="true"
        android:layout_marginBottom="64dp" />

    <ProgressBar
        style="?android:attr/progressBarStyleHorizontal"
        android:id="@+id/recordProgressBar"
        android:layout_width="200dp"
        android:layout_height="200dp"
        android:progressDrawable="@drawable/record_progress_bar"
        android:background="@drawable/record_progress_bar_background"
        android:indeterminate="false"
        android:max="100"
        android:progress="0"
        android:layout_marginTop="27dp"
        android:layout_alignParentTop="true"
        android:layout_centerHorizontal="true" />

    <TextView
        android:layout_width="wrap_content"
        android:layout_height="wrap_content"
        android:id="@+id/recording_status_text"
        android:text="@string/record_prompt"
        android:textStyle="bold"
        android:textSize="17sp"
        android:textColor="#000000"
        android:fontFamily="sans-serif-condensed"
        android:layout_above="@+id/btnRecord"
        android:layout_centerHorizontal="true"
        android:layout_marginBottom="60dp" />

</RelativeLayout>
Code Explanation
- The root layout is a RelativeLayout with the width of match_parent and height of match_parent also.
- Next, we have a floatingActionButton with the id -
Recordbtnwith the src attribute of -@drawable/ic_micwhich is a drawable file of a microphone which can be gotten by creating a new Image Asset.
The alignBottom and centerHorizontal attributes are both set to true meaning the floatingAction button will be displayed at the center and at the bottom of the screen as shown below. - Next, we add a
Chronometerwidget and give it an id of -chronometerand then center it horizontally using -android:layout_centerHorizontal="true". - The last two Widget are - ProgressBar and a TextView to indicate to the user that to record he has to tap on the FAB button.
Next in this tutorial, we have to then setup our RecordFragment.java class to start the recording and save the recording.
Firstly, we need to declear some private variables which we will be using later -
private int mRecordPromptCount = 0;
private boolean mStartRecording = true;
private int RECORD_AUDIO_REQUEST_CODE = 007;
Firstly, we need to inject our views using butterknife, by placing our cursor on the setContentView() method and hitting alt + ins on a windows PC and clicking on the Generate ButterKnife injection and select the views shown in the image below.

In the onClick() method of the FAB button injected by butterknife, we firstly check for the neccessary permissions needed in our application.
if (Build.VERSION.SDK_INT >= Build.VERSION_CODES.M) {
    getPermissionToRecordAudio();
}
 onRecord(mStartRecording);
 mStartRecording = !mStartRecording;
getPermissionToRecordAudio()
@RequiresApi(api = Build.VERSION_CODES.M)
public void getPermissionToRecordAudio() {
if (ContextCompat.checkSelfPermission(getActivity(), Manifest.permission.RECORD_AUDIO) != PackageManager.PERMISSION_GRANTED
        || ContextCompat.checkSelfPermission(getActivity(), Manifest.permission.READ_EXTERNAL_STORAGE) != PackageManager.PERMISSION_GRANTED
        || ContextCompat.checkSelfPermission(getActivity(), Manifest.permission.WRITE_EXTERNAL_STORAGE) != PackageManager.PERMISSION_GRANTED) {

    requestPermissions(new String[]{Manifest.permission.READ_EXTERNAL_STORAGE, Manifest.permission.RECORD_AUDIO, Manifest.permission.WRITE_EXTERNAL_STORAGE},
            RECORD_AUDIO_REQUEST_CODE);

}
}
Code Explanation
The above code checks if the permissions- ** READ_EXTERNAL_STORAGE and WRITE_EXTERNAL_STORAGE permissions are granted else we request the permissions witht the code - RECORD_AUDIO_REQUEST_CODE which is a private int variable declear at the top of our class file.
Next, we have to override the onRequestPermissionResult() method where we can check if we have been given the neccesarry permissions and if true we call the onRecord() method.
onRequestPermissionResult()
@RequiresApi(api = Build.VERSION_CODES.M)
@Override
public void onRequestPermissionsResult(int requestCode, @NonNull String permissions[], @NonNull int[] grantResults) {
    // Make sure it's our original READ_CONTACTS request
    if (requestCode == RECORD_AUDIO_REQUEST_CODE) {
        if (grantResults.length == 3 &&
                grantResults[0] == PackageManager.PERMISSION_GRANTED
                && grantResults[1] == PackageManager.PERMISSION_GRANTED
                && grantResults[2] == PackageManager.PERMISSION_GRANTED) {

                onRecord(mStartRecording);
                mStartRecording = !mStartRecording;
        } else {
            Toast.makeText(getActivity(), "You must give permissions to use this app. App is exiting.", Toast.LENGTH_SHORT).show();
        }
    }
}
onRecord() method
The onRecord() method is responsible for starting and stoping the record service.
This application uses a service to start and stop the recording and also the method is responsible for also showing user interactive text.
private void onRecord(boolean start) {

Intent intent = new Intent(getActivity(), RecordingService.class);

if (start) {
    // start recording
    btnRecord.setImageResource(R.drawable.ic_stop);
    Toast.makeText(getActivity(), R.string.toast_recording_start, Toast.LENGTH_SHORT).show();
    File folder = new File(Environment.getExternalStorageDirectory() + "/Soundbox");

    if (!folder.exists()) {
        //folder /SoundRecorder doesn't exist, create the folder
        folder.mkdir();
    }

    //start Chronometer
    chronometer.setBase(SystemClock.elapsedRealtime());
    chronometer.start();
    chronometer.setOnChronometerTickListener(new Chronometer.OnChronometerTickListener() {
        @Override
        public void onChronometerTick(Chronometer chronometer) {
            if (mRecordPromptCount == 0) {
                recordingStatusText.setText(getString(R.string.record_in_progress) + ".");
            } else if (mRecordPromptCount == 1) {
                recordingStatusText.setText(getString(R.string.record_in_progress) + "..");
            } else if (mRecordPromptCount == 2) {
                recordingStatusText.setText(getString(R.string.record_in_progress) + "...");
                mRecordPromptCount = -1;
            }

            mRecordPromptCount++;
        }
    });

    //start RecordingService
    getActivity().startService(intent);
    //keep screen on while recording
    getActivity().getWindow().addFlags(WindowManager.LayoutParams.FLAG_KEEP_SCREEN_ON);

    recordingStatusText.setText(getString(R.string.record_in_progress) + ".");
    mRecordPromptCount++;

} else {
    //stop recording
    btnRecord.setImageResource(R.drawable.ic_mic);
    chronometer.stop();
    chronometer.setBase(SystemClock.elapsedRealtime());

    recordingStatusText.setText(getString(R.string.record_prompt));

    getActivity().stopService(intent);
    //allow the screen to turn off again once recording is finished
    getActivity().getWindow().clearFlags(WindowManager.LayoutParams.FLAG_KEEP_SCREEN_ON);
}
}
Code Explanation
- Firstly, we create an Explicit intent specifying a service called -
RecordingService.class. - We then use an if statement to check the value of the
startbollean variable which we then set the image Resource of the FAB button to a stop image (which can be gotten by creating a new Image Asset and selecting the stop image) and then a Toast message is displayed to the user to indicate that the recording has started. - Next, a file object is created whose location is the ExternalStorageDirectory concatenated with the word -Soundbox -
File folder = new File(Environment.getExternalStorageDirectory() + "/Soundbox");and if the folder doesn't already exist, we create the folder. - We then set a user Interactive text which is determined using the
mRecordPromptCountint variable which we manipulate using the chronometer object. - We then start the service by calling -
getActivity().startServic(intent) - If the
startboolean variable is false, we then set the image resource of the FAB button to a microphone image, we stop the chornometer adnd then we also stop the service -getActivity().stopService(intent);
Setup ObjectBox Database
Next, we have to setup our ObjectBox Database, first we need to create a new java class file which we will be using as our POJO class.
To do that, right click on the java folder => New => java class, and then name it
Recordings
Recordings.java
@Entity
public class Recordings {

    @Id
    public long id;

    @NameInDb("RecordingName")
    private String recording_name;
    @NameInDb("RecordingPath")
    private String recording_path;
    @NameInDb("RecordingLength")
    private long recording_length;
    @NameInDb("RecordingTime")
    private long recording_time_added;

    public Recordings(long id, String recording_name, String recording_path,
                      long recording_length) {
        this.id = id;
        this.recording_name = recording_name;
        this.recording_path = recording_path;
        this.recording_length = recording_length;
        this.recording_time_added = System.currentTimeMillis();
    }

    //Getter and Setter Methods.
}
Code Explanation
- For all our ObjectBox objects, we must add the annotation
@Entityto the POJO class and there must always exist a public long variable which will be have the annotation@idwhich happens to be theidfield in the Recordings class. - We then have four private fields - recording_name,recording_path, recording_length and recording_time_added which are of type String and long equally shared 2 - 2.
NB: We use the@NameInDb()annotation to change the name of the fields in the Database saved by ObjectBox. - we then have a constructor initialzing all fields of this class except the
recording_time_added field which we set toSystem.currentTimeMillis();`
Having done that, we then need to build our project so that the neccesary classes will be created by ObjectBox, so to do that click ctrl + f9 on a windows.
Next, we need to create a java class file that extends the Application class inwhich we will be intanciating our ObjectBox object.
Create a new java class file and name it - MyApplicationClass.java and edit it to the following -
public class MyApplicationClass extends Application {

    public BoxStore boxStore;

    @Override
    public void onCreate() {
        super.onCreate();
        boxStore = MyObjectBox.builder().androidContext(MyApplicationClass.this).build();
    }

    public BoxStore getBoxStore() {
        return boxStore;
    }
}
Code Explanation
- We create a BoxStore variable - boxStore.
- In the onCreate() method, we intanciate the boxStore object -
boxStore = MyObjectBox.builder().androidContext(MyApplicationClass.this).build();. - And lastly, we create a public method that can be used to get a reference to the instantiated BoxStore object.
Lastly, for this tutorial, we are going to create a Service that will be used to start and stop the recording and then store the recording details to our ObjectBox Database.
To do this, we need to create a new java class called - RecordingService.java and must extend the Service class.
To create the service class, right click on the java folder => New => java class - and enter RecordingService as the file name.
RecordingService.class
Firstly, we need to create some variables that we will be using in this service class.
private String mFileName = null;
private String mFilePath = null;

private MediaRecorder mRecorder = null;

private long mStartingTimeMillis = 0;
private long mElapsedMillis = 0;
private Box<Recordings> recordingsBox;
Code Explnantion
- The
mFileNameandmFilePathString variables will be used to store the file name and also the file path. - A MediaRecorder object is created.
- The
mStartingTimeMillisandmElapsedMillislong variables will be used to get the time spent on each recording - We then create a Box of Recordings called recordingsBox which we will be using to store each recording details.
Next, in the onCreate() method of the service, we have to instanciate our recordingBox object -
@Override
public void onCreate() {
    super.onCreate();
    recordingsBox = ((MyApplicationClass) getApplication()).getBoxStore().boxFor(Recordings.class);
}
This way we create a Box of a type Recordings.class which happens to be our earlier created POJO class.
In our onStartCommand() we call the startRecording() method.
@Override
public int onStartCommand(Intent intent, int flags, int startId) {
    startRecording();
    return START_STICKY;
}
startRecording()
public void startRecording() {
setFileNameAndPath();

mRecorder = new MediaRecorder();
mRecorder.setAudioSource(MediaRecorder.AudioSource.MIC);
mRecorder.setOutputFormat(MediaRecorder.OutputFormat.MPEG_4);
mRecorder.setOutputFile(mFilePath);
mRecorder.setAudioEncoder(MediaRecorder.AudioEncoder.AAC);
mRecorder.setAudioChannels(1);
mRecorder.setAudioSamplingRate(44100);
mRecorder.setAudioEncodingBitRate(192000);

try {
    mRecorder.prepare();
    mRecorder.start();
    mStartingTimeMillis = System.currentTimeMillis();

} catch (IOException e) {
    Log.e(LOG_TAG, "prepare() failed");
}
}
Code Explanation
- We call the method
setFileNameAndPath()which as the name suggest sets the name of the recording and also the file path. - Next we instanciate our MediaRecorder object and then set some properties of the recorder and in a try/catch block we start the recording taking into account the time the recording starts and storing it in the
mStartingTimeMillisvariable.
setFileNameAndPath() Method.
public void setFileNameAndPath(){
    int count = 0;
    File f;

    do{
        count++;

        mFileName = getString(R.string.default_file_name)
                + "_" + (count) + ".mp4";
        mFilePath = Environment.getExternalStorageDirectory().getAbsolutePath();
        mFilePath += "/Soundbox/" + mFileName;

        f = new File(mFilePath);

    }while (f.exists() && !f.isDirectory());
}
Code Explanation
- In a do while loop, we set the mFileName variable to a string stored in the
strings.xmlfile with the value - "My Recording " and then we concatenate it with the increased value of count (count++) and then append a string(.mp4) to it. - We set the mFilePath variable to the absolutePath of the application -
mFilePath = Environment.getExternalStorageDirectory().getAbsolutePath();and append the strings - "Sounbox" and the ,mFileName variable and we finally create the file.
When a service is stopped, the onDestroy() method is called, therefore we need to override this method and then do the neccessary clean up and save the recording details to our ObjectBox Database.
@Override
public void onDestroy() {
    if (mRecorder != null) {
        stopRecording();
    }
    super.onDestroy();
}
stopRecording()
public void stopRecording() {
    mRecorder.stop();
    mElapsedMillis = (System.currentTimeMillis() - mStartingTimeMillis);
    mRecorder.release();
    Toast.makeText(this, getString(R.string.toast_recording_finish) + " " + mFilePath, Toast.LENGTH_LONG).show();

    mRecorder = null;

    try {
        Recordings recordings = new Recordings(0,mFileName,mFilePath,mElapsedMillis);

        recordingsBox.put(recordings);

        Toast.makeText(this, "New Recording Added", Toast.LENGTH_LONG).show();
    } catch (Exception e){
        Log.e(LOG_TAG, "exception", e);
    }
}
Code Explanation
- Firslt, we stopped the MediaRecorder object and then get the length of the recording by substracting the current system time from the current one now after which we relase the resources held by the MediaRecorder.
- Finally in the try/catch block, we create a new Recording specify 0 as the id which tells ObjectBox to automatically assign a value to the id column when saving this object, we pass the name of the file -
mFileName, the path of the file -mFilePathand then the length of the recording -mElapsedMillis. - We then use the Box object -
recordingsBoxput()method to save this recording details to our database.
Final Touches
For our application to run we have to include the permissions into out AndroidManifest file and also include our Application class file and also register our service.
To do this, we open ur AndroidManifest.xml file and add the following below the-
<uses-permission android:name="android.permission.RECORD_AUDIO" />
<uses-permission android:name="android.permission.WRITE_EXTERNAL_STORAGE" />
Next, inside our application tag, we need to include the Application class -
android:name=".MyApplicationClass" and lastly add the service using the service tag - <service android:name=".RecordingService" />
APPLICATION EXECUTION
Proof of Work
https://github.com/generalkolo/SoundRecorderObjectBox
Thank you for your contribution.
Your contribution has been evaluated according to Utopian policies and guidelines, as well as a predefined set of questions pertaining to the category.
To view those questions and the relevant answers related to your post, click here.
Need help? Write a ticket on https://support.utopian.io/.
Chat with us on Discord.
[utopian-moderator]
Thank you for your review, @portugalcoin!
So far this week you've reviewed 15 contributions. Keep up the good work!
Hey @edetebenezer
Thanks for contributing on Utopian.
We’re already looking forward to your next contribution!
Want to chat? Join us on Discord https://discord.gg/h52nFrV.
Vote for Utopian Witness!
You have a minor misspelling in the following sentence:
It should be necessary instead of neccesary.@resteemator is a new bot casting votes for its followers. Follow @resteemator and vote this comment to increase your chance to be voted in the future!