Java Tutorial : How To Create java JFrame/GUI To Play Music On NetBeans
Repository
https://github.com/dmlloyd/openjdk
What Will I Learn?
- You will learnHow to create aplication to play music
- You will learn how to create GUI/JFrame on NetBeans
- You will learn how to give button function
Requirements
State the requirements the user needs in order to follow this tutorial.
- you must understad basic of java programming
- you must know about item function on NetBeans JFrame
- you must know how to implement source code on JFrame object
Difficulty
- Intermediate
Tutorial Contents
okay, on this occasion I will create a java program for music player on netbeans, here I will create a simple user interface that lets us add playlists, play music, and delete playlists button.
here are the steps:
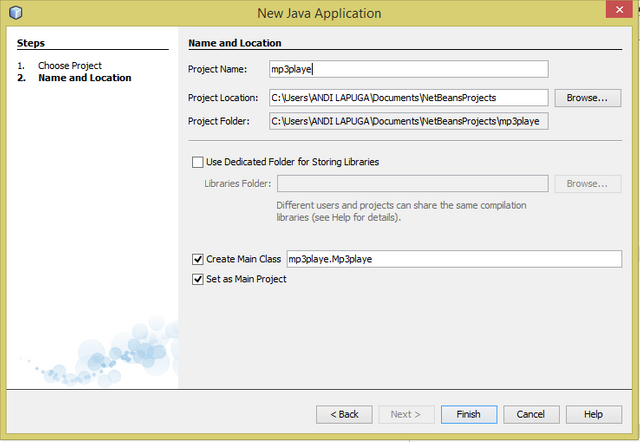
- the first step you should do is create a new project on NetBeans.
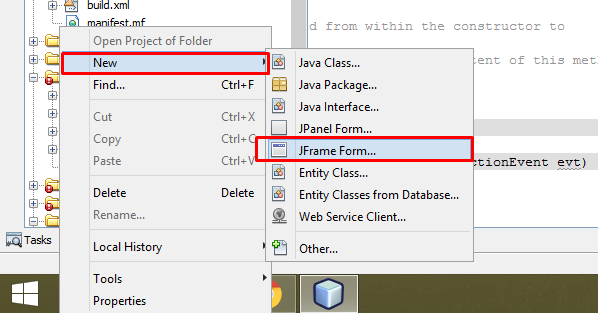
- then create a new JFrame class on the project you have created.
- right click on the project and select new >> JFrame:
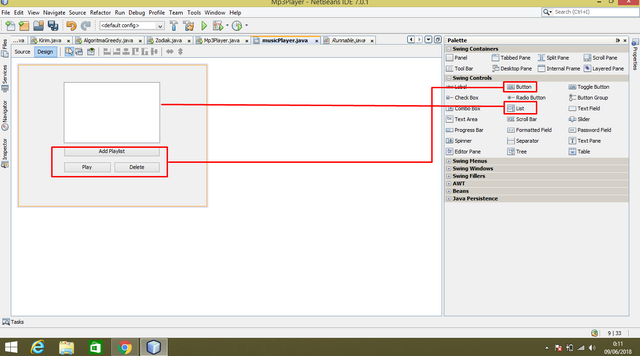
the next step is to design the GUI for our project
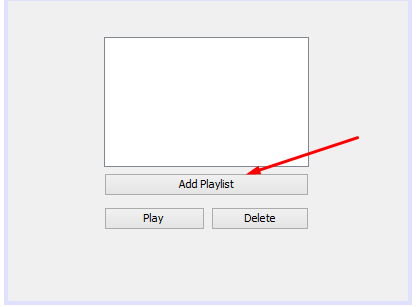
- create a design like in the picture below:
- then right click on the three buttons that we have created, change the text, and variable name:
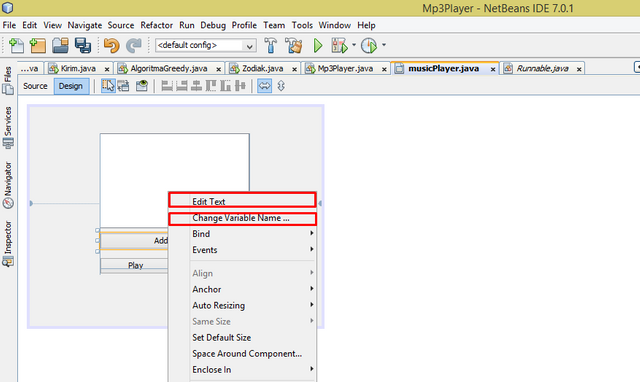
- Add Playlist variabel name : add
- Play button variable name : play
- Delete button variable name : del
create the button function :
- first enter this code under the package section
import javax.swing.DefaultListModel;
import javax.swing.JFileChooser;
import java.io.File;
- double click on the button we have design, then fill in the source code for the button to work
- below is the source code for button Add Playlist
JFileChooser fc = new JFileChooser();
    JFrame jf = new JFrame();
    int agree = fc.showOpenDialog(jf.add(fc));
    int position = jList1.getModel().getSize();
    if(agree == JFileChooser.APPROVE_OPTION){
        File file = fc.getSelectedFile();
        String text = file.getPath().toString();
        String[] txt;
        txt = new String[]{text};
        model.add(position, text);
- then enter the code for the Play button
 if(evt.getActionCommand().equalsIgnoreCase("play music")){
        String main =jList1.getSelectedValue().toString();
        try{
            mp3 =Manager.createPlayer(new URL ("D:\\data1.txt",null,main));
            mp3.star();
        }
        catch(Exception ex){}
        play.setText("stop");
    }
    if(evt.getActionCommand().equalsIgnoreCase("stop")){
        mp3.stop();
        play.setText("play music");
    }
}
- last enter code for Delete button
private void delActionPerformed(java.awt.event.ActionEvent evt) {
// TODO add your handling code here:
    int position = jList.getSelectedIndex();
    model.remove(position);
}
- Okay, all the code we have entered, then I will explain the function of the codes that we have entered above:
- this code we use because we use several different types of input
import javax.swing.DefaultListModel;
import javax.swing.JFileChooser;
import java.io.File;
- this is the variable for the Music queue
DefaultListModel model = new DefaultListModel (); - this is a variable to play music
private Player mp3; - this works for the music selection process
JFileChooser fc = new JFileChooser (); - this works to bring up the music selection dialog
int int = fc.showOpenDialog (jf.add (fc)); int position = jList1.getModel (). getSize ();function to set the queue position of musicFile file = fc.getSelectedFile ();variable to select the music file to be played.- This serves to retrieve the file name
String text = file.getPath (). toString ();. String [] txt;variable to hold the file name.- This works to display the music queue
jList1.setModel (model); - this is the condition when music has not been played
if (evt.getActionCommand (). equalsIgnoreCase ("play music")) { catch (Exception ex) {}is a variable for error handling.play.setText (" stop ");create function keys when music is paused.model.remove (position);functions when deleting music files.- okay, I think it's enough for the source code explanation, then we will run the program.
we will run the program we have created.
- after running it will look like this, click the Add Playlist button
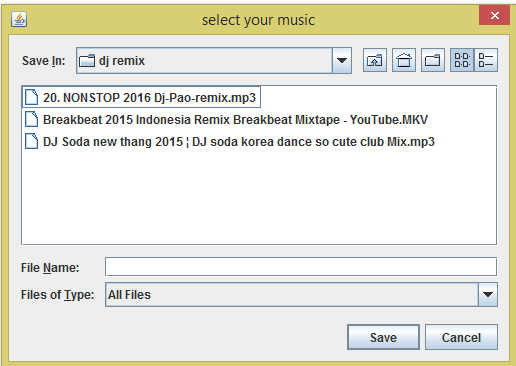
- then select music from your folder.
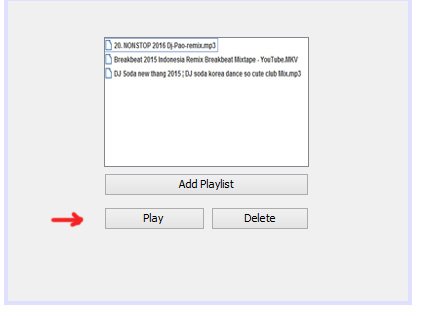
- then it will look like this, then press button Play then music will be executed in sequence in folder:
- Okay, after we run it will be heard the sound of music means our project has been successful, but if it has not turned up the music sound then you must check your source code carefully, there may be a wrong part during the process of typing.
- okay, the tutorial is over if there is a less obvious part you can ask in the comment field.
Curriculum
Include a list of related tutorials you have already shared on Utopian that make up a Course Curriculum, if applicable.
- Java Tutorial: How To Select And Send All File In One Folder Using "for" Looping Method On NetBeans
- HOW TO CREATE ACTION TO AUTO SELECT FILE USING "if" CONDITIONAL ON JAVA
- Java Tutorial: How To Create a Program To Send And Receive Files On NetBeans
Proof of Work Done
https://gist.github.com/andilapulga/d4613bf4715d60fb46c5baceefedf2fe
Thank you for your contribution.
While I liked the content of your contribution, I would still like to extend few advices for your upcoming contributions:
Looking forward to your upcoming tutorials.
Your contribution has been evaluated according to Utopian policies and guidelines, as well as a predefined set of questions pertaining to the category.
To view those questions and the relevant answers related to your post, click here.
Need help? Write a ticket on https://support.utopian.io/.
Chat with us on Discord.
[utopian-moderator]
Hey @lapulga
Thanks for contributing on Utopian.
We’re already looking forward to your next contribution!
Contributing on Utopian
Learn how to contribute on our website or by watching this tutorial on Youtube.
Want to chat? Join us on Discord https://discord.gg/h52nFrV.
Vote for Utopian Witness!
I'm curious about the codes. This is elucidative for me. Thx.