Retrieving Data From 2 Tables in play 2.6.x(Scala) Using Slick: Part 1
.png)
Repository
https://github.com/playframework/playframework
What Will I Learn?
In this tutorial you will learn the following
- How to carry out joins operations
- The difference between Applicative and Monadic Joins
Requirements
The following are required in order to properly follow along this tutorial.
- Intellij IDEA
- sbt
- playframework with slick installed
- Web browser
- Basic knowledge of Scala programming language
Resources
- Slick website:- http://slick.lightbend.com/
- Slick repository:- https://github.com/slick/slick
- Slick License:- BSD-style license
Difficulty
Choose one of the following options:
- Advanced
Tutorial Contents
In today's tutorial we are going to learn how to carry out JOIN operations in play(scala) 2.6.x . This tutorial is a continuation of previous tutorials. You can find previous links in the curriculum section. Before we continue let's look at some basic concepts
Joins, Monadic Joins and Applicative Joins
1. Joins
Join is used to retrieve data from 2 or more tables, based on the related column between them, in other words joins are used to retrieve data from 2 tables using a single query. In slick there are 2 basic Join styles, Applicative and Monadic.
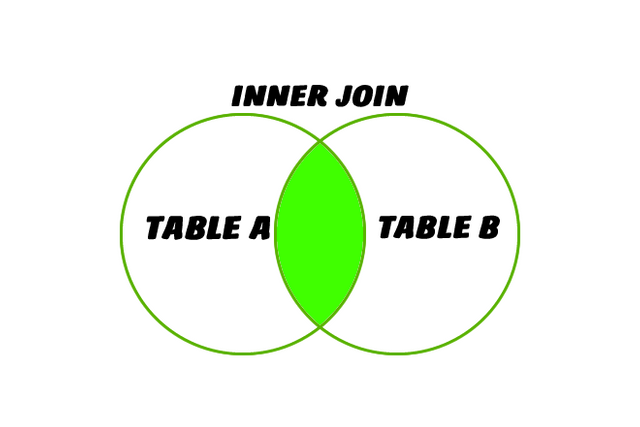
Image illustrating an inner join (Source: Designed by me with adobe fireworks)
2. Monadic joins
Monadic joins are created using the flatMap. Is not possible to carry out Monadic joins in SQL, in slick they can be carried out by compiling them to Applicative joins but this is useful in many cases but not in all cases.
3. Applicative joins
Applicative joins are called are carried out by calling a query that combines two queries into a single query. In Applicative joins the right hand side may not depend on the left hand side.
Carrying out joins in play(Scala)
In carrying our joins we will need to create 2 tables one table called person and the other called address. The person table will contain information about a person like name and age, while the address table will contain fields like address and city which and will hold the address of a particular user. We will create a foreign key in the address table that will link both tables.
To begin we will create 2 case classes, Person and Address and also define a JSON serializer for bot. We will do that by typing the following code
package models

import play.api.libs.json._

case class Person(id: Long, name: String, age: Int)
case class Address(id: Long, personId: Long, address: String, city: String)

object Person {
  implicit val personFormat = Json.format[Person]
}

object Address {
  implicit val personFormat = Json.format[Address]
}
Code explanation
We create a case class called
Personwhich contains 3 parametersid,nameandage. This would correspond to our first table definition in our models package.We create another case class called
Addresswhich takes 4 parametersid,personId,address, andcityA
PersonObject is created which contains the JSON serializer, the JSON serializer is called using thejson.format()function which holds thePersonarray as a parameter.A second Object is created for the Address case class known as
Address. It functions like the first object, but contains the JSON serializer for the Address.
Now it's time to define our tables, since we are retrieving data from 2 tables, we will have to define both tables and create a TableQuery Object.
So let's create a file in our app/models package, you can name yours as you desire, but I choose to call mine PersonRepository and we will define our first table known as PeopleTable and give it 3 columns, id, name and age
private class PeopleTable(tag: Tag) extends Table[Person](tag, "people") {

    def id = column[Long]("id", O.PrimaryKey, O.AutoInc)

    def name = column[String]("name")

    def age = column[Int]("age")

    def * = (id, name, age) <> ((Person.apply _).tupled, Person.unapply)
  }

private val people = TableQuery[PeopleTable]
Code Explanation
We create a private class known as
PeopleTablethat extends thePersonTable. Thetagmeans that our table name will be calledpeople.The
idcolumn is created as typeLongand it will be defined as Primary key and will auto increment. We do this by setting it to O.PrimaryKey and O.AutoInc.The
nameandagecolumn are defined asStringandIntegerrespectively. The column[String] and column[Int] sets the column to String and Integer.def *defines the table's default projection and sets theid,nameandageparametersPerson.applyandPerson.unapplycase class methods respectively.We create a
TableQueryobject known aspeopleby typing the following code :
private val people = TableQuery[PeopleTable]
Next we define our second table which we will call address, it contains the address and city of a person.
private class AddressTable(tag: Tag) extends Table[Address](tag, "address") {

    def id = column[Long]("id", O.PrimaryKey, O.AutoInc)

    def personId = column[Long]("personId")

    def address = column[String]("address")

    def city = column[String]("city")

    def user = foreignKey("user_fk", personId, people)(_.id)

    def * = (id, personId, address, city) <> ((Address.apply _).tupled, Address.unapply)
  }

  private val addresses =  TableQuery[AddressTable]
Code Explanation
Like above we define our address table which extends the Table class the value of the
tagmeans our table will be calledaddress.Our
idcolumn is set as primary key and will auto increment when a new row is added to the table.The
usercolumn is set as our foreign key, since we need a way to link both tables.def *defines the table's default projection and sets theid,personId,addressandcityparametersAddress.applyandAddress.unapplycase class methods respectively.We create a TableQuery object known as people by typing the following code :
private val addresses = TableQuery[AddressTable]
Still inside our PersonRepository file we will type the code to insert sample data and initiate the join query
 def insertAddress (personId: Int, address: String, city: String): Future[Int] = db.run {
    addresses.map(p => (p.personId, p.address, p.city )) +=(personId, address, city)
  }

  def insertPerson (name: String, age: Int): Future[Int]= db.run {
    people.map(p => (p.name,p.age)) +=(name, age)
  }

def innerJoin() : Future[Seq[(Person,Address)]] = db.run{
    people.
      join(addresses).on(_.id === _.personId).result
  }
Code Explanation
We define a function called
insertAddressit takes 3 parameterspersonId,addressandcityThe
db.runfunction maps our query to a variable, and the values are inserted when we type this+=(personId, address, city)We define another called
insertPerson, and it takes 2 parametersnameandage, we do the same thing to this function as step 2.we def a function known as
innerJoin, which will execute the query for our join operation.We join the people and the address table where the
idin people is equal to theuserIdin address. We execute the query when we add theresultfunction.
Now we move on to our controllers, where we will execute all our queries, controllers can be found inside the app/controllers package. Let's type the following code in our controllers.
 def execInsertAddress(personId: Int, address: String, city: String) = Action.async { implicit request =>
    repo.insertAddress(personId,address,city).map{
      _ =>
        Redirect(routes.PersonController.index())
    }
  }

  def execInsertPerson(name: String, age: Int)  = Action.async {implicit  request =>
    repo.insertPerson(name,age).map{
      _ =>
        Redirect(routes.PersonController.index())
    }
  }

  def execInnerJoin = Action.async{ implicit request =>
    repo.innerJoin().map {people =>
      Ok(Json.toJson(people))
    }
  }
Code Explanation
We define a method known as
execInsertAddress, this method takes 4 parameterspersonId,address, andcity, similar to theinsertAddressfunction created in our models package.An implicit request is initiated to insert values into the address table, and redirect the user back to the index page.
the same thing is done for
execInsertPerson, which inserts a person'snameandageinto thepeopletable.To join both tables we define a function known as
execInnerJoinand create an implicit request to join both tables using theinnerJoinfunction.We display the data serially as JSON using the
Json.toJson(people)function. This cannot be done unless the JSON serialization object is first created.
Next, we need to create a means to navigate our application and to do that we will create GETrequests in our routes file.
GET     /insertaddress/:personid/:address/:city                 controllers.PersonController.execInsertAddress(personId: Int, address: String, city: String)
GET     /insertperson/:name/:age                              controllers.PersonController.execInsertPerson(name: String, age: Int)
GET     /viewinnerjoin                                        controllers.PersonController.execInnerJoin
Code Explanation
The first
GETstatement maps toPersonController.execInsertAddress()function. The:personid/:address/:cityare value that must be entered in your browser if new user will be entered into people table.The second
GETstatement maps toPersonController.execInsertPerson, which inserts a new user address into the address table. Thepersonid,addressandcitymust be entered into the browser for a new column to be inserted into the table.The third
GETstatement maps toPersonController.execInnerJoin. This URL when called displays the result of the join.For instance if we want to insert a new address into the address table, where the
personid = 1,address = 123 wuse 2,city = Abuja. The URL would look something like thislocalhost:9000/1/123 wuse 2/Abuja
Finally we need to update our 1.sql file found in conf/evolutions.default with the following code
# --- !Ups

create table "people" (
  "id" bigint generated by default as identity(start with 1) not null primary key,
  "name" varchar not null,
  "age" int not null
);


create table "address" (
"id" bigint generated by default as identity(start with 1) not null primary key,
"personId" int not null,
"address" varchar not null,
"city" varchar not null
);

# --- !Downs

drop table "address" if exists;

drop table "people" if exists;
The above script will run when you run the application for the first time.
Code Explanation
The SQL statement is divided into 2 sections
# --- !Upsand# --- !Downs. The# --- !Upsis executed if there are no errors, while the# --- !Downsis executed if there are errors.In the
# --- !Upswe are creating 2 tablespeopleandaddress, with the SQL statementcreate table.The first table has 3 columns
id,name, andage. Theidcolumn has been set as the primary key and will auto increment, thenameandagecolumns have been set tovarchar(VarableCharacter, which is an SQL string type) andint(Integer, which is an SQL Integer type) respectively.The second table has 4 columns
id,personId,address,city, which areintandvarcharrespectively. Theidcolumn has a type called bigint and has been set as primary key and will auto increment when a new row is added to the database.The
# --- !Downssection drops thepeopleandaddresstable if there are any errors.
To run our application type the following address on your browser, localhost:9000. To enter a particular user enter the following localhost:9000/insertperson/***somename***/***someage***. To enter a new address enter the following localhost:9000/insertaddress/***somepersonid***/***someaddress***/***somecity***. To view the results of our join enter the following localhost:9000/viewinnerjoin.
When we run our application for the first time we will get the following message
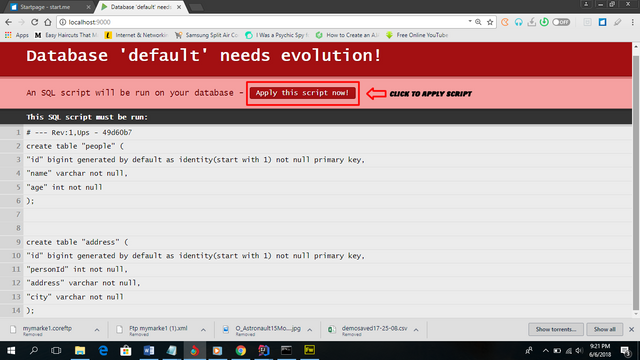.png)
Curriculum
- Creating a user registration system in play 2.6.x (scala) using mysql
- Creating a user registration system in play 2.6.x (Scala) using mysql
- Retrieving a particular user and initiating GET requests in play 2.6.x(Scala)
- Updating a particular user in play 2.6.x using slick
- Deleting a User and sorting elements in play(Scala) 2.6.x
- Carrying out aggregations in Play(Scala) 2.6.x
Proof of Work Done
Proof of work done can be found here
https://github.com/leczy642/play-scala-slick-JOIN
Thank you for your contribution.
While I liked the content of your contribution, I would still like to extend few advices for your upcoming contributions:
Looking forward to your upcoming tutorials.
Your contribution has been evaluated according to Utopian policies and guidelines, as well as a predefined set of questions pertaining to the category.
To view those questions and the relevant answers related to your post, click here.
Need help? Write a ticket on https://support.utopian.io/.
Chat with us on Discord.
[utopian-moderator]
Thanks for your moderation, I will work on making the necessary changes
Hey @portugalcoin
Here's a tip for your valuable feedback! @Utopian-io loves and incentivises informative comments.
Contributing on Utopian
Learn how to contribute on our website.
Want to chat? Join us on Discord https://discord.gg/h52nFrV.
Vote for Utopian Witness!
Hey @leczy
Thanks for contributing on Utopian.
We’re already looking forward to your next contribution!
Contributing on Utopian
Learn how to contribute on our website or by watching this tutorial on Youtube.
Want to chat? Join us on Discord https://discord.gg/h52nFrV.
Vote for Utopian Witness!
Get your post resteemed to 72,000 followers. Go here https://steemit.com/@a-a-a