How to create a Preloader and How to manage Preloader with Switch? | Materialize CSS #11
Repository
https://github.com/Dogfalo/materialize
What Will I Learn?
- You will learn how to create a preloader.
- You will learn how to use special if and else functions.
- You will learn how to create a switch checkbox.
- You will learn about toggleLiveData function.
- You will learn how to set the css style, functions and html page body on the same command page.
- You will learn how to use getElementById helper function.
- You will learn how to integrate switch into the preloader.
- You will learn how to manage preloader with switch.
Requirements
- Materialize Full Package 1.0.0-beta version.
- Materialize Icon Family CDN.
- Microsoft Visual Studio Code. (or another text editor.)
- A browser for testing.
- XAMPP Control Panel Server.
OS Requirement for Running Materialize
- Linux (64-bit)
- Windows 7 / Windows 8 / Windows 8.1 and Windows 10.
- macOS (64-bit)
Difficulty
- Intermediate
Description
A Small Overview
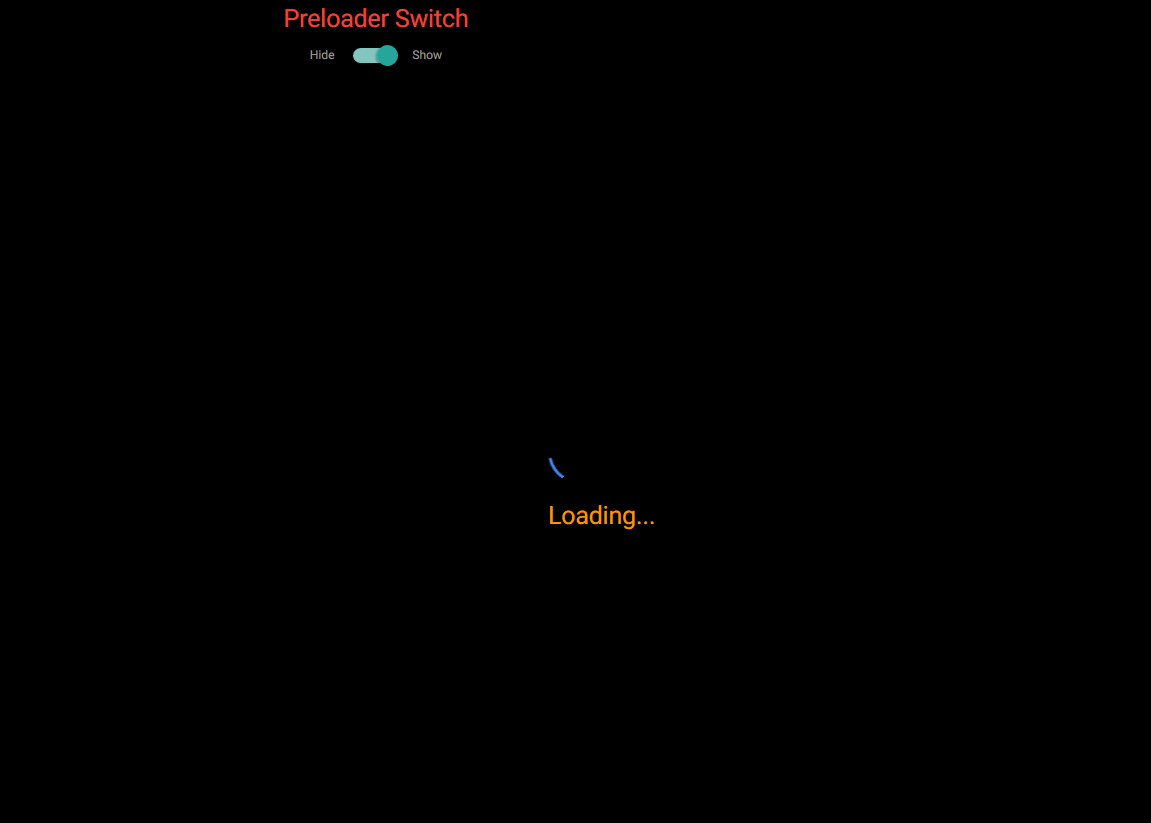
Firstly we created a blue preloader. We nested spinner in preloader-wrapper division, because the preloader will enter a infinite loop with the wrapper class. After that we defined our preloaders size as big. The default size is medium, but we added big size class. We created single color preloader. This tutorial not for creating flashing color preloader. For This tutorial, we can add only single color preloaders because the working principle of the flashing color preloaders is different than single color preloaders and the same codes will not work. After these, we added a text as Loading... for preloader.
After creating the preloader we started to create the switch.
We created switch for manage the appearance of the preloader in the page.
Briefly, we need to create the switch because switch will provide us to show / hide the preloader with using special toggleLiveData, checkbox with if & else JavaScript functions.
Finally, I gave technical information about codes, classes, components and all operations. Our Materialize education series will progress from basic - intermediate to advanced. All the programs described in the video (Materialize CSS, Visual Studio Code, XAMPP Server Control Panel Server) are open source and are all included in the links section of the GitHub repositories (Except XAMPP Control Panel Server). If you wish, you can access the web pages of these programs and download links for Windows from the All of Resources for this Project section.
All of Resources for this Project
- Materialize Main Logo: https://materializecss.com
- Materialize Github Repo: https://github.com/Dogfalo/materialize
- Materialize Documentation: https://materializecss.com/getting-started.html
- Visual Studio Code (VSCode) GitHub Repo: https://github.com/Microsoft/vscode
- Materialize Web Site: http://materializecss.com/
- Materialize Package Download for Windows:
https://github.com/Dogfalo/materialize/releases/ - Visual Studio Code Web Site: https://code.visualstudio.com/
- Visual Studio Code Download Link for Win x64: https://go.microsoft.com/fwlink/?Linkid=852157
- XAMPP Control Panel Server Web Site: https://www.apachefriends.org/en/
- XAMPP Control Panel Server (For Windows) Download Link: https://www.apachefriends.org/download.html
- Materialize Minified Ajax CSS Library: https://cdnjs.cloudflare.com/ajax/libs/materialize/1.0.0-beta/css/materialize.min.css
- Materialize Minified Ajax JavaScript Library: https://cdnjs.cloudflare.com/ajax/libs/materialize/1.0.0-beta/js/materialize.min.js
Knowledge Resources (Wiki)
- CSS Knowledge (wiki): https://www.w3schools.com/w3css/
- If - Else JavaScript Function Knowledge (wiki): https://www.w3schools.com/js/js_if_else.asp
- Preloader CSS Knowledge (wiki): https://www.w3schools.com/howto/howto_css_loader.asp
- Switch CSS Knowledge (wiki): https://www.w3schools.com/howto/howto_css_switch.asp
Cover Image Source
The source code and project file for this tutorial can be found here.
Summary: Critical Points and Important Points
Creating Preloader
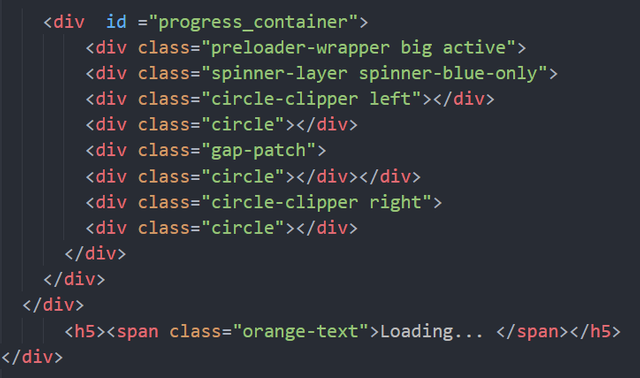
We normally start with the division class but this time we will start with division id because we need to set the spin properties of the preloader with css style. We defined ID as progress_container, this ID is a special ID for preloader css editing and specifying Javascript Functions. After that, we created a divison class for wrapper. We defined divison class as wrapper for infinite loop and we defined preloader size as big and status as active, this status will run our preloader. We defined division class as spinner layer because this class will provide spinner running and it will also provide us to define spinner color with spinner-blue-only class. We used another division class as circle-clipper and we also defined loop position as left. Circle-clipper class will provide an infinite loop towards to left of the preload circle. After that, we must define division class as a circle because we need to specify that the preloader is a circle. We defined division class as gap-patch because this class will provide us to see that the circle spin. We need to write a division class as circle-clipper right, if you remember, we just wrote for left spinner. In this line, we wrote another division class for infinite right loop. we defined division class for loop towards to right of the preload circle. And we need to define again division class as circle because we need to specify that the preloader is a circle for three times.
Why we specified circle class for three times?
Because we made three moves as left turn loop, right turn loop and gap-patch.
After creating preloader, we created loading text with span class to make text colorful. The Loading text will appear orange and under the preloader.
Creating Switch Title

Firstly we created two division classes as row and container. This classes for creating switch title's field. As you know, row and container classes are basic codes for creating a field.
After creating a field, we wrote a division class as col s12 m8 center We used these column values to set the position of the switch and the title of the switch. After that we created switch's title as Preloader Switch. We created this title with span class because we want the switch title color's appear red.
Creating Switch
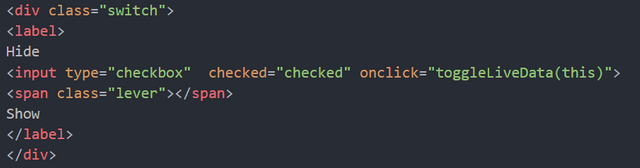
Firstly we created a division class as switch. This division class is first class for creating a switch.
We defined the special input class of the switch between the label tags.
We created Show side in switch checkbox. When we click the show, the preloader will appear in center of the page and when we click the hide the preloader will disappear.
We defined position of the show text as right (Switch ON) and we also defined position of the hide text as left (Switch OFF).
After that, we defined input type as checkbox because switch is a kind of checkbox so we can specify switch input type as checkbox. We defined checked status as checked because we want the switch to be in the open position. So, when we enter the site, switch will be in the "show" option and we can see our preloader.
After these we defined onclick small function as toggleLiveData(this). When we click on the switch, the live data will change. We set the toggleLiveData as this because the this function will affect our switch as main. This small function allows us to move the switch to the right and left. We also defined span class as lever because this class will provide us a lever checkbox.
Why we use span class as lever?
Because this span class generally using with "togglelivedata" function because these classes are interconnected and it allows us slide the switch slide right and left as lever.
Defining CSS Style
Preloader CSS
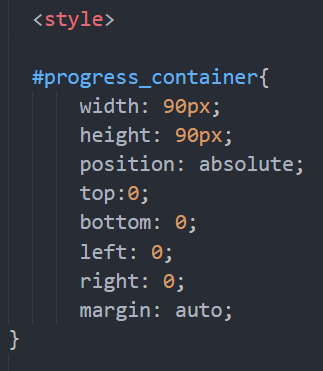
Firstly, we defined css style for progress_container. Let's remember, we defined our preloaders division id as progress_container at the beginning of the tutorial. We used this id for defining css style.
In the first css defining, we defined width and height sizes as 90px. After that we defined position as absolute. We defined top, left, bot and right values as zero because we want the preloader to appear in the center of the page. We also defined margin as auto because margin: auto style will provide preloader to appear in the center of the page. All these css styling codes will provide the preloader to appear in the middle of the page.
Page Body CSS
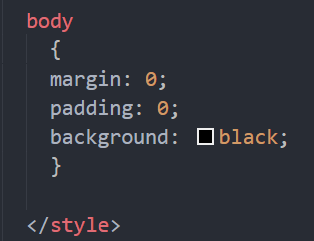
We defined margin and padding value as 0 because we want to make the page's color completely black so we defined our pages background color as black.
Writing JavaScript Special Functions
Switch: Creating ToggleLiveData Function
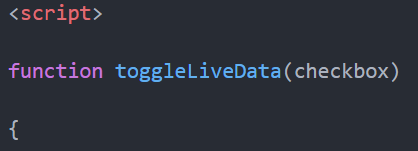
In this section, we used function for toggleLiveData, if you remember, we used it as input onclick line. We wrote our first functions as togglelivedata, in this way, when we click to switch's Show option, the preloader will be turned on and when we click to switch's Hide option, the preloader will be turned off and it will disappear on the page. Also It will happen in real time. If you remember, we defined on and off functions as show and hide. So we need to use if and else functions for this action.
Switch: Preloader Show Script
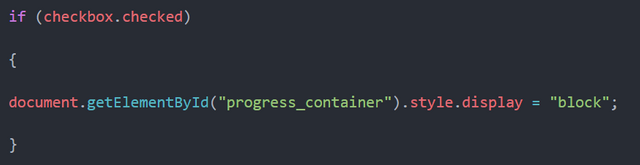
Firstly, we created checkbox as checked function. This functions mean, when checkbox is checked, it will "show" and "hide" preloader. We wrote this script function for show option.
We wrote document as getElementById because we used here getElementById as progress_container. As you know this is our preloader division ID. This function get element by progress_container. After that we defined display style as block, block means, show, when we click on switch's show option, this will show everything on the page.
Switch: Preloader Hide Script
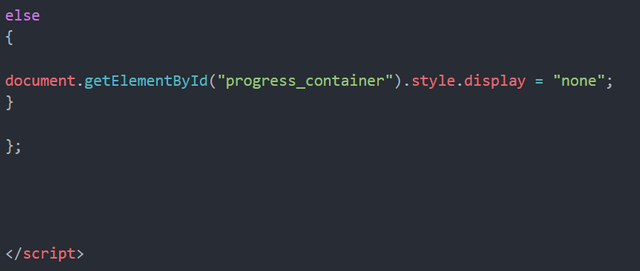
And in the last step, we have one question,
What happens if the switch turns hide (Switch OFF / left side)?.
We used else because we will define this function for hide. We used else because show functions opposite is hide and also hide option will appear switch's left side. If switch will turn hide (Switch OFF / left), the preloader will disappear from the page until click the show (Switch ON/ right).
Final State Of The Work
Video Tutorial
Curriculum
You can find the previous Materialize CSS tutorials here!
Simple Contact Form Without Server and BootstrapCDN
- How to Create a Simple Contact Form Without Using Server and Bootstrap CDN
Full Screen Image Slider with Carousel- How to Create a Full Screen Image Slider Using Carousel with XAMPP Localhost Server From Scratch
Creating Side Navbar- How to Create Side Navigation Bar using Materialize and jQuery Libraries with XAMPP Localhost Server From Scratch
Creating [Navbar] Top Navigation Bar- How to Create Top Navigation Menu (Navbar) using Materialize CSS with XAMPP Localhost Server
Scrollspy Menu- How to Create a Scrollspy Menu using Materialize CSS and jQuery Library with using XAMPP Localhost Server
Parallax Website- How to Create Parallax (Scrolling Image) Website using Materialize CSS and jQuery Library with using XAMPP Localhost Server
Professional Login Form- How to Create a Professional Login Form with using Modal Methods and Localhost Server
Questionnaire Form- How to Create a Questionnaire Form With Using Input Field, Toast, Checkbox and Special Plug-In
Statistics Panel
How to Create a Statistics Panel & Welcome Page with Cards, Footer, Table and Navigation Button
Creating Ranking Page and Status List
How to Create Moderator Ranking Page and Status List with Using Collections (Avatar Content, Secondary Content) and Badges (Customizable)
My GitHub Account
You can look at my github profile for reach other Materialize CSS tutorials project files!
Proof of Work Done
https://github.com/sargoon/materialize_prealoder_with_switch
Hi @sargoon,
Thank you for your contribution.
This is your 11th tutorial on the CSS tutorial. Since many of these basic tutorials are found elsewhere on the internet, try to create tutorials that are more unique, otherwise there are many tutorial duplicates.
Try to develop concepts that can go deeper into CSS usage and go for more depth and riches so that your learners can be highly motivated to continue to follow your video tutorials.
The microphone and your voice over have improved.
Your contribution has been evaluated according to Utopian policies and guidelines, as well as a predefined set of questions pertaining to the category.
To view those questions and the relevant answers related to your post, click here.
Need help? Write a ticket on https://support.utopian.io/.
Chat with us on Discord.
[utopian-moderator]
Hey @sargoon
Thanks for contributing on Utopian.
We’re already looking forward to your next contribution!
Contributing on Utopian
Learn how to contribute on our website or by watching this tutorial on Youtube.
Want to chat? Join us on Discord https://discord.gg/h52nFrV.
Vote for Utopian Witness!