Building the frontend Food order system with Angularjs.
Repository
https://github.com/angular/angular
In our last tutorial, we finished building our server client which is responsible for handling all the requests to different API endpoints from the front-end application. In this series, we will be handling the installation of our Angular 5 application. We are going to explain the whole ideology behind Angular 5, build some components and watch the output on the DOM (Document Object Model).
Rating
This tutorial is rated Intermediate.
Requirement.
- Typescript version 2.4.2
- Node version version 8.9.4
- Npm version 5.6.0
- Bootstrap 4.0
- Visual Studio Code IDE
- Voltront front client Repository
What would i learn? / Table of content.
- What is Angular?
- Angular installation
- App structure
- What is a component?
- Installing Bootstrap SASS
- Building the Navbar component.
- Component Nesting
- Routing
What is Angular?
Angular is a frontend JavaScript framework which allows you to build or create reactive and responsive SPA (Singe Page Application). Angular is built on component bases, where each component can function on its own. Angular components are reusable throughout the single page application.
Angular installation
Angular uses the Angular CLI (Command Line Interface) for generation of components, services, routes etc. To initiate installation and creation of our application, we must follow the following steps:
- Make sure sure you have the above (Node and NPM) installed on the development machine.
- Install the Angular CLI by opening the command line and running the command below which installs the CLI globally.
npm install -g @angular/cli
- Creating a new application
To create a new application, choose any directory on your machine, open the command line on the directory and run the command below:
ng new Voltron
Note: Voltron is our application name, but for our application, we will be using SASS as a preprocessor for our style sheet. We will be using the command below:
ng new Voltron --style=sass
- Serve the application
Go to the project directory and launch the application.
cd voltron
ng serve --open
Open Voltron in the IDE and let's talk about the structure.
App structure
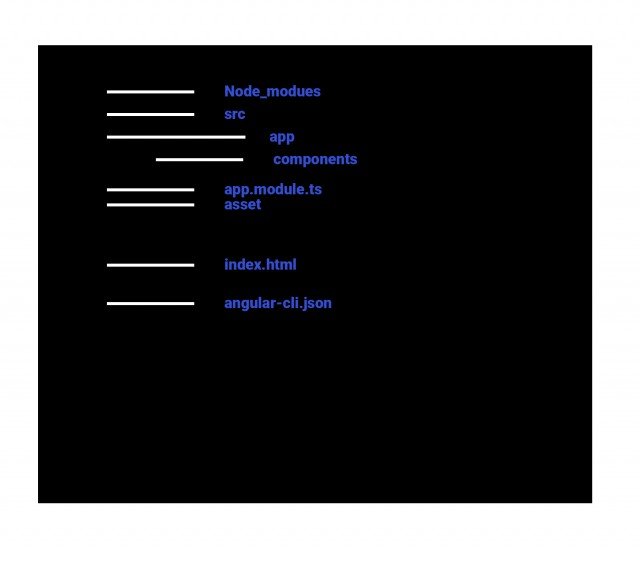
There are other structures on the app, we are just going to talk about a few of them,
The node_modules houses our npm packages for this application, the src folder contains the app folder which is the core of our application. In the app folder we generate all our component modules. Lets talk for example we have a component called app-navbar, this component would have the following files;
- app-navbar.component.html - file responsible for all the markup for the navbar component.
- app-navbar.component.sass - file responsible for the styling of the component
- app-navbar.component.spec.ts -file responsible for test writing.
- app-navbar.component.ts- file responsible for writing the components' logic
We also have the appmodule. ts, which bootstraps or starts the application, assets folder is responsible for keeping all asset related things like images and fonts etc.
Lastly the index.html is what holds the application in place by inserting the <app-root> selector from the app-component which was generated by default.
What is a component?
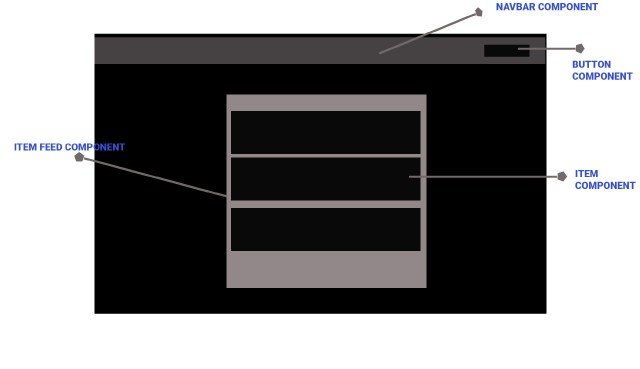
schematic diagram showing components
A component, is any reusable part on a DOM with its' own logic and can afford to stand on its own.
Basically, the above diagram shows our component level for the Voltron app, for the initial page of the voltron app, we have three components;
- Navbar component.
- Item component.
- Item-feed component.
Installing Bootstrap SASS
We will be using Bootstrap SASS for the Voltron project, hit the CLI enter
npm install bootstrap
Add the code below to the style.sass on the root directory
@import "~bootstrap/scss/bootstrap.scss";
The above imports the bootstrap.scss from the nodule_modules folder and makes it available to the application
Building the Navbar component
Take a look at the Navbar, there is a component that can stand on its own, it has other sub-components like buttons that can be embedded in the navbar component.
To generate, enter on your CLI
ng g c navbar
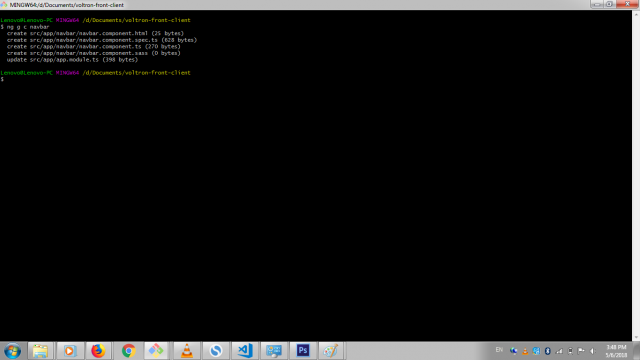
g stands for generate and c for component,
it can also be written as
ng generate component navbar
open the app-navbar folder and locate the file app-navbar.component.html and add the bootstrap.
<nav class="navbar navbar-expand-md navbar-dark bg-dark fixed-top">
  <a class="navbar-brand" href="#">Voltron</a>
  <button class="navbar-toggler" type="button" data-toggle="collapse" data-target="#navbarsExampleDefault" aria-controls="navbarsExampleDefault" aria-expanded="false" aria-label="Toggle navigation">
    <span class="navbar-toggler-icon"></span>
  </button>
  <div class="collapse navbar-collapse" id="navbarsExampleDefault">
    <ul class="navbar-nav mr-auto ">
      <li class="nav-item active">
      </li>
    </ul>
    <ul class="navbar-nav  mr-4">
      <li  class="nav-item active " *ngIf="authUser" >
        <a class="nav-link"  (click)="logout()" >Logout</a>
      </li>
      <li   class="nav-item active" *ngIf="!authUser" >
          <a class="nav-link" >Login</a>
        </li>
      <li   class="nav-item active" *ngIf="!authUser">
        <a class="nav-link" >Signup</a>
      </li>
    </ul>
    <div  class="mr-4 text-white">
        <i class="fa fa-cart-arrow-down"><span class="badge badge-light">0</span></i>
    </div>
  </div>
</nav>
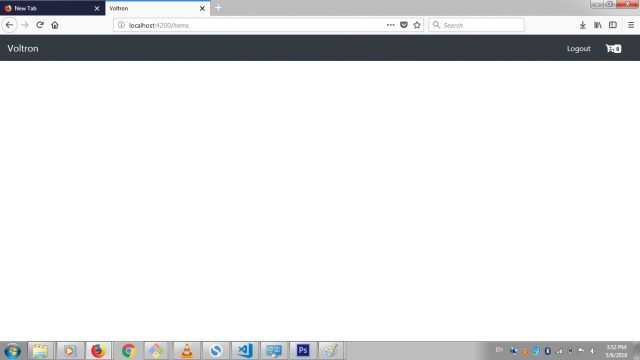
If you open the app-navbar.component.ts file, in the component decorator @component you can see the selector for this component which we are going to add to the app.component.html to display the component on the DOM.
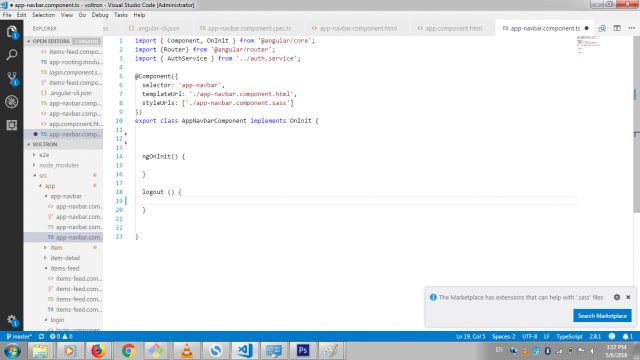
Lastly we need to import the component to the appmodule.ts file and add to the component to the @NgModule decorator, which would be done for us by default when we generate through the CLI.
if you noticed, at the bottom we bootstrap through the appComponent (start off through the AppComponent)
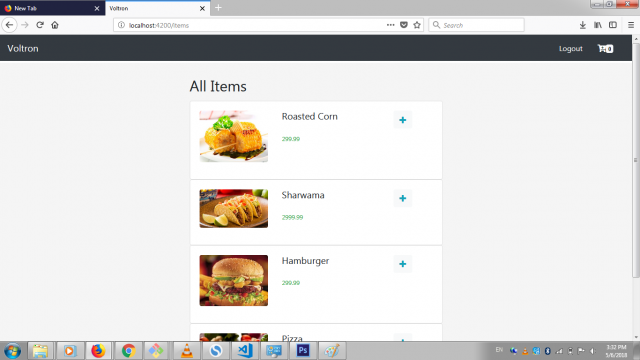
Below is the output on the browser.
Component Nesting
We will be using the concept of component nesting when building the Item feed component and the item component, nesting is a process of a parent component housing the child component with out direct knowledge of each other. In this idea, the Item feed component is the parent component while the item component is the child component.
Lets start by building the parent component
generate the parent component using the command below
ng g c itemFeed
A folder item-feed is created, in the folder,add the markup for the item-feed in the item-feed.component.html
<div class="items-feed__container">
  <section class="container">
    <div class="row align-items-center justify-content-center">
      <section class="col-md-6 offset-md-6">
        <h2 class="mb-3">All Items</h2>


      </section>
    </div>
  </section>
</div>
We are simply creating a container and setting the items in that container to align center
In the scss file of the component add
.items-feed__container
    margin-top: 60px;
    padding: 30px 0;
    background: #f5f5f5;
Here, we just increase the margin from the navbar component,next up is to
generate the child component item
ng g c item
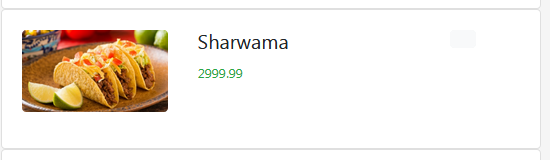
in the html file of the item component add
<div class="card">
  <div class="card-body">
      <div class="media">
          <div class="media-body">

              <section class="row">
                  <div class="col-xs-4 col-sm-4 col-md-4">
                        <`img class="mr-3 mb-3 img-fluid rounded img-responsive "  alt="Generic placeholder image">
                   <div>

                  <div class="col-xs-7 col-sm-7 col-md-7">
                      <h5 class="mt-0 clearfix">
                        sharwama

                        <button class="float-right btn btn-light text-info">
                            <i class="fa fa-plus"></i>
                        </button>
                      </h5>

                      <small class="text-success">2999.99</small>
                  </div>

              </section>

          </div>
        </div>
  </div>
</div>
The default value of price and title,would be gotten from the server and outputted on the DOM through interpolation,but for now, we would be using a placeholder
we basically created a div that houses and image, title and a clickable button
We need to add the newly created item to the parent container
Add the selector, below the H2 tag
<app-item></app-item>
which would append it as a child of the item-feed.
Routing
Right now our parent component with its child is not yet on the DOM, we want to show it using routing, we need router to carryout this function
generate a router from the CLI
ng generate module app-routing --flat --module=app
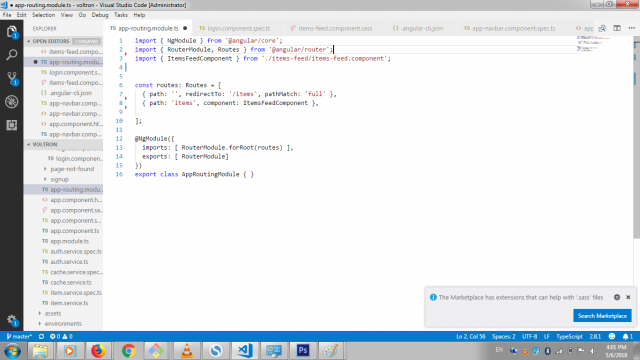
Open up the generated app-routing.module.ts and import the component we want to add a router for
import { ItemsFeedComponent } from './items-feed/items-feed.component';
in the import array and the export array, add
 imports: [ RouterModule.forRoot(routes) ],
  exports: [ RouterModule]
one imports the router and the other exports it globally
We also need to create the Routes array to hold all the routes for our application
We have defined one route and a redirect route that is triggered once the application lunches
{ path: 'items', component: ItemsFeedComponent },
The code above matches the path localhost:4200/items and issue out the items feed component to the DOM
the last route uses the home to redirect to the item feed component, that is why it uses an empty string on its path.
import { NgModule } from '@angular/core';
import { RouterModule, Routes } from '@angular/router';
import { ItemsFeedComponent } from './items-feed/items-feed.component';

const routes: Routes = [
    { path: '', redirectTo: '/items', pathMatch: 'full' },
    { path: 'items', component: ItemsFeedComponent },
];

@NgModule({
  imports: [ RouterModule.forRoot(routes) ],
  exports: [ RouterModule]
})
export class AppRoutingModule { }
Next up,in the app.module.ts, we need to import the router and add it to the imports array
import { AppRoutingModule } from './/app-routing.module';
Add AppRoutingModule to the imports array
finally, we need to add a router-outlet to the app.component.html
<router-outlet></router-outlet>
below is the final result
<main>
  <app-navbar></app-navbar>
  <router-outlet></router-outlet>
</main>
The router-outlet inserts the itemFeedComponent in the DOM once the application starts.
Conclusion
It has been a nice trip from installation to building components and routing. In the next series, we are going to talk about component interaction, services and observable.
Curriculum
- Building a food order system with MEAN Stack (MongoDB, Express, AngularJs and NodeJs). pt1.
- Building a food order system with MEAN Stack (MongoDB, Express, AngularJs and NodeJs). pt2.
- Building a food order system with MEAN Stack (MongoDB, Express, AngularJs and NodeJs). pt3.
- Pt4 Building a food order system with MEAN Stack (MongoDB, Express, AngularJs and NodeJs).
Resources
- Angular Docs
- Bootstrap 4 documentation
- Remember to check out the Repo for this project
Hey there this post caught my attention on my feed and I went through your profile and found some really helpful articles! I was wondering if you would be interested in putting together a guest post for my blog called nichemarket
Have a look at the guest post section and if you’re interested let me know and I’ll send you further details
Thanks
I am interested
How's the crypto market looking in Nigeria? You converting some Naira to Bitcoin lately?
Cool feel free to contact us via our website looking forward to hearing from you
Sure we are. The market is doing great
Your Post Has Been Featured on @Resteemable!
Feature any Steemit post using resteemit.com!
How It Works:
1. Take Any Steemit URL
2. Erase
https://3. Type
reGet Featured Instantly & Featured Posts are voted every 2.4hrs
Join the Curation Team Here | Vote Resteemable for Witness
Thank you for your contribution.
Overall I liked your work.
As a few suggestions for your future work, aim to:
Looking forward to your upcoming tutorials.
Need help? Write a ticket on https://support.utopian.io/.
Chat with us on Discord.
[utopian-moderator]
Hey @sirfreeman
We're already looking forward to your next contribution!
Contributing on Utopian
Learn how to contribute on our website or by watching this tutorial on Youtube.
Utopian Witness!
Vote for Utopian Witness! We are made of developers, system administrators, entrepreneurs, artists, content creators, thinkers. We embrace every nationality, mindset and belief.
Want to chat? Join us on Discord https://discord.gg/h52nFrV
This is a very impressive implementation of Angular, nice work done here..
Thanks