Building A food Order system Part 11
Contribution Repository
previously on this series, we were able to pass data from our route on the navbar component into the order component and display the the items from the server with the *ngFor directive, we also worked on adding items to our cartService, which in turns updates the Navbar component with the total amount of items in the cart. In this series, i am going to explain a lot about state management and how we can implement the same state on two separate component.
Rating
This tutorial is rated Intermediate.
What Will I learn?
- We are going to learn how to use the object spread operator to mutate our objects and add a new property
- We would learn how to use the map and filter functions to manipulate array of data.
- Event bubbling on components
- Lastly, we are going to learn more on observables and using them increment and decrement an objects property.
Requirement.
- Typescript version 2.4.2
- Node version version 8.9.4
- Npm version 5.6.0
- Bootstrap 4.0
- Visual Studio Code IDE
- Voltront front client Repository
This series implementation

Introduction
Illustration for the tutorial
Welcome back to our new series on the food App, yeah we have been doing well, below is the last state or structure o our application.
- Voltron
- node_modules/
- src/
- app
- app-navbar/
- item/
- order
- order-item
- items-feed/
- signup/
- login/
- app-routing.module
- app.component.html
- app.component.sass
- app.component.ts
- app.module.ts
- auth.service.ts
- item.service
- cache.service
- cart.service
- asset/
- environments/
- item.ts
- user.ts
- auth.ts
- app
- .angular-cli.json
- .editorconfig
+.....
Recall in our last series, we able to implement the removal of items from the cartItems using a filter function by removing the selected items from the observable.
In this series we are going to refactor our code a little, what if we like our user to add, remove, increment and decrement quantity from the cart. Lets say we want to implement it in such a way that the user can carryout both functions in the items feeds and in the and in the order feed.
previous implementation
This implementation is quite easy lets go on a smooth ride, a little bumpy so follow every step.
We are going to be using a lot of Vanilla JavaScript methods of which i will try to explain every code block.
let ride like the happy guy below.

We would take each module and work on it. lets start with the following Implementation on the Item feed component
- Adding the item to the cart
- Removing the item from the cart
- Increasing the quantity of items in the cart from the item feed
- decreasing the quantity of item in the cart
Lets Jump in.
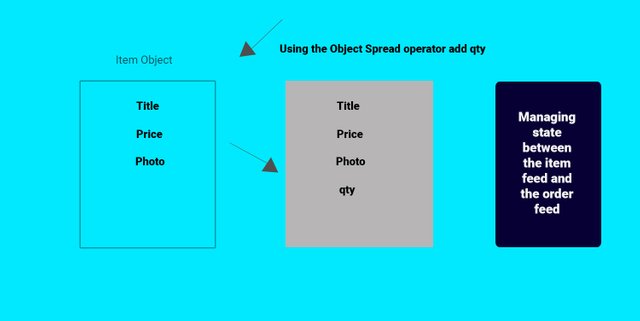
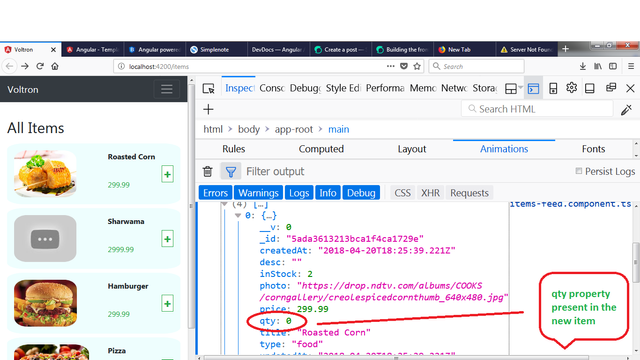
When the item is fetch from the server using the item service we do not have a quantity property on the object
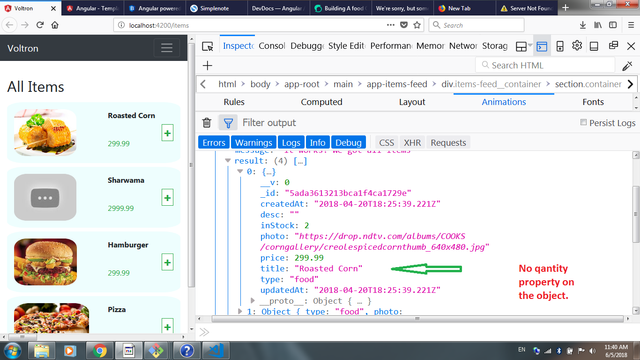
Before we implement the above, we need to add the quantity property to the items once they arrive from the server. We are going to harness the power of the object spread operator. In the previous tutorial, the items were fetched the getItems method which calls a similar method on the itemService to fetch the items from the server.
Open item-feed.component.ts and update the getItems method
getItems(): void {
    this.itemService.getItems()
        .subscribe(items => {
          this.items = items['result'].map(item => {
            return {
              ...item,
              qty: 0
            }
          })

        });
  }
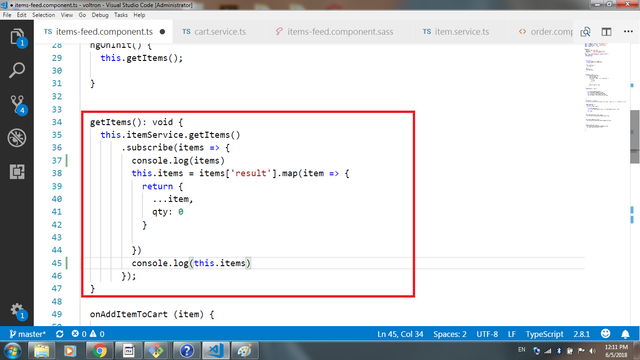
As explained before, we subscribe for the items from the cartServices' getItems method which returns the items from the server.
next up we added the qty property to item by iterating through the result of the items from the server and spreading the object using the object spread operator (...) to add the former object (item) and a new property of qty set to zero.
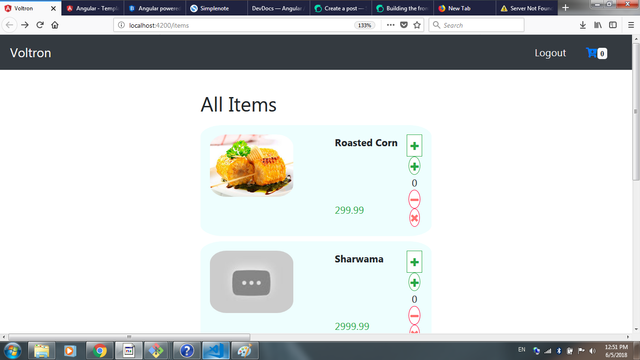
Lets update our item.component.html and the item.component.sass to support our new feature
<div class="order-item mb-2" *ngIf="item">
        <div class="item-photo">
            <a routerLink="/items/item-detail/{{item._id}}">gtimg  class="img-responsive" src="{{item.photo}}" alt=""></a>
        </div>

        <div class="details">
            <p class="detail-title">{{item.title}}</p>
            <p class="text-success">{{item.price}}</p>
        </div>
        <div class="controls">
            <button   class="btn add-button-lg button-lg"><i class="fa text-success fa-plus"></i></button>
            <button  class="btn add-button"><i class="fa text-success fa-plus"></i></button>
            <span  >{{item.qty}}</span>
            g

            <button   class="btn reduce-button"><i class="fa fa-minus"></i></button>
            <button   class="btn reduce-button"><i class="fa fa-times"></i></button>
        </div>
</div>
This component is responsible for showing the item, we are creating four buttons for the actions below
- removing from cart
- adding to cart
+increasing and decreasing quantity
later in the tutorial, the buttons would be toggle with a condition on the items' quantity property
update the item.component.sass with the styles.
.order-item
    display: flex;
    flex: 1 1 auto;
    background-color: #eefefe;
    padding: 15px;
    border-radius: 10%;


.item-photo
    display: flex;
    height: 100px;
    width: 100px;

img
    border-radius: 20%;
    height: 100%;

.details
    display: flex;
    margin-left: 100px;
    flex-direction: column;
    justify-content: space-between;

.controls
    display: flex;
    margin-left: auto;
    flex-direction: column;
    align-items: center
    justify-content: space-around;

.detail-title
    font-weight: bolder;


button
    background-color: #fff;
    border-radius: 50%;
    padding: 2px;
.add-button
    border: 1px solid #28a745

.reduce-button
    border: 1px solid #ff0039

.remove-button
    border: 1px solid #ff7171
.fa
    font-size: 15px;
.fa-minus
    color:  #ff7171;
.fa-times
    color:  #ff7171;
.add-button-lg
    border: 1px solid #28a745

.button-lg
    background-color: #fff;
    border-radius: 0;
    padding: 5px;


.fa-plus:hover
    color: #fff;
Emitting events for the buttons
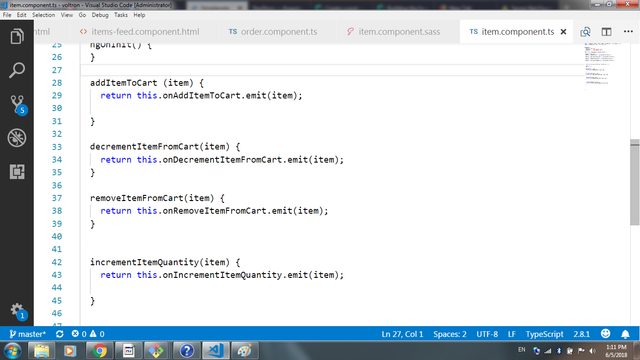
Open items.component.ts where we imported EventEmitter and output, all we need to do is create some set of events using the EventEmitter and output.
@Output() onAddItemToCart = new EventEmitter<object>();

  @Output() onDecrementItemFromCart = new EventEmitter<object>();

  @Output() onRemoveItemFromCart = new EventEmitter<object>();

  @Output() onIncrementItemQuantity = new EventEmitter<object>();
Here we are creating new events, we set onAddItemToCart, onDecrementItemFromCart, onRemoveItemFromCart and onIncrementItemQuantity to new events just like a click event.
These events would be bubbled out to the parent container through the Output, we need this event to bubble out the items so we need to create the methods to bubble out the event once they are called by a click handle.
addItemToCart (item) {
    return this.onAddItemToCart.emit(item);

  }

decrementItemFromCart(item) {
    return this.onDecrementItemFromCart.emit(item);
  }

removeItemFromCart(item) {
    return this.onRemoveItemFromCart.emit(item);
  }


incrementItemQuantity(item) {
    return this.onIncrementItemQuantity.emit(item);

  }
The above methods return an emission of the item object once called by the click handler on a button.
Adding the click events to the buttons
Earlier, we created for sets up button on the Item.component. html, we need to add a click handle that calls the method on the component to emit each events.
eg (click)="someMethod()"
update the item.component.html to the code below
<div class="order-item mb-2" *ngIf="item">
        <div class="item-photo">
            <a routerLink="/items/item-detail/{{item._id}}">gtimg  class="img-responsive" src="{{item.photo}}" alt=""></a>
        </div>

        <div class="details">
            <p class="detail-title">{{item.title}}</p>
            <p class="text-success">{{item.price}}</p>
        </div>
        <div class="controls">
            <button *ngIf="item.qty == 0" (click)="addItemToCart(item)" class="btn add-button-lg button-lg"><i class="fa text-success fa-plus"></i></button>
            <button *ngIf="item.qty > 0" (click)="incrementItemQuantity(item)" class="btn add-button"><i class="fa text-success fa-plus"></i></button>
            <span  *ngIf="item.qty > 1">{{item.qty}}</span>

            <button *ngIf="item.qty > 1" (click)="decrementItemFromCart(item)" class="btn reduce-button"><i class="fa fa-minus"></i></button>
            <button *ngIf="item.qty == 1" (click)="removeItemFromCart(item)" class="btn reduce-button"><i class="fa fa-times"></i></button>
        </div>

</div>
In the above, we are creating the item layout which contains the item photo, price and title shown by using interpolation
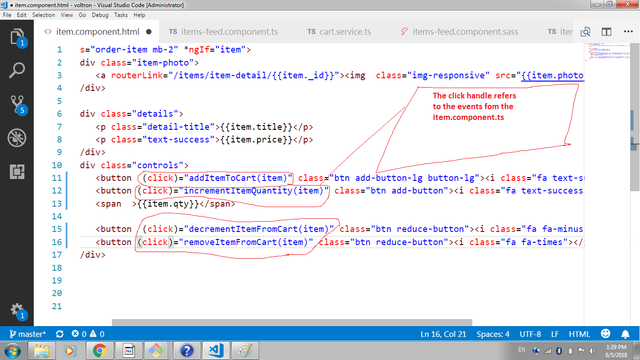
Next up, we need to create the methods to carryout these actions and bind them to the item-feed.component iteration.
Writing the methods to mutate objects in an observable
The only way our application can know the state of an object has change is by mutating the object from a stream that is monitored by the application, We talked about observables in previous tutorial were we said observables are streams of data monitored by the application.
In this case, we want to mutate the the state of the item in the cart. We already have the cartItems in the cartService as an observable, lets write methods to mutate the state.
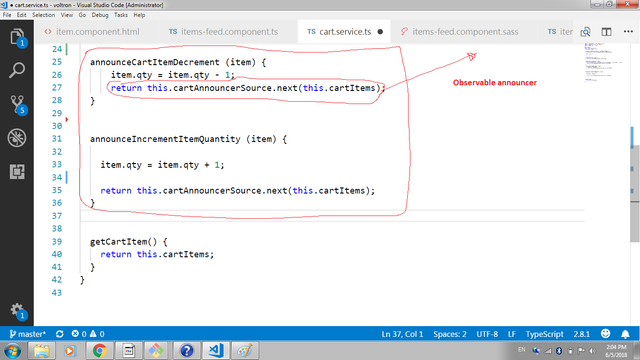
Open up the cartService.ts
In the last series, we added methods to add and remove from the observable, lets create two methods to increment and decrement the quantity of item in the observable
announceCartItemDecrement (item) {
      item.qty = item.qty - 1;
      return this.cartAnnouncerSource.next(this.cartItems);
  }


  announceIncrementItemQuantity (item) {

    item.qty = item.qty + 1;

    return this.cartAnnouncerSource.next(this.cartItems);
  }
The first method, accepts the item, and retrieves the property qty and decrement it by running
item.qty = item.qty - 1; when ever it is called. The last line announces to the observable that a data has change.
The second method is the reverse of the first which increases the qty when ever it is called and announce to the observable that the data has changed
Next up we need to use these methods in our component
We are going to refactor our code differently from the last time, "what is the mission?", we want to be able to add a particular item once into the cart and we wont be able to add it if its already exist and we also want to be able to increase the quantity and also decrease it.
Lets create a method to check if an item exist in the cart
Note this method return an object
getItemInCart (cartItem) {
    return this.cartService.cartItems.filter(item => item['_id'] === cartItem['_id'])[0]
  }
The method filter through the observable and returns the item that matches the one in the cart. The notation "[0]" tells the filter method to return the first object in the array. To learn more on the filter method checkout this article
The next methods checks if the getItemInCart method evaluates to undefined, if yes it means the said item doesn't exist in the cartItem then it run the method to increment the qty and pushes the item to the observable.
onAddItemToCart (item) {


    if (!this.getItemInCart(item)){
      this.onIncrementItemQuantity(item)
      this.cartService.cartItems.push(item);
      this.cartService.announceCartItem(item);
      this.cartItems = this.cartService.cartItems;


    }
  }
Note we haven't written the method to increment and decrement from the observable through the item feed component
onDecrementItemFromCart(item: Item) {
    this.cartService.announceCartItemDecrement(item);

  }

  onIncrementItemQuantity(item) {
    this.cartService.announceIncrementItemQuantity(item);


  }
The both methods calls the method in the service to decrement and increment the quantity on the observable respectively by announcing to the source that the object has changed.
Finally lets update the onRemoveItemFromCart()
onRemoveItemFromCart(item) {
    this.cartService.announceCartItemRemoval(item);
    this.onDecrementItemFromCart(item)

  }
When the method is clicked, we need to call the OnDecremenItemFromCart method to reduce the quantity in the cart zero before removing from the cart.
Binding the to event listeners on the Item-feed.
The event listeners picks up any bubbled events from the child component, so need to make the binding to listen for those events from the child.
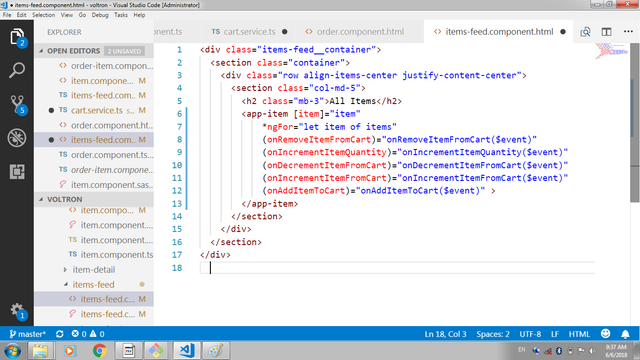
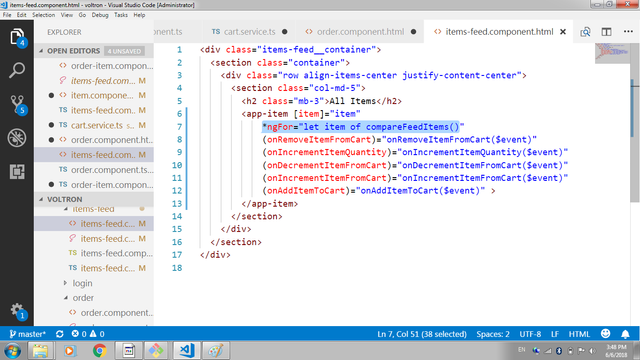
Open up item-feed.component.html and add the code below.
<app-item [item]="item"
            *ngFor="let item of items"
            (onRemoveItemFromCart)="onRemoveItemFromCart($event)"
            (onIncrementItemQuantity)="onIncrementItemQuantity($event)"
            (onDecrementItemFromCart)="onDecrementItemFromCart($event)"
            (onIncrementItemFromCart)="onIncrementItemFromCart($event)"
            (onAddItemToCart)="onAddItemToCart($event)" >
        </app-item>
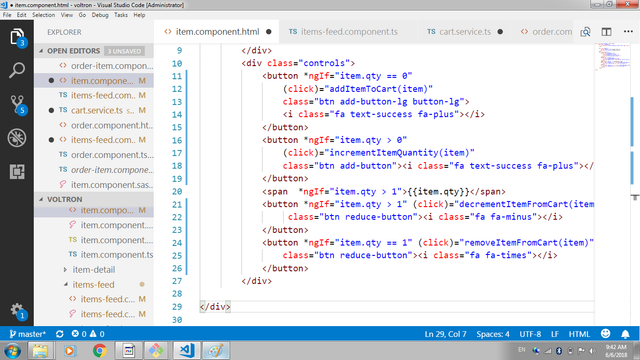
Rendering buttons by conditions on the quantity
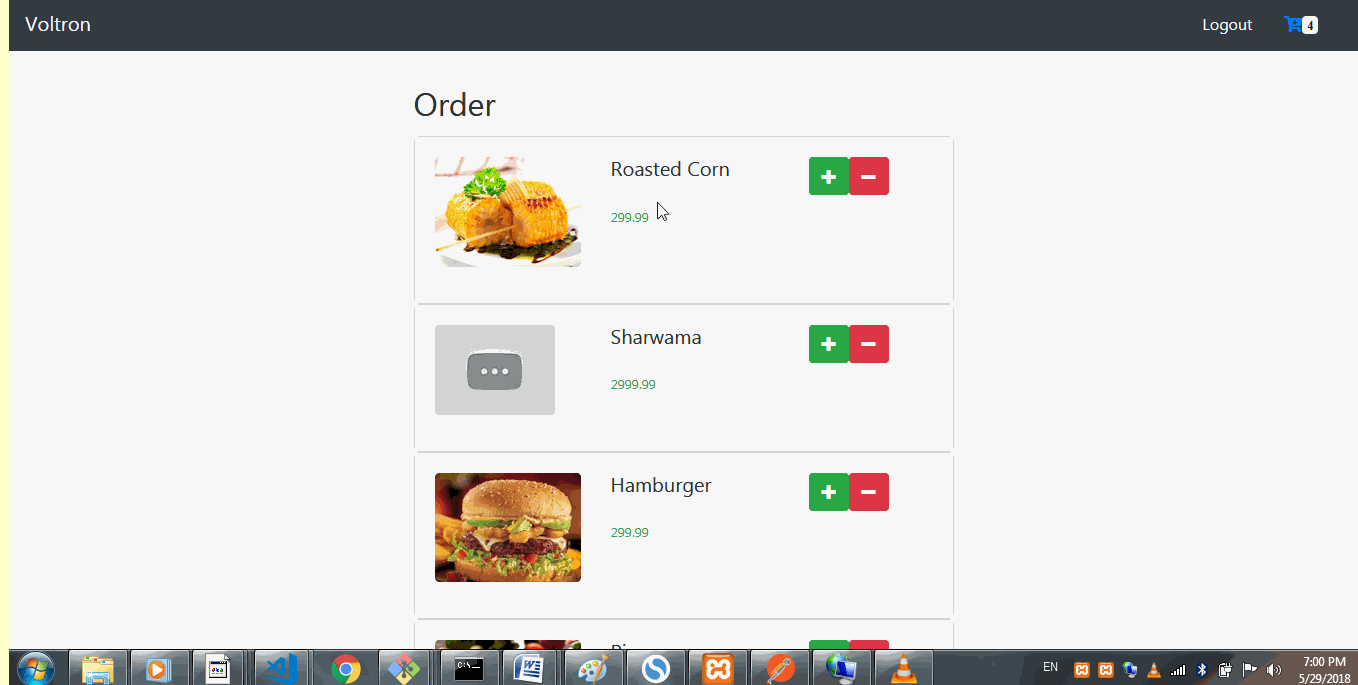
We want to show the add cart button when the items are loaded the toggle the display of the button. When the item is in the cart, the qty property would be set to "1" and the the decrement and increment buttons are showed. The decrement button is replaced with the removeItemFromcart button;
What are the conditions to show the different buttons?
qty = 0, show the ad button
qty = 1, show the remove and increment button
qty > 1, show the decrement button
Update the item.component.html with the new (*ngIf) directives
<div class="controls">
            <button *ngIf="item.qty == 0"
                (click)="addItemToCart(item)"
                class="btn add-button-lg button-lg">
                <i class="fa text-success fa-plus"></i>
            </button>
            <button *ngIf="item.qty > 0"
                (click)="incrementItemQuantity(item)"
                class="btn add-button"><i class="fa text-success fa-plus"></i>
            </button>
            <span  *ngIf="item.qty > 1">{{item.qty}}</span>
            <button *ngIf="item.qty > 1" (click)="decrementItemFromCart(item)"
                 class="btn reduce-button"><i class="fa fa-minus"></i>
            </button>
            <button *ngIf="item.qty == 1" (click)="removeItemFromCart(item)"
                class="btn reduce-button"><i class="fa fa-times"></i>
            </button>
        </div>
Updating the Order and the Order-item component
The order item is just like the item component, it would bubble out event to listen for the onRemoveItemFromCart, onIncrementQantity and onDecrementQantity, just like the item.component.ts, we need to create and emit new events
@Output() onDecrementItemFromCart = new EventEmitter<object>();

  @Output() onRemoveItemFromCart = new EventEmitter<object>();

  @Output() onIncrementItemQuantity = new EventEmitter<object>();
The above are set to new events which are bubble by a method we are yet to create, lets create those method
decrementItemFromCart(cartItem) {
    return this.onDecrementItemFromCart.emit(cartItem);
  }

  removeItemFromCart(cartItem) {
    return this.onRemoveItemFromCart.emit(cartItem);
  }


  incrementItemQuantity(cartItem) {
    return this.onIncrementItemQuantity.emit(cartItem);

  }
The method once called, bubble out the cartItem that was clicked to the parent container which is the order.component.ts
Next up we need to add the buttons and the methods just like in the item component to call these
methods to bubble the events.
update the order-item.component.html
<div class="order-item mb-2" *ngIf="cartItem">
    <div class="item-photo">
        gtimg src="{{cartItem.photo}}" alt="">
    </div>

    <div class="details">
        <p class="detail-title">{{cartItem.title}}</p>
        <p class="text-success">{{cartItem.price}}</p>
    </div>
    <div class="controls">
        <button (click)="incrementItemQuantity(cartItem)" class="btn add-button"><i class="fa text-success fa-plus"></i></button>
        <span >{{cartItem.qty}}</span>
        <button (click)="decrementItemFromCart(cartItem)" class="btn reduce-button"><i class="fa fa-minus"></i></button>
        <button  (click)="removeItemFromCart(cartItem)" class="btn reduce-button"><i class="fa fa-times"></i></button>
    </div>
</div>
Above, we added three buttons to to call the methods to increment, decrement quantities and remove the item from cart
update the item.component.html with its styles to show the structure of its layout.
.order-item
    display: flex;
    flex: 1 1 auto;
    background-color: #eefefe;
    padding: 15px;
    border-radius: 10%;


.item-photo
    display: flex;
    height: 100px;
    width: 100px;

img
    border-radius: 20%;
    height: 100%;

.details
    display: flex;
    margin-left: 60px;
    flex-direction: column;
    justify-content: space-between;

.controls
    display: flex;
    margin-left: auto;
    flex-direction: column;
    align-items: center
    justify-content: space-around;

.detail-title
    font-weight: bolder;


button
    background-color: #fff;
    border-radius: 50%;
    padding: 2px;
.add-button
    border: 1px solid #28a745

.reduce-button
    border: 1px solid #ff0039

.remove-button
    border: 1px solid #ff7171
.fa
    font-size: 15px;
.fa-minus
    color:  #ff7171;
.fa-times
    color:  #ff7171;
Creating the methods for which the are called when the events are propagated by the child component
In the previous section, we created methods that emits events once they are called by the click event on the button in the order component.
On the item-feed.component.ts, the methods to carryout the actions would be created
onDecrementItemFromCart(cartItem: Item) {
    this.cartService.announceCartItemDecrement(cartItem);
    this.getOrderItems()
  }
This method, calls the announceCartItemDecrement method on the cartService which accepts a cartItem and reduces the cartItems' quantity property by 1.
onIncrementItemQuantity(cartItem: Item) {
    this.cartService.announceIncrementItemQuantity(cartItem);
  }
This method, calls the announceIncrementItemQuantity method on the cartService which accepts a cartItem and Increases the cartItems' quantity property by 1.
onRemoveItemFromCart(cartItem: Item) {
    this.cartService.announceCartItemRemoval(cartItem);
    this.cartItems = this.cartService.cartItems
  }
This method calls the announceCartItemRemoval method on the cart which accepts a cartItem and
using the filter method check if the currentItems that are been filtered is not equal to the cartItem
currentItem => currentItem !== item
Binding the methods to event on the order component
We have to bind the methods to the iteration on the parent component t listen for when the child emits an event. Update order.component.html to reflect the binding
<app-order-item [cartItem]="cartItem"
          *ngFor="let cartItem of cartItems"
          (onRemoveItemFromCart)="onRemoveItemFromCart($event)"
           (onIncrementItemQuantity)="onIncrementItemQuantity($event)"
           (onDecrementItemFromCart)="onDecrementItemFromCart($event)">
 </app-order-item>
Here we are simply binding the events bubbled from the child component to the method to carryout the actions on the order.component.ts
Toggling button display on the Order-item.component.ts
Just like we did on the item.component.html, we need to toggle the display of the buttons using the *ngIf directive to render different button and the span element once a certain condition is met.
Update order-item.component.html
<div class="controls">
        <button (click)="incrementItemQuantity(cartItem)" class="btn add-button"><i class="fa text-success fa-plus"></i></button>
        <span *ngIf="cartItem.qty > 1">{{cartItem.qty}}</span>
        <button *ngIf="cartItem.qty > 1" (click)="decrementItemFromCart(cartItem)" class="btn reduce-button"><i class="fa fa-minus"></i></button>
        <button *ngIf="cartItem.qty === 1" (click)="removeItemFromCart(cartItem)" class="btn reduce-button"><i class="fa fa-times"></i></button>
    </div>
The button to decrement quantity is shown when the cartItem.qty propertie is > 1 and the button to remove the item from cart is only displayed when the cartItem.qty is equal to 1.
Final effect
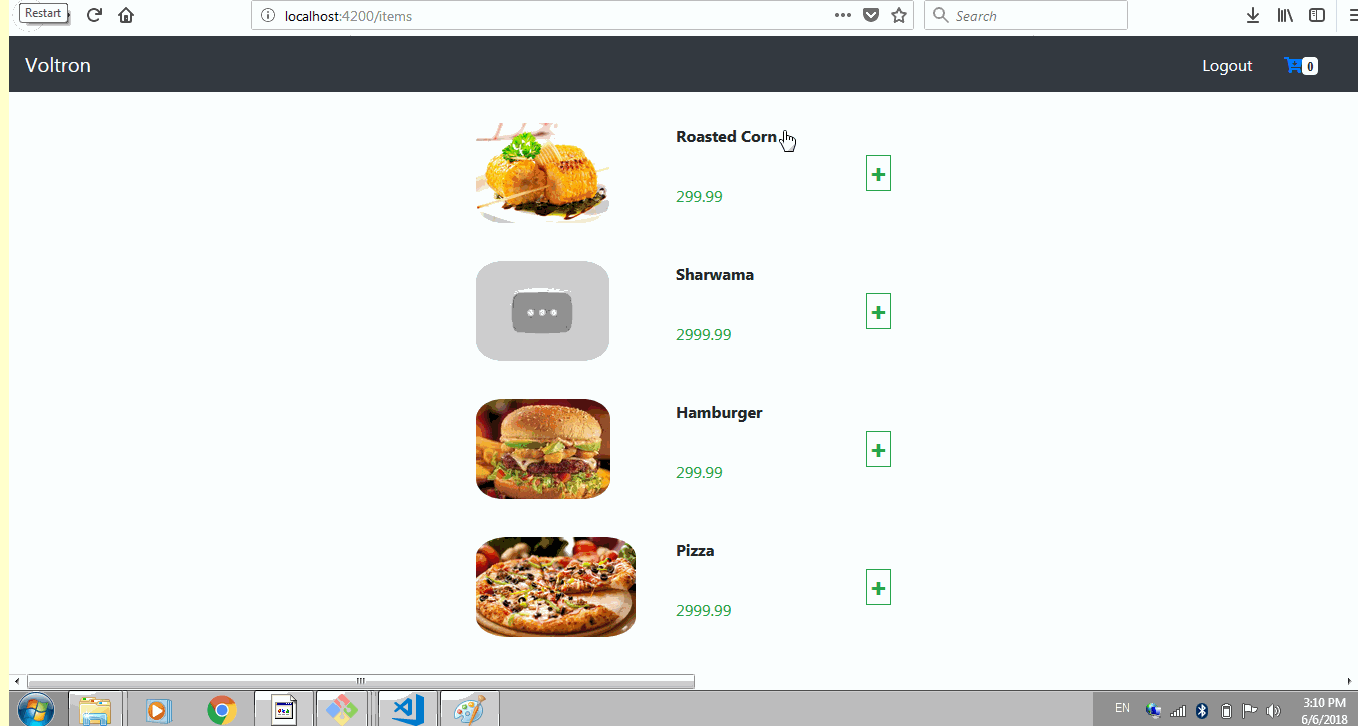
We have a little problem from our application, if you watch the gif above after putting the items on cart and visiting the order route, if you return back to the initial route, events carried out on the item feed disappears. How do we solve this?
We need to find a way to retrieve the values mutated in the cart items' observable and displaying the mutated values in the cart on the item feed. Lets write a method to do this.
 compareFeedItems () {
    let self = this;
    return this.items.length ?

      this.items.map(item => {
        return self.getItemInCart(item) ? self.getItemInCart(item) : item;
      }) :
      this.items;

  }
Here, this method says if there are items on the item feed, when the check returns true, iterate through the available items and check using the getItemInCart method to know if a particular item is in the cart, when the statement evaluate to true, return the item in cart else return all items.
Since this method will return every thing on the item-feed, we can up date our item.component.html to use the method for iteration.
*ngFor="let item of compareFeedItems()
Conclusion
In this series, we where able to remove, increment and decrement quantities of items from the observable and we where also able to maintain equal state in the item-feed and the order-feed component. next up we would run calculations on our order and take about skeletal Screen loading in angular.
Remember to check out the Food Order System Repo
Curriculum
- Building a food order system with MEAN Stack (MongoDB, Express, AngularJs and NodeJs). pt1.
- Building a food order system with MEAN Stack (MongoDB, Express, AngularJs and NodeJs). pt2.
- Building a food order system with MEAN Stack (MongoDB, Express, AngularJs and NodeJs). pt3.
- Pt4 Building a food order system with MEAN Stack (MongoDB, Express, AngularJs and NodeJs).
- Building the frontend Food order system with Angularjs. Part 5
- Building the frontend Food order system with Angularjs. Part 6
- Building the frontend Food order system with Angularjs. Part7
- Building the frontend Food order system with Angularjs (building angular authentication).Part8
- Building the frontend Food order system with Angularjs Part9
- Building the frontend Food order system with Angularjs Part11
Resources
- Angular Docs
- Reactivex Observables
- Bootstrap 4 documentation
- Remember to check out the Repo for this project
- Official documentation on form validation
- Learning about filter funtion
Congratulations @sirfreeman! You have completed some achievement on Steemit and have been rewarded with new badge(s) :
Click on the badge to view your Board of Honor.
If you no longer want to receive notifications, reply to this comment with the word
STOPTo support your work, I also upvoted your post!
Thank you for your contribution.
While I liked the content of your contribution, I would still like to extend few advices for your upcoming contributions:
Looking forward to your upcoming tutorials.
Your contribution has been evaluated according to Utopian policies and guidelines, as well as a predefined set of questions pertaining to the category.
To view those questions and the relevant answers related to your post, click here.
Need help? Write a ticket on https://support.utopian.io/.
Chat with us on Discord.
[utopian-moderator]
Hey @sirfreeman
Thanks for contributing on Utopian.
We’re already looking forward to your next contribution!
Contributing on Utopian
Learn how to contribute on our website or by watching this tutorial on Youtube.
Want to chat? Join us on Discord https://discord.gg/h52nFrV.
Vote for Utopian Witness!