Adding images to post in wordpress
Adding images to post in wordpress
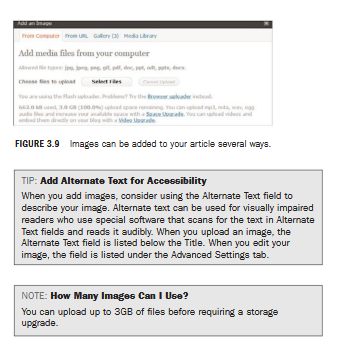
Adding images to your article communicates much more information than text alone. Inserting images into your article is available in four ways:
I. From your computer
- From a URL (another website)
- from the gallery (available after images are uploaded)
- from the media library Begin any of these methods by placing your cursor in the body of your text where you want to insert the image and then click the Add an Image icon. The Add an Image window opens
Adding an image From Your Computer
To add an image from your computer follows these steps: - Select the left option (From Computer) at the top of the Add an Image window You can upload JPEG, GIF or PNG image files by clicking the Select Files button.
- Use your computer’s browse feature to select the file(s) you want to upload
3 Click Open (Windows) or Select (Mac)- Your file is uploaded. And a thumbnail of your image is displayed with various properties.
4 Click the insert into Post button. Use the scroll bar on the Add an Image window so look further down if you don’t see the button displayed. Your image is then inserted into your post If you need to modify any of the image properties, such as alignment. Size, Caption, and so on. Click your image and two icons appear in the upper-left corner of your image. Click the icon that looks like a mountain and sky to edit your image: click the red circle with a slash through it to delete your image
Adding an image From a URL
Another way to add an image to your article is to reference it from another location (someone else’s site) or add it by using the URL. Adding an image by using a URL saves you disk space and ensures changes to an image at the source are reflected on your site. The downside is that your site is generating traffic on the other server instead of your own server. Which is sometimes frowned upon? Another disadvantage is the lack of control you have on the image you are using. 1f someone on the other site deletes the file; you will find yourself with a missing image. Before you use this option, be sure you have permission to include images through the URL. To add an image from a URL, do the following: - Determine the URL to the image you want to use by going to that page and right-clicking on the image.
- Copy the URL. Depending on your browser: Firefox: Choose Copy Image Location. Internet Explorer: Choose Properties and copy the text from the Address (URL) field Safari: Choose Copy Image Address.
3 Click the Add an Image icon from the toolbar - In the Add an Image window . click the From URL tab.
- Copy the Image URL by placing your cursor in the Image URL. Field and typing Ctr+V (Windows), X -V (Mac), or right- click and choose Paste.
- Add descriptive text to the Alternate Text field.
- Enter a caption (optional).
- Specify how you want the image aligned (optional).
- If you want the image to link to another site or page when the reader clicks on the image, enter the URL in the Link Image to field (this field is blank by default).
- Click the insert Into Peat button at the bottom.
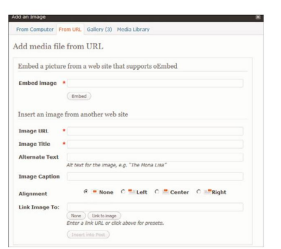
Your image is now part of your article. To edit the image properties, Click the image and then click the icon that looks like a mountain and sky that appears in the upper-left corner When the Add an Image window appears. Notice that there is a second way so insert an image by using a URL. The option at the top uses a protocol known as oEmbed. without getting too technical, oEmbed is a new technology so address some problems discovered with referencing media from another site with a direct URL. The advantage of oEmbed is that it provides additional information about the media being requested so that the software (WordPress in this case) can be smarter about how it is embedded. The capability so embed an image is supported by many popular media sites such as YouTube. Flickr, and Hulu: more are being added all the time. For more information about oEmbed. Visit www.oembed.com
Adding Image from the Gallery
Your gallery is a collection of images attached to a post or page. It is a subset of the media library (a collection of all images and media files uploaded to your blog). ‘When you add another image to the same article, a fourth option labeled Gallery appears on the top of the Add an Image window . This option enables you so view the images attached to that article and insert them as a collection in the post For example let’s say I have several images from my summer vacation. Rather than inserting the images individually to the post or page. I can create a gallery using the following steps: - Click the Add an Image icon.
- Click the From Computer tab to upload the images the same as you would to insert the images in to a post
- Instead of clicking Insert into Post, click Save All Changes
- Click the Insert Gallery button to add all four images at once. Changing the settings of your gallery is similar to images. Click on the gallery after it is added to your post or page and use the upper-left icon to change where the image thumbnails link to, the order of the images. and how many columns to display. Click Update Gallery Settings to save your changes. You can find additional information about the Gallery at http://en.support.wordpress.com/mage(gallery)
Adding an Image from the Media Library
The final way to add an image to your article is from your media library After you load images into your media library, you can easily add images to an article: Click the cursor where you want to insert the graphic in your text 2. Click the Add an Image icon from the toolbar 3. When the Add an Image window appears, click Media Library at the top.