Ionic Tutorials: Setting Up Your In-App Settings for an Ionic app

Repository: Ionic Github Repository
Software Requirements:
Visual Studio Code(Or any preferred code editor),
npm, ionic.
What you will learn:
In this tutorial you would learn about how to manage your ionic app on whatever platform you choose to target covering these major concepts
- How to update settings whenever changed
- How to Sync setting across app using lifecycle events
- How to Sync a modify template elements using
@viewChildandRenderer
Tutorial
Today, I would be coming back from my 3 week break with a new tutorial about how you could set up settings for your application.
In this tutorial we would be building a complete application from scratch.
Almost all applications give users options to change some parts of the application either embedded in the template or even part of the logic of the application. I did some research and this isn't properly taught on any free courses so i chose to show my reader how you could set up settings for your application using lifecycle events and storage memory for a local app. And you could also use your backend to sync settings for a user that may be using his account over multiple devices.
Lets get started...
Update Settings on Change
Start up a new ionic project with a tabs template like this
ionic start newProject tabs
Agree to all the prompts and then proceed to open your preferred editor in the folder that ionic just created.
Before we jump into this i would like to show you the life cycle events that we will be using for this tutorial. If you haven't been following my series
Lifecycle events are functions that are triggered automatically when a user is switching between views.
For this tutorial we would be using
-ionViewWillEnter: Triggered before a view Enters
-ionViewDidLoad: Triggered the first time the view loads.
For the purpose of this tutorial we would have to create some logic which we would like the user to be allowed to change. We would be making the user choose what content he would see on his homepage from the settings page.
Our app comes with the Home, About and Contact Tab. For this tutorial, we would be converting the About Tab to the settings tab.
Head over to the tabs.html document under the tabs folder and make this relevant changes.
<ion-tabs>
  <ion-tab [root]="tab1Root" tabTitle="Home" tabIcon="home"></ion-tab>
  <ion-tab [root]="tab2Root" tabTitle="Settings" tabIcon="settings"></ion-tab>//Here i changed the icon for the tab and the name shown
  <ion-tab [root]="tab3Root" tabTitle="Contact" tabIcon="contacts"></ion-tab>
</ion-tabs>
You can now head to your home page and begin creating the template for a simple note taking app.
This would be the content of the homepage.
<ion-header>
  <ion-navbar>
    <ion-title>My Note Taking App</ion-title>
  </ion-navbar>
</ion-header>

<ion-content #area>
  <ion-card>
    <ion-card-header>
      Add a new note
      <ion-buttons end>
        <button ion-button icon-only (click)="addNote()">
          <ion-icon name="add"></ion-icon>
        </button>
      </ion-buttons>
    </ion-card-header>
    <ion-card-content>
      <ion-item>
        <ion-label>
          Type Here
        </ion-label>
        <ion-textarea col='5' [(ngModel)]="note">
        </ion-textarea>
      </ion-item>
    </ion-card-content>
  </ion-card>
  <ion-list>
    <ion-item *ngFor="let item of notes">
      {{ item }}
    </ion-item>
  </ion-list>

</ion-content>
And you can then run ionic s which would run in our browser to show the template. As we can see for this tutorial we would be using a simple note taking application.
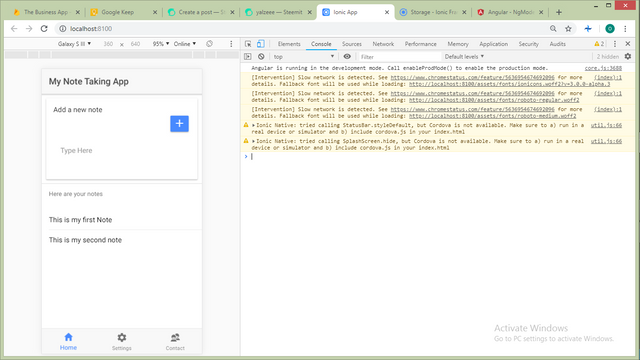.png)
Tip: You can easily open the chrome console using ctrl + J
Note: To get the storage to work you would need to update your app.module.ts file to know which storage to use like this.
import { IonicStorageModule } from '@ionic/storage';

@NgModule({
  declarations: [
    // ...
  ],
  imports: [
    BrowserModule,
    IonicModule.forRoot(MyApp),
    IonicStorageModule.forRoot()
  ],
  bootstrap: [IonicApp],
  entryComponents: [
    // ...
  ],
  providers: [
    // ...
  ]
})
export class AppModule {}
After that head to your home.ts file and add the logic that helps you collect these notes and store them on the devices storage.
import { Component } from '@angular/core';
import { NavController, AlertController, ActionSheetController,Platform } from 'ionic-angular';
import { Storage } from '@ionic/storage';

@Component({
  selector: 'page-home',
  templateUrl: 'home.html'
})
export class HomePage {
  note: string;
  notes = [];
  constructor(public storage: Storage , public actionSheetCtrl: ActionSheetController, public alertCtrl: AlertController, public navCtrl: NavController) {

  }
  ionViewDidLoad(){
    this.storage.get('notes').then(notes=>{
      if(notes){
      this.notes = notes;
    }
    })
  }
  addNote(){
    console.log(this.note);
    this.notes.push(this.note);
    this.note = '';
    this.storage.set('notes',this.notes)
  }
}
And with this we can get to adding settings. For the purpose of this tutorial we would be using settings to change the theme of the application and restrict who can add notes to this app by requiring a secret key.
Head to your setting tab and add a toggle for the light and dark theme and another for the restriction to a secret key.
<ion-header>
  <ion-navbar>
    <ion-title>
      Settings
    </ion-title>
  </ion-navbar>
</ion-header>

<ion-content>
  <ion-item>
    <ion-label>
      Dark Theme
    </ion-label>
    <ion-toggle [(ngModel)]='darkTheme' (ionChange)="updateSettings()">
    </ion-toggle>
  </ion-item>
  <ion-item>
    <ion-label>
      Require Secret Key
    </ion-label>
    <ion-toggle [(ngModel)]='secret' (ionChange)="updateSettings()>
    </ion-toggle>
  </ion-item>

</ion-content>
In ionic there is an event triggered whenever a toggle is changed and this is the (ionChange). So we would imply bind that event to any change in the toggles to update them in the home page template.
You can then head to your about.ts file and make it update the settings to storage whenever the settings are updated like this
import { Component } from '@angular/core';
import { NavController } from 'ionic-angular';
import { Storage } from '@ionic/storage';

@Component({
  selector: 'page-about',
  templateUrl: 'about.html'
})
export class AboutPage {
  secret: boolean = false;
  darkTheme: boolean = false;

  constructor(public storage: Storage, public navCtrl: NavController) {

  }
  updateSettings(){
    console.log('settings Updated');
    const settings = { darkTheme: this.darkTheme, secret: this.secret}
    this.storage.set('settings',settings)
  }

}
So the last step to this would be to update the template based on the setting whenever the page loads using the life cycle events.
We want the app to check for settings on the home page whenever the app loads and update the template based on this
For the dark theme settings
Notice that on the homepage we referenced the ion content in the line
<ion-content #area>//Template reference
We will then be able to change properties from our logic files by doing this
@ViewChild('area') area: ElementRef;//This would reference the content on our page and allow us to change it
So what is happening here is that the view is being updated every time the user enters that view by checking the settings and using the data to updated what the user sees in the view.
This is the final code for the home page
Syncing across life cycle events and using the renderer to change template elements
import { Component, ViewChild, ElementRef, Renderer2 } from '@angular/core';
import { NavController, AlertController, ActionSheetController, Platform } from 'ionic-angular';
import { Storage } from '@ionic/storage';

@Component({
  selector: 'page-home',
  templateUrl: 'home.html'
})
export class HomePage {
  note: string;
  notes = [];
  secret: boolean = false;

  @ViewChild('area',{read: ElementRef}) area: ElementRef;

  constructor(public renderer: Renderer2, public storage: Storage, public actionSheetCtrl: ActionSheetController, public alertCtrl: AlertController, public navCtrl: NavController) {

  }
  ionViewDidLoad() {
    console.log(this.area.nativeElement);
    this.storage.get('notes').then(notes => {
      if (notes) {
        this.notes = notes;
      }
    })
  }
  ionViewWillEnter() {//This is the lifecycle event that updates the settings before we enter the homepage view
    this.storage.get('settings').then(settings => {
      console.log(settings);
      if (settings.darkTheme) {
        this.renderer.setStyle(this.area.nativeElement, 'background-color', 'black')
      }
      else if (!settings.darkTheme) {
        this.renderer.setStyle(this.area.nativeElement, 'background-color', 'white')
      }
      if (settings.secret) {
        this.secret = true;
       }
       else if(!settings.secret){
         this.secret = false;
       }
    })
  }
  addNote() {//this is the function that adds the notes. It asks for a key if the user changes the settings from the other menu
    if (this.secret,this.note) {
      this.alertCtrl.create({
        title: 'Secret Key',
        inputs: [{
          name: 'key',
          placeholder: 'Here',
        }],
        buttons: [{
          text: 'Confirm',
          handler: (data) => {
            if (data.key == 'secret') {
              this.notes.push(this.note);
              this.note = '';
              this.storage.set('notes', this.notes)
            }
            else{
              console.log('wrong auth pin')
            }
          }
        }]
      }).present();

    }
    else{
      if(this.note){
      console.log(this.note);
      this.notes.push(this.note);
      this.note = '';
      this.storage.set('notes', this.notes)
    }
    }
  }
}
At the end we see that our settings are working when we change view.
.png)
After this we can compile the app for either android or ios using
ionic cordova build android --device//For android
or
ionic cordova build ios --device //For ios
You can find the code for this tutorial in my GITHUB repository.
Hope you enjoyed this tutorial
Thank you for your contribution.
Your contribution has been evaluated according to Utopian policies and guidelines, as well as a predefined set of questions pertaining to the category.
To view those questions and the relevant answers related to your post, click here.
Need help? Chat with us on Discord.
[utopian-moderator]
Thank you for your review, @mcfarhat! Keep up the good work!
Hi @yalzeee!
Your post was upvoted by @steem-ua, new Steem dApp, using UserAuthority for algorithmic post curation!
Your post is eligible for our upvote, thanks to our collaboration with @utopian-io!
Feel free to join our @steem-ua Discord server
Hey, @yalzeee!
Thanks for contributing on Utopian.
We’re already looking forward to your next contribution!
Get higher incentives and support Utopian.io!
Simply set @utopian.pay as a 5% (or higher) payout beneficiary on your contribution post (via SteemPlus or Steeditor).
Want to chat? Join us on Discord https://discord.gg/h52nFrV.
Vote for Utopian Witness!
Congratulations @yalzeee! You have completed the following achievement on the Steem blockchain and have been rewarded with new badge(s) :
Click here to view your Board
If you no longer want to receive notifications, reply to this comment with the word
STOP