Object Detection With Sipeed MaiX Boards(Kendryte K210)
As a continuation of my previous article about image recognition with Sipeed MaiX Boards, I decided to write another tutorial, focusing on object detection. There was some interesting hardware popping up recently with Kendryte K210 chip, including Seeed AI Hat for Edge Computing, M5 stack's M5StickV and DFRobot's HuskyLens (although that one has proprietary firmware and more targeted for complete beginners). Because of it's cheap price, Kendryte K210 has appealed to people, wishing to add computer vision to their projects. But as usual with Chinese hardware products, the tech support is lacking and this is something that I'm trying to improve with my articles and videos. But do keep in mind, that I am not on the Kendryte or Sipeed developers team and cannot answer all the questions related to their product.
With that in mind, let's start! We'll begin with short(and simplified) overview of how object recognition CNN models work.
UPDATE MAY 2020: Seeing how my article and video on Object Detection with K210 boards are still very popular and among top results on YouTube and Google, I decided to update the article to include the information about aXeleRate, Keras-based framework for AI on the Edge I develop. aXeleRate, essentially, is based off the collection of scripts I used for training image recognition/object detection models - combined into a single framework and optimized for workflow on Google Colab. It is more convenient to use and more up to date.
For the updated version of the article, please follow the link.
Object Detection Model Architecture Explained
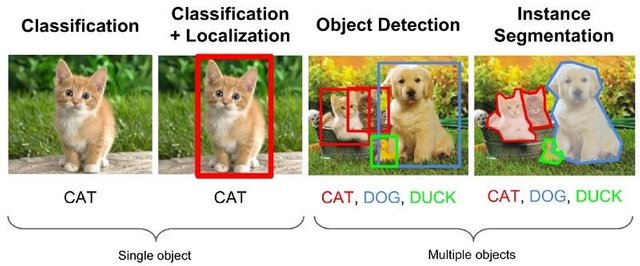
Image recognition (or image classification) models take the whole image as an input and output a list of probabilities for each class we're trying to recognize. It is very useful if the object we're interested in occupies a large portion of the image and we don't care much about its location. But what if our project (say, face-tracking camera) requires us not only to have a knowledge about the type of object in the image, but also its coordinates. And what about project requiring detecting multiple objects(for example for counting)?
Here is when Object Detection Models come in handy. In this article we'll be using YOLO (you only look once) architecture and focus the explanation on internal mechanics of this particular architecture.
We're trying to determine what objects are present in the picture and what are their coordinates. Since machine learning is not magic and not "a thinking machine", but just an algorithm which uses statistics to optimize the function(neural network) to better solve a particular problem. We need to paraphrase this problem to make it more "optimizable". A naive approach here would be to have the algorithm minimizing loss(difference) between it's prediction and correct coordinates of the object. That would work pretty well, as long as we have only one object in the image. For multiple objects we take a different approach - we add the grid and make our network predict the presence (or absence) of the object(s) in each grid.

Sounds great, but still leaves too much uncertainty for the network - how to output the prediction and what to do when there are multiple objects with center inside one grid cell? We need to add one more constrain - so called anchors. Anchors are initial sizes (width, height) some of which (the closest to the object size) will be resized to the object size - using some outputs from the neural network (final feature map).
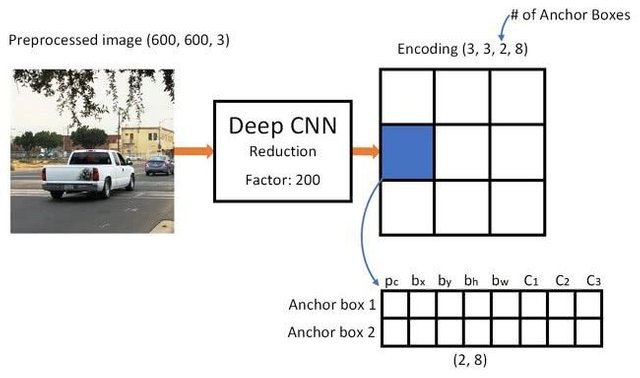
So, here's a top-level view on what's going on when YOLO architecture neural network performs an object detection on the image. According to features detected by feature extractor network, for each grid cell a set of predictions is made, which includes the anchors offset, anchor probability and anchor class. Then we discard the predictions with low probability and voila!
Prepare the Environment
My work is based on wonderful project by penny4860, SVHN yolo-v2 digit detector. There are many implementations of YOLO architecture with Keras, but I found this one to be working out of the box and easy to tweak to suit my particular use case.
Clone my github repo for this project. It is a fork of penny4860's detector with some minor changes. I highly recommend you installing all the necessary dependencies in Anaconda environment to keep your project separated from others and avoid conflicts.
Download the installer here.
After installation is complete, create a new environment and install the necessary packages:
conda create -n yolo python=3.6
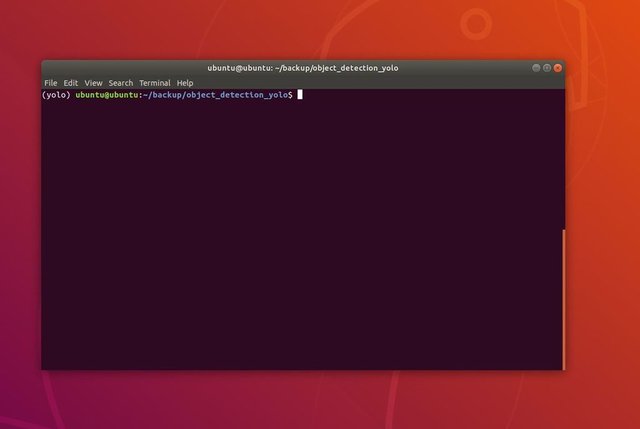
Let's activate the new environment
conda activate yolo
A prefix before your bash shell will appear with the name of the environment, indicating that you work now in that environment.
We'll install the necessary packages from text file requirements.txt (these two commands needs to be done inside of the folder cloned from my github repo)
pip install -r requirements.txt
Then we'll install the yolo package
pip install -e .
Train an Object Detection Model With Keras
Now we can run a training script with the configuration file. Since Keras implementation of YOLO object detector is quite complicated, instead of explaining every relevant piece of code, I will explain how to configure the training and also describe relevant modules, in case you want to make some changes to them yourself.
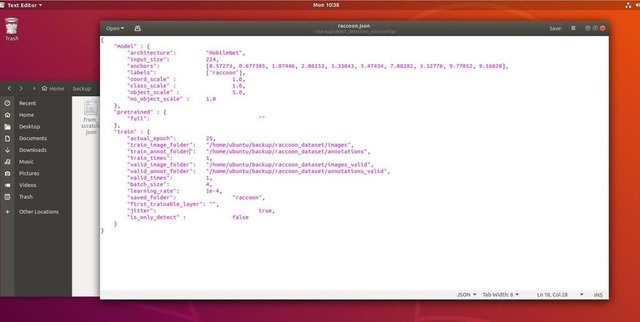
Let's start with a toy example and train a racoon detector. There is a config file inside of /config folder, raccoon.json. We choose MobileNet as architecture and 224x224 as input size. Most of the parameters are pretty much self-explanatory, with the exception of:
jitter - image augumentation, resizing, shifting and blurring the image in order to prevent overfitting and have greater variety in dataset. It also flips the image randomly, so set it to false if your objects are orientation-sensitive.
train_times, validation_size - how many times to repeat the dataset. Useful if you have jitter enabled
first_trainable_layer - allows you to freeze certain layers if you're using a pre-trained feature network
Now we will clone this github repo, which is a racoon detection dataset, contaminating 150 annotated pictures.
Make sure to change the lines in configuration file(train_image_folder,train_annot_folder) accordingly and then start the training with the following command:
python train.py -c config/raccoon.json
Train.py reads the configuration from .json file and trains the model with yolo/yolo_frontend.py script. yolo/backend/loss.py is where custom loss function is implemented and yolo/backend/network.py is where the model is created(input, feature extractor and detection layers put together). yolo/backend/utils/fit.py is script that implements training process(I made a slight modification to it, which will save Keras model to .tflite file on Ctrl-C and training end) and yolo/backend/utils/feature.py contains feature extractors. If you intend to use trained model with K210 chip, you can choose between MobileNet and TinyYolo, but I've found MobileNet gives better detection accuracy. By default it is hard-coded to use 0.75 alpha 224 input_size MobileNet with imagenet weights, you can change these settings in yolo/backend/utils/feature.py.
Since it is a toy example and only contains 150 images of raccoons, the training process should be pretty fast, even without GPU, although the accuracy will be far from stellar. For work-related project I've trained a traffic sign detector and a number detector, both datasets included over a few thousand training examples.
When the training is done, it's time for the next step, model conversion to .kmodel format.
Convert It to .kmodel Format
Upon training end (or keyboard interrupt event) we should have our model saved to both .h5 and .tflite formats to folder where you ran train.py script.
After that clone Maix toolbox repository and from repository directory execute following command in terminal
bash get_nncase.sh
This will download nncase, a toolkit for model conversion. Place a few of the images, that have the same dimensions as input_layer of your network(224x224) to image directory of Maix toolbox folder. Then copy the trained model to Maix toolbox folder and run the following command:
./tflite2kmodel.sh model.tflite
If the conversion was successful you will see output similar to the one above. Now to the last step, actually running our model on Sipeed hardware!
Run on Micropython Firmware

It is possible to run inference with our object detection model with C code, but for the sake of convenience we will use Micropython firmware and MaixPy IDE instead.
Download MaixPy IDE from here and micropython firmware from here. You can use python script kflash.py to burn the firmware or download separate GUI flash tool here.
Copy model.kmodel to the root of an SD card and insert SD card into Sipeed Maix Bit(or other K210 device). Alternatively you can burn .kmodel to device's flash memory. My example script reads .kmodel from flash memory. If you are using SD card, please change this line
task = kpu.load(0x600000)
to
task = kpu.load("/sd/model.kmodel")
Open MaixPy IDE and press the connect button. Open raccoon_detector.py script and press Start button. You should be seeing a live stream from camera with bounding boxes around ... well, raccoons. You can increase the accuracy of the model by proving more training examples, but do keep in mind that it is fairy small model(1.9 M) and it will have troubles detecting small objects(due to low resolution).
One of the questions I received in comments to my previous article on image recognition is how to send the detection results over UART/I2C to other device connected to Sipeed development boards. In my github repository you will be able to find another example script, raccoon_detector_uart.py, which (you guessed it) detects raccoons and sends the coordinates of bounding boxes over UART. Keep in mind, that pins used for UART communication are different of different boards, this is something you need to check yourself in the documentation.
Summary
Kendryte K210 is a solid chip for computer vision, flexible, albeit with limited memory available. So far, in my tutorials we have covered using it for recognizing custom objects, detecting custom objects and running some OpenMV based computer vision tasks. I know for a fact that it is also suitable for face recognition and with some tinkering it should be possible to do pose detection and image segmentation(for example for monocular depth estimation). Feel free to fork my Github repos and do some awesome things yourself!
Here are some articles I used in writing this tutorial, have a look if you want to learn more about object detection with neural networks:
Bounding box object detectors: understanding YOLO, You Look Only Once
Understanding YOLO (more math)
Gentle guide on how YOLO Object Localization works with Keras (Part 2)
Real-time Object Detection with YOLO, YOLOv2 and now YOLOv3
Hope you can use the knowledge you have now to build some awesome projects with machine vision! You can buy Sipeed boards here, they are among the cheapest options available for ML on embedded systems.
Add me on LinkedIn if you have any questions and subscribe to my YouTube channel to get notified about more interesting projects involving machine learning and robotics.