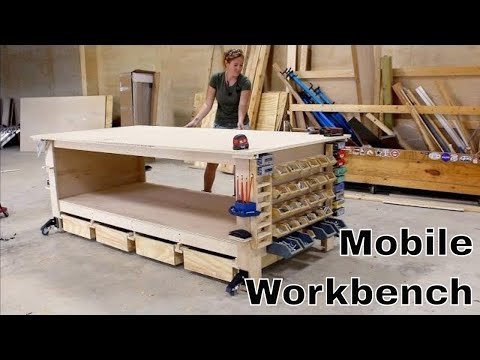
For the past few projects I have been working off a 2x6 workbench just laid over some sawhorses and while it does work it's a little bit frustrating not having a lot of surface area to work off of so this week I took the time and threw together a very quick but strong assembly table slash workbench stay tuned and I'll show you how I did it the body of the workbench is built completely from three sheets of plywood and if you're interested in building your own and I do have a set of plans that includes a full material list and cut list for you I started off by using my tracks all to break down the sheets of plywood into more manageable size pieces of course utilizing the cut list that I put together for the build then I used the table saw to rip all of the pieces down to the final dimensions I started off by assembling the legs of the workbench utilizing my super jaws to hold it in place while I was putting them together and just about everything on the workbench is glued and screwed together since this is an indoor project I stuck with pipe on original wood glue after getting the legs built I then glued and screwed the side panels into place this will not only connect the two legs together but it'll also enclose the sides giving me a small amount of area to use a storage it was my goal when building this workbench not only give myself a large usable work surface but also a place to store items that I most frequently used while building so the workbench will serve as a way to store these items until I have more time to deck out the walls of my shop to store these items after getting all of the bottom shelf supporting stretchers into place I cut down a sheet of plywood to make up the bottom shelf and set it into place while I'm setting that into place I want to say a big thank you to you peer bond plywood for sponsoring this project and supporting what I do here bond is a hardwood plywood that is sold at your local Home Depot so it's readily available the best part is is that it's very high quality plywood but at competitive prices so if you have a project coming up where you'd like to use a little bit higher of grade of plywood then definitely check out peer bond at your local Home Depot it's made right here in the US and they use it for Melda highest three solution in their manufacturing so it's even a little bit more environmental friendly at this point the bottom shelf is just test fitted into place and you can see when I stand on it that it has a little bit of bow and give to it this is completely taken out whenever I glue and screw it into place after getting that bottom shelf attached I moved up and repeated the process for attaching the stretchers that will support the top oh and here you can see as I walk across it just how much flex gluing and screwing it down took out when I was modeling this and Sketch up I was really thinking that it was gonna have some rot to it because of a long span distance however I was shocked at just how sturdy and unmoving it felt and the biggest contributor to the stability is the fact that I glued all the joints the top is made from a full sheet of plywood which will give me plenty of surface area to work on the only thing on this workbench I didn't glue is the top and that is so I can replace it easily in the future whenever it gets a little bit too destroyed I went in straight from the top and used a countersink bit to make sure that the screw heads wouldn't be proud of the table and get in my way when sliding things across the top from start to finish this only took me six hours to build and that is with filming slowing me down so if you're needing a workbench then definitely don't put it off as it's a very simple project to complete now I could have very well stopped here I had the top four working on the bottom for storing stuff on but I decided to take a little bit more time and build a few out ons to make it a little bit more functional a few projects back when I was building those outer Ron Duck chairs I was making a mental note of all of the things that I would have liked to have a storage solution for readily at hand and one of the biggest things was hardware storage so my first out on was to cut a few french cleats so that I could utilize some of these hardware storage bins that I made years ago these have just been tucked away in the box since I moved out of my shop in Fort Worth and it felt great to unbox them and finally put them to use again I'm attaching the French cleats directly to the side of the workbench and I already know that tons of you will comment that these will fill up with sawdust being out in the open and yes much like everything else in the wood shop they will get dusty however I've had these bins exposed on a rolling caddy in my previous shop and for me the amount of sawdust that gets inside them isn't bothersome enough to override the convenience of having them readily available so I still move forward with the decision of placing them directly out in the open on my workbench and on that note if you'd like to make your own bins and I do have a free set of plans on all three sizes that I felt before in the past moving on to drill storage I wanted someplace to store my drills that wasn't all the way across the shop and I thought about storing them under the overhang however if a drill has a bit in it and that won't be possible so instead I cut in two notches directly into the tabletop getting the idea from my current drill holder over on my French cleat system it was my original plan to drill a few of these in every corner of the top however I think I'll start with these two and see if one I actually end up using it and two if I even like it something else on my workbench wishlist what's a place to store speed squares it's so frustrating always looking around for where I left my speed square so I decided to make some very simple holders on every single corner of my workbench always have one within an arm's reach these are simple holders made from half-inch plywood better is hatch together in an L formation and then touch to the underside of every single corner improve to actually work I'm gonna try to get into the system of using it and then immediately putting it right back we'll see if that works continuing with hardware storage I made a few simple screw box holders I've made a few of these before and I can't stress how handy they are to have all of your boxes of screws in one location it's definitely worth the amount of time it takes to make one of these holders it's a great project to utilize some of the scraps laying around and of course you can attach it just about anywhere moving on to pencil and fit storage I didn't make anything for this one because Rockler already has a great solution for this called shot blocks it's a very lightweight organizer that you can hang on a wall pegboard or even set directly on top of your workbench I utilized the front bins for your bits and Tunsil sharpeners and then the top compartment for a pencil or even longer bit storage next up I made a few mallet holders even though I only have one mallet I made two holders and place them on opposite legs so that no matter which side of the workbench I'm working on I have a holder that I could throw it into going to the other side of the workbench I started off by drilling some holes for some tape storage i routed through my scrap bin and found some half inch dowels so I drilled some half inch holes and then stuck them directly in place simple enough the large area on this side was dedicated to storing my quick clamps I cut a small blog to hold some PVC off of the workbench just enough so that I could slip on a spring clamp and straddle that PVC you can see I use pocket holes in order to secure these two blocks to the workbench itself and mine does droop a little bit because of the weight of the spring clamps but the next time I go to the store I'm going to pick up some off red to slip into the PVC and this will take out that little bit of droop that the weight of the of the clamps creates for my quick clamps I stuck with simple and drilled a hole all the way through the workbench so that I can insert a dowel and have something to hang these clamps off of I made sure to keep the length of this dowel just under the length of the overhang of the workbench so that my leg wouldn't catch it house I'm walking around the workbench in my last shop I made a bench cookie dispenser and I could have sworn I threw it into a box however I couldn't find it so I simply made another one I grabbed some three inch PVC and cut it to the height of the amount of bench cookies that I have I used one of the bench cookies to mark its height on the PVC pipe so that I can cut in a slot at the bottom this will give me a grab point I can reach my hand in and pull one out I cut a three inch circle from some scrap wood then use type on thick and quick to glue the wood to the PVC and create a shelf at the bottom utilizing my superjaws to clamp it while that glue is setting up and then a countersink and a few screws to attach it to my actual workbench lid and you can see it works by pulling out a bench cookie at the bottom and then throwing it back onto the top whenever I'm done with it with that I think the size of the workbench are as decked out as I can get them I am NOT a fan of having drawers in a shop however I'm also not a fan of wasted space which is what all of this space at the bottom of the workbench is without drawers so next I put my attention into making a railing system so I could start building and attaching drawers I'm going with a wooden railing system and over sliders because sliders are expensive and with this being shop furniture plywood rails is just fine with me I first tried to attach the bottom rails with the dust setting as is however it was just absolutely silly to try it this way so I emptied off the workbench and instead flipped it over on its side so that I could have easier access to the bottom after getting it on its side I glued and screwed and all of the rails that I made for it before moving on to making the drawers themselves the drawers are made from half-inch plywood and it took an additional two sheets in order to make all of them since there is so many I kept my drawer construction very simple and easy as I don't plan to really utilize and overload these drawers I don't like things being out of sight because when they're out of mind but if there are a few things that even I think go good and drawers such a shop rags or fun Rush's there might be another thing or two I'll have to think about it but of course I know a lot of people are huge fans of drawers so base your drawer construction method off of what you're actually going to be using the drawers for after building the drawers themselves I attached a wooden rail to both of its sides then before throwing it in I used a little bit of pace wax on the entire wooden railing system so that everything will move nice and smoothly last out on for function is to attach four quick-release casters these are some awesome casters that Rockler puts out made specifically for attaching the work benches that you need to be stationary the majority of the time but you still want to have the ability to make them mobile quickly just by stepping on all forward the levers it'll very easily lift up the work bench making it mobile and allowing me to move it wherever I need it the only other thing that I did to my workbench was put a coat of oil on the top to protect it a little bit from stain or glue or anything else that I'm doing now keep in mind that you can take all of the storage solutions that I'm putting on this workbench and move them to your walls make them bigger make them smaller so I hope you've been able to take away a few nuggets from this video to help organize your own shop I have let do link to all of the products that I've used down in the description and also a link to the plans if you'd like to build your own workbench big thank you to rock there for supporting what I do and pure bond I hope that you enjoyed this video and I will see you next time
Hello @mahbubk! This is a friendly reminder that you have 3000 Partiko Points unclaimed in your Partiko account!
Partiko is a fast and beautiful mobile app for Steem, and it’s the most popular Steem mobile app out there! Download Partiko using the link below and login using SteemConnect to claim your 3000 Partiko points! You can easily convert them into Steem token!
✅ Enjoy the vote! For more amazing content, please follow @themadcurator for a chance to receive more free votes!
Congratulations @mahbubk! You have completed the following achievement on the Steem blockchain and have been rewarded with new badge(s) :
Click here to view your Board
If you no longer want to receive notifications, reply to this comment with the word
STOPHello @mahbubk! This is a friendly reminder that you have 3000 Partiko Points unclaimed in your Partiko account!
Partiko is a fast and beautiful mobile app for Steem, and it’s the most popular Steem mobile app out there! Download Partiko using the link below and login using SteemConnect to claim your 3000 Partiko points! You can easily convert them into Steem token!
https://partiko.app/referral/partiko
Congratulations @mahbubk! You received a personal award!
You can view your badges on your Steem Board and compare to others on the Steem Ranking
Vote for @Steemitboard as a witness to get one more award and increased upvotes!