Pregnancy and Puppets: Lucca at Bat Illustration Process
I can’t really share this on my normal channels as it is a gift for this year’s Reddit Secret Santa. I was super lucky to pull another lady nerd as my giftee. I had a lot of fun picking out a t-shirt and toy for her, but I wanted to add something with a more personal touch. I haven’t drawn anything in awhile, so, after checking out her user info, I finally came up with this idea.

I stuck mostly with nerdy things (my bailiwick), hence using her favorite Chrono Trigger character, Lucca. But my giftee is also a big baseball fan, so I found a fun way to merge the ideas together. Because I haven’t done any illustrations in such a long time, I thought it might be fun to show a bit of my process for anyone out there looking for pointers.
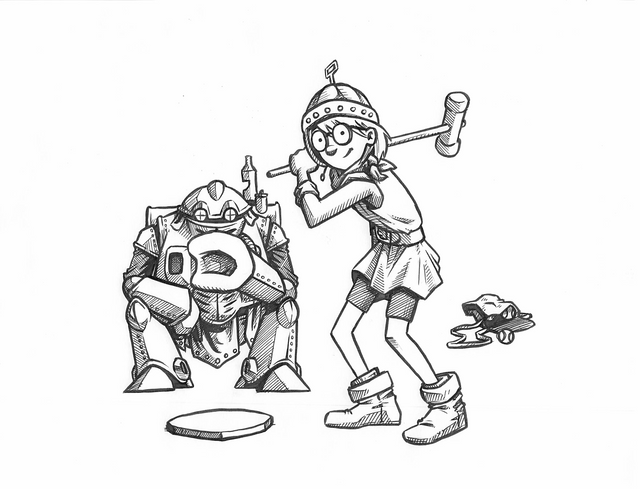
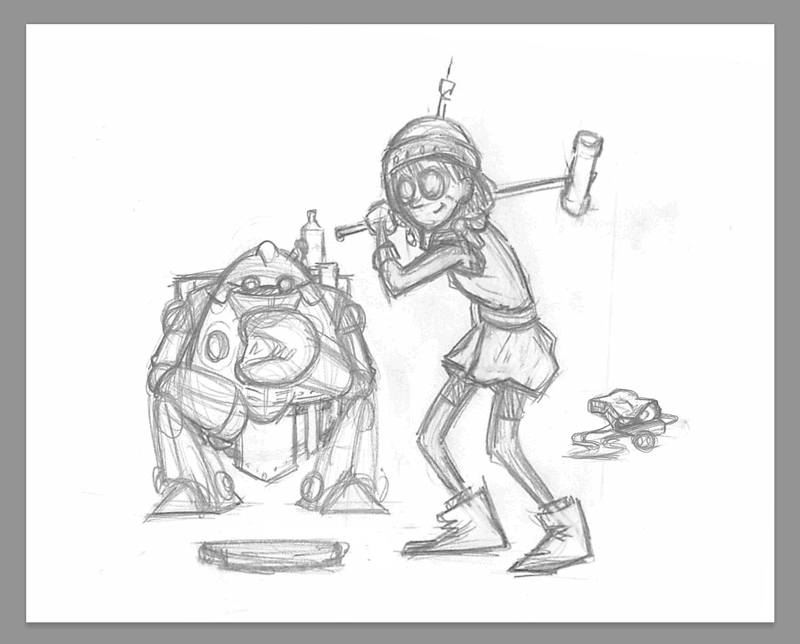
The biggest step that I totally skipped here is thumbnailing. The idea was fairly simple, so I mostly just sketched a few images before creating the first rough draft of the piece.
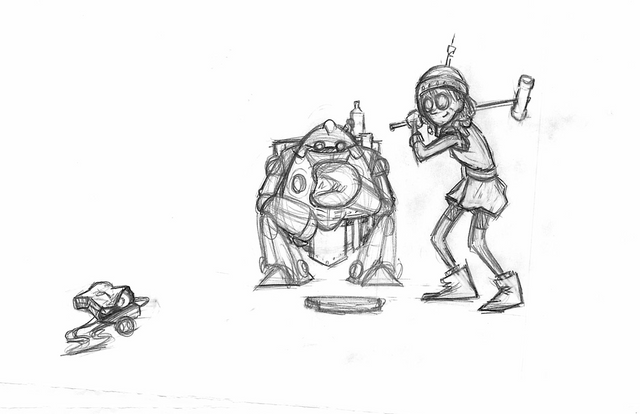
While the quality of materials can help enhance your work, I like to keep these early stages easy and loose. In keeping with that mindset, I usually use simple tools available to me. The sketch was done on cheap printer paper using a mechanical pencil that’ll cost you less than $0.25 online. I utilize a mixture of digital tools and tracing, so the materials are not as important during these early steps.
After sketching out the rough draft, I scan the image to Photoshop. I transform pieces and arrange the illustration until I find a layout that I like. I also flip the image horizontal to check for accuracy. This is how I catch a majority of issues with disproportionate body parts and facial features. (TIP: If you aren’t able to scan your art into a digital environment, you can simple hold it up to a window with the image facing away from you to check it’s mirrored accuracy.) Since this piece is so cartoony, I didn’t really feel that much editing was needed.
Then I resize the image to print on a standard letter size sheet.

Continuing to use the cheap supplies, I now flesh out more detail by drawing on top of the lightly printed image. With the larger image, I can tighten things up a bit and add more little intricacies. Once this second round of sketching is done, it’s time to scan again.
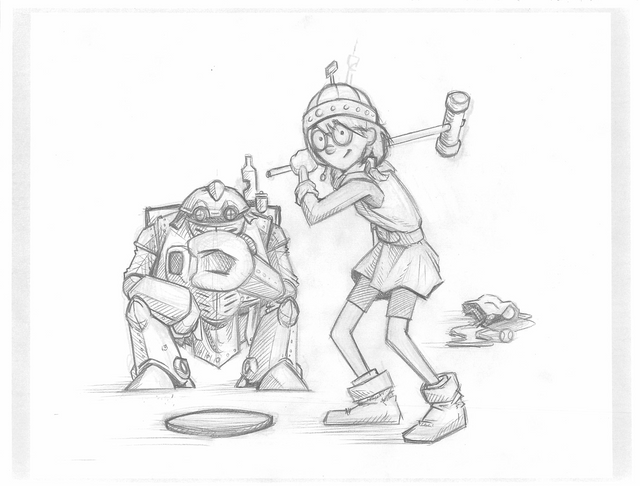
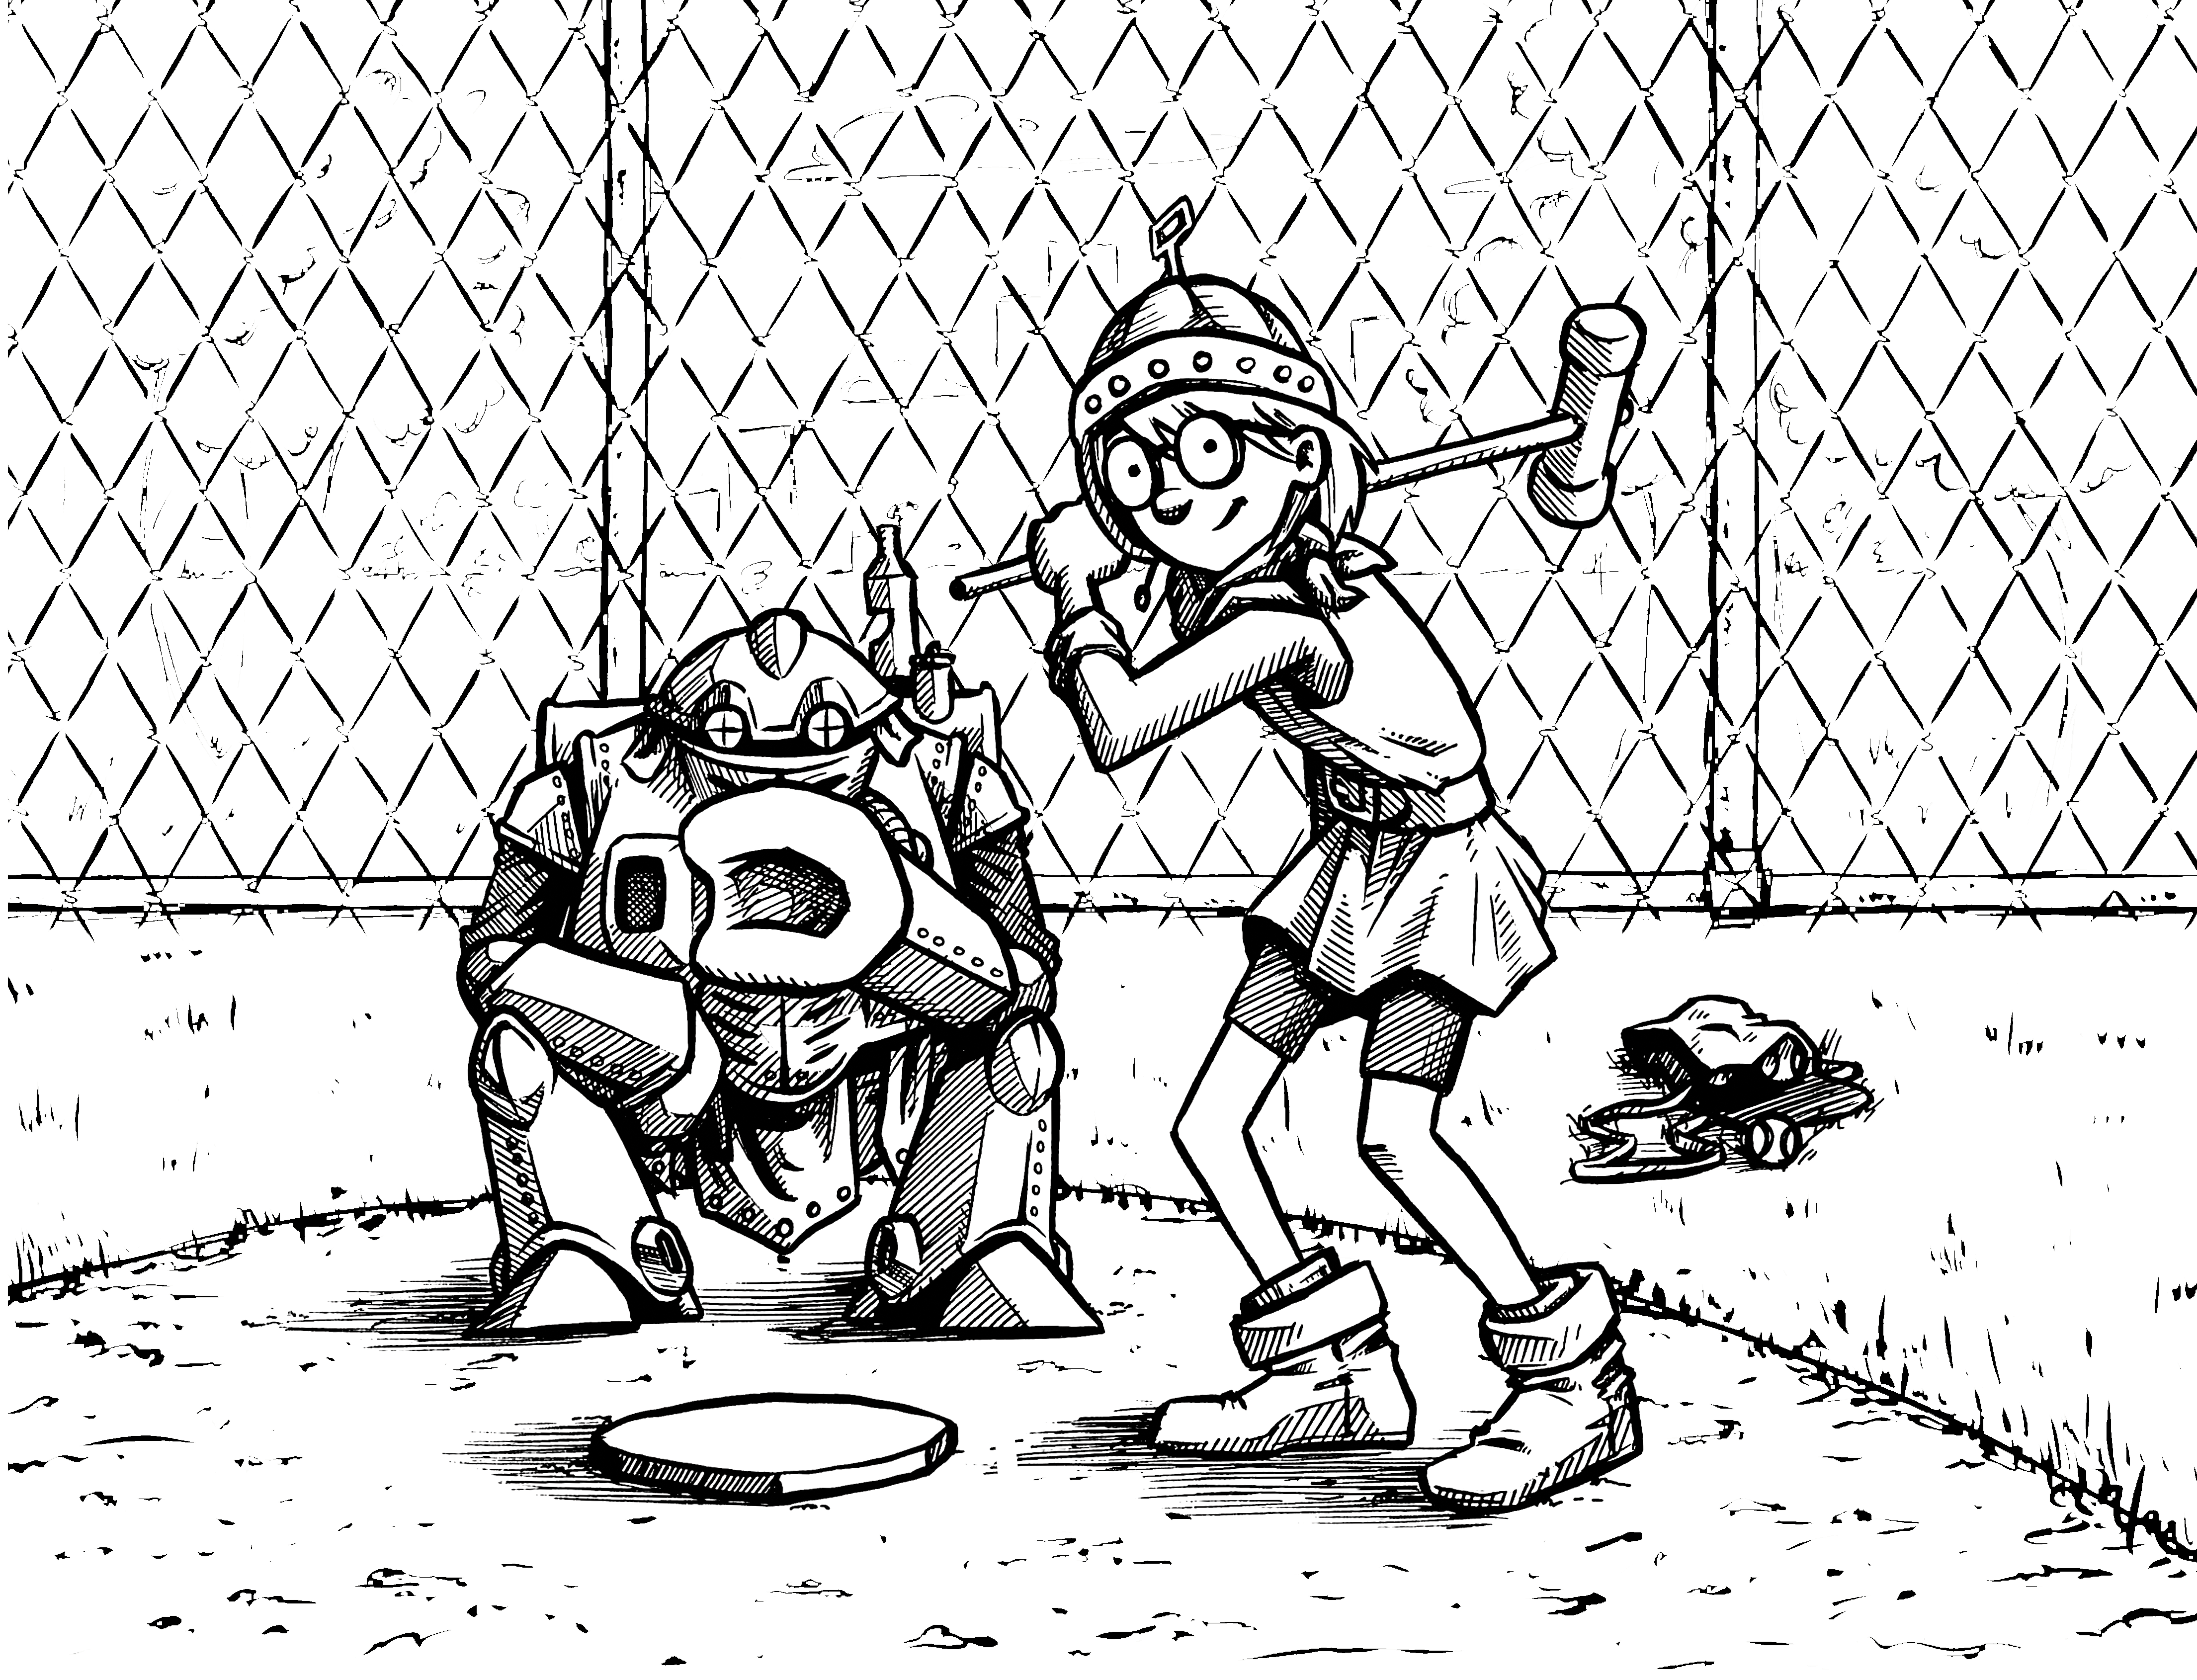
It was around this point that I started considering a background. Generally I try to avoid them whenever possible, but in this case, I thought some scenery would be nice. In order to keep from messing with my clean sketch, I sketched the background layout using a second print of the original, resized sketch. My goal was to keep from going too crazy with detail here to keep from competing with the subjects in the foreground.
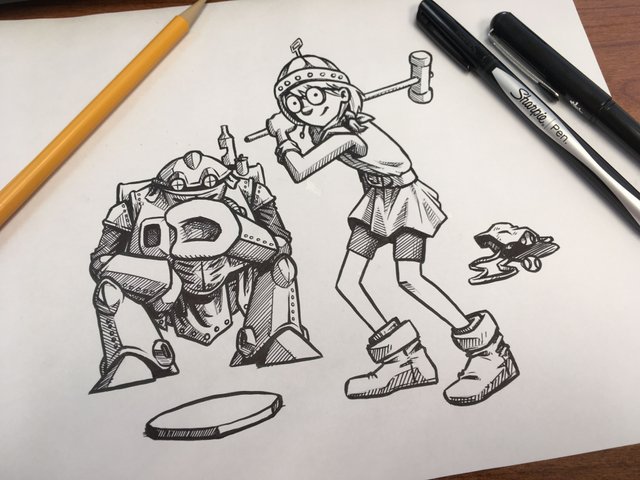
So, with all the pieces in place, it’s time to start inking.
I’m a creature of habit and I learned to draw using traditional materials. While I use digital media to enhance my projects, I feel most comfortable putting my hand to actual paper when working with illustrations. For inking, I have a couple of go to instruments.
An illustration instructor introduced me to the Pentel Pocket Brush my Senior year in college. It works like a fountain pen in that it has replaceable ink cartridges. Instead of a metal nib however, the ink feeds into a brush tip made from actual fibers. This allows a huge range of line weight and creates expressive line work.
For hatching, however, I want even, light-weight lines. I also wanted to keep clean up to a minimum. So, for shading, I went with a personal favorite: the black Sharpie Pen.
As for paper, since I’ll be tracing from a reprinted sketch, I need to keep the paper somewhat transparent. Smooth tooth papers work best with ink and I like to minimize bleeding through the paper. For all these reasons, I decided to use Canson Marker Paper. It has the transparent qualities of tracing paper, but with better strength and almost no bleeding.
Once I have collected all my supplies, I’m ready to start tracing. I don’t have a light table, but I DID accidentally get to work a few hours early the other day. Since no one else was around, I just used the tried and true method of taping the printout and marker paper to the window and let the sun act as my lightbox.
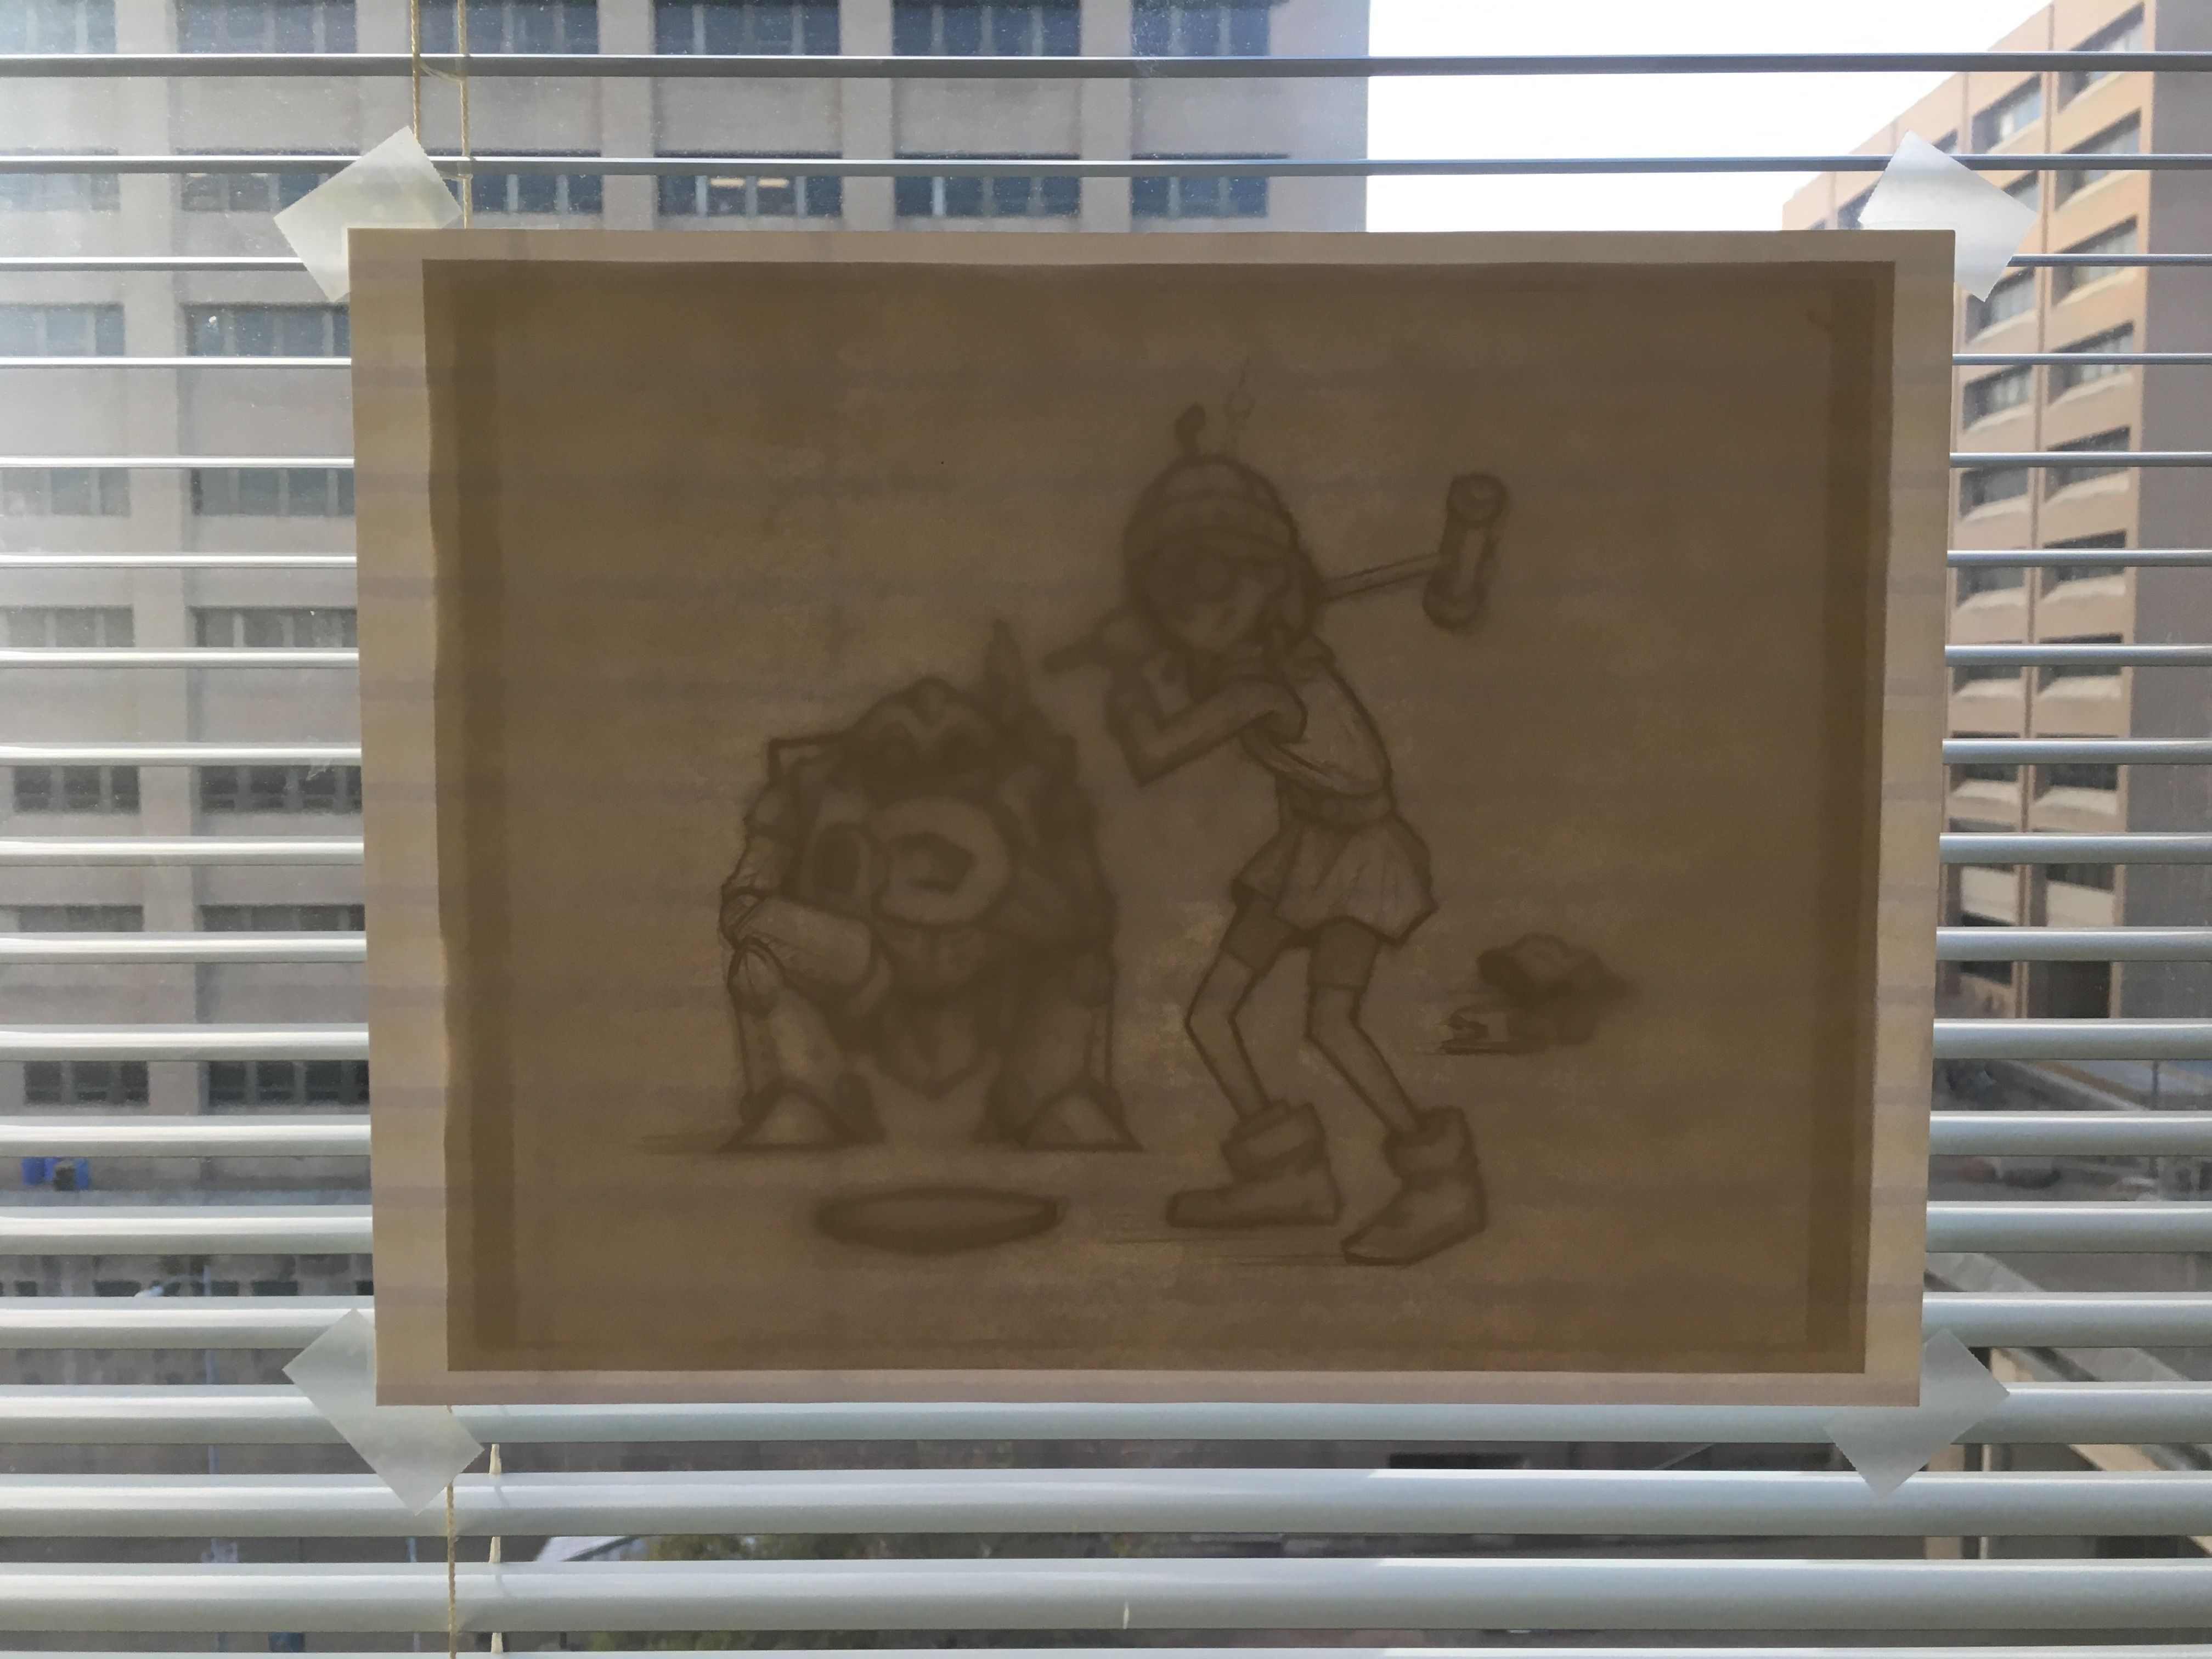
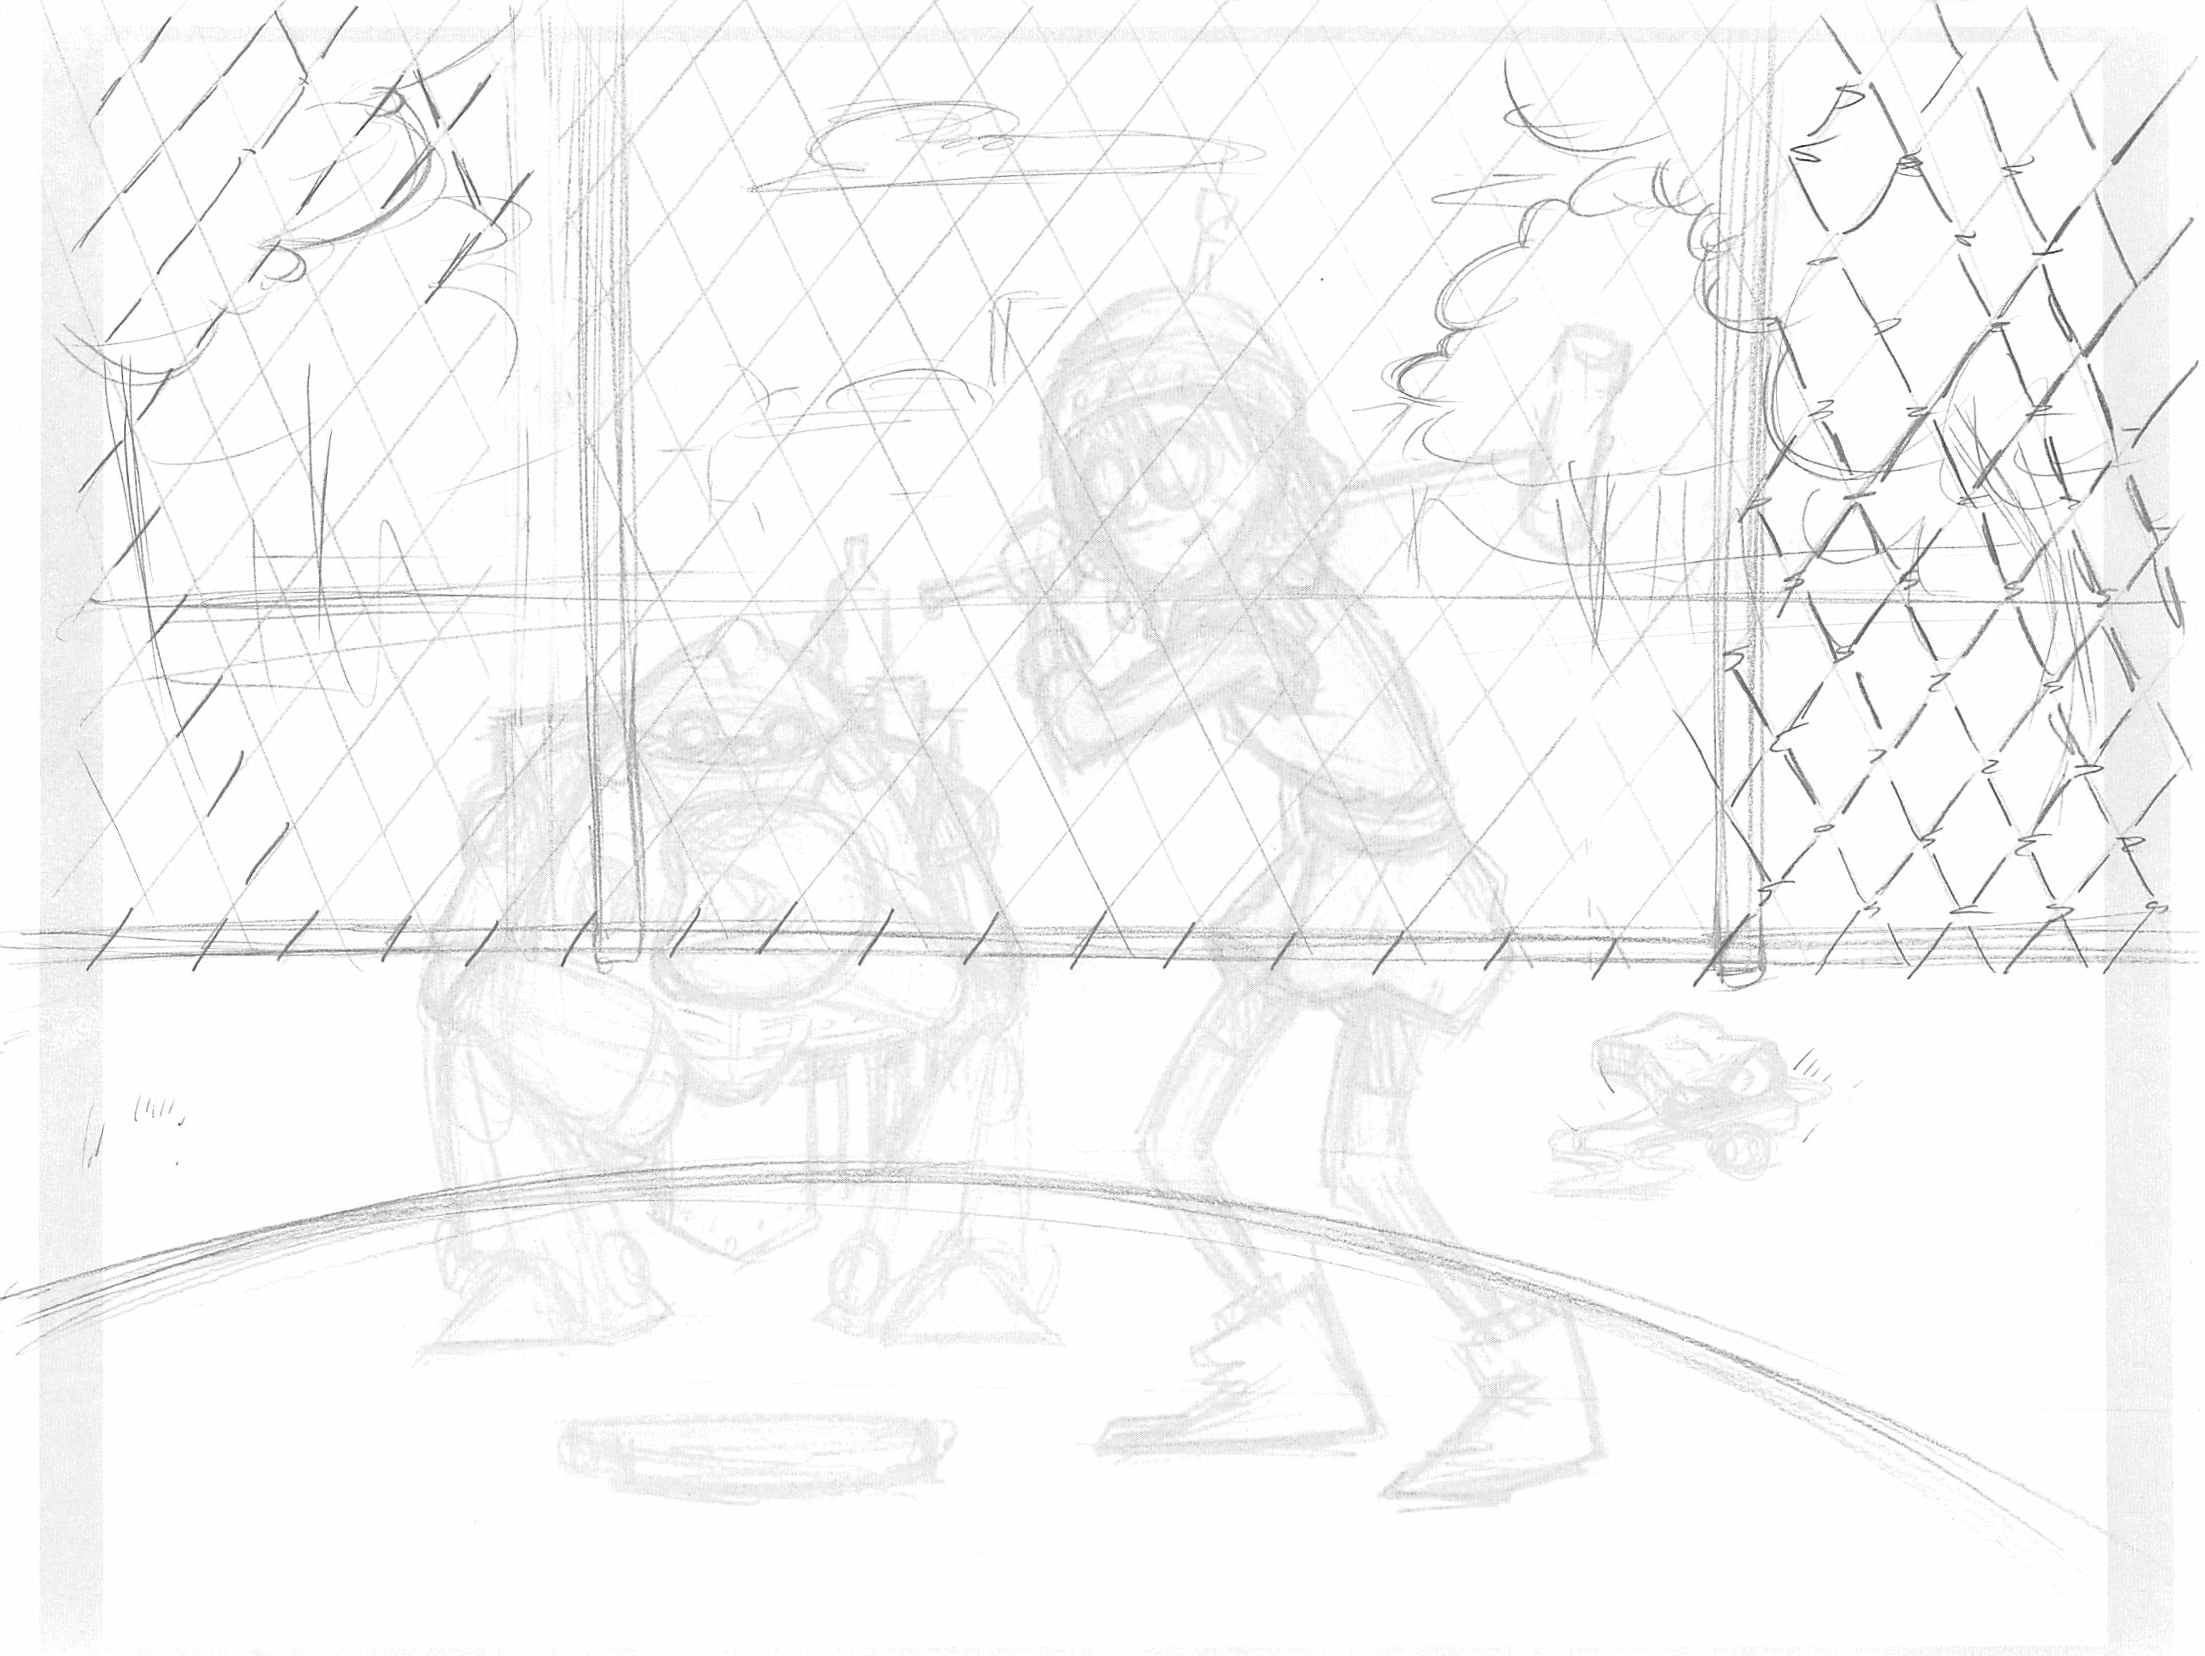
I started by tracing the linework of the foreground subjects using the pocket brush. Honestly, I wish I would have been able to work on a larger scale as the brush can make very thick lines. So I had to work pretty carefully.
Once the line work was completed, I was able to take the image back to my desk and add the preplanned hatching lines. (No tracing necessary.)
After seeing the subjects alone, I confirmed that a background would help round out the image So, back to the tracing window, but this time with the background sketch and the Sharpie Pen. I trace this image on a separate piece of paper, scan both sheets to my computer, and use Photoshop layers to combine them into a single image. We’re ready for color!
Since there are a plethora of more in depth and informative tutorials out there on digital color, I will skim over my process. To keep it concise, let us resort to a numbered list:
Step 1: Apply flat color and adjust hue/cast/saturation as needed.
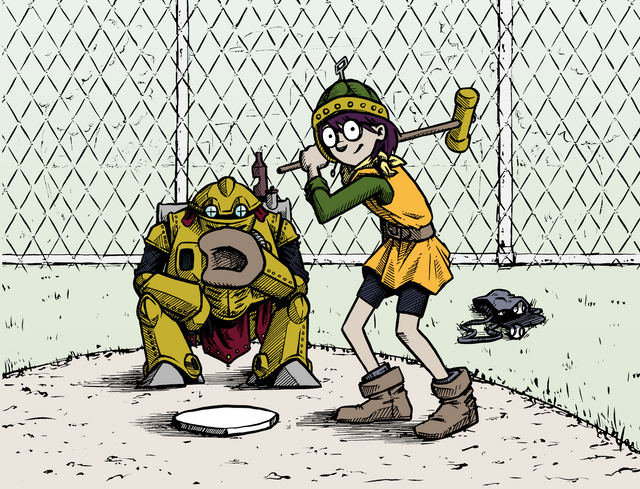
Step 2: Add shadows by using a dark blue fill layer over top, setting it to “Darken” and erasing all non-shadowy areas and make necessary color corrections.

Step 3: Add highlights by creating a third layer of light (almost white) yellow and drawing areas of brighter light and set layer to ~30-50% opacity. (A lot of color adjustments were needed here to keep the highlights looking mostly realistic.)
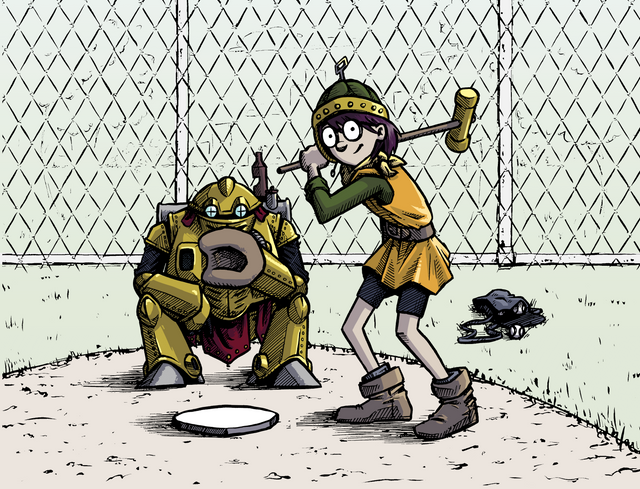
Once these main steps are done, I will duplicate all the layers and flatten them. With this flattened layer, I will make final adjustments using levels, curves, and a variety of other filters in Photoshop to prep the image for print. At a minimum, since digital displays are much brighter than prints, I will always lighten and slightly desaturate color. It’s minimal, but it helps to keep prints from over-saturating and printing super dark.
So, if you’re still here, thanks for sticking it out. Like I said, I haven’t completed an illustration in a while, so my process is a little less honed than when I first graduated. Either way, please feel free to ask any questions in the comments and give me a like if you want to see more posts like this.
Thanks for checking out my work! And, if you need more fun stuff to shove into your eyeballs, hop over and check out my YouTube channel, Chimp Skipper, or my online portfolio.
#illustration #ink #SNES #ChronoTrigger #art #comics #RedditGifts #SecretSanta
I love it thnak you for that @hglucky13
Thanks! I hope my giftee likes it as well.
Really great one
Thank you!
Congratulations @hglucky13! You have completed some achievement on Steemit and have been rewarded with new badge(s) :
Click on any badge to view your own Board of Honor on SteemitBoard.
For more information about SteemitBoard, click here
If you no longer want to receive notifications, reply to this comment with the word
STOPCongratulations @hglucky13, this post is the second most rewarded post (based on pending payouts) in the last 12 hours written by a Dust account holder (accounts that hold between 0 and 0.01 Mega Vests). The total number of posts by Dust account holders during this period was 6068 and the total pending payments to posts in this category was $1154.49. To see the full list of highest paid posts across all accounts categories, click here.
If you do not wish to receive these messages in future, please reply stop to this comment.
Your art is great ))
Thank you! I'm glad you like it :D
great hatching. Looks super cool. You made such a thoughtful gift.
Thanks! I was so excited to get someone with similar interests that I had to come up with something special.
Very nice , and i liked your gif as well ,
Followed you √
Thank you! As always, I look forward to seeing your work as well :)
<3 <3
@OriginalWorks
The @OriginalWorks bot has determined this post by @hglucky13 to be original material and upvoted(1.5%) it!
To call @OriginalWorks, simply reply to any post with @originalworks or !originalworks in your message!
Cool
Thanks!
Chrono trigger! Loved that game. Robo was one of my favorite characters too, love the art.
Very interesting to see the process carried out from sketches too.
Cheers!
Thank you! I had to defer to my partner since he got into videogames earlier than I did, but Robo was really fun to draw. I'm glad you like it :)