A Breakdown of My Latest Still Life Painting
A Breakdown of My Latest Still Life Painting

Greetings and Salutations Everyone!
In today’s post I’ll be discussing my latest still life painting and to best of my abilities I’ll be narrating its process step by step. I have to admit though, that despite my traditional education this painting in particular took a rather “unorthodox” turn in its development. In my usual way of working, for the most part I usually have a very clear and precisely clarified goal in mind. In a technical process I suppose would be best described as a sort of reverse engineering, I breakdown the painting’s future progress into smaller quantifiable steps as to not only to anchor where I’m currently at, but to isolate any future potential problems as to make them more easily recognizable. I guess you could say in layman’s terms in that the less time I’m spinning my wheels trying to find the nature of a problem, the better right? But in this particular case, in no way did I feel that the lack of initial clarity in the finished product was in any way daunting. In fact, I guess you could say that I took the hazily unresolved initial problems within the painting as a form of navigation, allowing it guide me into where things needed to be solved as they came rather than using its early completed steps as an island of sorts where I could venture off from and come back in case things became too chaotic.
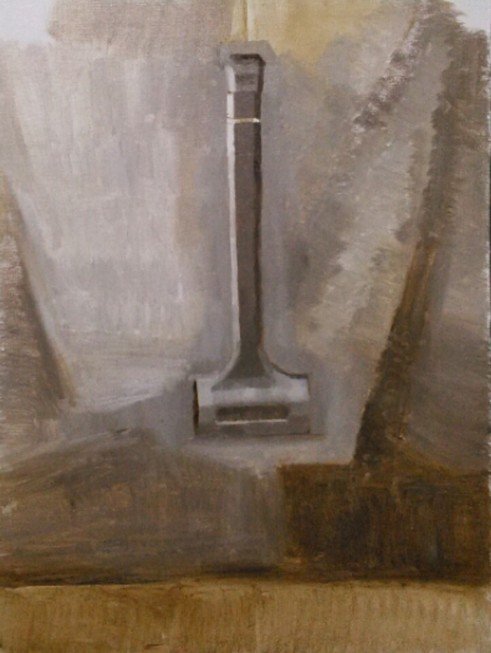
So at first I began to work on the predominant focal point/subject matter (which is of course the hammer) and the background. Traditionally I would begin with an armature or refined block in drawing, transfer the drawing onto my painting surface, seal the drawing with ink, and then tone my painting surface with thinned down raw umber. But for this work I decided to work directly by drawing in and massing in shapes with the thinned raw umber. I kept a very special attention in making sure to keep my darks transparent and my lights relatively opaque. I wanted to make sure that I didn’t build up the paint too fast. You could say that this particular kind of working would be closely related to alla prima or painting directly. Normally I would’ve already had the drawing locked in and sealed, but in this case particular I wanted to leave ample room as to the possibility things would need to be moved around and adjusted on the fly. This particular grisaille step I employed is commonly known as a “tonal underpainting”.
Once again, in the classical tradition this tonal underpainting would’ve been pursued until its completion where the entirety of the painting would be complete in its drawing, composition, value and form; completely void of temperature and color (On an additional note, Old Masters use to employ this method back when pigments were scarce!). But for this case in particular, I only felt it was needed until I resolved the issues of the placements of the rest of the subject material on the table.
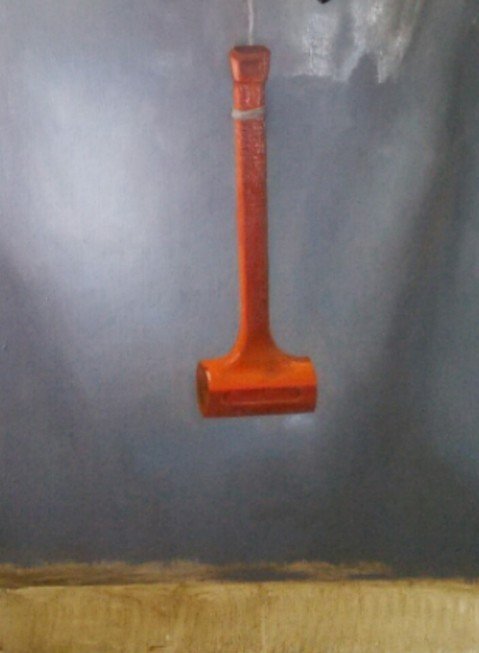
I then began working color into the tonal underpainting by beginning with the shadows in the drapery. As I was working on the local color of the background, I took special attention and decided to make an executive decision in rendering the color of the cloth to be slightly muted as compared in reality as to not distract the eye from the soon to be highly chromatic hammer.
I also paid special attention in pushing the values of the shadows darker than they appeared as to increase its dramatic effect. At this point, I’d like to add that it is best to keep in mind in that one of the most important principles to consistently put into practice is keeping a strong and wide value range. Keeping a wide value range always attracts the eye. If you have that right, then temperature and color can come into play. Which in turn, if the temperature of a color is right, the color itself can’t help but be right. So remember...VALUE is the most important!
So then after completing the background, from the hammer’s edges I began to render the form inwards, keeping in mind to keep the core shadows and reflected light to be especially hot. Then from the core shadow I then attempted to push the chroma of the hammer as much as I could considering the transparency of the cadmium orange I was using. I found this part of the task to be quite challenging. At the base of the hammer, I began working across and upwards (pretty much like the way I’d work on a Bargue plate).
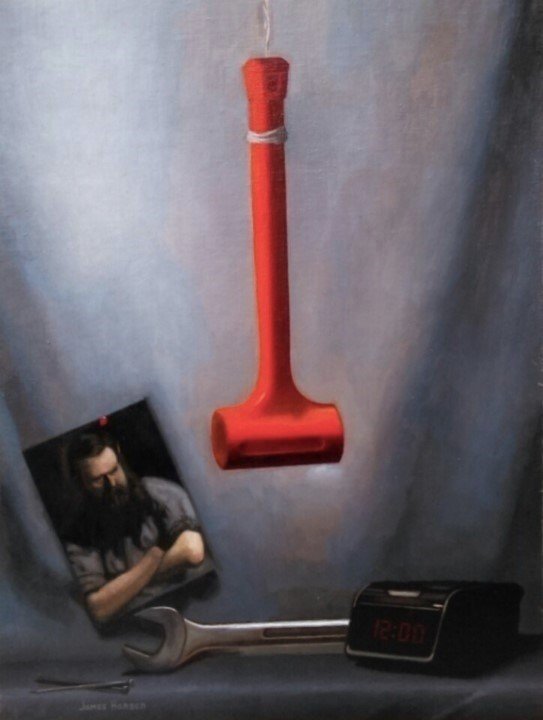
"Will, Mortality, and Responsibility"
(With recent inspiration from Jordan Peterson, Friedrich Nietzsche,Fyodor Dostoyevsky, and Carl Jung.)
18" x 24"
Oil on Canvas
At this stage of the painting’s development, I thought it was strange and interesting to point out that in relation to the hammer and background with the rest of the objects on the table, it was as if I were handling two different paintings simultaneously. It was as if almost I had to “stitch” them together, which I admit took quite a bit of ingenuity. While taking special attention to the previously increased value of the shadows of the background, I also had to take note in how I was going to merge these objects within the space’s vicinity, as I had to account for the reflected light bouncing off of everything else.
Upon coming to a relative conclusion to some of the objects on the table, I then began to draw and mass in the clock lightly and with transparently thinned raw umber. At this point I’d like to add that whenever you decide to draw in your block in with paint, to always make sure you’re using a warm earth tone, say for example raw or burnt umber. Using colder pigments (say ivory black or ultramarine blue) has a tendency to deaden the color and kill the luminosity of your warm shadows, in which they should always be.
After laying in the drawing of the clock, once again from its edges I proceeded to mass in its larger shape and refining its details last. I then proceeded to do the same with the wrench, and then with the hanging Frank Duveneck master copy. The nails I obviously handled last.
Overall I noticed that this particular painting surface was a little more “thirsty” than usual, so when going back to further refine some of the paintings details, I naturally had to oil out. To those who are not quite familiar with oiling out, its basic purpose is to revive the colors as to give the appearance of them being freshly painted, as to be able to judge the paint’s value correctly and to continue working where one left off. It is important to point out that one should only oil out when it is absolutely necessary. The last thing a painter wants is unwanted built up layers of oil. You also should make sure that the section of the painting you’ll be working on is ABSOLUTELY dry to the touch, otherwise you’ll end up ruining your previous work and creating a needless mess. When going back to work on the clock, I also noticed that the colors were “sinking in”. Don’t worry as this is common with oil paint. This is what aids in its appearance of looking chalky, matte, and flat. Also remember that when choosing to oil out, it is important to choose to work methodically, like in sections as I did. So to oil out the clock section, I took a dry brush and added an ever so tiny amount of oil to it and began to scrub it thinly as possible over the area. I wanted just enough to bring back the transparency of the darks. I then took a clean cloth and wiped off the excess. After refining edges and details, I then began to repeat this process all the way across eventually finishing the ground plane.
Working on the master copy I also happened to notice required a sort of unique approach. It is one thing to work on a master copy in and of itself, but in this particular instance, I found it to be a strange experience in that I had to treat the two dimensional image as a tactile object, giving it form and depth within a three dimensional space. So I guess I had to create the illusion of a painting of a painting...you know what I mean?
After refining once again some of the edges on the master copy, I of course routinely signed it and considered it finished!
Please feel free to let me know what you think? Thanks for reading Everyone!
-James Hansen
Thanks for sharing the detailed process, I found it really interesting. I'm still trying to figure out oils, so these notes are always useful.
@bzaryp Thank you so much, I really appreciate that. I'm glad you found it helpful. What I like about oils is that not only have they been around since the dawn of time, but that they are very forgiving. It actually takes quite a bit of effort to completely destroy a painting as you're working on it :)
@originalworks
The @OriginalWorks bot has determined this post by @jameszenartist to be original material and upvoted(1.5%) it!
To call @OriginalWorks, simply reply to any post with @originalworks or !originalworks in your message!