Stitch custom made figure as engagement ring box.
I was very silent for last few weeks. I was busy moving to new place and making it my home. It involved lots of packing, unpacking and weeks of DIY. I did floors and painted walls, for the first time, so learned a lot of new things in the process. I was exhausted in the evenings with limited energy to post on social media. I am finally going back to my routines and building models, so you will see new posts and new projects. Here is one, I worked on a while ago and showed you one photo of progress. I can finally share it with the world because it was gifted to its new owner. It is not just figurine, it is engagement ring box based on Disney character Stitch. I built him from scratch based on my client's requirements and his girlfriend's favorite things.
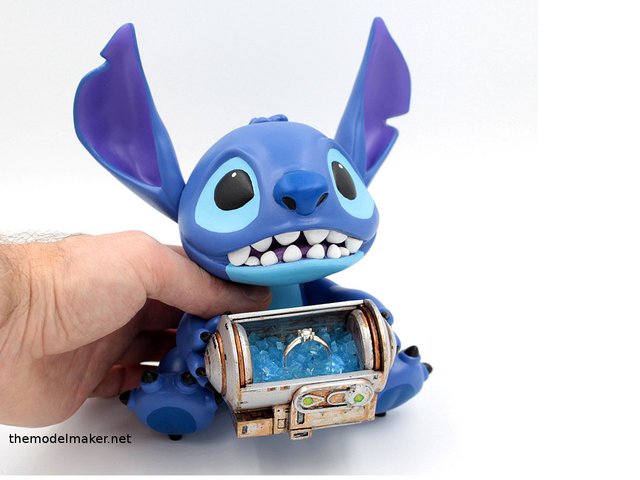
photo credit: Me (http://themodelmaker.net)
I was approached by Mike from Santa Monica with the idea of creating Stitch figurine. We started bouncing ideas, started with Stitch holding the ring on his tongue and his mouth openable with small hinge on the back of his head but it evolved to him holding the crate from Sarah's favorite game, Destiny 2. Mike sent me a video showing this object and I liked its design and few interesting challenges it would create. I like solving problems so I agreed to build it.
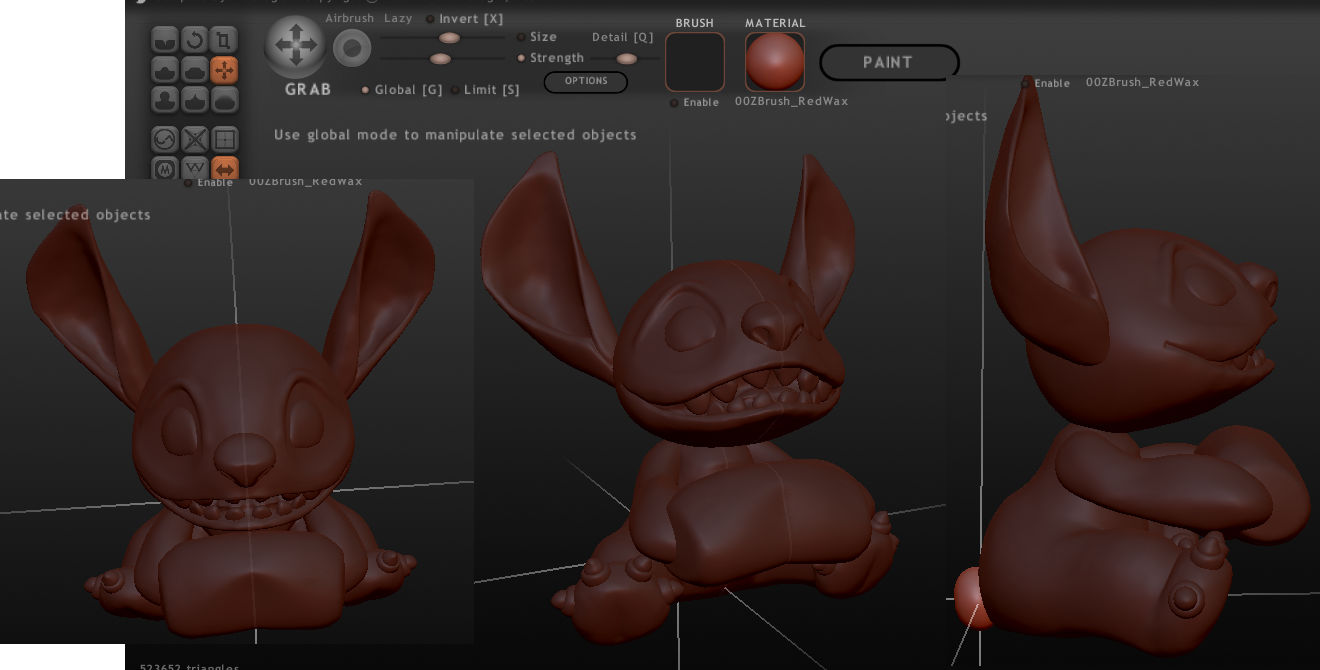
photo credit: Me (Sculptris)
I was going for holidays to visit my parents then, so decided to sculpt him digitally on the laptop. I spent few evenings doing it in Sculptris. It is free program, very basic, but does the job. My plan for this year is to learn sculpting in Zbrush which is industry standard software with more tools and more complicated at first glance.
It is created with multiple spheres modified to create shapes like nose, ears legs and arms. I can shape each independent element and quickly move it, rotate or scale to suit my needs. It greatly speeds my process. I later combine the meshes in Meshmixer and cut them to easy to print pieces which fit in my 3d printer. This model turned to be bigger than I expected, but its size was dictated by engagement ring size. You can see in the picture above, he holds the crate placeholder, I designed it later in the different program and scaled figure based on that.
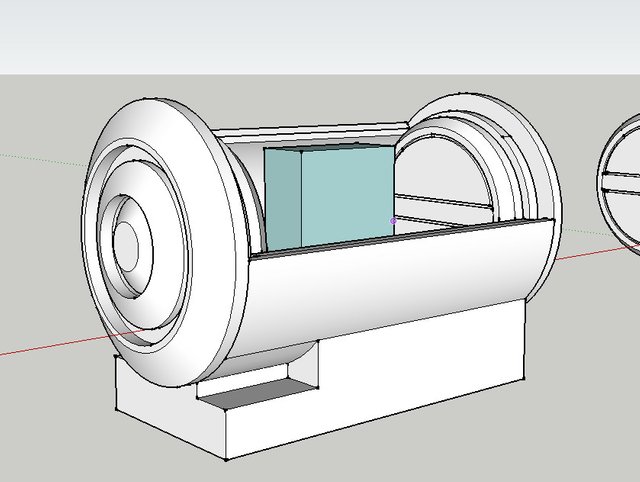
photo credit: Me (Sketchup)
The ring was of certain size and design. It would need to fit inside the crate. The diameter of a compartment inside of the crate was slightly bigger than a ring with the diamond. I drew this tubes in Sketch-up and started from there. I designed the mechanism so the lid slides like in the game. I had to give enough thickness to the elements so they are strong but look right. I quickly came with an elegant solution which worked. It was easier than I estimated so we added the lights :) I figured the way to switch the LEDs ON when the lid slides. I placed tiny potentiometer hidden in the side panel, attached at the axis. This dims the light when it is closing. Clever, isn't it? :)
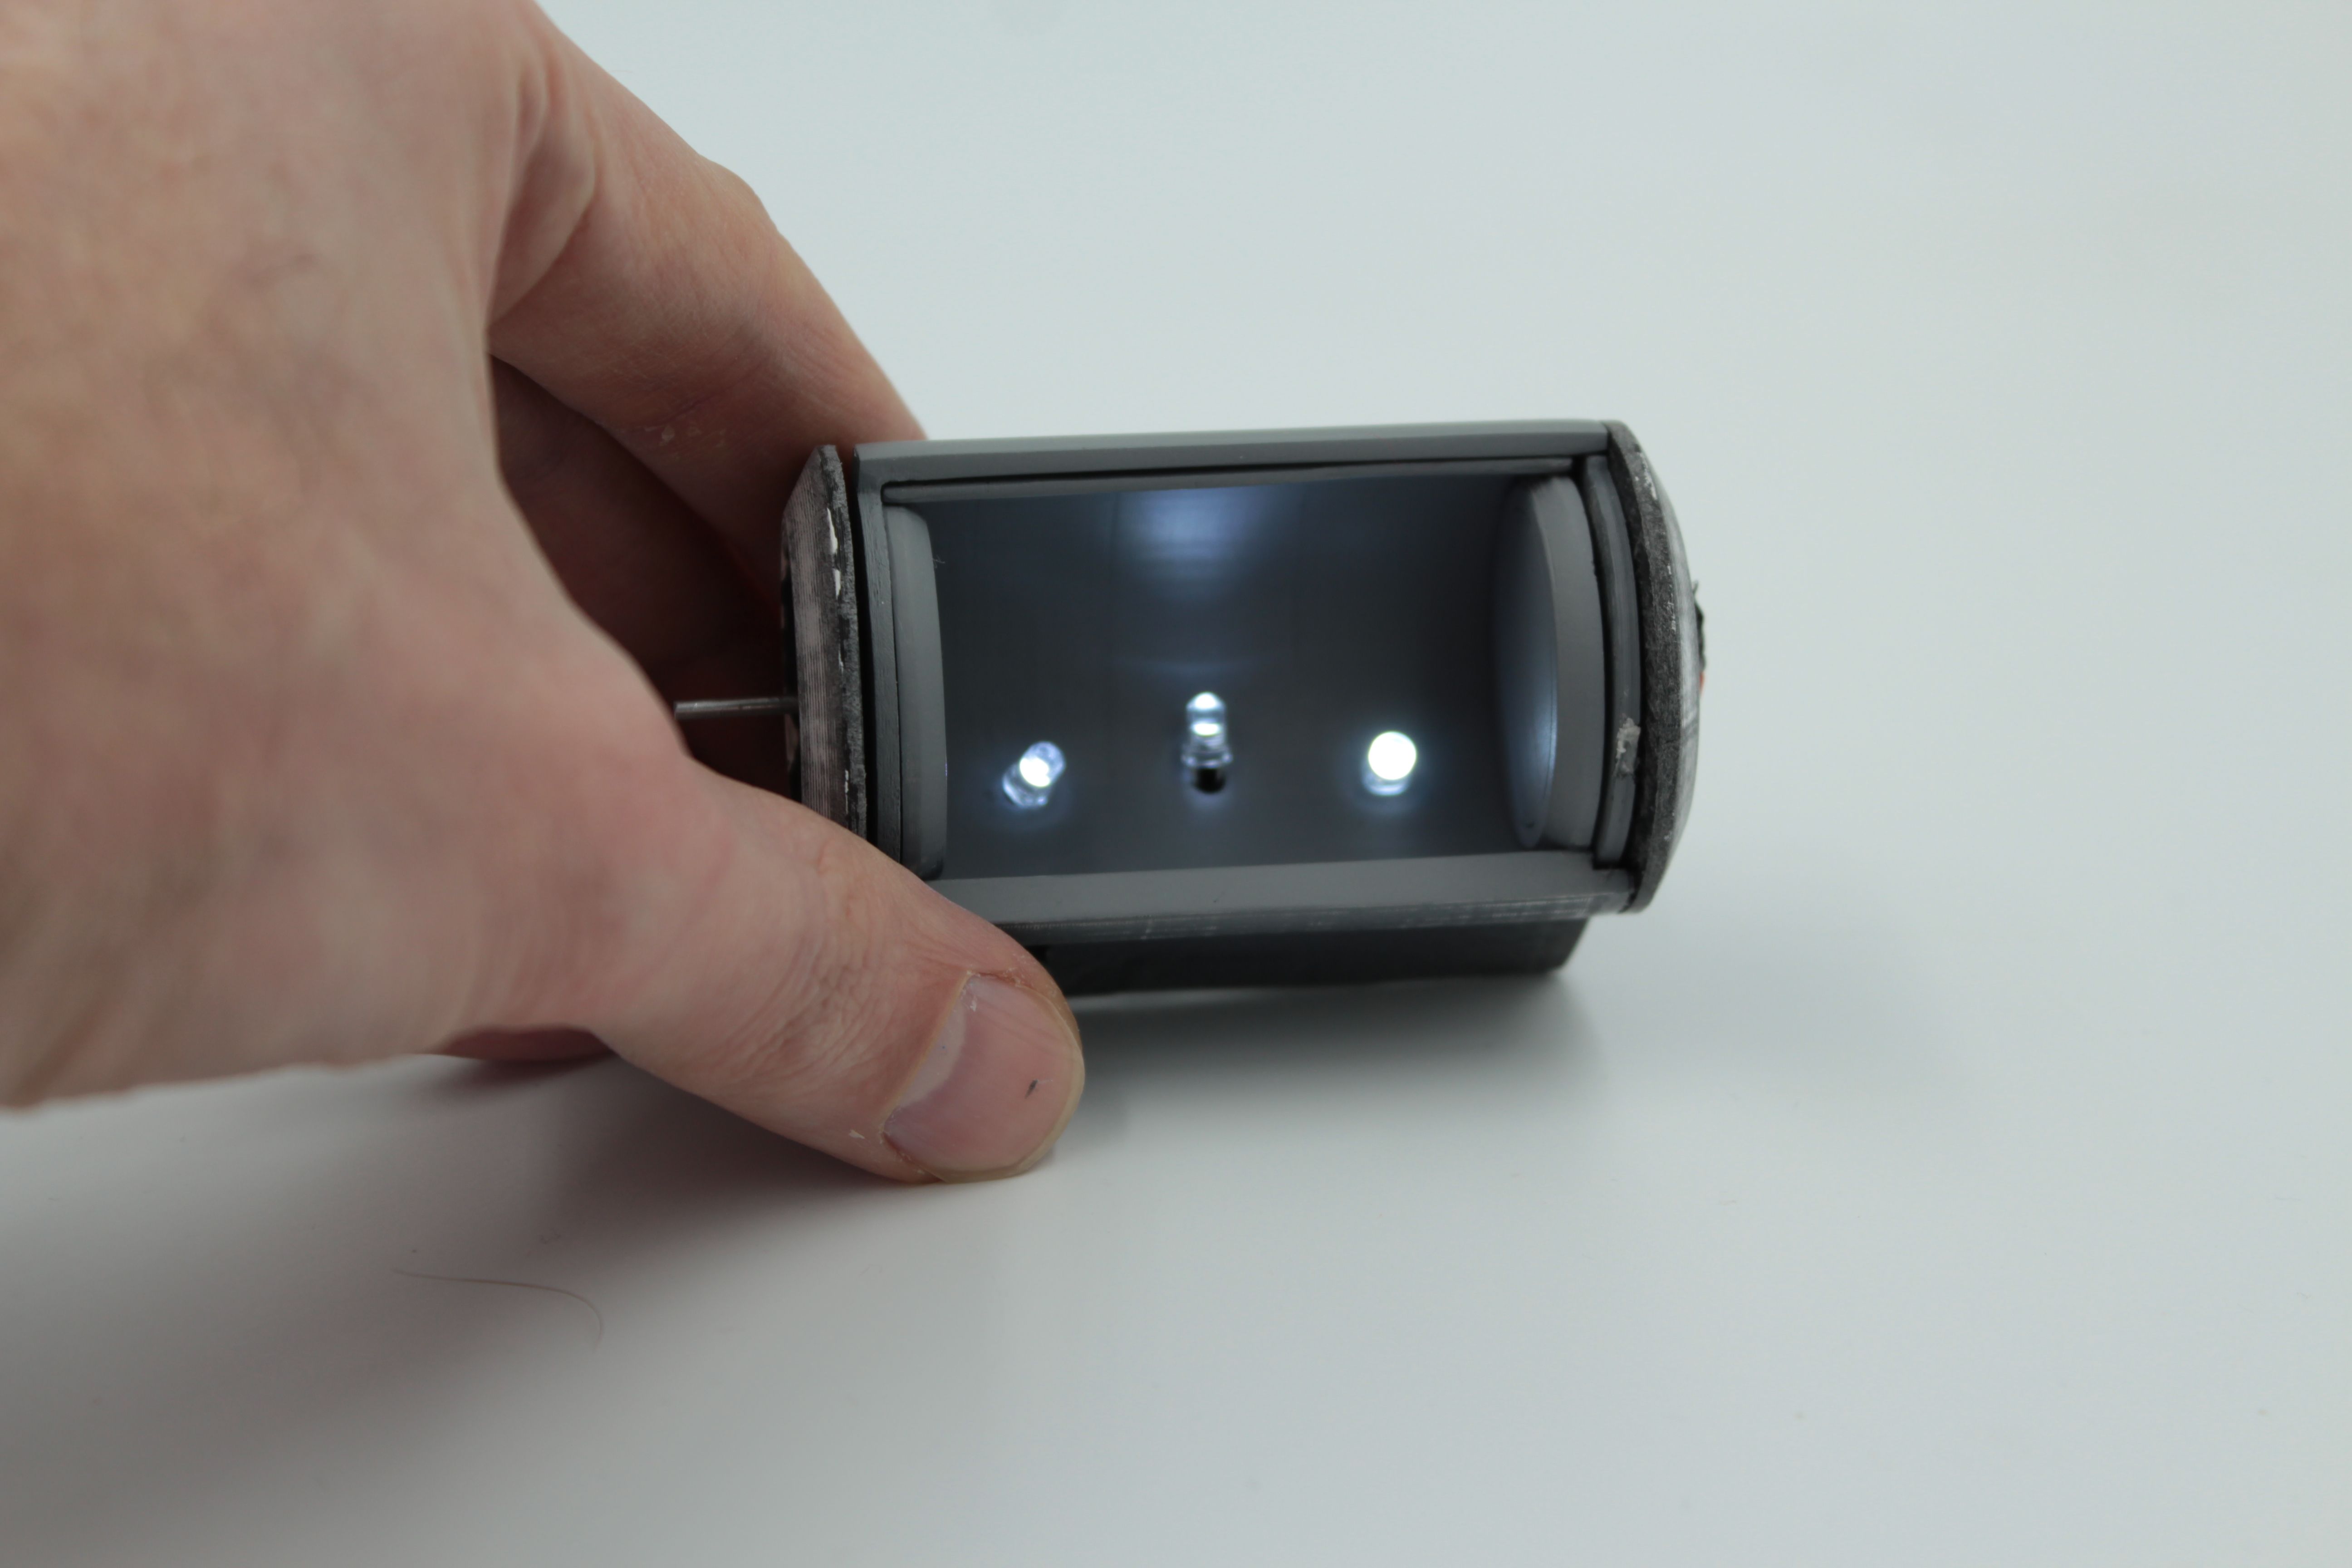
photo credit: Me (http://themodelmaker.net)
I am holding here bare bones of the crate to test how it works. I later added more details to look more like in the game. I also added a layer of translucent silicone as a ring holder. I tinted it with acrylic paint and poured a thin layer on glass. When it set, I diced it with the knife. I then mixed tiny pieces with a fresh batch of silicone and placed it inside the painted box. I used a coin to create a void for the ring. It produced a nice effect in real life, but hard to photograph.
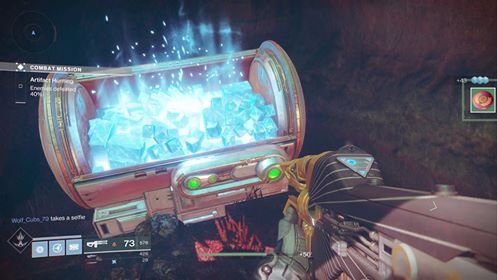
photo credit: Mike (Destiny 2)
I used ABS plastic to print all the pieces, so it was easy to weld them with acetone, creating strong bond. Using this smelly filament also speeds the sanding process, because it is softer and less brittle. I can also use acetone to smooth some hard to reach places like inside his mouth. Fortunately, I guessed this area will be a pain so I removed teeth and printed them separately.
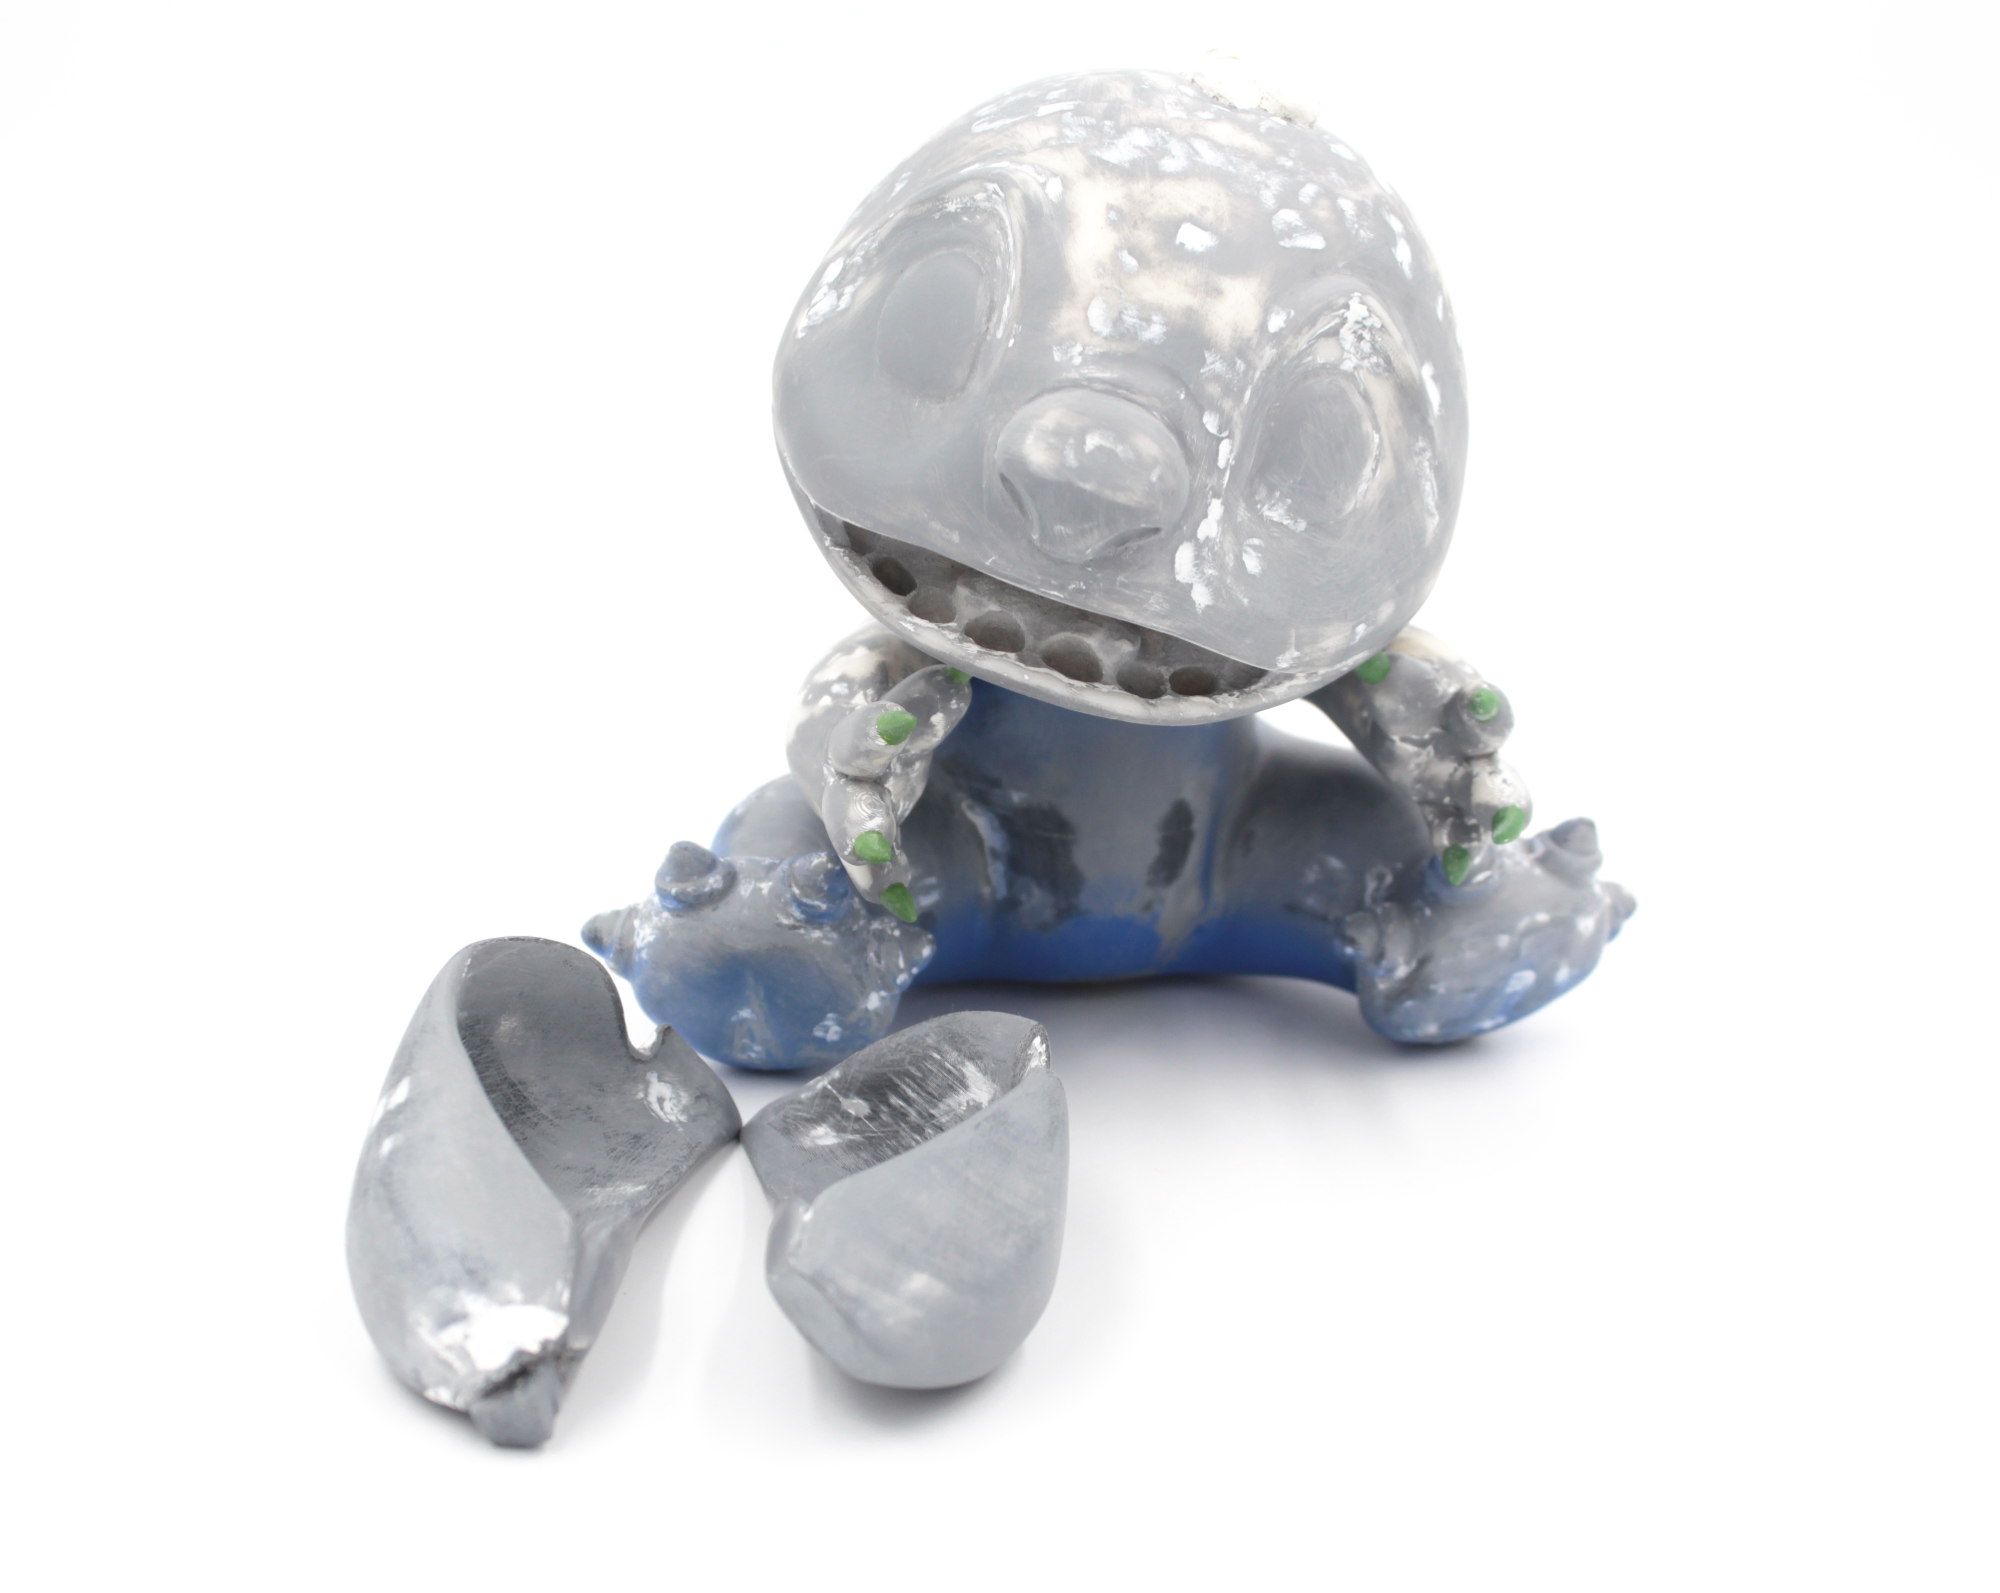
photo credit: Me
I hate sanding and filling 3d printed pieces. It takes so much time and patience. I start with rough paper on all surfaces to get rid of the layers. Then I paint all with grey primer. Then I can see all the holes and imperfections. I fill them with Tamiya filler which smells bad or water-based liquid green stuff. I recently discovered another option, wood filler by Ronseal which sticks to print well and is very smooth when sanded. It is also much cheaper than my other options. I used it on my whole BB9E model, this will be a real test for durability.

photo credit: Me
The sanding and filling process is repeated 4-5 times and finished with wet sanding with very fine sandpaper. It should only remove and polish top layer for primer and produce the very smooth surface. I can of course always find places which require more attention so end with few more passes of this stage :)
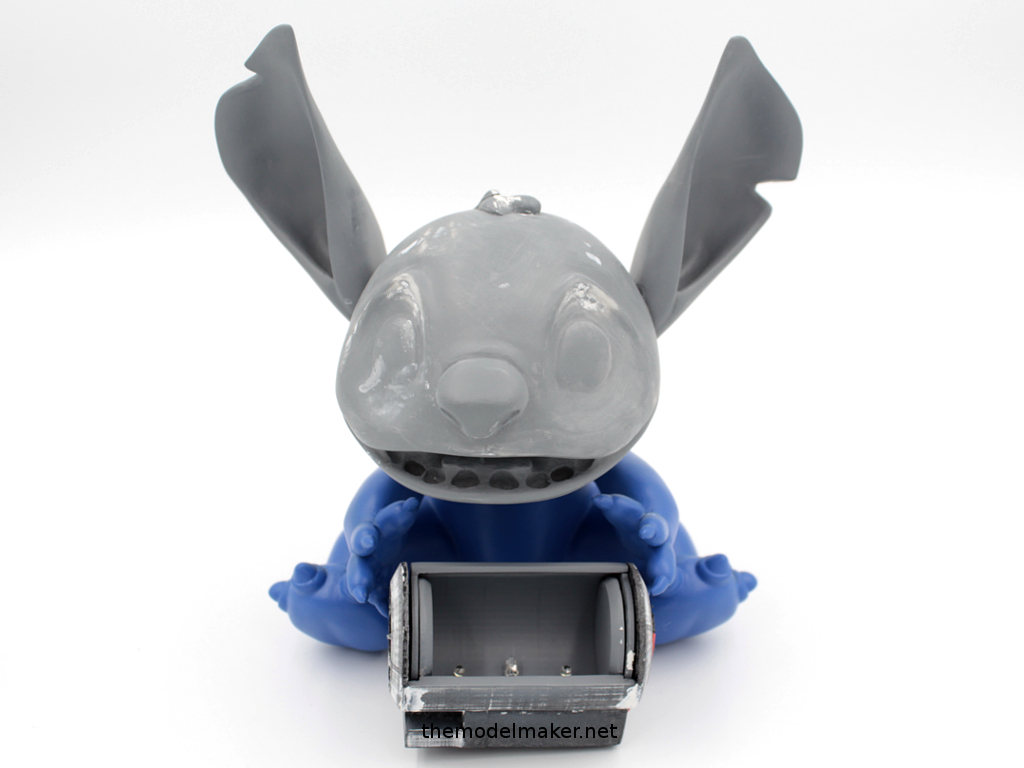
photo credit: Me
I was fortunate that this character was the same color as Ultramarine Blue primer from Army Painter series of color primers. This gave me great solid base color for later detail work with acrylic paints applied with brushes.
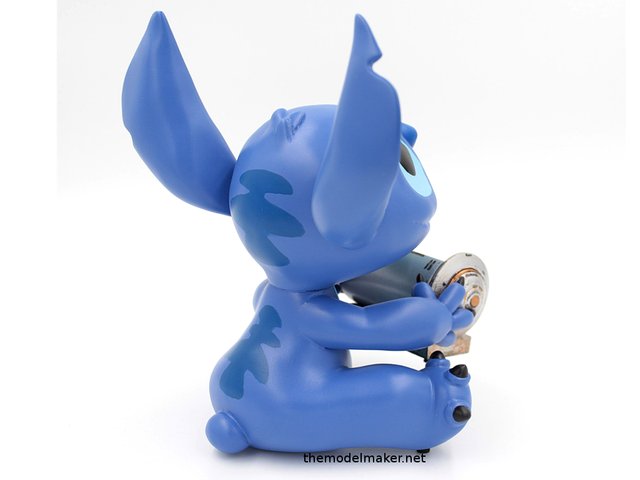
photo credit: Me (http://themodelmaker.net)
After weeks of hard work, I ended with a clean and solid toy, similar could be found in many stores for much less :) It is often the case with my models. I spend a lot of time and attention to bring them to the look of finished and mass-produced toy or statue. The only difference, it is one of the kind prototypes what makes them expensive to make. I often underestimate the time needed and charge too little so you can help me recoup the costs with your upvotes. I hope you enjoyed reading about the process and learned something new. I am now going back to sanding my BB9E, so I can write about it if you are interested. You can see updates about Stitch engagement ring box on this blog post: https://themodelmaker.net/stitch-custom-engagement-ring-box/
Thanks for your support!
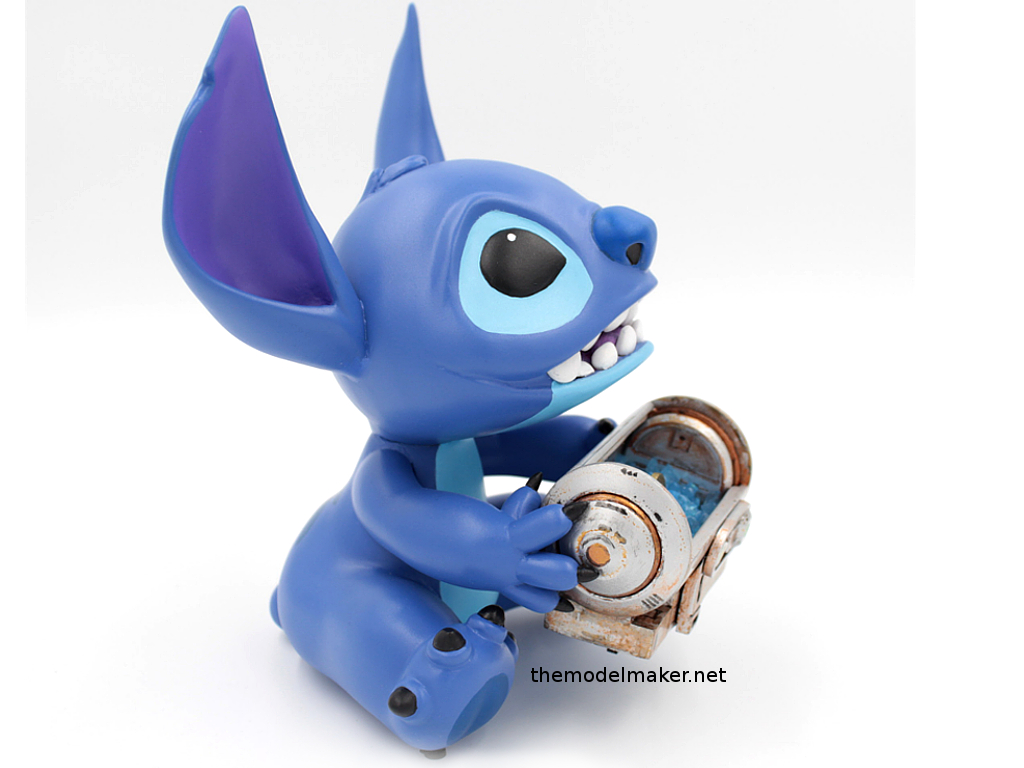
photo credit: Me (http://themodelmaker.net)
Damn you @mitchhunter !!!! I said I was not going to follow anyone else today but then I come across this and look at your page. This is fantastic! I’m going to be stalking your page later looking at your older crap.
Thanks for doing that. I appreciate you changed your mind :) I hope I will deliver the content which will satisfy your nerdy needs :)
@mitchhunter lol. What's funny is I had a customer come into my shop today and ask for a Stitch Funko Pop. It reminded me of this so I pulled it up and showed her. She thought it was awesome!
Thats awsome! Thank you for helping me to show the work to new people. With so many interesting things online it is hard to get attention
Well keep that work coming. Slowly intergrading myself into the “geek” community here and I know they would love to see stuff like this so keep it coming!!
Well keep that work coming. Slowly intergrading myself into the “geek” community here and I know they would love to see stuff like this so keep it coming!!
What a lot of work but a great result. Having the LED lights come on when the lid slides is a wonderful touch. Really well done.
Thanks. Yes, that was a great accidental idea when I thought about how to switch on the light when opening. At first, planned to put some brass connectors but later came with the idea of a potentiometer. Will be using it in my other projects now.
Also looked into zbrush resently as a modeling workflow but the price scared me away.
Yes, it is an investment, will need to produce few projects to pay it. I saw there is 45 days trial, I am planning to use it when my life stabilizes :) I will be using 3d printing more now, I just got Anycubic Photon and it produces amazing details. Finally quality good enough for my projects :)
Yea a DLP printer is probably perfect for your miniatures.
Im a huge fan of stitch and disney films. Im really impressed of your work.
Thank you. I am a fan too. Feeling lucky I can practice sculpting and making my favourite characters at the same time.
Wow! It looks awesome. I'm sure the owner loved it.
Yes she did, she thanked me on instagram. they are now planning wedding. Mission complete :)
Hi Mitch. I just wanted to let you know that I featured you in my latest post: https://steemit.com/art/@beinart/inspiring-artists-on-steemit
Love your work!
Thank you for your feature. You put me there with some amazing artists I follow and admire here on steemit! Not sure if I deserve it but I greatly appreciate it!
Join our Discord Channel to connect with us and nominate your own or somebody else's posts in our review channel.
Help us to reward you for making it ! Join our voting trail or delegate steem power to the community account.
Your post is also presented on the community website www.steemmakers.com where you can find other selected content.
If you like our work, please consider upvoting this comment to support the growth of our community. Thank you.
WOW! Just wow! This is amazing! I just can't even imagine what she thought when she saw this! But do you know if she said "Yes" or not? I sure hope so! Thanks for sharing!
Thanks. She said Yes and she loved the model. Mission complete ;)
wow really cool!!
Thanks! I hope you will also check my future creations.