Enhancing photo reference - Digital painting tutorial #6 [IT/EN]


Manipolare reference fotografico - Tutorial sulla pittura digitale #6
Usare reference fotografico è essenziale per dipingere un qualsiasi soggetto. Tuttavia, un software come Adobe Photoshop può aiutare a "giocare" con il reference in modo da renderlo ancora più creativo e interessante. Il fatto che serva solamente come spunto per dipingere, da sì che la post produzione fotografica non debba essere precisa o perfettamente realistica.
Ecco alcune tecniche da applicare sul reference (le immagini sono prese da pexels.com).

Enhancing photo reference - Digital painting tutorial #6
Using photographic reference is essential for painting any subject. However, software such as Adobe Photoshop can help you "play" with the reference to make it more creative and interesting. It will serve only as a starting point for painting, therefore the post-production won't have to be precise or perfectly realistic.
Here are some techniques to be applied on the reference (the images are taken from pexels.com).


Ritoccare una foto esistente per renderla più adatta alle nostre esigenze
- menu Immagine => Regolazioni => Tonalità e saturazione (Ctrl U) per cambiare la luminosità, la saturazione o la tonalità di colore.
- menu Immagine => Regolazioni => Valori tonali (Ctrl L) per manipolare i chiari, scuri e mezzitoni, sia usando i valori in input che in output.
- menu Immagine => Regolazioni => Bilanciamento colore (Ctrl B) per virare l'immagine verso tonalità più calde o più fredde.
- menu Filtro => Sfocatura => Controllo sfocatura per sfocare gli elementi su un livello.

Retouch an existing photo to make it more suitable for our needs
- Menu Image => Settings => Hue and saturation (Ctrl U) to change the brightness, saturation or hue.
- Menu Image => Adjustments => Levels (Ctrl L) to manipulate the light, dark and halftones, using input or output values.
- Menu Image => Adjustments => Color Balance (Ctrl B) to turn the image to warmer or colder tones.
- Menu Filter => Blur => Motion Blur to blur elements on a layer.

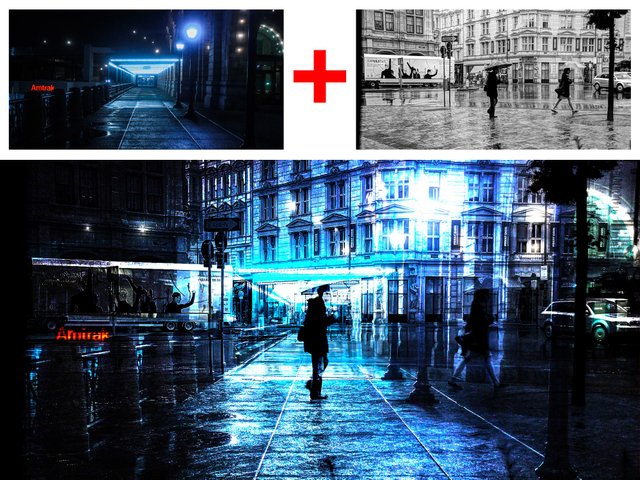
Creare una fusione di immagini per ottenere forme e combinazioni inaspettate (tecnica del Photobashing)
- Aprire in Photoshop la foto che utilizzeremo come base. Aprire la seconda foto che intendiamo fondere con la foto base.
- Selezionare la seconda foto con Ctrl A per poi copiarla con menu Modifica => Copia. Spostarsi sul lavoro base e incollare la seconda foto con menu Modifica => Incolla.
- Modificare la seconda foto a piacimento con Ctrl T (spostare, ridurre, ingrandire, distorcere).
- Cambiare il metodo di fusione del livello con la seconda foto. Sperimentare con i cari metodi di fusione fino al raggiungimento dell'effetto desiderato.
- Ripetere con altre foto a piacimento.
Create a fusion of images to get unexpected shapes and combinations (Photobashing technique)
- Open the photo that will be used as main layer in Photoshop. Open the second photo that we intend to merge with the main photo.
- Select the second photo with Ctrl A and then copy it with Edit => Copy menu. Navigate to the main work and paste the second photo with Edit => Paste menu.
- Edit the second photo at will with Ctrl T (move, reduce, enlarge, distort).
- Change the blending mode of the layer with the second photo. Experiment with the desired blending modes until the desired effect is achieved.
- Repeat with other photos as you like.

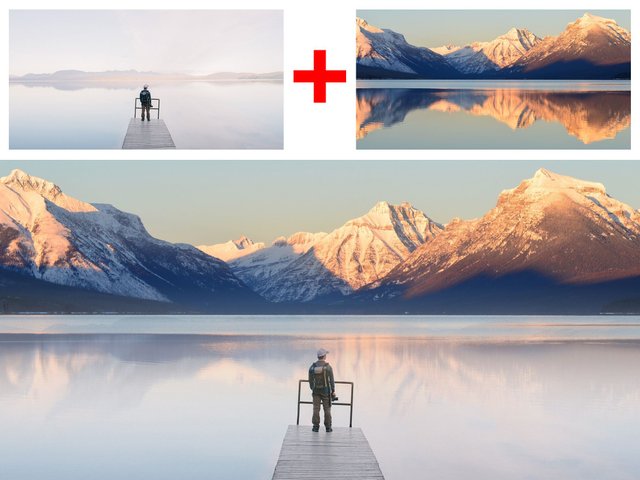
Prelevare elementi da una foto per inserirli in un'altra tramite le selezioni.
- Aprire in Photoshop la foto che utilizzeremo come base. Aprire la seconda foto che contiene gli elementi desiderati.
- Selezionare gli elementi da prelevare utilizzando le selezioni rettangolo/ellisse o il lazo a mano libera/poligonale.
- Menu Modifica => Copia, spostarsi sulla foto principale e menu Modifica => Incolla.
- Modificare l'elemento incollato a piacimento con Ctrl T (spostare, ridurre, ingrandire, distorcere). Occorre tenere conto della linea dell'orizzonte, l'elemento incollato deve avere la stessa prospettiva della foto di base.
Pick up elements from one photo and place them into another using selections.
- Open the photo you're going to use as main layer in Photoshop. Open the second photo that contains the desired elements.
- Select the elements to be taken using the rectangle/ellipse selection or the free/polygonal lasso.
- Edit => Copy menu, move to the main photo and Edit => Paste menu.
- Edit the pasted item as you wish with Ctrl T (move, reduce, enlarge, distort). Keep the horizon line under control, the pasted element must have the same perspective as the base photo.
Utilizzare le maschere di livello per creare dei fotomontaggi avanzati.
Le maschere di livello sono uno strumento potente ma difficile da padroneggiare. Si tratta di una maschera da abbinare ad un livello superiore a quello di sfondo e che servirà per nascondere o mostrare il livello stesso. Il colore nero, sulla maschera, nasconde. Il colore bianco, mostra.
Vediamo come si usano nella pratica.
- Aprire in Photoshop la foto che utilizzeremo come base. Aprire la seconda foto che intendiamo unire alla foto base.
- Selezionare la seconda foto con Ctrl A per poi copiarla con menu Modifica => Copia. Spostarsi sul lavoro base e incollare la seconda foto con menu Modifica => Incolla.
- Modificare la seconda foto a piacimento con Ctrl T (spostare, ridurre, ingrandire, distorcere).
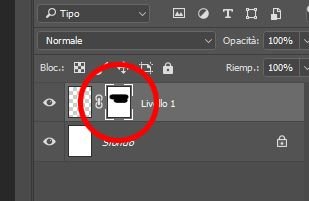
- ATTIVARE LA MASCHERA DI LIVELLO cliccando sul livello della seconda foto e sul simbolo di un rettangolo bianco con cerchio nero sulla palette dei livelli.
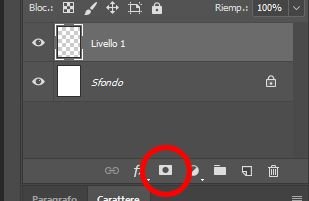
- CLICCARE SULLA MASCHERA DI LIVELLO per aggiungere nero o bianco a seconda che si voglia nascondere o mostrare il livello.
Si può operare nei seguenti modi:
Tirare delle sfumature bianche o nere per rendere la fusione delle due immagini molto morbida.
Dipingere con il pennello con il bianco o con il nero. Tenere a mente che con il tasto X si cambia velocemente da colore di primo piano a colore di sfondo, quindi dal bianco al nero.
Se vogliamo riempire la maschera tutta di nero o tutta di bianco occorre selezionarla con Ctrl A e poi menu Modifica => Riempi, scegliendo il bianco o il nero.

- Qualora si volesse eliminare la maschera o renderla definitiva, troviamo tutte le opzioni disponibili cliccando sulla maschera stessa con il tasto destro.
- Quando abbiamo finito di operare con la maschera e vogliamo tornare a lavorare con i livelli "normali", occorre cliccarli!
Using layer masks to merge photos.
Layer masks are a powerful but difficult tool to master. It is a mask to be combined with a layer dofferent from the background and that will hide or show the level itself. The black color hides. The white color shows.
Let's see how they are used practically.
- Open the photo you're going to use as main layer in Photoshop. Open the second photo that contains the desired elements.
- Select the second photo with Ctrl A and then copy with the Edit => Copy menu. Navigate to the main photo and paste the second one with Edit => Paste menu.
- Edit the second photo at will with Ctrl T (move, reduce, enlarge, distort).
- ACTIVATE THE LAYER MASK by clicking on the layer of the second photo and, then, on the symbol of a white rectangle with a black circle at the bottom of the layer palette.
- CLICK ON THE LAYER MASK and add black or white depending on whether you want to hide or show the layer.
You can operate in the following ways:
Pull some white or black gradients to make the merging of the two images very soft.
Paint with a brush with white or black. Keep in mind that with the X key you can quickly switch foreground color with background color, hence from white to black.
If we want to fill all the mask with black or white, select with Ctrl A and then menu Edit => Fill, choosing white or black.
- If you want to delete or apply the mask, right clicking on the mask itself.
- When you've finished working with the mask and you want to go back to working with the "normal" layers, just click them!

Fundamentals of learning how to paint environments - Digital painting tutorial #1 [IT/EN]
Painting with selections - Digital painting tutorial #2 [IT/EN]
Geometric perspective - Digital painting tutorial #3 [IT/EN]
Using perspective grids in Adobe Photoshop - Digital painting tutorial #4 [IT/EN]
Composition rules for landscapes - Digital painting tutorial #5 [IT/EN]
This post has received a 1.67 % upvote from @booster thanks to: @onicreative.
Congratulations @onicreative! You have completed some achievement on Steemit and have been rewarded with new badge(s) :
Click on any badge to view your own Board of Honor on SteemitBoard.
For more information about SteemitBoard, click here
If you no longer want to receive notifications, reply to this comment with the word
STOPCongratulations @onicreative! You received a personal award!
Click here to view your Board of Honor
Congratulations @onicreative! You received a personal award!
You can view your badges on your Steem Board and compare to others on the Steem Ranking
Vote for @Steemitboard as a witness to get one more award and increased upvotes!