NaughtScape[04] - Modeling a Wrought Iron Fence in Blender
But why male fence models ?
The structure model I decided to try and make first was a fence tile. I wanted to make something a little fancier than just some metal bars or wood planks. I decided to model a wall based around a fence built around a local community green space called the Dartmouth Commons and a fence in the game Old School RuneScape (OSRS). I could have made a solid wall, but since the theme for my first level will be an arena I though a good strong fence would be a better fit.
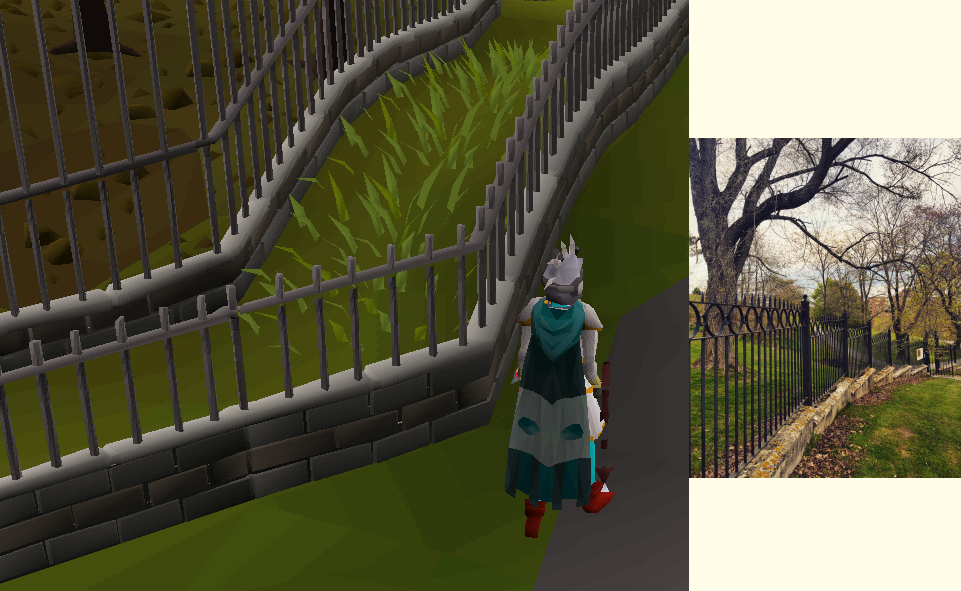
The fences I based my fence model on.
Starting Out
I used Blender to create the fence model, I like Blender because it's free and I can't justify purchasing a license to a product right now.
To start out this model I created a new plane to use as a tile reference. Then I decided to start out with modeling the fence bars, I began by creating a cylinder (shift+A, Mesh->Cylinder) and setting some of it's properties in the left hand window before doing anything else.
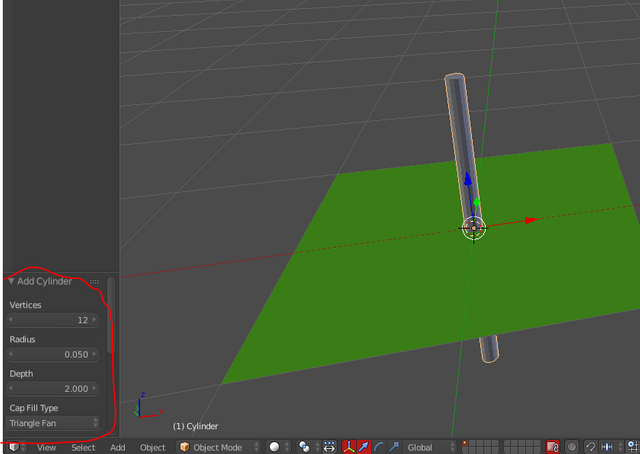
I lowered the vertices to 12, set the radius to 0.05, and changed the Cap Fill Type to Triangle Fan.
Once I had the properties set I moved the cylinder up along the z-axis and scaled it down along the x and y axes until it got to a thickness I felt was right. The next step was to create the spikes at the top of the bars.
Because I chose triangle fan as a cap fill type the flat ends of my cylinder were made up of multiple triangles meeting in the center instead of a singular face.
NOTE: If you wanted to scale something in multiple axes you can press shift + [The axis you DO NOT want to effect]. So if you wanted to move on the x and y axes you would hit
shift+Zto no effect the z axis.
Making a Point
To make the base of the spike I selected the outer ring of vertices and extruded them (E) and hit enter, not moving them at all. Without deselecting them, I scaled them on the x and y axes (S, shift+Z) to expand the points out horizontally from where they started. Once I have the base to the size I wanted I extruded the points only in the z direction, creating the sides of the spike. I pulled the sides up and when I felt like it was big enough, I merged all of the vertices into the center (Alt+M, ->At Center).

Topper spike before I combined the vertices in the center.
Positioning
Once I had a single vertical bar complete it was time to position multiple in a row. I decided on having 3 bars per tile, because I felt like that was a good number. But after I had them placed I thought that the bars looked too far apart, that fence wouldn't stop anybody ! In order to keep the spacing the same between the bars in the model, and between multiple models, I decided to place them every 0.25 units along the x axis.
I think it ended up looking pretty good (for just some vertical bars).
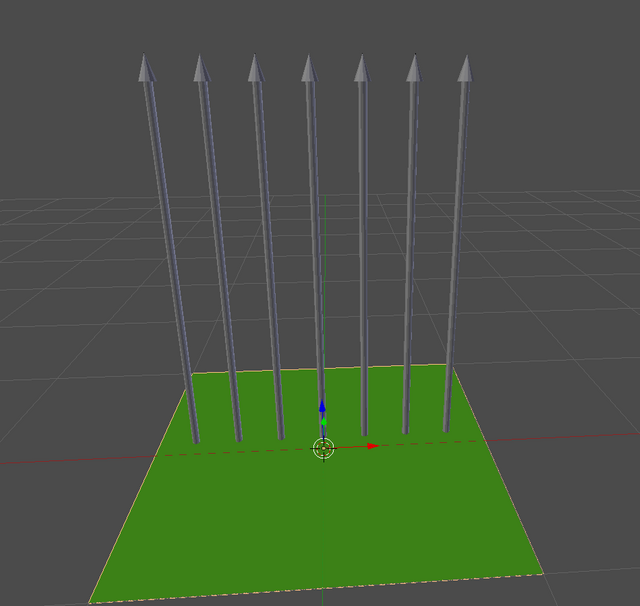
I ended up with 7 vertical bars.
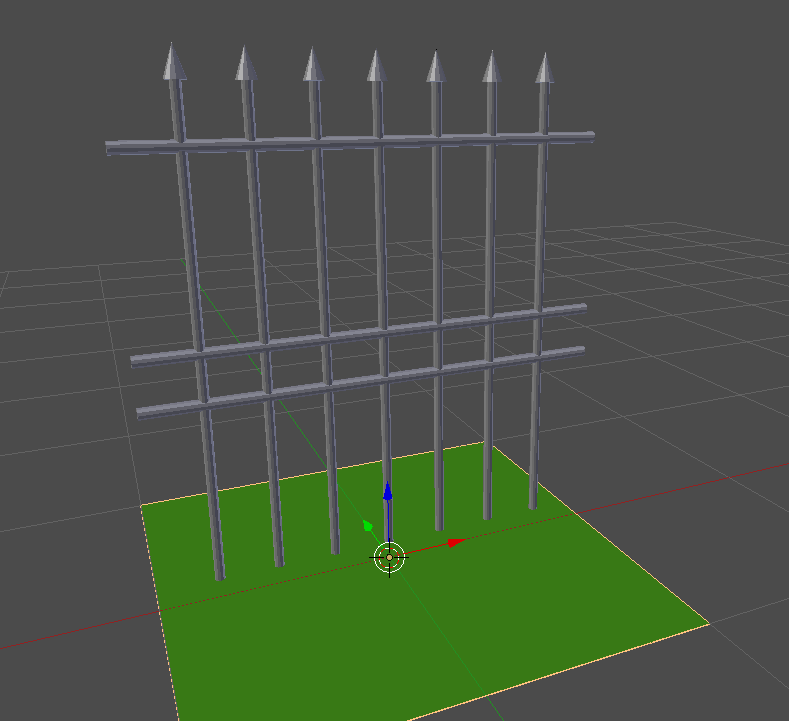
Horizontal Bars
To create the horizontal bars I spawned in a new cylinder and did everything the same as when I created the vertical bars except for making the spikes. Then I rotated the bar 90 degrees on the y axis, and that put it exactly where I wanted it in relation to the other bars. All I had to do was move it along the z axis until it was at a height I liked, and then duplicated the bar twice and moved each of the duplicates down a lower position.
The Tedious Part
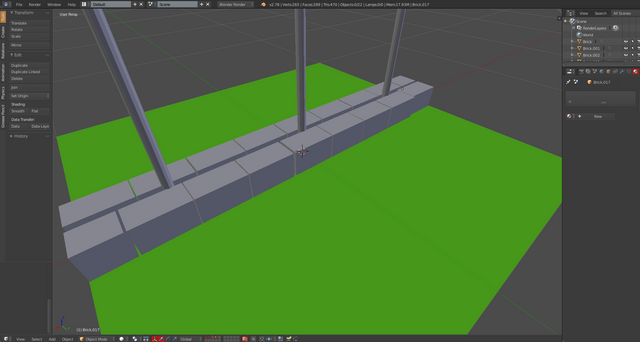
Now that I had all of the easy parts out of the way, it was time to build the wall. I could have used a solid rectangle and make the wall in a few seconds, but I wanted to make a fancy looking wall dang it ! I decided to style the wall more closely to the OSRS wall I have pictured above. This meant a wall made up of singular bricks. The placement would be tedious, but the finished product would be worth it.
A single brick was create using a cube, and then scaling it down until I got a general brick shape. To create the first row of the wall I simply duplicated the brick, moved it along the x axis until it sat next to the previous brick, and repeated. When I hit the end of the tile, I moved the duplicate brick along the y axis so it would become the opposite side of the wall.
To give the wall some texture so it wasn't a long flat surface I went along each side and slightly adjusted each brick. I moved them so they sat directly next to each other, some pushed in or pulled out slightly. I also rotated a few of them on the z axis to mimic loose bricks shifting in their spots.
The bottom row of the wall.
I repeated the same process I used to create the first row 3 more times until I had 4 rows in total on each side of the bars. It was finally really starting to look like a nice wrought iron fence.

Wall Topper
The top of the wall is still looking a little rough so I thought adding a piece of metal to cover the top would work with the overall look. This would also be quite an easy add as well. I started in a similar manner to creating the horizontal bars:
- I spawned in a cylinder
- Set the number of vertices down to 10
- Rotated 90 degrees on the y axis
- In edit mode I deleted the bottom 4 vertices, leaving me with 6 on each end in a semi-circle.
- Recreated the faces on the end that were removed when I deleted the vertices.
This left me with a topper that was the length of the wall, but far too skinny on the y and z axes. I solved this by scaling in only those axes, leaving the x axis untouched. That's all it took to get the wall topper set up !
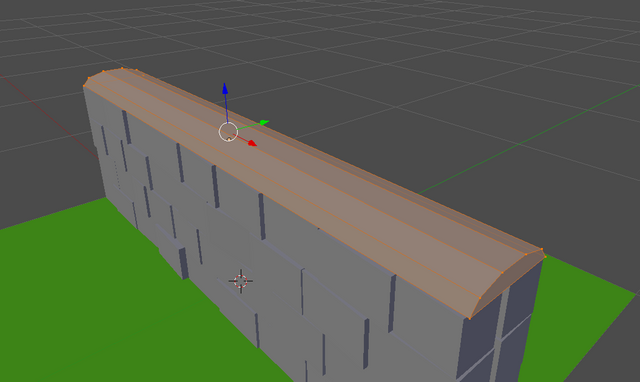
Completed and placed wall topper.
Time for Some Colour !
This first thing I had to do was write down a list of colours I would need for this model. I ended up deciding on 4 colours:
- Iron Grey - For the bars and wall topper
- Stone Grey - For some of the bricks
- Reddish Grey - A light reddish colour for some of the bricks
- Darker Grey - For some of the lower bricks
For colour consistency throughout models I wrote down the RGB values for each of them. After defining each of the needed colours, I went about slowly applying them to each object. I combined all of the vertical fence bars into a single object and the horizontal bars into another object, this allowed me to colour them all with one assignment. They also no longer need to be separate.
To get the bricks all coloured I selected each object separately while in object mode, this would allow me to colour the entire block at once. I started with the darker grey blocks because there would be the fewest of these. Then I did the red tinted blocks, for each of these colours I semi-randomly selected blocks to colour. I didn't want large areas of colour, but also didn't want a random static of colours.
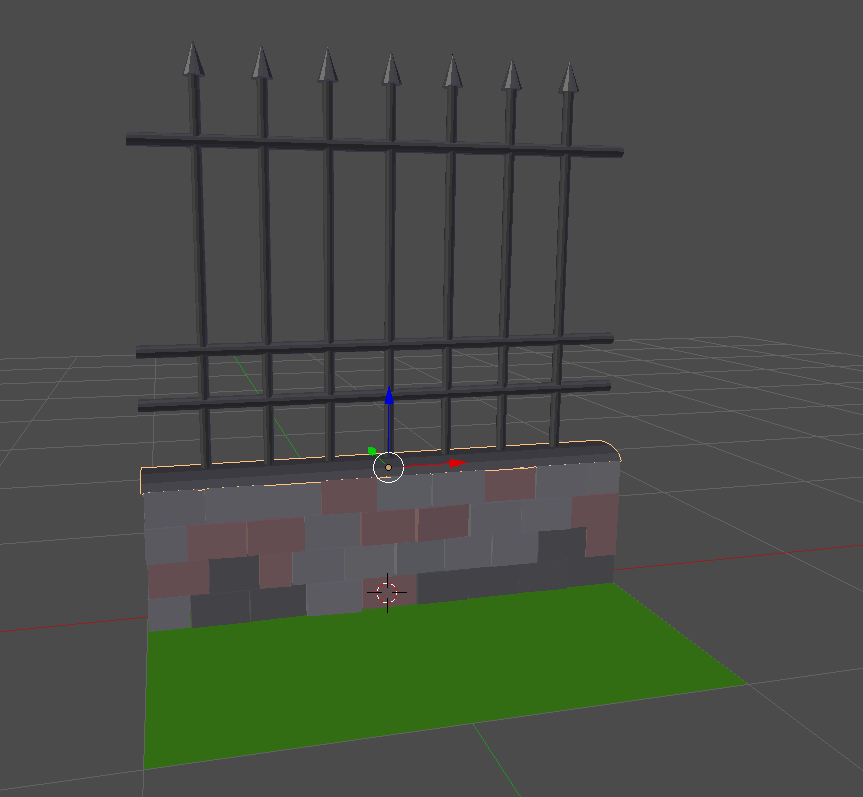
The end product of all the tedious colouring.
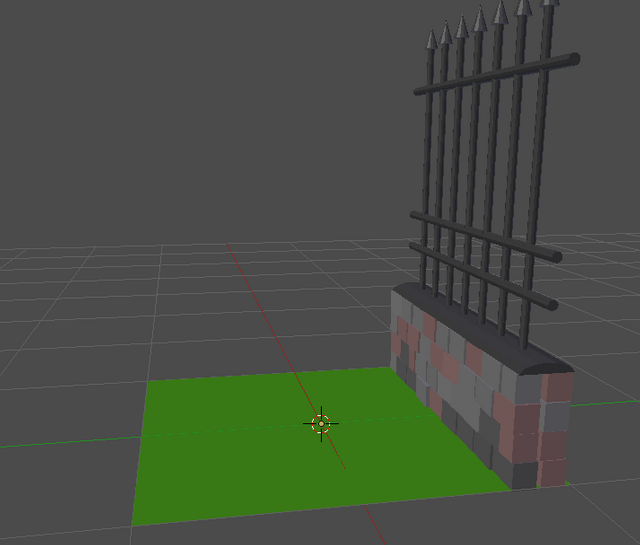
Placement Within the Tile
Something I didn't put much thought into until I saw the finished model was the amount of space that would actually be taken up by the model. In OSRS the fences and walls don't block an entire tile. Instead they are place along one edge and block the ability to path through that edge of the tile. With this in mind I pushed the entire model back to the edge of the tile on the y axis. This should offer up enough room left in the tile for the player model to fit and stand.
Into Unity !
Like the previous model I made, I will have to combine all of the separate objects into one. Because this model is so complex, if I ever want to change how this model looks (spoiler, I will) or recolour any part of it I will have to separate specific pieces tediously. To make this a bit easier in the future I saved the model to a different folder outside of my Unity project, I called the folder "NaughtScape\Unmerged Models.
Until Next Time !
If you have any suggestions for improvements, questions, or links to resources that would help me out feel free to leave a comment. Upvote if you liked the post or found it helpful, and follow me for future updates on NaughtScape, sometimes other programming, and occasionally other stuff. All of the source code can be found on my Github.
You could also add me in game on OSRS if you play !
My ign is MapleThunder.
Great modelling skills mate !
I need to take look at Blender. Now I am working in 3ds max, mostly doing architectural CGI's, which you can check on my profile. Keep going, we need more 3d graphic on steemit !!
I looked into both 3DS and Maya, but with something like a job covering the cost I unfortunately don't see myself being able to really use them in the near future.
Yeah !!! That is true... Price of this products can kill your wallet... Could you say something more about Blender? What does this software that others cant do... I mean Blender...
I'm not sure if it can specifically do something the other softwares can't, because I've never used other modeling software. After looking for some comparisons I've found there doesn't seem to be a big difference between the big software (3DS MAx, Maya LT, and Blender). I've seen it mentioned here that Blender has a built in game engine thjat can apparently help to "quickly prototype ideas directly in" Blender. I'm not too sure what that means, but I'm still pretty new to the world of 3D modeling and asset creation.
When I eventually have to create the character and enemy models and then animate them it will be quite the interesting learning experience.
Which software did you use to make this model? Can you write this in the post?
I used Blender to create the model ! I thought I had it written in there but must have forgotten, thanks for letting me know so I could update the post.
So, i know very little about the programming side of things when it comes to games, but I have mucked around in blender before, building models for export into an ancient game engine for a mmo i used to have time to play. (Uru Online, based on Myst/Riven, if that rings any bells) Anyway, due to the age of the engine, most of what you have built here would have been done using textures only, to keep the face/vertex count low and help the engine run faster. I'm just imagining the roars the programming guys would have made if I had passed them a model with all those hidden faces requiring rendering! Lol. I would have been expected to build a long, tall, narrow box, for the bottom of the wall, with texture mapped to look like the bricks and cap, and a flat plane, or possibly a very thin box, for the wrought iron, mapped with a transparent texture to look like the bars. 16 vertices at maximum, pared down to 12 if I used a plane for the top portion. So streamline, much simple.
All that to say, that's a very nice looking wall that would never have been allowed to build, although I would have liked to very much, and I'm sad that the Uru engine was not Unity haha
I only did something similar to what you would have had to do while modeling the wall topper. I left out recreating the bottom of the topper because it would always be sitting directly on top of the wall so the player would never see it. If this ended up being a larger project some of those techniques would probably be very useful to optimize things and probably help slower computers render the needed graphics.
Congratulations @maple-thunder! You have completed some achievement on Steemit and have been rewarded with new badge(s) :
Click on any badge to view your own Board of Honor on SteemitBoard.
For more information about SteemitBoard, click here
If you no longer want to receive notifications, reply to this comment with the word
STOPCongratulations @maple-thunder, this post is the most rewarded post (based on pending payouts) in the last 12 hours written by a Newbie account holder (accounts that hold between 0.01 and 0.1 Mega Vests). The total number of posts by newbie account holders during this period was 2386 and the total pending payments to posts in this category was $837.71. To see the full list of highest paid posts across all accounts categories, click here.
If you do not wish to receive these messages in future, please reply stop to this comment.
Congratulations, your post received one of the top 10 most powerful upvotes in the last 12 hours. You received an upvote from @curie valued at 41.47 SBD, based on the pending payout at the time the data was extracted.
If you do not wish to receive these messages in future, reply with the word "stop".