Hello my all steemit users how are u all? so my steemit mates today i learn how to use DSLR Camera?
DSLR Basics:8 Easy Steps to Learn Manual Mode for Canon DSLR....
Manual Mode in DSLR Camera is considered to be an out-of-this-world setting that many people never ever think of trying it. I have come across many people who own DSLR Camera for many years but never tried. Most popular reason being that it requires them to have technical know-how of Aperture, Shutter Speed and ISO settings which has a steep learning curve.
If this reasoning rings a bell even for you, let us tackle it right here right now. You will see yourself playing around with Manual Mode like never before within matter of few minutes.
I have used images of Canon Rebel T3i DSLR camera settings in this article. Most of the Canon DSLRs probably have very similar settings. If you are a Nikon DSLR owner, please read DSLR Basics: 8 Easy Steps to Learn Manual Mode for Nikon DSLR Cameras.
If you follow these steps exactly the way I describe, you will never have to switch back to Auto mode.
Step 1: Pick up your Camera and Start the Timer.
This is the most important step. If you are just reading it in your office, or a restaurant, or a coffee shop, then no matter what, you will never learn it. If you do not have access to camera right now, then stop it here. Go back home, pick up your camera and then follow the next steps. Start the timer now. Let us see how much time you will take to understand the manual mode.
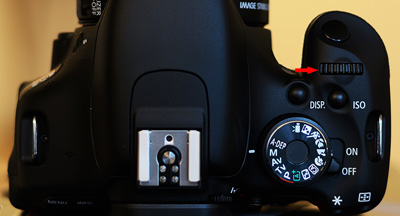
Step 2: Turn the Mode dial to point to M which means Manual Mode.
Rotate the mode dial, which is usually at the top right hand side, to point to M . Some of the models may have the mode dial at the top left hand side.

Step 3: Point the Camera where you find good light.
This is very important step. Do not ignore this step. Turn on the camera if you have not done it already and point it towards a subject/object which has sufficient amount of light. Keep the camera on a stable surface to make sure the composition does not change.
To use Manual Mode under all lighting conditions read the DSLR Photography Basics: Getting Perfect Exposure Using Aperture, Shutter Speed and ISO.
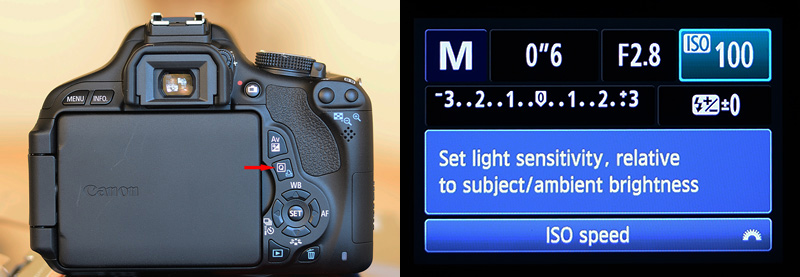
Step 4: Check the Important Camera Settings.
Press the disp button which will display current settings in the LCD.

Note: After a few seconds LCD screen display turns off, press disp button to get it back.
You will see too many settings there. As of now, we are interested only in Aperture (F number) and ISO.
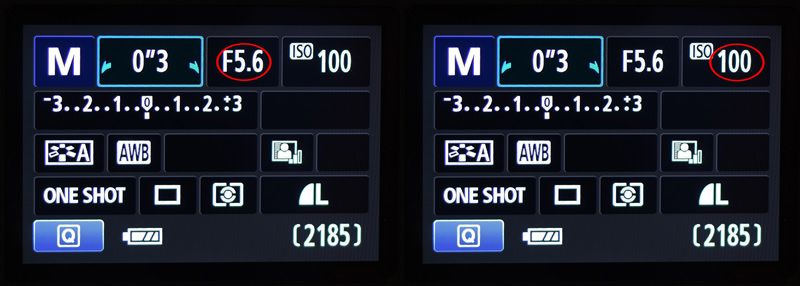
If you have never before touched the manual mode, then you should see F number to be very small like f/2.8, f/3.5, or f5.6. If not, press Q (Quick Mode) button then traverse to aperture setting with F number. Turn the top dial towards your left until there is no change in F number.

If ISO value is 100, which is the least value, then you are good. Otherwise, press Q button then traverse to aperture setting with ISO number. Turn the top dial towards your left until you get the lowest ISO number usually 100.
Step 5: Check the Camera Metering indicator.
Check the camera metering indicator which displays a dotted line with -3 and +3 on either side of the line.
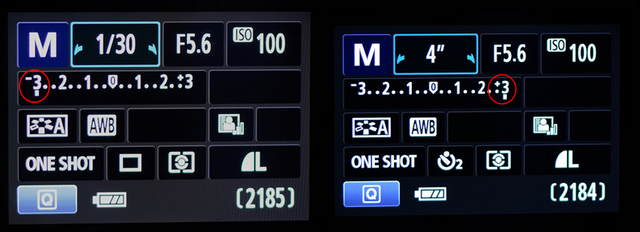
If you half-press the shutter button, you will also notice a blinking indicator either to the -3 side or to the +3 side of the dotted line. It is fine whichever way it is currently pointing to since you will learn in few minutes to deal with it.
Step 6: Press the Shutter button.
Press the shutter button. I mean it…just do it.
This is an important aspect of learning. Take action, make mistakes, learn from mistakes. If you learn only the right way of doing things, as the time passes, you will be scared to test anything else.
Now let us talk about the picture you took.
You are probably not impressed with what you got. May be it is not what you expected? Let us analyze it then.
Is it very dark? then it is underexposed, because of less light hitting the sensor. It means the meter indicator was towards -3.
If the picture is bright or washed out, then it is overexposed, because of too much light hitting the sensor. It means the meter indicator was pointing towards? you know that.
You might already have solved the problem in your head now. Have you? you know what to do, isn’t it? Do it.
Step 7: Achieving the Proper Exposure.
Press the disp button again to get back to the settings on the LCD screen.
If the picture was underexposed or the arrow is pointing towards -3, then turn the main dial towards your left (counter-clockwise direction).
As you turn it left, you will notice that the blinking indicator below the dotted line comes closer towards center. Keep turning the dial in counter-clockwise direction until the blinking indicator hits the center (0 marking) of the dotted line.
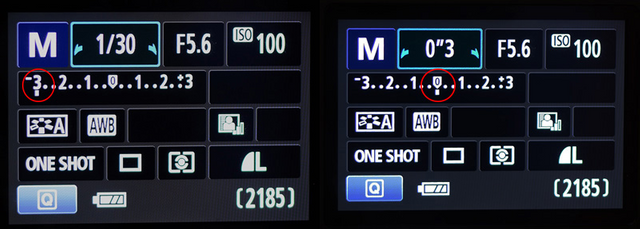
If the picture was overexposed or the arrow is pointing towards +, then turn the dial, towards your right (clockwise direction).
As you turn it right, you will notice that the blinking indicator below the dotted line comes closer towards center. Keep turning the dial in clockwise direction until the blinking indicator hits the center (0 marking) of the dotted line.
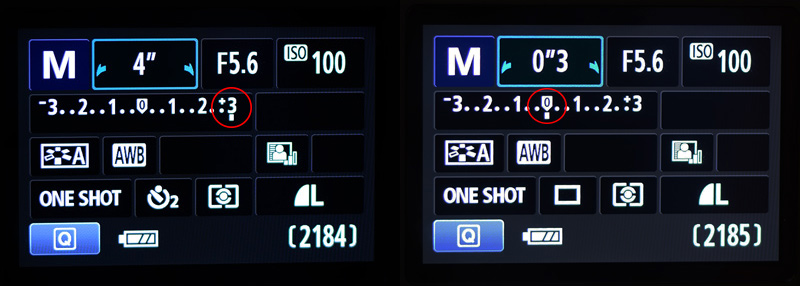
In Steps 6 and 7, you changed the Shutter Speed to achieve the proper exposure. Shutter speed is represented in seconds. Generally it will be in fraction of seconds like 1/30 or 1/60 all the way upto 1/4000 or 1/8000.
In all possibilities, you should get the arrow to point to center unless you have chosen a subject which is way too dark or way too bright.
Step 8: Make your very first Photograph using Manual Mode!
Press the shutter button now. Did you get the picture what you were longing for?!
Congratulations! on your very first photograph using manual mode. You have taken control of your camera, there is no turning back from here.
Thanks and Did you enjoy this article? Do you want to know about some other concept that is haunting you from a long time? Let me know in your comments...
@raoumar great work bro learned little bit about camera operating from your post you did great job hope soon your post will get handsome reward I'll try my best to promote your work with my friend keep it up man :)
Thanks buddy😊
This post has received a 12.50 % upvote from @steemthat thanks to: @farhanali. Thank you for your support. Stay Updated And Use Cool Tools At SteemThat.com
Thanks @steemthat😊☺
I have this camera but never thought that it can do all this. Thank you. Am following you and vote for you And if you like my post please repost them or vote for my blog
Thank you resteem if you really like it :)
I did . Which of my posts do you like and resteem
great information bro...
Thanks
Use this refferal link to get more upvote on steemfollower
https://steemfollower.com/?r=8245
It is good
Thanks