Do It Yourself - Replacing Window Regulators/Power Window Assembly [REAR Pt. 1] in your BMW E46, E39, E38, E36, E53
Today we'll replace a faulty rear window regulator on my E46 BMW. Operation is specific to the rear, will do front in a separate blog as it is quite more complicated in front. This works on any late 90s early 00s BMW so feel free to comment with meaningful differences or observations if you do this on other models. This is part one of two due to the extensive number of work steps.
Preparation / Tools
First things first, what do you need for this operation:
- Your new window regulator (usually comes in one piece)
- Your new window regulator motor (optional)
- Your new window (optional)
- Torx ## and Nut ##
It is also useful to have some Silicone Spray, a dry brush and a roll of tape handy. Also before you start working on the door disconnect your battery.
Step 1 – Door Panel Removal
Before we get to the window regulator we need to remove the door panel.
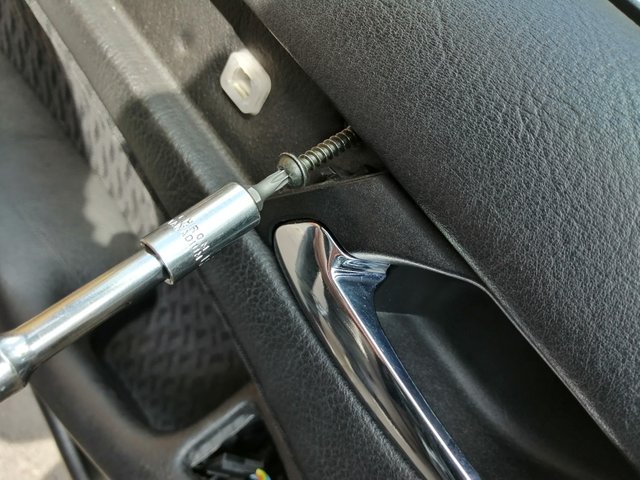
Initially we need to loosen the screws around the armrest, there are three in total. One is behind the dummy mirror adjustment cover and two are below the armrest itself. The bottom screws are behind a plastic popout cover.
Once the screws are removed (if they fall into the armrest just leave them there until you remove it but be careful as they might drop out upon removal) you can remove the top trim piece. This is done by starting at the rear and carefully popping it out of the assembly using either a plastic wedge tool or simply your fingers. Do not bend the trim pieces too much as they will crack quickly. Once they are out of the door panel sufficiently you will be able to slide the piece back and out of the door handle housing.
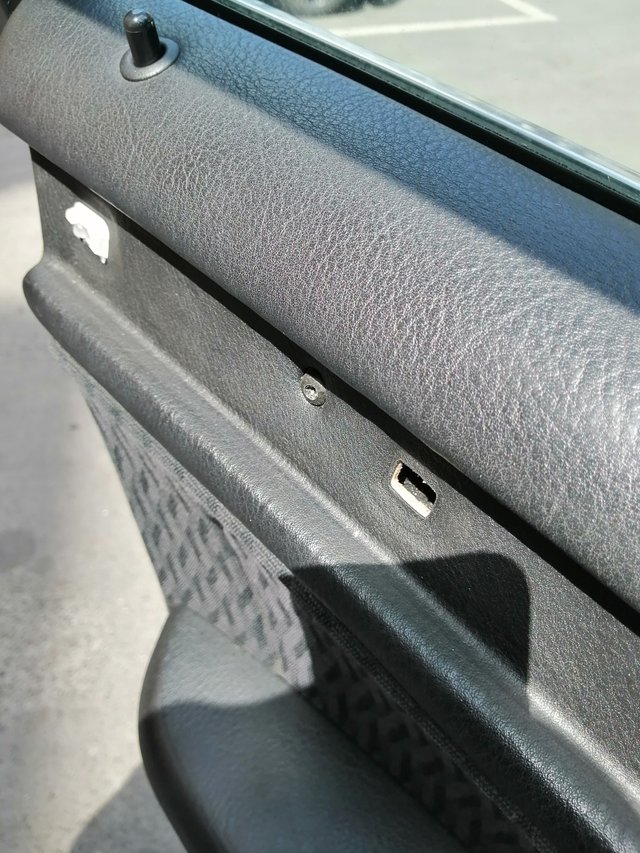
You will then see two additional screws near the door handle and the center of the panel (same size Torx ##). The front one is noticeably longer than the rear one and needs to go back in like that again.
You now need to disconnect the mirror adjustment switch or power window switch cables in the back (front passenger side door panel needs no cables disconnected at this point) and then start to carefully pull the door panel from the door by starting at the bottom side front or rear.
As you pull it you will hear the panel connectors pop out one by one as you move around and up. Once its loosened around the bottom and sides you need to tilt it upwards slightly and pull it out of the topside hooks be careful once you get to the door lock pins as you will need to pull the panel out and up over the pin until it is fully disconnected from the door. Do not pull the panel out now!
Look behind the panel while holding it in place and remove the following:
- Remove the black and/or white speaker connectors (depending on your car’s sound system this ranges from 2-4 connectors per door panel)
- Pull out the door handle switch, it’s white plastic and simply rotates out of the door handle assembly housing
- Remove the mirror adjustment/power window switch cables out of the armrest
- the armrest cannot be disconnected from the door panel itself

You can now remove any remaining plastic hooks connected to the door cable harness, pull the door panel and store it bottom side up in a dry, warm and fuzzy place (j/k).
Step 2 – Airbag Removal
One last step before lifting the rubber cover is removing the side airbags. On some models you have side airbags in the rear doors, all models have them in front – removal process is the same for both.
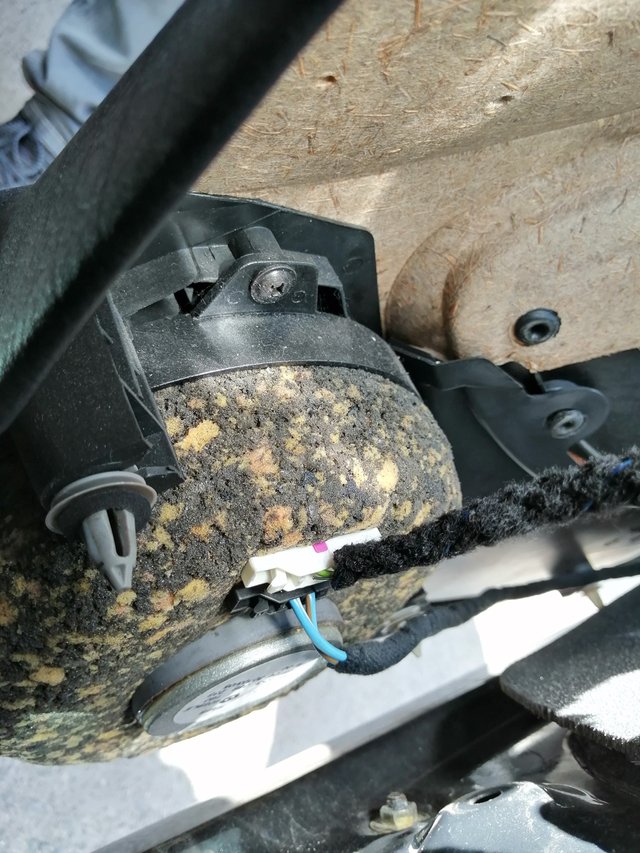
Upon removing the door panel you will see something like this:
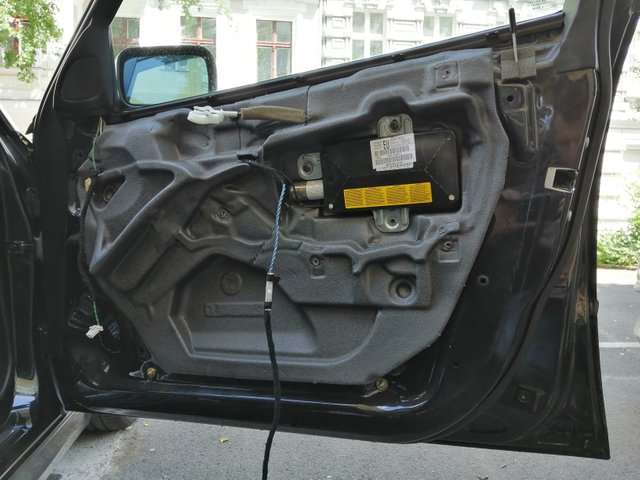
Remember when I told you to disconnect the battery? This is why. Loosen the three screws holding the airbag module in the door and pull it out.
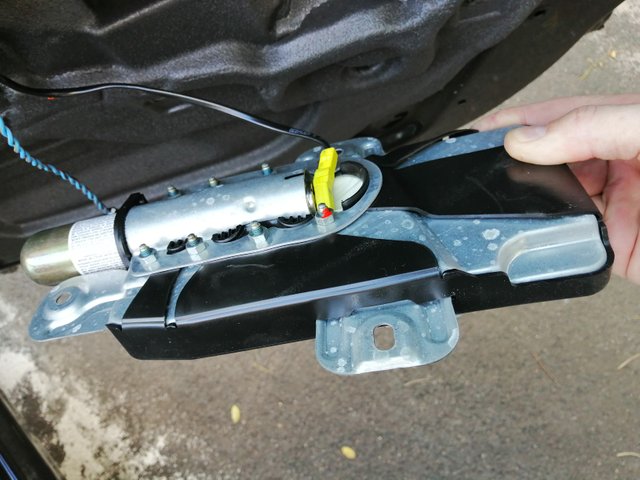
You can now rotate the yellow connector and pull it out. Do not rotate the connector, simply pull it straight out of the socket.
As usual store the airbag bottom side up in a safe location (trunk).
Step 3 – Removal - Window Regulator Rear
Reconnect your battery as you will need it in a few minutes. What follows now is a tedious process which will take some time. Here the upper right edge near the door pin front and rear
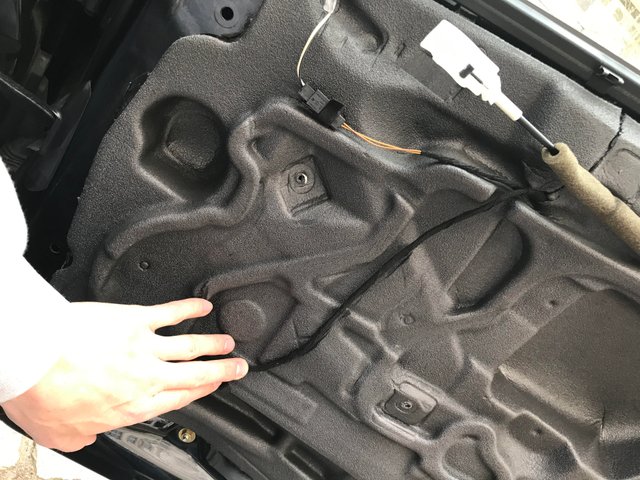
The rubber protective cover behind the door panel basically only has two functions: insulate humidity and outside temperature to keep it from entering the cabin and noise reduction. Here is the cover of the rear seat, in my case without the side airbag:
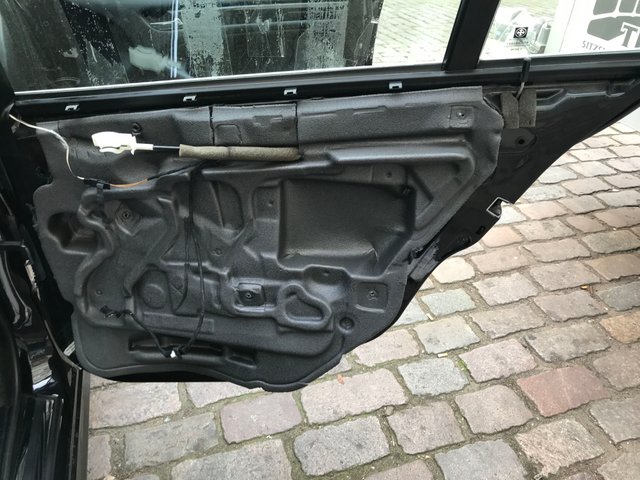
Ideally the cover is fully connected to the door itself but often with cars approaching or having passed the 20 years it will be loose here and there. Use this opportunity to refresh the compound which you can cheaply get at your BMW dealer or in well stocked car parts stores.

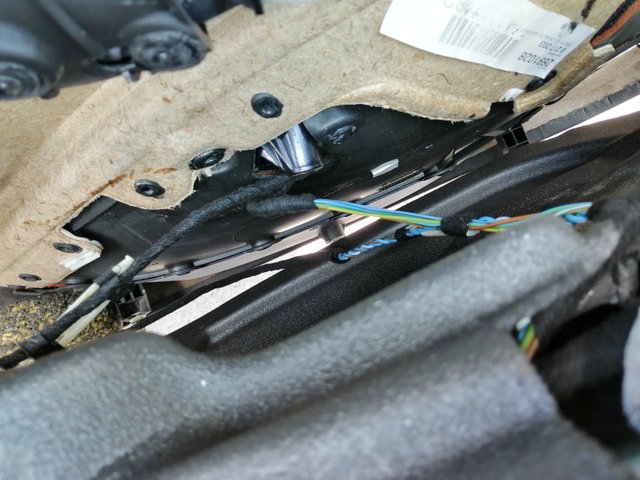
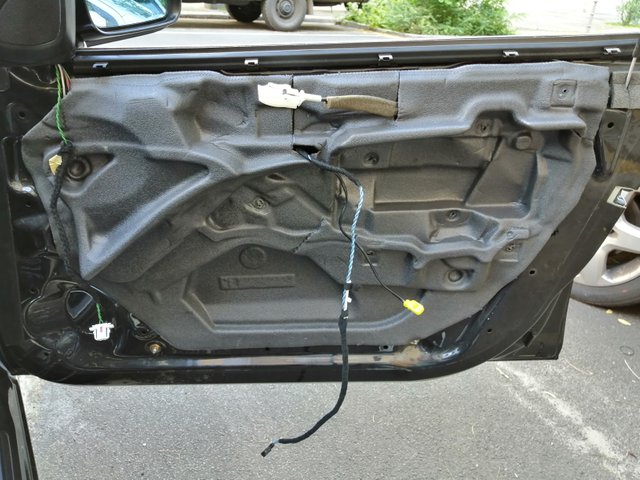
You need to start at the bottom and slowly (slowly) pull the cover from the door using both hands and working slowly and smoothly as it tends to rip very quickly if you pull too firmly. Take pictures of the cover to make sure cable routing is documented:
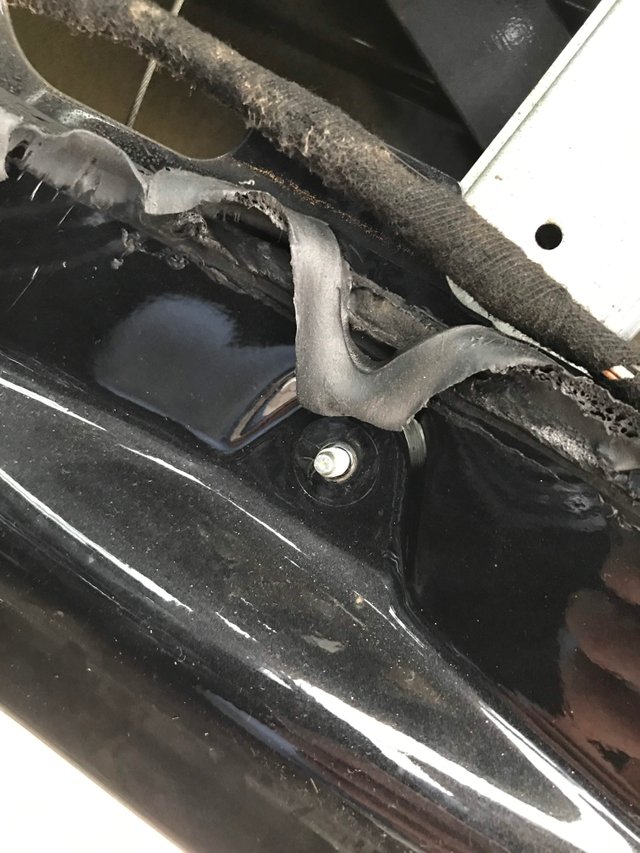
We don’t want to remove this cover completely so only go up as far as necessary for you to be able to access the top window regulator screws. Best start near the visible screw at the bottom:
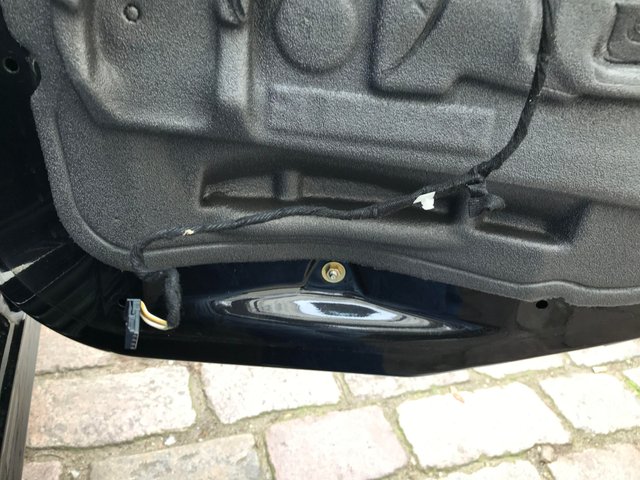
Now grab your tape, pull up your cover and tape it to the door frame so it stays out of your way.
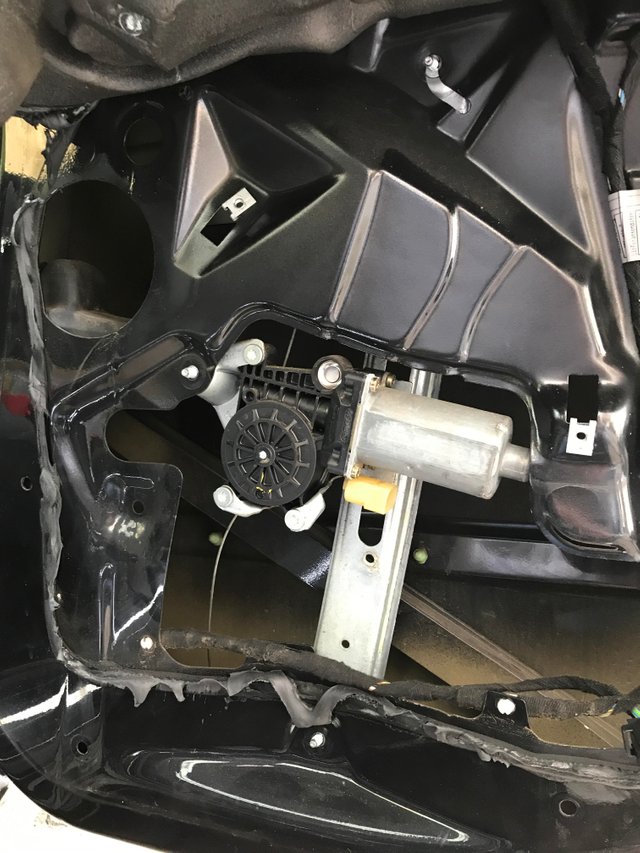
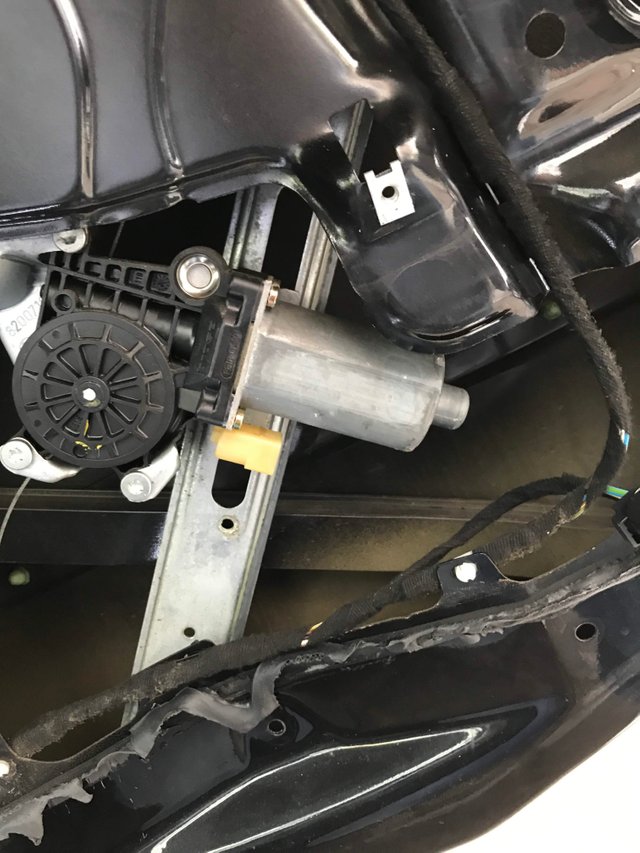
Now we can finally take a look at our culprit:
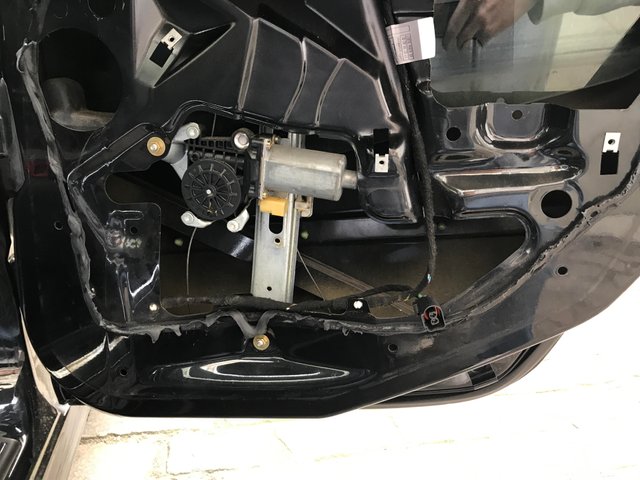
One thing that instantly tells you that this regulator is gone is the clearly visible steel cables inside the door. They should never be visible and certainly not hang around losely like that.
The three gold plated screws need to be removed as well as the cable connector that hooks up to the motor. In most cases the motor will still be good so you can retain it and hook it up to the new regulator.
Before doing anything we need to detach the window glass from the regulator though. Lower your window to about this position:
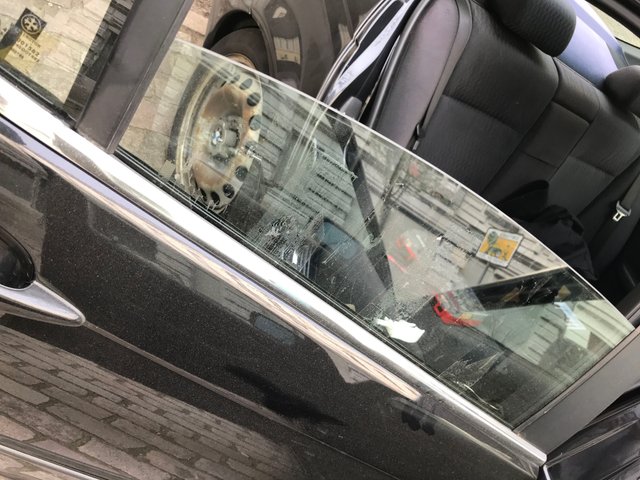
If your window regulator (like mine) is completely shot you will have to manually move the window into that position and then secure it with some tape around the door frame. If you have a coupe or convertible with frameless doors you will most likely need a second person to assist.
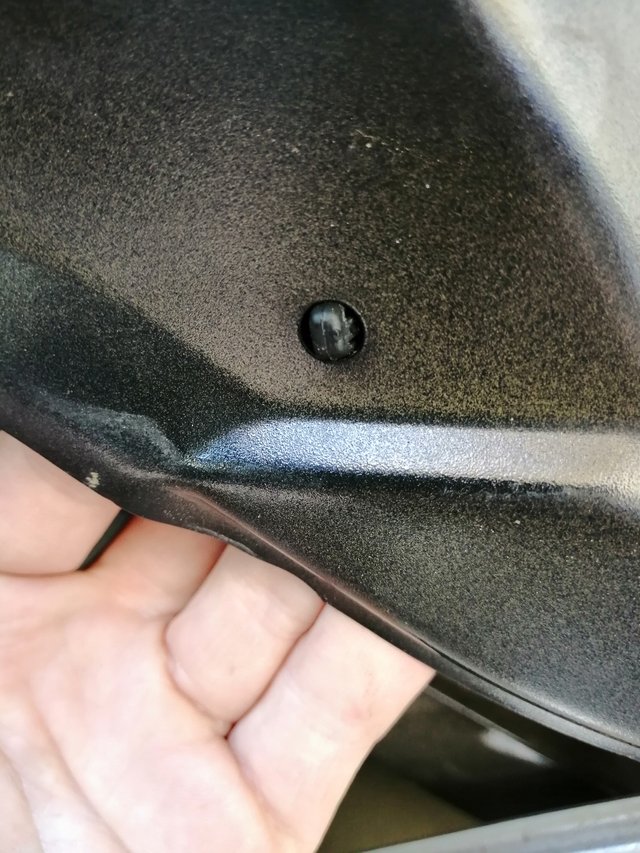
What we're looking for is this:
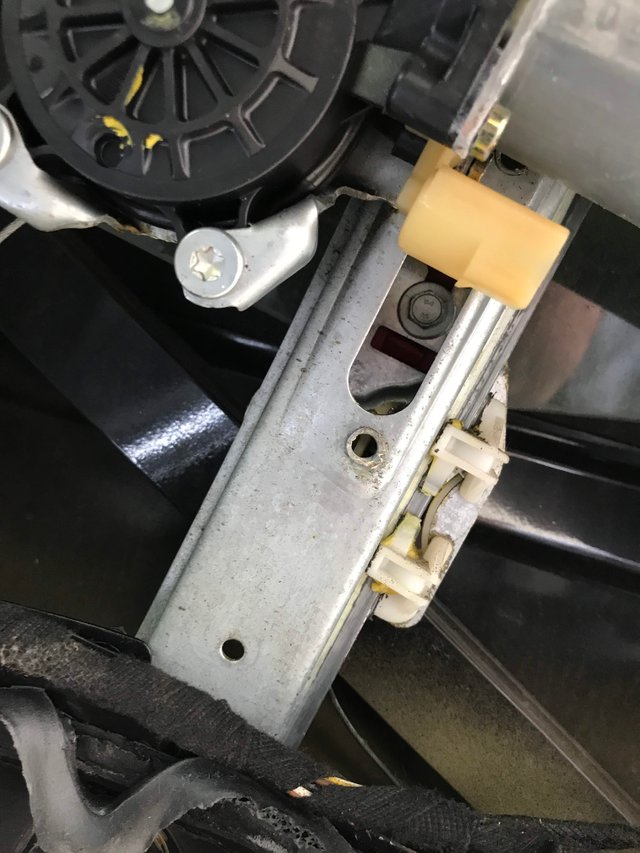
In the rear only one screw is used to attach the window to the regulator slide, in front or on coupes/convertibles it will be two screws one in front and one in the rear as these doors also have two regulator slides.
Before you losen this screw you need to watch out for two things one being that the screw tends to fall into the regulator assembly and the other being that there is a lug on the other side of the glass which the screw goes into. It is not fixed to the assembly!
To ease the process take some of the door cover glue residue and apply it to your nut so the screw sticks to it once you have losened it. After putting your wrench on the screw and making sure it picks up (important as the head is super thin and you don't want to run through the thread) apply some pressure from behind so you can feel the lug. This way as you losen the screw you'll be able to take both out simultaneously without any pieces falling into the door. Even if this happens you can still locate and recover them but it does save tons of time to do it this way.
Now you can pull your window up and out of the regulator and fix it with some more tape around the door frame. Watch out with the glass as soon as you've removed the screw and lug! The red plastic seating is attached to the glass so you push out the little nob outward until it pops out of the regulator and then pull the window up. Beware as now nothing is holding the glass in place except the sealing lines!
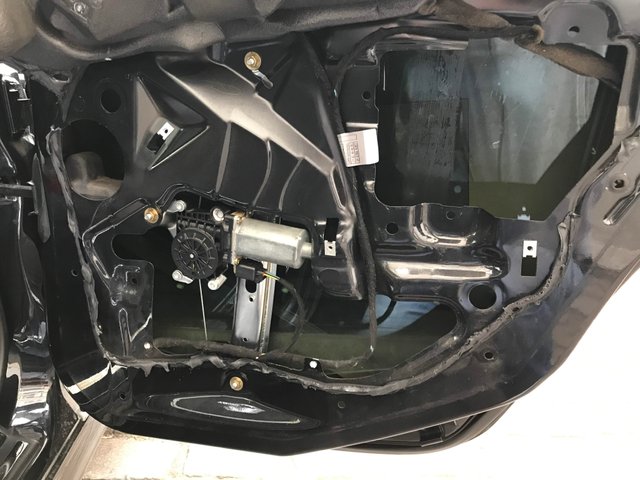
We can now remove the three regulator screws:
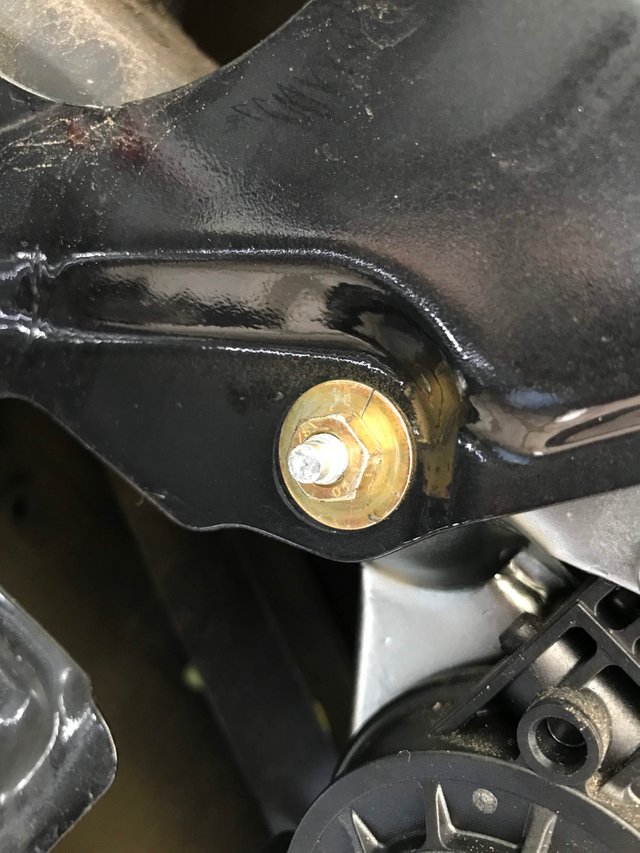
Doesn't matter in which order just make sure you get them all out and remove the motor cable connector:

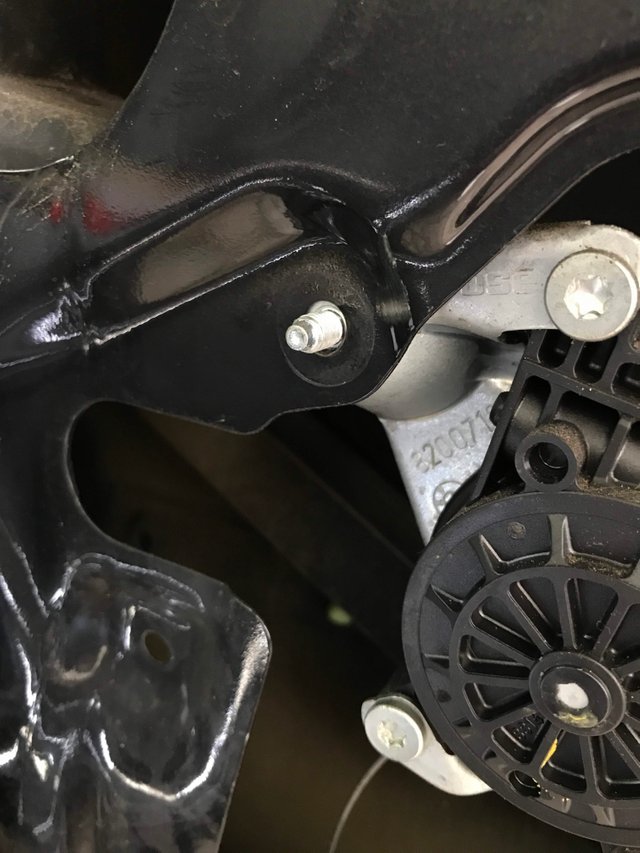
Do not clean up the door sheet metal as the prints will tell you where to align the new regulator later:
Before finally pulling the regulator make sure that you have removed any cable clamps, cable routing and other plastic clips from the door so you don't accidentally rip them out later:
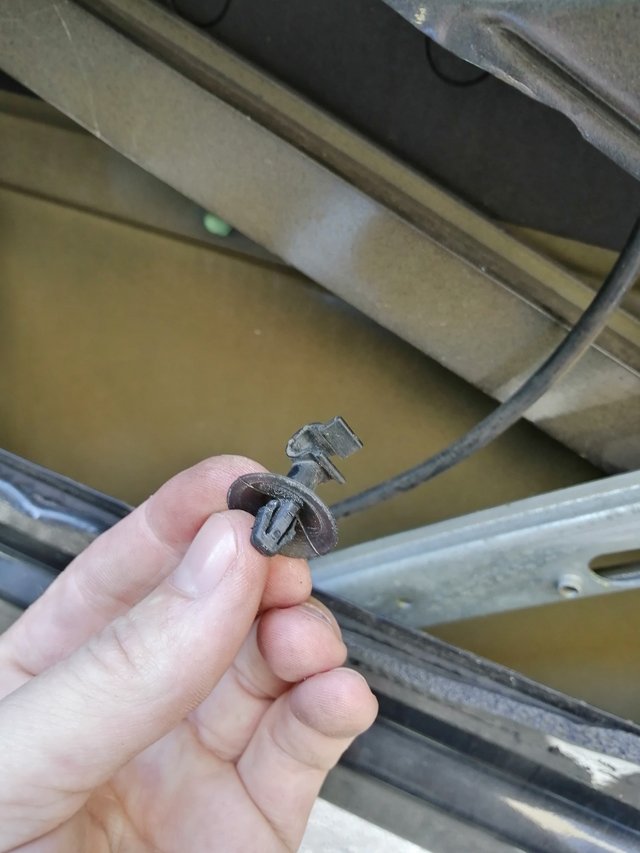
Most are very solid and should be ready for reuse later. If you want to be extra thorough and not use any cable clamps DIY style later you can check this page and order the spare parts:
http://www.bmw-etk.info/parts-catalog/prd/BMW/VT/P/E46/Lim/320i/RUS/L/N/2001/01/47699/51/51_3225
http://www.bmw-etk.info/parts-catalog/prd/BMW/VT/P/E46/Lim/320i/RUS/L/N/2001/01/47699/51/51_3227
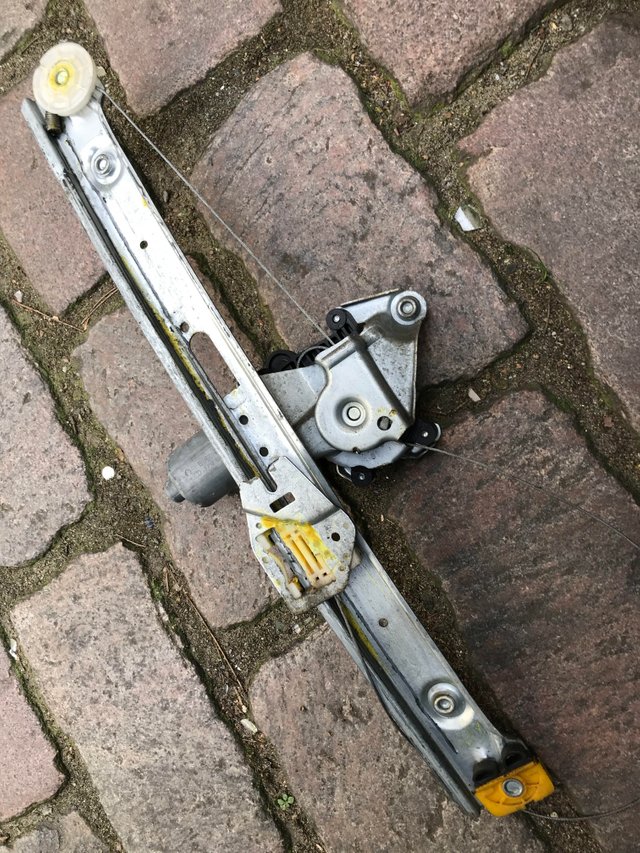
Now simply grab the regulator and slowly push it out of the door frame until the pins are fully out:
You can then rotate it and slide it out of the large bottom section of the door.
Parts Check - Window Regulator
Before replacement make sure that your components are actually identical and fit is good:
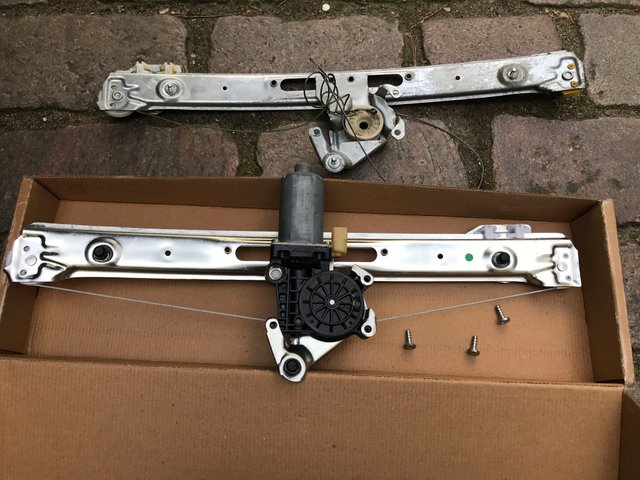
All BMW window regulators are door specific so you always need to get an exact match while the motors are only side specific meaning left motor will work front and rear but not on the right side.
I had ordered a new motor but as the old one was working fine and OEM quality motors tend to go a bit smoother and slower overall I decided to swap my original motor onto the new regulator:
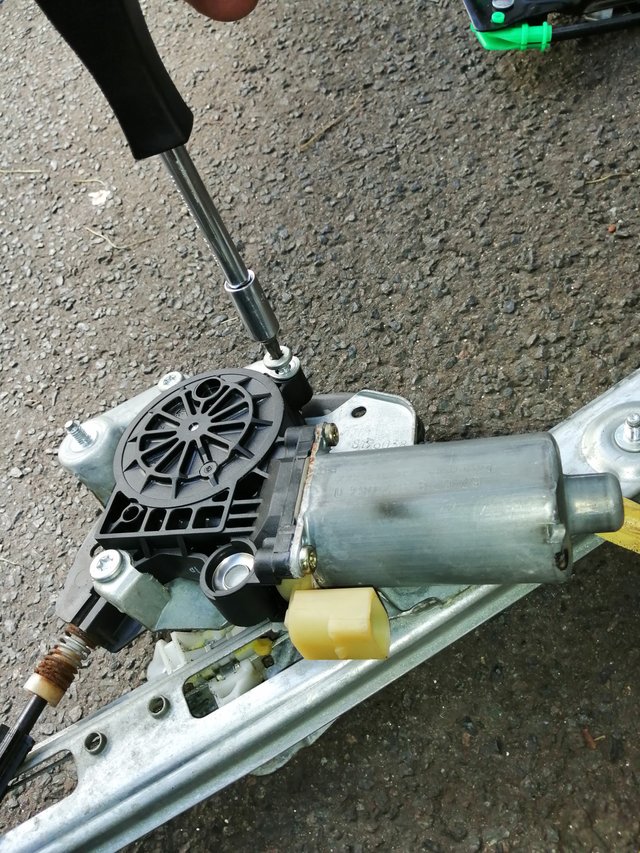
When I did the front door I found out that you can also remove and install the motor without removing the regulator. If you struggle to remove the assembly in one piece or just want to swap your motor you can also do it that way.
Join me next time for the installation of this bad boy!
Steem on people and I hope you enjoyed this as much as I did putting it together.
Hi peterschroeter,
Visit curiesteem.com or join the Curie Discord community to learn more.
Very niche post! LOL
If there was ever a meme that's all me it's this one...
Congrats on the @curie vote! ✌️
Hai...recently only I came to know about this DIY tags and its related posts, and now I think frequently I am noticing it. Looks to be a great post in this category.
Many people here - and the owners of one two cars -and in that case even myself might never had a chance to see how the inside of the door might looked like and now there is one. Even if we go to a mechanic with our car for such complaints, many would never would bother about how they do this or have a look at what they are doing.
I really loved this post, Your step by step procedure with the help of suitable photographs makes a great reading and for those who really wish try an experiment in such scenereios this would turn out to be a great textbook example what to follow.
Thanks for this post and cheers