How to Setup ClipBucket to Start Video Sharing Website in Linux
ClipBucket is a free and open source software which helps us to create a complete video sharing website like Youtube, Dailymotion, Metacafe, Veoh, Hulu in few minutes of setup. ClipBucket is the fastest growing application which was first started as Youtube Clone but now its advance features & enhancements makes it the most versatile, reliable & scalable media distribution platform with latest social networking features. It uses FFMPEG for video conversion and thumbs generation which is the most widely used application so, users can stream it straight away using the Flash & HTML 5 Players. Here are some of the awesome features available in ClipBucket.
.jpg)
- ClipBucket is 100% free and open source web application making it extensible and pretty easy to customize.
- It uses FFMpeg for real time conversion of videos to make on fly video conversion allowing users to stream using the Flash & HTML 5 Players.
- It has a beautiful media management, user management and messaging system.
- It also contains ajax based comments, ratings and channels and user feeds.
- In addition, it also consists of a built-in language editor.
- ClipBucket promises to make it 100% secure from different Security issues like SQL injection.
1. Installing LAMP Stack
First of all, we'll need to install a complete LAMP Stack. LAMP stack is the combination of Apache Web Server, MySQL/MariaDB Database server and PHP modules. In order to setup, we'll need to run the following command as shown below with respect to the distribution of linux we're running. Here, in this tutorial, we'll be focusing on two distributions of linux, CentOS and Ubuntu.On Ubuntu 14.04
First of all, we'll gonna update the local repository index of our Ubuntu system so that we'll get the repository index of the latest available software packages.# apt-get updateAfter the update is complete, we'll go for the installation of the lamp stack using apt-get command line as shown below.
# apt-get install apache2 mariadb-server php5 php5-gd php5-mysql php5-curl php5-xsl php5-cli php-pear unzipIn Ubuntu, we'll be asked to enter a new password for the MariaDB root user as shown below. We'll need this password in future for accessing the root user of MariaDB database server.

On CentOS 7
On CentOS 7, as we have yum as the package manager, we'll run the following command to install lamp stack.
# yum install httpd mariadb-server mariadb php php-gd php-mysql php-curl php-xsl php-cli php-mbstring php-pear unzip
2. Installing ImageMagick
After our LAMP Stack has been successfully installed, we'll now go for the installation of ImageMagick in our linux machine. ImageMagick will allow our clipbucket to process and manipulate the images. To setup, we'll need to run the following commands according to the linux distribution we are running in our machine.On Ubuntu 14.04
# apt-get install imagemagick php5-imagick # php5enmod imagick
On CentOS 7
# yum install ImageMagick ImageMagick-devel ImageMagick-perlAfter installing ImageMagick and its other packages, we'll now install imagick which is a php module for ImageMagick. To install that, we'll need to run pecl command as shown below.
# pecl install imagickAnd then, we'll need to append /etc/php.ini configuration file and add extension=imagick.so in the end of the file.
# echo extension=imagick.so >> /etc/php.ini
3. Installing FFMPEG
Next, we'll need to setup FFMPEG in our system. FFMPEG allows us to easily record, convert and stream audio and video. It will be used by Clipbucket to make a working video streaming site. In order to install it, we'll need to run the following commands in a console or terminal with sudo or root access as shown below.On Ubuntu 14.04
As FFMPEG is currently not available in Ubuntu's repository, we'll either need to compile it and setup using the source code or install it via a PPA hosted in launchpad. There is a PPA of FFMPEG available which we can add by running the following command.# apt-add-repository ppa:mc3man/trusty-mediaIf You GOt Error Like "apt-add-respostitory command not found"
then first run this command
#sudo apt-get install software-properties-common python-software-properties
After done, we'll need to update the local repository index using the following command.# apt-get updateThen, we can install the required FFMPEG packages by running the following apt-get command.# apt-get install ffmpeg gstreamer0.10-ffmpegOn CentOS 7
FFMPEG is also not available in the official repository of CentOS so, we'll need to install NUX Dextop Release and EPEL "Extra Packages for Enterprise Linux" repository in our CentOS machine as its available in it.# rpm -Uvh http://li.nux.ro/download/nux/dextop/el7/x86_64/nux-dextop-release-0-1.el7.nux.noarch.rpm # yum install epel-releaseAfter the repositories are added in our machine, we'll now go for the installation of FFMPEG in our machine by running the following yum package manager.# yum install ffmpeg4. Installing FLVTool2
We'll now install FLVTool2 which is an application for the manipulation of Macromedia Flash Video files (FLV). It can calculate a lot of meta data, insert an onMetaData tag, cut FLV files, add cue points and more. To install it we'll first need to install ruby in our machine. To do so, we'll need to run the following command.Installing Ruby
On Ubuntu 14.04# apt-get install rubyOn CentOS 7# yum install rubyAfter ruby and its dependencies are installed successfully, we'll need to install flvtool2 using gem as shown below.Installing via gem
# gem install flvtool2Fetching: flvtool2-1.0.6.gem (100%)
Successfully installed flvtool2-1.0.6
1 gem installed
Installing ri documentation for flvtool2-1.0.6...
Installing RDoc documentation for flvtool2-1.0.6...
5. Installing MP4Box (GPAC)
we'll then need to install GPAC which is also known as MP4Box. It is needed by Clipbucked for performing many manipulations on multimedia files like AVI, MPG, TS, but mostly on ISO media files like MP4, 3GP. To install it, we'll need to execute the following command depending on the distributions we are running.
On Ubuntu 14.04
# apt-get install gpac mediainfoOn CentOS 7
# yum install gpac mediainfo6. Configuring PHP Configurations
After everything above is installed successfully, we'll now go for configuring the PHP configuration. We'll need to edit the php.ini file which is located in different directory according to the distribution. In Ubuntu, php.ini file is located under /etc/php5/apache2/ directory whereas in CentOS, it is located under /etc/ directory.On Ubuntu 14.04
# nano /etc/php5/apache2/php.iniOn CentOS 7
# nano /etc/php.iniAfter opening the file with the text editor, we'll make sure that we have the configuration file configured as shown below. We'll need to append the opened file as the configurations shown below.upload_max_filesize = 500M max_execution_time = 300 max_input_time = 300 memory_limit = 256M magic_quotes_gpc = on magic_quotes_runtime = off post_max_size = 500M register_globals = off safe_mode = off output_buffering = off display_errors = onAfter done, we'll need to restart the Apache Web Server that is running in our machine.On Ubuntu 14.04
# service apache2 restartOn CentOS 7# systemctl restart httpd7. Configuring MariaDB server
As we have already set password for our MariaDB root user in our machine running Ubuntu, we'll simply skip this step of configuring MariaDB and continue the next step of creating the database. But if we are running CentOS, we haven't configured MariaDB server so, we'll need to follow this step.At first, as we haven't set any root password for our MariaDB server, we'll need to configure a root password for it. And after its done, we'll move forward towards the creation of a database user and a database so that Clip-Bucket can utilize it to store its data. To configure MariaDB and assign a root password, we’ll need to run the following command.
# mysql_secure_installation This will ask us to enter the password for root but as we haven’t set any password before and its our first time we’ve installed mariadb, we’ll simply press enter and go further. Then, we’ll be asked to set root password, here we’ll hit Y and enter our password for root of MariaDB. Then, we’ll simply hit enter to set the default values for the further configurations. …. so you should just press enter here. Enter current password for root (enter for none): OK, successfully used password, moving on… Setting the root password ensures that nobody can log into the MariaDB root user without the proper authorisation. Set root password? [Y/n] y New password: Re-enter new password: Password updated successfully! Reloading privilege tables.. … Success! … installation should now be secure. Thanks for using MariaDB!Lines that needed in vesta CP Only
replace here with the password that you given in maria db#nano /root/.my.cnf
#nano /usr/local/vesta/conf/mysql.conf
8. Creating a MariaDB Database
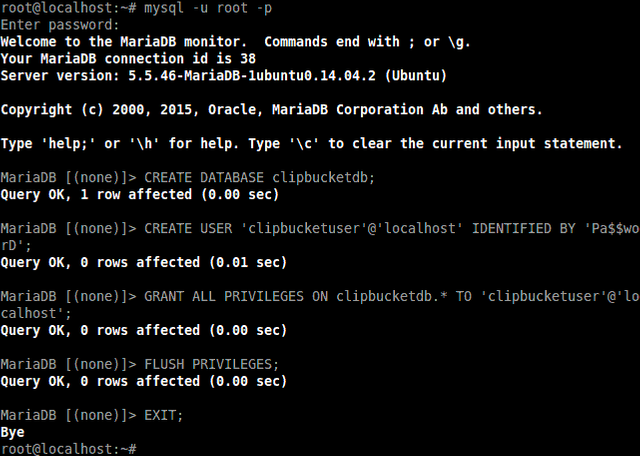
Next, we’ll login to the MariaDB command prompt as root. Here, we’ll need to enter the password of the MariaDB root account that we had set above.# mysql -u root -pAfter we’re logged in into the mariadb command prompt, we’ll gonna create the database for clip-bucket.> CREATE DATABASE clipbucketdb; > CREATE USER 'clipbucketuser'@'localhost' IDENTIFIED BY 'Pa$$worD'; > GRANT ALL PRIVILEGES ON clipbucketdb.* TO 'clipbucketuser'@'localhost'; > FLUSH PRIVILEGES; > EXIT;
Finally, we’ve successfully created a database named clipbucketdb with username clipbucketuser and password as Pa$$worD .
Note: It is strongly recommended to replace the above variables as your desire for the security issue.
9. Configuring Apache Web Server
We'll now add a new virtualhost in the apache configuration so that we can define a specific apache configuration to our clipbucket installation. Creating it will help us to define specific ports, webroot, domain, alias and other configurations for our ClipBucket installation. Here are some configurations we'll setup in this tutorial respective to the distribution of linux we're running.
On Ubuntu 14.04 LTS
# touch /etc/apache2/sites-available/clipbucket.conf # ln -s /etc/apache2/sites-available/clipbucket.conf /etc/apache2/sites-enabled/clipbucket.conf # nano /etc/apache2/sites-available/clipbucket.confNow, we'll gonna add the following lines of configuration into the opened file.<VirtualHost *:80> ServerAdmin [email protected] DocumentRoot /var/www/clipbucket/ ServerName clipbucket.linoxide.com ServerAlias www.clipbucket.linoxide.com <Directory /var/www/clipbucket/> Options FollowSymLinks AllowOverride All </Directory> ErrorLog /var/log/apache2/clipbucket.linoxide.com-error_log CustomLog /var/log/apache2/clipbucket.linoxide.com-access_log common </VirtualHost>After done, we'll gonna save the file and exit the text editor. Then, we'll need to make sure that mod is enabled. To enable it, we'll need to execute the following command.# a2enmod rewriteEnabling module rewrite.
To activate the new configuration, you need to run:
service apache2 restart
Then, we'll restart our apache web server.# service apache2 restartOn CentOS 7
In our CentOS machine, we'll create a file named clipbucket.conf under /etc/httpd/conf.d/ directory using a text editor.# nano /etc/httpd/conf.d/clipbucket.confThen, we'll gonna add the following lines of configuration into the file.<VirtualHost *:80> ServerAdmin [email protected] DocumentRoot /var/www/clipbucket/ ServerName clipbucket.linoxide.com ServerAlias www.clipbucket.linoxide.com <Directory /var/www/clipbucket/> Options FollowSymLinks AllowOverride All </Directory> ErrorLog /var/log/httpd/clipbucket.linoxide.com-error_log CustomLog /var/log/httpd/clipbucket.linoxide.com-access_log common </VirtualHost>Once done, we'll simply save the file and exit the editor. And then, we'll gonna restart our apache web server.# systemctl restart httpd10. Downloading ClipBucket
We'll now go for downloading the Clip Bucket package from the Official Clip Bucket Download Page . As the latest release of Clip Bucket is version 2.8, we'll get the link from the download page and then start the download using wget as follows under /tmp/ directory.# cd /tmp/ # wget http://downloads.sourceforge.net/project/clipbucket/ClipBucket%20v2/clipbucket-2.8.v3354-stable.zip--2015-12-12 11:15:16-- http://downloads.sourceforge.net/project/clipbucket/ClipBucket%20v2/clipbucket-2.8.v3354-stable.zip
Resolving downloads.sourceforge.net (downloads.sourceforge.net)... 216.34.181.59
...
Connecting to liquidtelecom.dl.sourceforge.net (liquidtelecom.dl.sourceforge.net)|197.155.77.8|:80... connected.
HTTP request sent, awaiting response... 200 OK
Length: 10710544 (10M) [application/octet-stream]
Saving to: 'clipbucket-2.8.v3354-stable.zip'
100%[===============================================>] 10,710,544 37.0KB/s in 3m 1s
2015-12-12 11:18:18 (57.9 KB/s) - 'clipbucket-2.8.v3354-stable.zip' saved [10710544/10710544]
After the download is completed, we'll gonna extract the zip file using unzip.# unzip clipbucket-2.8.v3354-stable.zipOnce the compressed zip file is extracted, we'll get inside the extracted folder in which we'll see two folders named upload and do_not_upload. Under upload folder we'll see that there is the ClipBucket installation file which we'll copy to the webroot of apache server ie /var/www/html/ by default. Whereas under do_not_upload folder, we'll see a file named admin_change_pass.php which we can use to change the default password of Clipbucket login administration user.To copy the installation files and directories of Clipbucket which lies under upload directory, we'll need to run the following command.
# mkdir /var/www/clipbucket # cp -r /tmp/clipbucket-2.8.v3354-stable/upload/* /var/www/clipbucket/ # cp /tmp/clipbucket-2.8.v3354-stable/upload/.htaccess /var/www/clipbucket/11. Fixing File Permission
After the compressed Clip Bucket zip file is extracted and moved to the webroot, we'll go further towards fixing of permission in the files and directories which lies under the installation directory.# chmod -R 777 /var/www/clipbucket/includes/ # chmod -R 777 /var/www/clipbucket/files/ # chmod -R 777 /var/www/clipbucket/images/ # chmod -R 777 /var/www/clipbucket/cache/ # chmod -R 777 /var/www/clipbucket/cb_install/After that, we'll also set the ownership of the installation directory to apache user as it should have full access to the files. To set the ownership of the directory to apache processes, we'll need to run the following command according to the distribution as the apache process owner may be different in different linux distribution.On Ubuntu 14.04
# chown www-data:www-data -R /var/www/clipbucket/On CentOS 7
# chown apache:apache -R /var/www/clipbucket/12. Setting Up Crons
Now, its time for setting up the cronjob for making some scripts automated. We'll need to run crontab -e command which will open the crontab file in which we'll configure the automation.# crontab -eThen, we'll simply need to append the file with the following lines and we can even adjust the frequency of it according to our need for better performance.* * * * * php -q /var/www/clipbucket/actions/video_convert.php * * * * * php -q /var/www/clipbucket/actions/verify_converted_videos.php 0 0,12,13 * * * php -q /var/www/clipbucket/actions/update_cb_stats.phpAfter done, we'll simply save and close the text editor.13. Allowing Firewall
Now, we'll allow port 80 to expose on the internet so that our site is accessible in the same network. To enable http or allow port 80, we'll need to run the following command.On Ubuntu 14.04
Iptables is a very popular firewall solution program used in Ubuntu 14.04. So, to allow or expose port 80, we'll need to execute the following iptables command.# iptables -A INPUT -p tcp -m tcp --dport 80 -j ACCEPT # iptables-save > /etc/iptables-up.rulesOn CentOS 7
As systemd is used as the init system in CentOS 7, we'll have firewalld installed for firewall program. To allow port 80 or http service, we'll need to run the following commands.# firewall-cmd --permanent --add-service=http # firewall-cmd --reload14. Web based Installation
Finally, as we have setup and configured everything correctly in above steps, we'll now go further towards the web based installation of ClipBucket. To do so, we'll need to point our web browser to http://ip-address/ or http://domain.com according to the configuration of the server. Here, in this tutorial, we'll point our browser to http://clipbucket.linoxide.com/ . After the site is loaded in our browser, we'll see the first web installation page of Clipbucket asking us to accept the license and continue the installation.
Once we have clicked on I agree and Continue, we'll be directed towards the next step of the installation where we'll see the components installed and missing in our system. Here, as PhpShield is an optional package, we haven't installed it so it must be showing red cross in it. Though, if you need to setup the missing dependencies for better performance, you can do that later too. And after that, we'll click on Continue to Next Step to continue further towards the next page.
In this page, we'll see everywhere green colored tick as we have successfully made those directories writeable in the above steps. So, we'll continue further towards the database page.
We'll now further set the database configuration according to the database we had created above. Here, we'll keep the hostname as localhost, database name as clipbucketdb, database user as clipbucketuser and password as Pa$$worD , and after done, we'll simply move forward by clicking on Check Connection in order to ensure that our ClipBucket application is able to connect to the database server.
Next, we'll be asked to set the admin username, password and email address. Here, we set the default username and password ie admin and admin respectively.
Now, we'll be asked to enter the Website Title, Slogan and URL of our brand new video streaming site.
Then, finally we'll see another screen where we'll be said that Clipbucket has been successfully installed. After its installed, we'll need to further make sure to perform post installation tasks.
15. Post Installation
After its installed, we'll be asked to delete cb_install directory from the Clipbucket website path. To do so, we'll need to run the following command.# rm -rf /var/www/clipbucket/cb_install/After its done, we'll go to the login page and enter our username and password as admin and admin respectively. We strictly recommend everyone to change your administration username and password for the security measures.